GEOSATpro GS120 User manual

DiSEqC 1.2 Motorized H-H Motor
DiSEqC 1.2 Motorized H
H-
-H Motor
H Motor
Compatible with DiSEqC 1.2 & USALS Receivers
Adjustable Hardware Limiters for 140 Degree Coverage
Goto X Preprogrammed for North American Satellites
LED Indicator for Power and DiSEqC Verification
Manual Button for Quick Installation
Interchangeable 40mm Post
Rated for Disk Size up to 1.2M
Compact,Powerful and Quiet
GEOSATpro GS120
http://www.geosatpro.com

-1 -
ADJUSTING HARDWARE LIMITS & INSTALLING POST
The factory preset hardware limits are from 70°East to 70°West of True South. If smaller azimuth
range is required, adjust the hardware limits before assembling the motor.
1. Always drive the motor to 0 position before
adjusting the hardware limits.
2. Disassemble the Post from the Motor.
3. Lift the azimuth scale to reveal the Limit Sliders.
Loosenthe screw on the Limit Slider. Do not
loosenthe screw thoroughly; otherwise,
the Slider will drop into the motor.
4. Adjust the Limit Slider to the desired angle
( 20~70° East or West ) .
5. Tighten the screws.
6. Reassemble the Motor Tube onto the Motor.
7. Drive the motor East and West via the Manual
Button or the receiver to make sure the
hardware limits are correctly set.
ASSEMBLE THE MOTOR
1. Assemble the Elevation Bracket and U- Bolt Post Mount .
2. Make sure the mounting pole is perfectly plumb and level
before installing the motor.This is critical for the dish to accurately
track multiple satellites.
3. Attach the H-H Motor Mount onto the Mounting Pole.
INSTALLING THE MOTOR
1. Aiming TRUE SOUTH
Attach the Dish to the Motor Post. Align the dish with the 0 Position. Many dishes have a
through bolt on the Post Clamp that will align and secure the dish to the motor tube.
2. Rotate the Motor Mount on the Mounting Pole toward TRUE SOUTH. True South can be
calculated by adding or subtracting the installation location's magnetic deviation to the compass
reading. Magnetic deviation charts are available at: http://www.geosatpro.com or
http://www.ngdc.noaa.gov/seg/WMM/
http://www.geosatpro.com

-2 -
3. Connect the Motor to the receiver via coaxial cable. The Green LED will light to indicate that the
motor is receiving power from the receiver.
.
II. Quick Installation (A receiver with Goto X Function or USALS compatible):
1. Set the Angle of the motor:
Set the Motor Angle Scale to match the installation location Latitude.
2. Mount the Dish:
Find the Dish Angle Settings on Page 6 of this manual.
Set the Dish Angle using the elevation scale on the antenna dish.
LATI
Motor Angle Setting Disk Angle Setting
http://www.geosatpro.com

-3 -
3. Drive the motor to the position for a favorite satellite:
Set the receiver to Goto X or USALS function, input the longitude and select satellite,
the receiver will calculate and drive the motor to right angle automatically.
4. Aim the Satellite:
While tuned to an active Transponder Frequency,Rotate the motor unit on the mounting
pole to find the strongest quality signal from the choosen satellite and peak for Quality
Signal, Adjust the Dish Angle to peak for Quality Signal.
Tighten all hardware and the installation is finished.
CABLE CONNECTION
Connect the Motor via the coaxial cable (RG-6/U is recommended) as the following diagram.
MANUAL BUTTON
Drive the Motor East / West via the Manual Button (do not use in USALS mode).
1. West: Press once and hold.
2. East: Press twice within 0.5 second and hold.
3. West Fine-tune: Press Once and release immediately for one step West.
4. East Fine-tune: Press Twice and then release the button for one step East.
INDICATING LED
The LED on the bottom of the Motor can show the following information
Color Green On Power On; Standby Mode
Orange Blink Receiving DiSEqC 1.2 Commands / Reset Mode
Orange On Error Message: Over Current / Reach Hardware Limits …
DiSEqC 1.2 /USALS Receiver
H-H Mount
LNB
TV
To
Receiver
To
LNB
Coaxial Cable
Coaxial Cable
Adjustable
Hardware
Limits
Manual Button
Indicating LED
Reset
Key
Color Status Indication
http://www.geosatpro.com

-4 -
HARDWARE RESET
1. Make sure the power from the receiver is turn-on. The indicating LED lights on.
2. Drive the motor to 0°via the manual button.
3. Probe the RESET button behind the bottom of the motor via a thin rod for 2 seconds. The LED
blinks in Orange Color. The reset process is OK while the LED is green. The preset Satellite
Tablewillbere-install and the current position will be set as 0°. Please cut off the power for the
motor first before any operation.
DiSEqC 1.2 OPERATION
The Motor is designed for DiSEqC 1.2 Receiver. The commands on the receivers might be
different, but similar. Please refer to the manual of the receiver.
1. Go East / West: Drive the dish to East / West.
2. Fine Tune East / West: Drive the dish East / West for one step.
3. Store nn: Store Satellites Position nn (01~60).
4. Goto nn: Drive Motor to Satellite Position nn (01~60).
5. East / West Limits: Set software East / West limits.
6. Limit Off: Disable the software limits.
7. Goto 0°: Drive the Motor to 0°as a reference point.
8. Re-synchronize / Shift:
a) Drive the motor to a position by Goto command. For example, P03.
b) Drive the motor East / West to a better position.
c) SendRe-synchronize commandstothemotor. The P03 will be shifted to the new position.
All the other Satellite positions are also changed.
d) If step a) is skipped, the P01 will be shifted to the new position.
9. Goto X Function or USALS:
e) This function only works with receivers which have goto x function.
f) It can drive the motor to exact x.x°East or West relative to the 0 position of the motor.
( For example, 15.2°East on the bottom of the motor.)
g) Just input the longitude, some receivers can drive the antenna to focus on the right
Satellites automatically after locating and peaking the first satellite.
P03P02
P01
P02
P03
P01
Stored Positions
http://www.geosatpro.com

-5 -
TROUBLESHOOTING
Symptom Check points
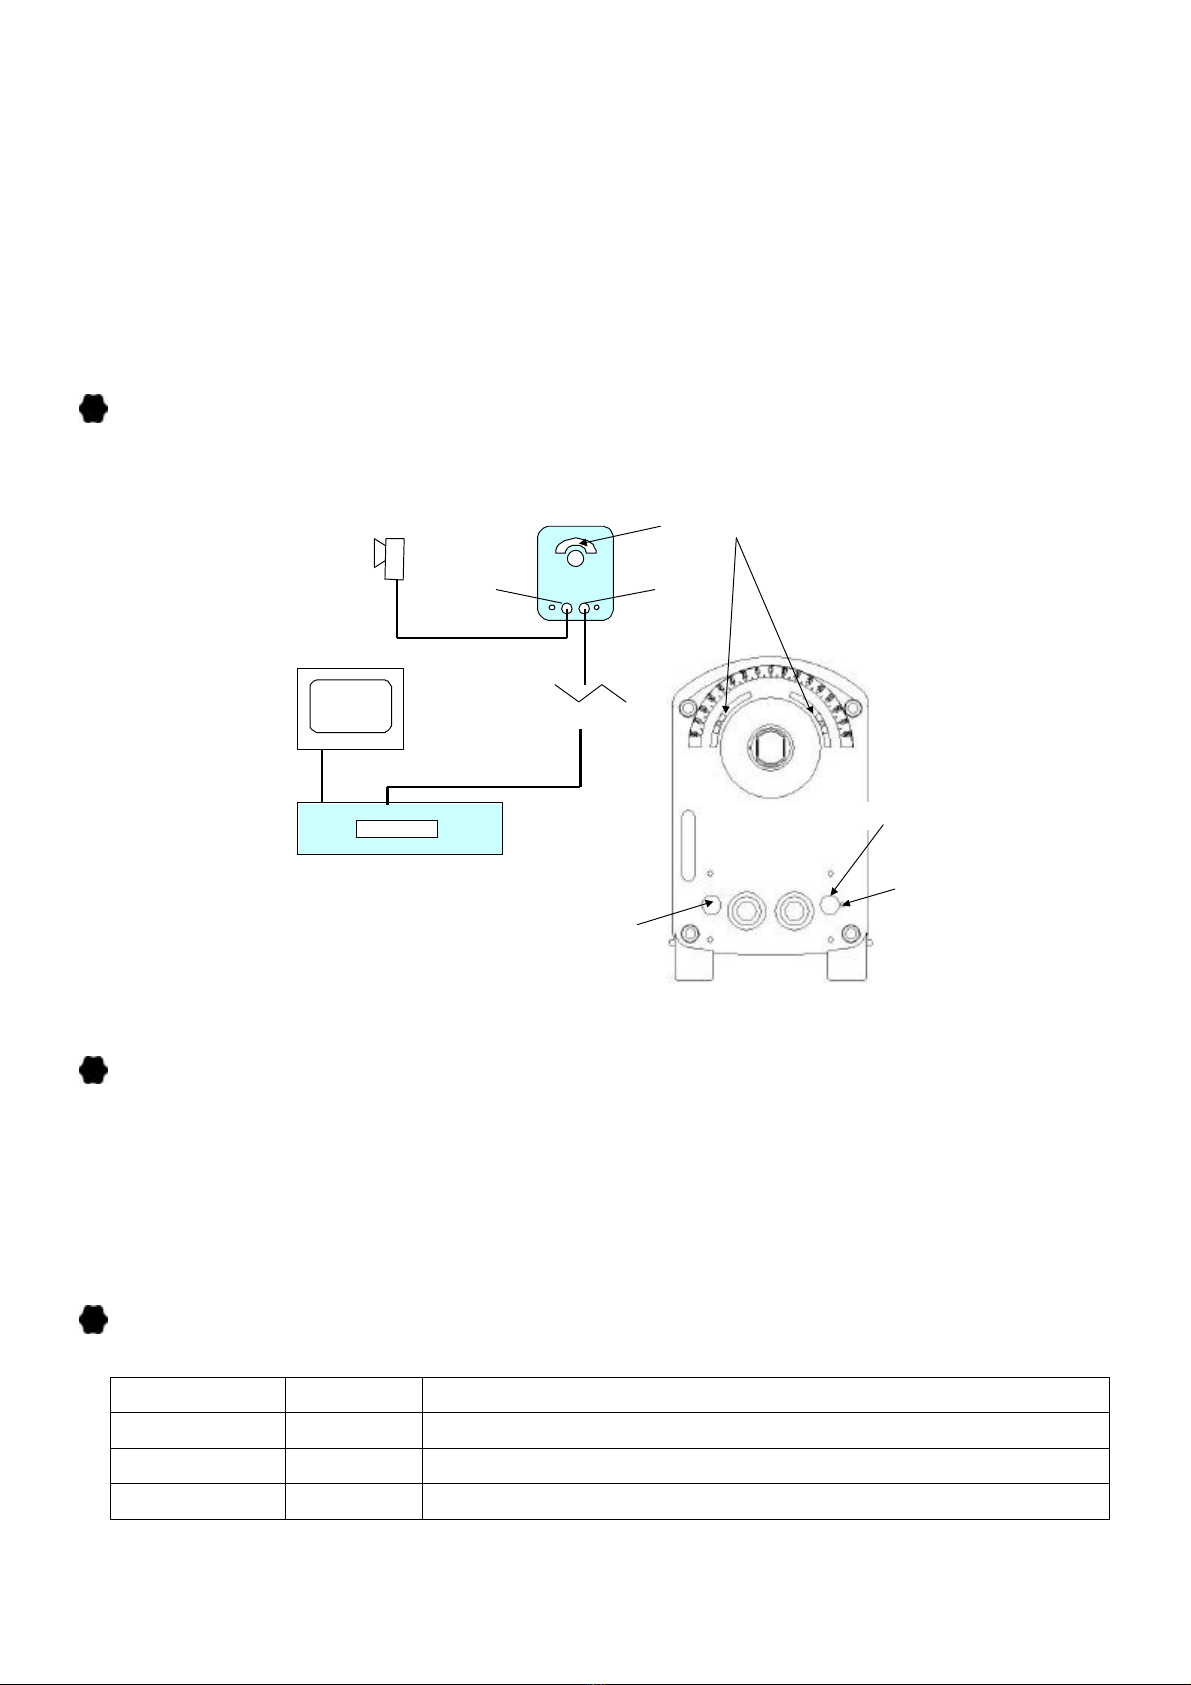
The Manual Button doesn’t work 1. Make sure the power of receiver is on and the indication
LED on the bottom of the motor lightson.
2. Check every devices between receiver and motor.
The Manual Button can only drive
the motor toward West For East movement: Press the manual button twice within 1
second or shorter.
The Motor doesn’t work
1. Make sure all cables and power are well connected. The
LED on the bottom is lit.
2. Make sure the motor is not blocked by the software limits.
Try to use the manual button, which is only limited by
hardware limits.
3. Check if the receiver supports DiSEqC 1.2 or USALS and
the DiSEqC 1.2 or USALS option has been enabled.
The Motor stops at a certain
position and can’t go further.
1. Disable the software limits and drive the motor again.
2. Check if movement is stopped by the hardware limit sliders.
3. Make sure the Motor /antenna is not hitting an object.
The Motor runs intermittedly
1. Make sure the antenna is not too heavy or too large. The
maximum size is 1.2 m.
2. Check if the cable quality is good quality RG-6,Is cable length
too long?Many receivers are unable to contorl over 150'
3.Check if the output power of the receiver is less than
350mA.
The Motor runs sometimes fast
and sometimes slowly.
The speed of the motor is according to the output voltage (13
/18V) of the receiver. Vertical=13V=slow
Horizontal=18V=fast
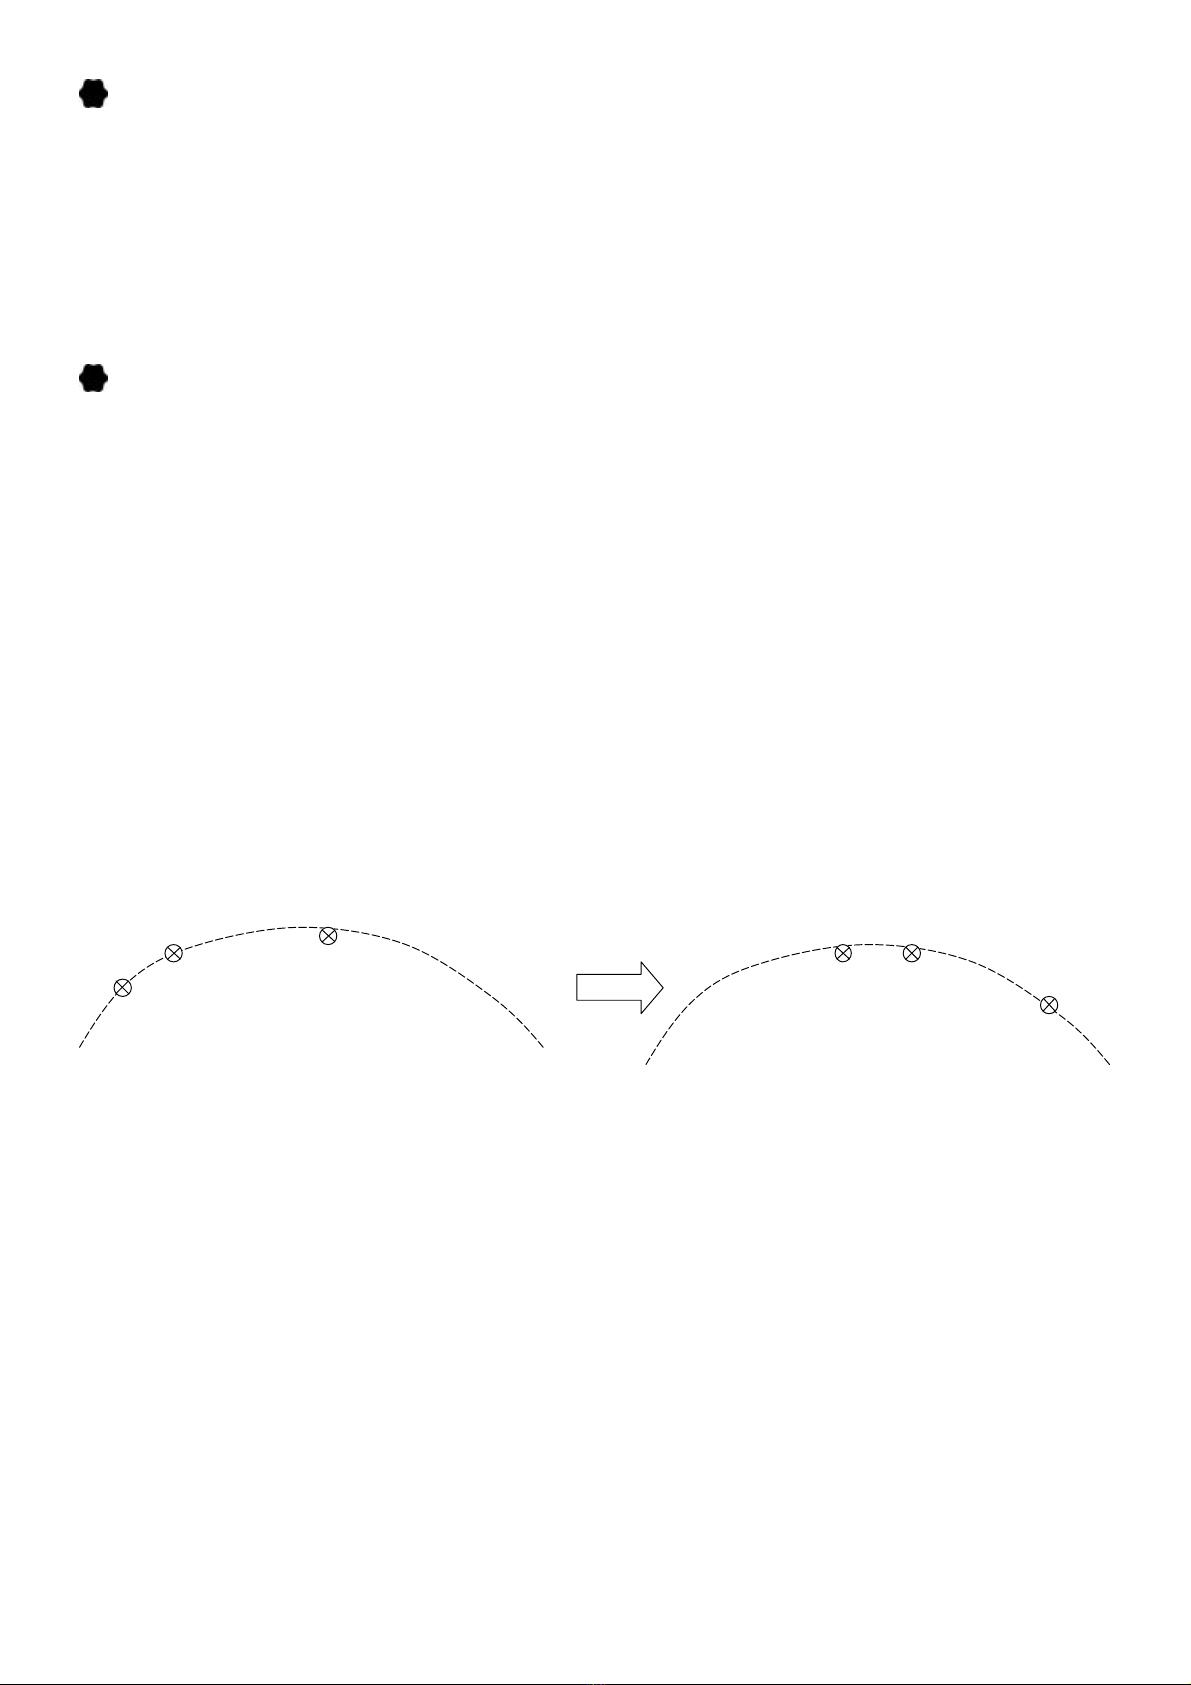
All satellite positions are not
correct.
1. Goto One satellite position via receiver. Wait for about 30
seconds until the motor stops.
2. Drive the antenna East or West until the reception of this
satellite is clear.
3. Use “Re-calculate” Function to correct position via receiver.
Or
Use Goto 0 position Function to go to 0 degree as a reference
point.
The Motor stops immediately
without moving. This could be caused by ainternal damage to the motor.
Please contact your vendor for repair.
The Motor doesn’t make any
movement, but clicks from inside
of the motor can be heard
1. Check if the dish is too heavy. The maximum size of the
antenna is 1.2 m.
2. The DC motor inside is damaged. Please contact your vendor
for repair.
http://www.geosatpro.com

-6 -
DISH ANGLE TABLE
Site Dish Angle Site Dish Angle
Latitude Setting Latitude Setting
030.000 34 24.490
129.882 35 24.359
229.645 36 24.230
329.467 3724.103
429.290 38 24.034
529.113 39 23.858
628.937 40 23.740
728.861 41 23.624
828.585 42 23.511
928.411 43 23.400
10 28.237 4423.292
11 28.064 45 23.287
12 27.892 46 23.201
13 27.721 47 22.985
14 27.551 48 22.888
15 27.382 49 22.795
16 27.214 50 22.704
17 27.048 51 22.615
18 26.883 52 22.530
19 26.720 53 22.448
20 26.558 54 22.368
21 26.397 56 22.218
22 26.239 58 22.208
23 26.082 60 21.953
24 25.927 62 21.838
25 25.774 64 21.735
26 25.623 6621.643
27 25.474 68 21.563
28 25.326 70 21.495
29 25.181 72 21.438
30 25.039 74 21.392
31 24.988 76 21.357
32 24.759 78 21.334
33 24.623 80 21.322
http://www.geosatpro.com

-7 -
SPECIFICATION
Protocol :
DiSEqC 1.2 / USALS
Compatible Receiver :
DiSEqC 1.2 / USALS Compatible Receiver
Antenna Size :
120 cm +/4' + Rated
Speed :
1.9°/ sec (at 13V); 2.5°/ sec (at 18V)
Azimuth Angle :
75°East ~ 75°West (150°Max.) Adjustable
Elevation Angle :
10~75°
Tube for Antenna :
Ø40x 160 mm (Optional 55mm)
Diameter of Stand-mast :
Ø35~65 mm
Input Voltage :
13 / 18Vdc
Output Voltage :
13 / 18Vdc (according to input)
Power Consumption :
50 mA (Standby) / 200mA (Normal) / 350mA (Max.)
Satellite Positions :
60 positions
Goto 0 Position Function :
Yes ( Go to 0°)
Recalculation Function :
Yes
Goto X Function :
Yes
Manual Button :
Yes (East /West)
Indicating LED :
Yes (2 Colors)
Limit Protection :
1. Adjustable Hardware Limits
2. Programmable Software Limit
3. Current Limit
Positioning Sensor :
High Resolution Hall Effect Sensor
Weight :
3.1 Kg /6.8 lb (Net) / 3.5 Kg/7.7 lb (Gross)
Dimension :
345mm/13.6" x 168mm/6.6" x 110 mm/4.3" (Gross)
DiSEqCTM is a trademark of EUTELSAT
Preprogrammed Satellite Positions
No. Satellite Position
1 AMC 6 72°W14 Echo 6/8 110°W
2SBS 6 75°W15 SatMex 5 116.8°W
3 AMC5 79°W16 Echo 7 119°W
4 AMC 9 85°W17 IA 13 121°W
5 AMC 3 87°W18 Galaxy 10R 123°W
6 Galaxy 11 91°W19 Galaxy 13 127°W
7 IA 6 93°W20 Echo 1/2 148°W
8 Galaxy 3C 95°W
E
9 IA 5 97°W
10 Galaxy 4R 99°W
11 AMC 4 101°W
12 AMC 1 103°W
13 AMC 2 105°W
http://www.geosatpro.com
Table of contents
Popular Engine manuals by other brands

DANA
DANA 4360-94 parts list

rojaflex
rojaflex ML Series Original assembly and operating instructions

WEG
WEG W22Xdb C 315 Installation, operation and maintenance manual

McCulloch
McCulloch RVM110 manual

MerCruiser
MerCruiser Axius 350 MAG user manual

Briggs & Stratton
Briggs & Stratton 129H00 Series Illustrated parts list