GEOSATpro HDVR1200 User manual

www.glorystar.tv Toll Free 866-597-0728
9
HDVR1200 Satellite Receiver
Rear Panel
1. Connect USB 2.0 Devices for DVR / Media / Upgrades / WiFi (5v/500ma)
2. Connect Analog Component Video to TV or other video equipment
3. RS232 Null Modem Serial Port for Upgrade and Diagnostic
4. Connect to the Satellite Dish Coax Cable
5. Loop Satellite Signal Out (not recommended for 2nd receiver connection)
6. Connect Optical Digital Audio to Digital Audio Amplifier
7. Connect Digital HDMI Video and Audio to TV or other video equipment
8. Connect Analog Composite Video to TV or other video equipment
9. Connect Analog Audio Left/Right (decoded Dolby) to TV or other equipment
10. Connects to DC Power Supply (12vdc / 1500ma / positive tip)
The Front panel of the HDVR1200 satellite receiver has many of the important
controls needed for operation of your Glorystar system. It is important to install the
receiver so the front display can be visible for proper remote control operation and
to have easy access to the control keys in case the remote control is misplaced.

10
LED display lights to verify remote operation
Enter the Manual Timer Setting menu
Display Media Player for Videos / Photos / Music
Page Down in a List and DVR Scan Rewind
Skip Rewind
Play DVR / Media
Freeze Video or Pause DVR / Media
Display DVR Recordings List
Display Satellite List
Display the Main Menu Screens
Change Channel or Menu Navigation Up / Down
Display Channel Banner, 2x for Program EPG,
3x for Service Information
Display Electronic Program Guide (if provided)
Increase / Decrease Volume
Numeric / Alpha Keys for direct Channel Change
and Menu Setting
Mute or Enable Muted Audio
Select Standby or Operation Mode
Select Closed Caption ON / OFF
Display a Full Screen Signal Meter
1.
2.
3.
4.
5.
6.
7.
8.
9.
10.
11.
12.
13.
14.
15.
16.
17.
18.
19.
Page Up in a List and DVR Scan Forward
Skip Forward
Stop DVR Play or Record / Stop Media Playback
Start DVR Manual Record
Select the Favorite List Mode
Magnify a Portion of the Screen
Exit Screens or Functions
Display the Channel List or Accept a Menu Item
Increase / Decrease Volume or Menu Navigation Left / Right
Return to Previous Channel
Change Channel Up / Down
Select Alternative Language / Audio Mode / Sound Track
Select to View TV or Listen to Radio Channels
20.
21.
22.
23.
24.
25.
26.
27.
28.
29.
30.
31.
32.
Turn the Receiver ON / OFF - 17
Change Channels - 11 or 30
Adjust Volume - 14 or 28
Mute Audio - 16
View TV / Listen to Radio - 32
•
•
•
•
•
Remote Shortcuts
View Channel List - 27
View Channel Banner - 12
View Signal Meter - 19
Electronic Program Guide - 13
(if available from the broadcaster)
•
•
•
•

www.glorystar.tv Toll Free 866-597-0728
11
CAUTION: DO NOTATTEMPTTO OPERATE ELECTRONIC
DEVICES IN AN UNSAFE LOCATION OR IN VIOLATION
OF SAFEGUARDS PROVIDED IN THIS MANUAL OR ANY
OTHER EQUIPMENT MANUAL PROVIDED WITH THIS
SATELLITE SYSTEM.
Remove the satellite receiver and remote control from the packaging. Inspect the
unit before operation. If any equipment is damaged or if you have any questions,
please immediately contact your reseller. Install the two included AAA batteries
into the remote control battery compartment.
The BEST and Easiest method to aim the satellite dish is to temporarily place
the satellite receiver and a small TV near the satellite dish. This method allows
the installer to see the signal changes that occur with small dish movements. It is
extremely difficult to install the satellite system if the TV is inside the home and
out of the view of the installer. Attempting to communicate the signal readings
with a second person viewing the TV will complicate the aiming process!
Connect Receiver to a TV
To view high definition video in HD and listen to digital audio, connect a HDMI
cable between the receiver and TV. No other cables are needed with the HDMI
cable.
A basic connection for standard definition SD TV viewing is to connect the to the
TV with the included RCA cable. Connect the yellow Video port and the white/
red Audio RCA jacks from the receiver to the yellow/white/red RCA plugs on the
TV’s AV IN jacks.
Plug the television power plug into a surge protected AC power strip. Turn the
TV power ON and set the TV to the AV input. The TV is now ready to view the
satellite receiver.
Best Quality Picture Poor Quality Picture

12
Connect a short RG6 coax cable from the LNBF on the satellite
dish to the SAT IN port on the rear panel of the HDVR1200.
Plug the satellite receiver’s power supply into the 12VDC
port on the rear panel of the HDVR1200. Plug the HDVR1200
power supply AC plug into the surge protected power strip.
Older TV: Only Antenna Jack
Consult the owners manual provided with TV, VCR or other device that will
be connected to the GEOSATpro satellite receiver. Questions regarding the
connection to any other equipment should be directed to the manufacturer of that
device.
Standard Definition Connections (opt.)
VCR - Standard Definition

www.glorystar.tv Toll Free 866-597-0728
13
When the receiver is first powered
ON it will display “Welcome! Please
select Install Type”. Press the OK key
on the remote control to install for the
Glorystar Christian Satellite Service.
1.
Receiver Activation and Set-up
Press the remote control Left
or Right Navigation key to select the
connection cable type used to connect
the satellite receiver to the TV. If a
HDMI cable is connected, select HDMI
then press OK key and continue to step
# 3. If a RCA cable is used, select RCA
then press OK key and skip to step # 5
2.
TV Resolution - To display the
best picture quality, the HDMI output
needs to be set to the highest quality
that the TV supports. Press OK key to
select the best resolution for your TV.
3.
480i is the lowest resolution and will provide poor picture quality. 1080p
will provide the highest picture quality. If you do not know the highest resolution
that the TV supports, highlight the highest resolution of 1080p and press OK key.
If the TV supports the resolution, you will see a display “Your TV supports this
Resolution. Do you wish to Save or Test another?”. If you see this display, press
the OK key to save.
4.
If the TV does not support the selected resolution, nothing will display on the TV
screen. After 10 seconds, the receiver will return to the Resolution Quality menu
screen. Repeat steps #3 and #4 and select a lower resolution quality setting until
the TV displays the selected resolution and it is saved.

14
Glorystar - Local Time is set by
selecting your Time Zone. With Time
Zone highlighted, press the Left or
Right Navigation key to display the
install location time zone. For Example:
-5:00 EST - New York is the correct
time zone selection for the east coast of
the US.
5.
Press the Down Navigation key
to highlight “Does this Time Zone
observe Daylight Savings?” Press the
Right or Left Navigation key to select
OFF if your location does not change
between Standard and Daylight Savings
or ON if your location changes between
Standard and Daylight Savings.
6.
Press OK key to continue. Please take a few minutes to read this Glorystar
Install Guide. When you are ready to continue the install, press the OK key to
continue.
7.
A Signal Strength reading of 0-5% indicates that the receiver is not properly
connected to a working LNBF. The low Signal Quality reading at or below 30%
indicates that the dish is not properly aimed or the LNBF is not properly rotated
to receive the satellite signal.
A Signal Strength reading of 50-80% indicates that the receiver is connected to a
working LNBF. No Signal Quality reading indicates that the dish is not aimed.
Signal Strength and Quality Meter
The Signal Strength and the Signal Quality meters provide important information
about the satellite system. Here are some examples of different meter reading and
what they tell you about the wiring connections, dish aiming and LNBF rotation.
It is very important to optimize the Signal Quality readings to provide the best
performance during adverse weather conditions. The higher the Signal Quality
reading, the better the reception. If the Signal Quality reading is too low, the
picture will break up into little squares and the sound may become garbled, out of
sync, choppy or disappear completely!

www.glorystar.tv Toll Free 866-597-0728
15
Aim the dish towards the distant
landmark which corresponds with
the compass reading for the satellite.
Observe the Signal Quality reading on
Channel 901, RT News and very slowly
pan the dish. While watching the
Signal Quality reading, SLOWLY pan
the dish towards the east approximately
10 - 15 degrees away from the starting
compass reading provided for the
target satellite. If the Signal Quality
reading does not increase, SLOWLY
pan the dish back to the starting point
then SLOWLY pan the dish to the west
approximately 10 - 15 degrees.
If no Signal Quality reading or a
low Signal Quality reading is displayed,
increase or decrease the dish elevation
by one degree increments and repeat
the slow panning of the dish.
8.
9.
Not Aimed at the Satellite
Starting to Receive the Satellite
If any channel displays a Signal Quality reading below
50%, additional fine tuning adjustments MUST be made.
The Green color Signal Quality bar with a reading at or above 60% and video of
the channel playing behind the meters indicates that the dish is properly aimed.
The Yellow color bar displaying a Signal Quality reading at or below 60% and
video of the channel playing behind the meters indicates that the dish is aimed
at the correct satellite, but needs more adjustment or the LNBF is not properly
rotated to optimally receive the satellite signal.
The Red color bar displaying a low Signal Quality reading at or below 50%
indicates that the dish might be aimed at the correct satellite, but needs more
adjustment.
Locate and Peak Satellite Signal

16
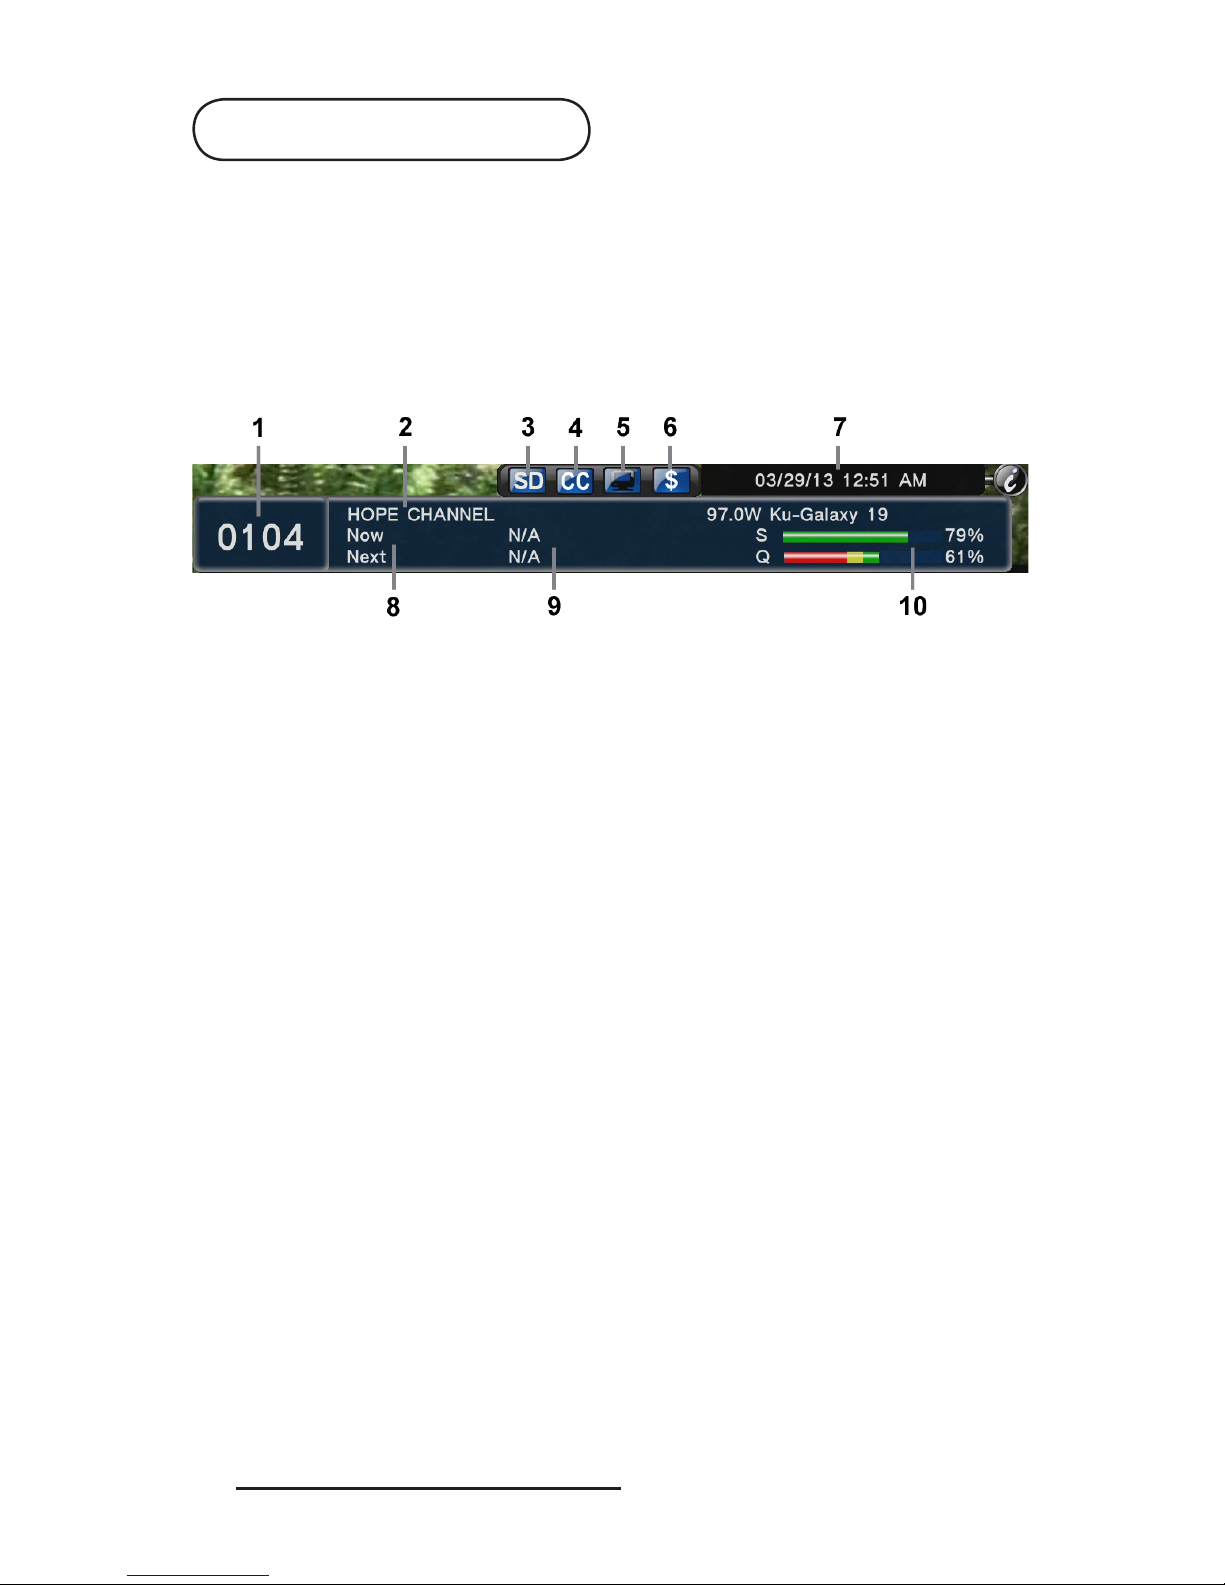
Once the correct satellite is
detected, the Signal Quality reading
will appear and increase from a low
quality Red color meter display to a
stronger signal indicated with Yellow
and a Green meter display when the
Signal Quality reading is good.
Continue to optimize the dish
aiming by making very small changes
to the elevation (up/down) and
azimuth (left/right) to peak the Signal
Quality reading. Failure to optimize and
maximize the Signal Quality reading
may result in the loss of programming
during inclement weather.
When the dish is correctly aimed,
the RT News Channel programming
will be displayed and the Signal Quality
reading will read 60% or higher.
10.
11.
12.
Almost There! Adjust a Little More...
Great Quality Reading above 60%
Press the CH/DOWN arrow key
on the remote control to select Channel
#113, Cornerstone.
Verify the Signal Quality
reading is at least 60% and displaying
Cornerstone programming. If the
Signal Quality is less than 60%, make
very small adjustments to fine tune the
dish elevation and azimuth (side to
side).
13.
14.
Quality Reading above 60%
Press the CH/DOWN arrow
key to select Channel #106 , 3ABN
English.
Verify the Signal Quality
reading is at least 50% and displaying
a picture. If the Signal Quality is less
than 60%, make very small adjustments
to fine tune the dish.
15.
16.
The Signal Level
(S)
is important when determining if the receiver is
connected to a working LNBF. A Signal Level reading of 50% or higher
indicates a connection to a working LNBF, but does not indicate finding
the correct satellite.

www.glorystar.tv Toll Free 866-597-0728
17
Slight clockwise or counter clockwise adjustments to the LNBF rotation
or sliding the LNBF towards the reflector or away from the reflector may also
provide increased Signal Quality readings.
Change between Channels 901, 113 and 106 and balance for Peak Signal
Quality readings on these three channels. The Glorystar system will have the
best performance when the Signal Quality Levels are peaked and balanced on all
channels and weakest channel has a Signal Quality reading at or above 60%. If
you must to exit the installation process before the three channels are optimized or
if the power is removed, the receiver will return to step #1 in the set-up screens.
When the dish aiming is complete, tighten all dish hardware to permanently
hold the dish in this position.
17.
18.
19.
Select “Aiming Complete
- Continue” and press OK key to
automatically update the satellite
receiver with the latest Glorystar
channels. This process may take up to
10 minutes and the update progress will
be displayed. Please be patient and wait
for the receiver to automatically power
down and restart with a complete
channel list installed.
If the update progress does not progress
in 15 minutes, remove the power cord
for 10 seconds then reinsert to return to
step #1 in the set-up screens.
20.
If the dish is not properly aimed and the satellite signal is not strong enough, the
receiver cannot be updated. The receiver will immediately exit the update and
display “No Signal” or one of the three pre programmed channels. Remove the
power cord for 10 seconds then reinsert to return the receiver to return to step #1
in the set-up screens.
Congratulations! The Satellite dish is now aimed and the receiver is updated with
the latest firmware and Glorystar Channel List. The Glorystar channel list will be
automatically updated each week.
You may set you favorite channels lists and scan in additional free channels on
the satellite. These settings and channels will not be deleted during the weekly
Glorystar channel updates. This receiver also records your favorite programs.
Simply attach an USB hard drive to the USB port on the back of the receiver and
press record.

18
Channel Banner
Channel Number - Glorystar Channels are organized by language and type:1.
100 English TV
200 Spanish TV
300 Russian
350 Italian
400 Arabic / Aramaic
•
•
•
•
•
Channel Name
Standard or High Definition Television Channel
Closed Captioning for Hearing Impaired Available
Television or Radio Channel
Free or Scrambled Channel
Current Date and Time set automatically by satellite
Electronic Program Guide Start Stop Time (if provided by broadcaster)
Program Name (if provided by broadcaster)
Signal Strength and Signal Quality Readings (Quality reading must be above
60% for reliable reception)
2.
3.
4.
5.
6.
7.
8.
9.
10.
Press the i(information) remote control key to display the Channel Banner. The
banner provides information about the TV or Radio channel. This banner will
automatically disappear after the selected display time in the OSD menu screen.
Press the ikey two times to display detailed program information if the broadcaster
provides the EPG (Electronic Program Guide) information. Advanced users may
press the ikey three times to display detailed technical information about the
channel.
500 Multi-Language TV
900 News & Entertainment
1000 English Radio
1100 Spanish Radio
1500 Multi-Language Radio
•
•
•
•
•
To learn more about the advanced features of this receiver, please review the latest
Owners Manual.
Download the latest GEOSATpro HDVR1200 Owners Manual
at: www.geosatpro.com/manuals

www.glorystar.tv Toll Free 866-597-0728
19
Multiple Room Install
Carefully route the coax cable from
the dish to the ground block then to the
satellite receiver. Secure all cables using
appropriate cable clips and nylon zip
ties. Avoid using wire staples as they can
dimple or penetrate the cable and can
cause loss of signal! Form drip loops and
cable loops as needed to prevent water
from running down the cables and entering
cable connection fittings or into wall
penetrations. Remember to seal all exterior
wall and/or roof holes with a quality sealant or silicone caulking.
Install the grounding block and wire
while observing all NEC, National
Electrical Code and local codes. Connect
the ground wire to the structure ground.
If you are unsure of how to properly
ground your satellite system, please
consult with a local professional. Copies
of the NEC are available at your local
library or online.
Completing the Install and Grounding
Important Notice: GEOSATpro recommends that you DO NOT use existing
coaxial cabling that has been pre-wired or previously used in your home. Often
these cables are low quality RG-59, not rated for satellite applications or have
splitters and other devices that are not compatible. Always connect the RG-6 type
coax cable directly from the satellite dish LNBF through the grounding block and
attach to the Satellite IN connection on the rear of the satellite receiver.
Cable splitters and other devices in the coax line may cause the satellite receiver to
shut down or malfunction. Do not use any device in the coax line unless approved
for satellite installation. Multiple receiver installations must use a multiple output
LNBF to avoid tuning conflicts between the receivers. Splitters will not work!

20
DVR Record / Playback
To enable the Digital Video Record feature of the GEOSATpro HDVR1200,
connect an USB drive to the USB port located on the rear panel. The minimum
supported USB memory size is 4GB and the largest harddrive is 2TB. Make sure
that you connect an USB drive with adequate space to store the programming
that you wish to record and archive. Standard definition TV recordings typically
require approximately 1GB per hour of recording. Example: 32GB USB thumb
drive will provide approximately 32 hours of TV recording while a 500GB will
allow up to 500 hours, etc.
The USB drive should have an external power supply. Portable harddrives without
external power supplies should not be used for DVR operation as they are not
designed for extended recording and playback and have the potential to damage
the receiver.
Recordings may be either played back on the HDVR1200 receiver directly to
the TV or unplug the USB drive and connect to a PC, Mac or media device for
viewing, archiving, burning a DVD or ripping a media file. The DVR recordings
are standard ts extension files and no special software is needed on a computer or
media player.
DVR Quick Keys
If a channel provides the EPG service displaying current and upcoming programs
on the channel banner, press the EPG key to display this list. Select the program
to record and press the yellow color key to set a future recording timer. (Note that
this feature is not currently available on most channels).
EPG - Electronic Program Guide
Table of contents
Other GEOSATpro Receiver manuals