German pool CMC-101 User manual

2-in-1 Free Standing Steam Oven GPU-6SSL
GPNB-6SSL
Please read these instructions and warranty information carefully
before use and keep them handyfor future reference.
Online Warranty Registration
Capsule Coffee Maker CMC-101
USER MANUA L

Contents
1. Safety Notes
2. Product Structure
3. Installation Instructions
4. Operating Instructions
5. Care and Maintenance
6. Troubleshooting
7. Specifications
8. Warranty
03
05
06
06
11
13
13
27

P.3
1. Safety Notes
Please take time to read these safety precautions carefully before connecting your machine to the
power supply. It is essential to follow them and the operating instructions.
1. First read this entire operating manual.
2. Danger of electric shock! Never immerse the machine in water or any other liquid.
3. Connect only to a properly grounded power point.
4. To make sure that the machine is switched off, remove the plug from the power point.
5. Always pull out the power plug before:
- Relocating the machine;
- Cleaning or maintenance;
- Long periods of disuse.
6. Never clamp or run the power cable over sharp corners or edges.
7. Danger of electric shock! Damaged power cables may only be replaced at the customer service
centre.
8. Danger of electric shock! Never touch the power plug/socket/cable or the machine with damp or
wet hands. Never unplug by pulling out the power cable; always remove the plug.
9. If you need an extension cable, make sure it is suitable for your machine (3-pole grounded, 1.5
mm conductor cross-section), and lay the cable to avoid tripping.
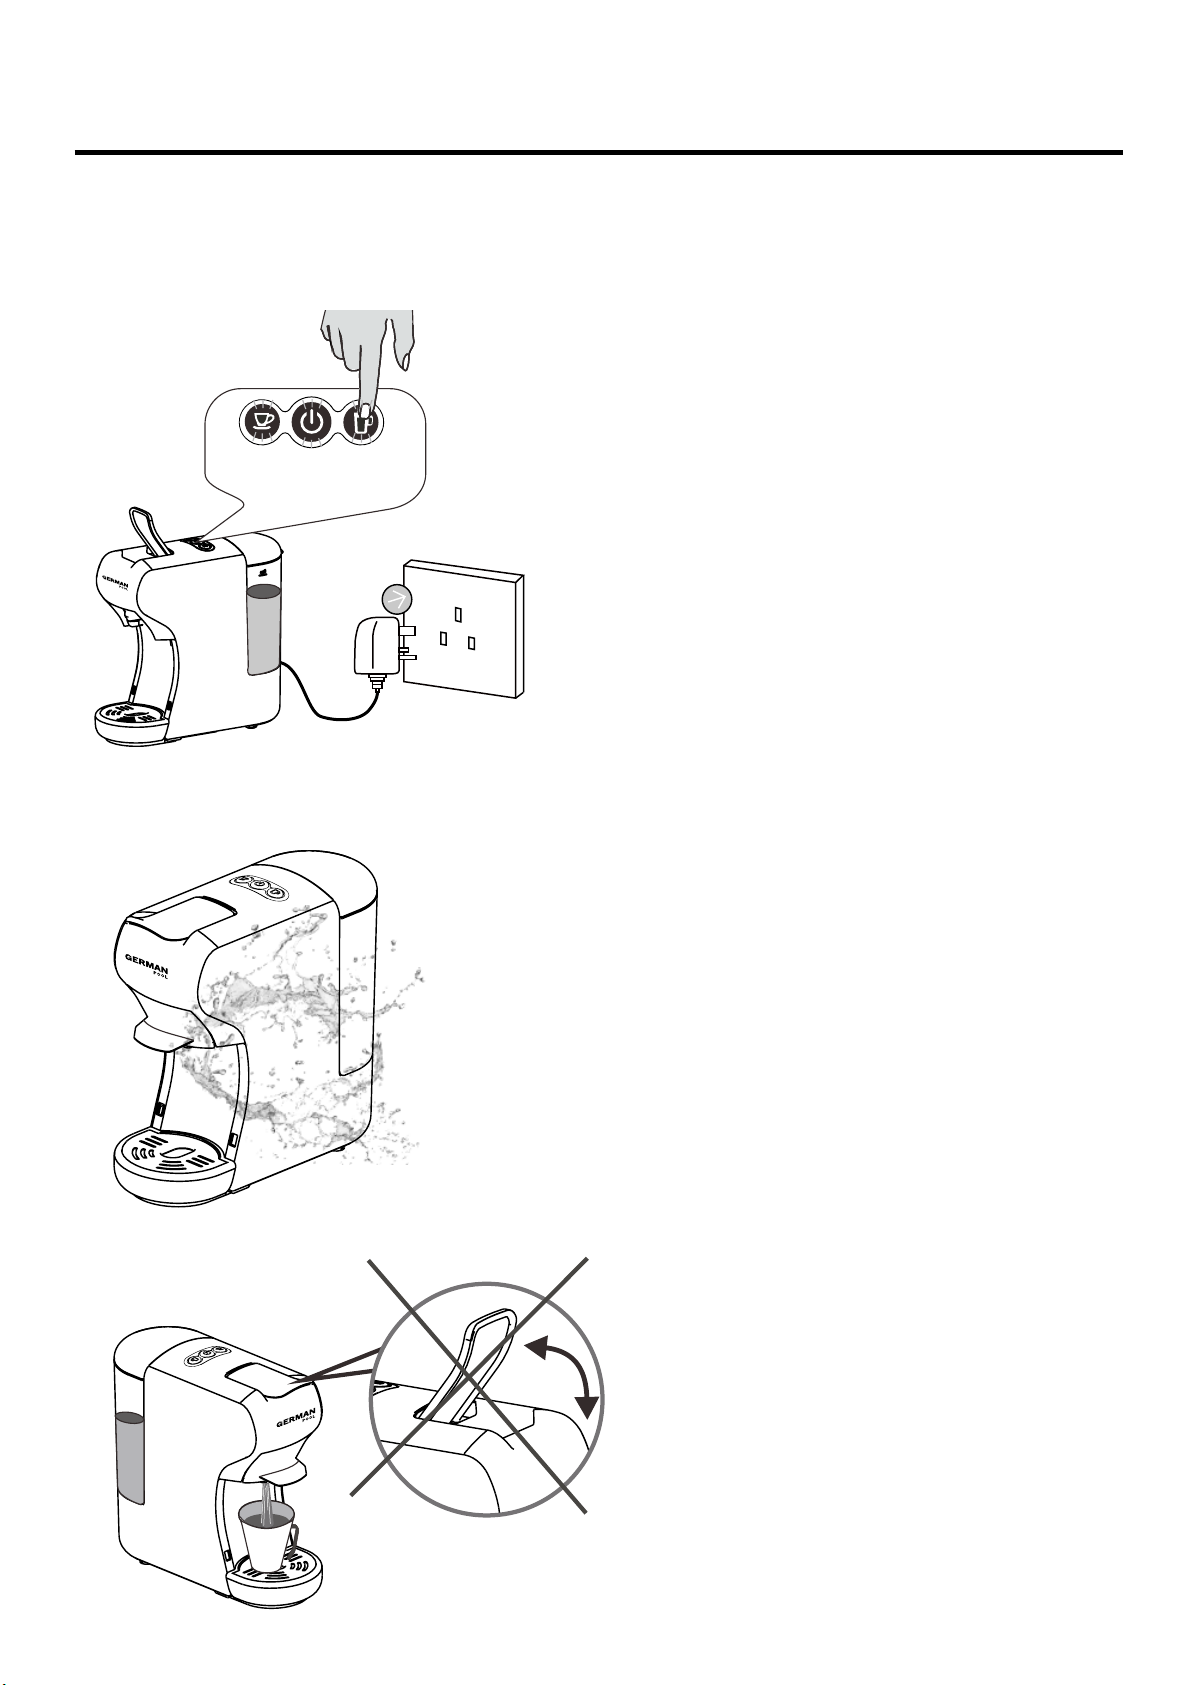
10. Danger of scalding! Never move the machine during operation!
11. Never operate the machine without water.
12. Always make sure there is water in water tank not less than minimum level.
13. Danger of burning! Never touch very hot parts of the machine (e.g. brew unit during operations).
14. Danger of scalding! Do not touch the steam or water jets.
15. Danger of scalding! Do not move the operating lever when the machine is still under pressure
making coffee .
16. Do not use the machine in case of:
- Faulty operation;
- Damaged power cable;
- After falling or other damage;
- In such cases immediately have the machine checked and repaired if necessary at the customer
service centre.
17. The machine location must meet the following requirements:
- Choose a dry, stable and level support surface not immediately underneath the power point;
- At least 60 cm away from the washbasin and taps;
- Never place on flammable/fusible surfaces or equipment.
- Never place the machine or power cable on or nearer than 50 cm to hot surfaces or open flames;
- Never cover the machine during operation.
2

P.4
1. Safety Notes
18. Keep children away from the machine during operation.
19. Only use the machine in dry rooms.
20. Danger of tripping! Do not let the power cable hang down.
21. Pull out the power plug and allow the machine to cool down completely before cleaning and or
Maintenance.
22. To prevent damage, never use replacement parts or accessories not recommended by the
manufacturer.
23. If the supply cord is damaged, it must be replaced by the manufacturer, its service agent or
similarly qualified persons in order to avoid a hazard.
24. This appliance is intended to be used in household and similar applica ons such as:
- Staff kitchen areas in shops, offices and other working environments;
- Farm houses;
- By clients in hotels, motels and other residen al type environments;
- Bed and breakfast type environments.

P.5
2. Product Structure
1. Lever
2. Buttons
3. Water tank lid
4. Water tank
5. Coffee adaptor
6. Drip tray lid
7. Drip tray
1
2
3
4
5
6
7

P.6
Before using for the rst me
Caution: Improper handling of electrical equipment is dangerous and can be lethal.
Please pay attention to the safety precautions in this manual, in particular the following:
- Danger of scalding: beware of hot water!
- Do not operate the machine with an empty water tank or water is less than MINIMUM
level.
- Do not open the handle when the machine is brewing.
- Always pull out the power plug before cleaning the machine.
- Only use the machine in a dry room.
- Thoroughly rinse out the water tank with fresh water before using for the rst me. Clean the machine
using a damp cloth only.
- Before using for the rst time, ush out the machine once without capsule inside.
3. Installation Instructions
4.Operating Instructions
•Remove your from capsule coffee machine its packaging.
•After unpacking, please check that the following parts are included:
- Water tank
- Coffee machine
- Manual
- 2 Cofee adaptors
- Drip tray
- Pump
•Check that your home power supply voltage is the same as marked on the machine rating plate.
•Destroy all the plastic bags to prevent danger to children!
•Keep the packaging for transporting the machine (e.g. for removals, servicing, etc.)
•You may nd a little water remaining in the machine.
•In order to ensure that this machine works perfectly, it was tested with water before leaving the factory.
•Danger of frost.
Watch the video clip

P.7
Instructions for the Water Tank
Filling without removing the tank (Fig. 1)
- Uncap the water tank.
- Fill the tank with cold fresh water. The maximum temperature of the water is 35°C. The maximum
capacity is 0.6 L.
- Close the water tank lid.
Filling by removing the water tank (Fig. 2)
- Hold the water grip at tilting angle to remove the water tank from the machine.
- Fill the tank with cold fresh water. The maximum temperature of the water is 35°C. The maximum
capacity is 0.6 L.
- Slide the water tank slowly on water tank base, when the water tank outlet is inserted in the inlet
receptacle, pushing rmly on the water to lock the water tank.
Fig1 Fig2
4.Operating Instructions
2. Choose the right capsule adaptor to house the corresponding capsule
Supplied Accessories
Suitable for nespresso-
type capsule or alike
CMA-101-NS CMA-101-GD
Suitable for ground
coffee powder
1. Warming up
• Fill up the water tank, connect the machine to an electric socket and turn on the AC mains, the (on/
off) button lights up in red;
• About 45 seconds later, all 3 buttons will light up in blue, meaning the machine is ready to brew
coffee.
Note: Add at least 20 ml of water. Water level must not exceed the maximum mark (max.)!
•Use distilled water only. Never use hot water, non-ltered tap water or other liquid.
The owner of the above mark ‘NESPRESSO’ is Societe des Produits Nestle S.A. We are not the license of
the said mark. Nor are we associated with the business of Societe des Produits Nestle S.A.

P.8
4. Buttons
5. Coffee Making
Select a large or small cup according to the desired consumption amount (press the corresponding
button)
• Large cup takes about 25 seconds to brew approximately 40-65ml coffee.
• Small cup takes about 47 seconds to brew approximately 20-30ml coffee.
Note: The time required and quantity produced for different types of coffee may vary.
Set the Volume of coffee
Depending on user preference, adjust the desired volume by pressing the small cup button or large
cup button . After warming up the machine, it is ready to make coffee (on/off button, small cup
button, large cup button, all light up in blue):
• Press Small cup button for setting the quantity: keep pressing the small cup button (minimum
10 seconds, maximum 90 seconds) according to the desired volume. Release the button, the
machine will remember and apply the same setting on the next occasion;
• Press Large cup button for setting the quantity: keep pressing the large cup button (minimum
10 seconds, maximum 90 seconds) according to the desired volume, Release the button, the
machine will remember and apply the same setting on the next occasion.
4.Operating Instructions
Volume Press Button Press Duration
Small Cup (Preset
volume about 20-30ml)
Large Cup (Preset
volume about 40-65ml)
Small Cup Adjustable Range 10-90
seconds
Adjustable Range 10-90
seconds
Large Cup
We recommend using ne coffee grounds in order to enhance the extraction process, it will improve the
overall taste of the coffee. Before purchasing coffee, please refer to the packaging to distinguish the
grind size.
3. Place coffee in the capsule adaptor
• Lift the lever.
• Select the suitable capsule adaptor that matches the desired capsule.
• Place ground coffee, capsule or coffee pods into the slot inside the capsule adaptor.
• Insert the adaptor into the machine and put down the lever.
• Put one coffee cup below the coffee spout to hold liquid coffee.
開關鍵
小杯鍵
大杯鍵

P.9
Stand-by Mode
In factory default standby mode, the machine will be turn off after 15 mins, and all indicator lights will
be off.
Press the On/Off Button to switch on the machine again if the machine is in standby mode.
Setting the Standby mode
- Keep pressing the small cup button and large cup button at the same time, insert the plug to the
socket.
- On/Off Button light will be on.
- Press small cup button, small cup button light off, standby mode cancelled.
- Press small cup button, small cup button light on, standby mode activated.
4.Operating Instructions
>15 Minutes

P.10
4.Operating Instructions
Resetting to Factory Default
Press the large cup button, insert the plug to the socket. The indicator light of buttons will ash twice.
It means the machine is reset to factory default setting.
Warning
Do not splash water on the machine.
Do not lift the lever when brewing coffee.

P.11
5. Care and Maintenance
Switch off and unplug the coffee maker before cleaning and performing maintenance.
Water tank: Take out the tank, discard residual water, clean it with a soft cloth and rinse
it with water.
Note: never use a dishwasher to clean any parts of the coffee maker.
Watch the video clip
Drip tray & capsule adaptors: Take them out,
discard water or coffee residue, clean them
with a soft cloth and rinse with water.
The used coffee adaptor is used in high
temperatures so be careful of burns.
When loading or removing the coffee adaptor,
you must be careful to pay attention to the
sharp needles above the coffee adaptor to
avoid cutting your ngers.
Exterior: Wipe the exterior with a soft cloth at
a regular interval. Keep the appliance clean,
especially the switches and plug.

P.1 2
5. Care and Maintenance
Decalcication
Drinking water varies according to region. The lime particles in hard drinking water are deposited
as residues in the machine and can block the piping and cause damage. To prevent this, be sure to
decalcify the machine every one and a half to two months.
Decalcication must be done correctly to prevent damage. So it is essential to follow these instructions.
Important Note:
– Never clean the machine with vinegar. This causes damage and makes your coffee taste bad.
– Damage caused by incorrect decalcication or failure to decalcify is not covered by the warranty
Caution: beware of hot water!
Procedures
1. Recommend to purchase commercially available decalcier (decalcifying liquid), diluted according to
the manufacturer‘s instructions.
2. Make sure there is without capsule inside the machine.
3. Place a large bowl under the dispensing head to collect the decalcication diluted and lime residues.
4. Fill the water tank with water to maximum level mixed with decalcifying solution or lemon acid, make
sure the solution is dissolved completely.
5. Press the large cup button to run decalcifying water as you brew coffee normally, repeat for several
times to run out the entire tank water.
6. Repeat the process to run another tanks of water mixed with decalcifying solution.
7. Repeat the process to ush out the intern circuit with a tank of fresh water (without the decalcifying
solution) to clean the internal circuit completely.
Using the pump
Before initial use or after long periods of time of not using (e.g. holidays) the machine may have difculty
pumping water. The following short procedure can regulate the water circulation within the coffee
maker, by using the pump and pipe to inject water into the coffee maker manually prior to turning on the
coffee machine for its rst rell.
1. Insert the pipe into
the water opening.
After the above steps, the machine will be able to pump water out normally.
*If necessary repeat these steps 2 or 3 times.
2. Pour small amounts of
water into the pipe.
3. Push down on the pump to
inject water from the pipe
into the appliance. The
internal pipeline will be lled
with water removing any
excess air.

P.13
6. Troubleshooting
7. Specications
Specications are subject to change without prior notice.
If there is any inconsistency or ambiguity between the English version and the Chinese version, the
Chinese version shall prevail.
Refer to www.germanpool.com for the most up-to-date version of the Operating Instructions.
Issue Probable Cause Possible Solution
No coffee output
Coffee is not hot enough
Unable to lift the lever
Difcult to pump water
Coffee machine is leaking
Water tank is empty
Coffee cup
Accumulated water scale
Coffee machine is not hot enough
Water tank is leaking
Dip tray is full
Coffee adaptor is not placed
properly
Inner pipeline is blocked
Model No
Rated Voltage / Frequency
Power
Water Tank Capacity
Net Weight
Product Dimensions
CMC-101
220-240~ 50/60 Hz
1450W
0.6 L
2.5 kg
(H)260 (W)110 (D)268 mm
Add water
Preheat coffee cup
Clean and descale machine
Run once with warm water to
preheat the coffee machine
Ensure water tank is properly
attached
Place coffee adaptor in the
proper position
Use the pump to inject water
Pour out drip tray
ENVIRONMENTALLY FRIENDLY DISPOSAL:
At the end of its service life, the product must not be disposed of as urban
waste. It must be sent to a designated waste collection and handling center or
to a dealer who provides similar disposal service. Separating its disposal from
other domestic waste avoids potentially negative impact on the environment
and public health resulting from inappropriate disposal. It also enables the
recovery of the constituent materials, which help contribute to environmentally
friendly endeavors. The symbol shown on the left (appears also on the warning
label) reminds user to choose an appropriate waste disposal scheme and
must not dispose of the appliance in traditional refuse containers. For further
information, contact the local authority or the dealer shop from where the
product is purchased.

1. 安全注意事項
2. 產品結構
3. 安裝說明
4. 操作說明
5. 清潔與保養
6. 常見故障及處理
7. 技術規格
8. 保用條款
15
16
17
17
22
24
24
27
目錄

P.15
使用咖啡機之前,請仔細閱讀和遵循以下安全說明和操作說明。
1. 閱讀完所有說明。
2. 小心觸電!切勿將咖啡機浸入水中或任何其他液體中。
3. 僅連接到正確接地的電源插座。
4. 為確保咖啡機已關機,請從電源插座上拔出插頭。
5. 進行以下操作前務必拔出電源插頭:
- 重新安置咖啡機;
- 清潔或維護;
- 長時間不使用咖啡機。
6. 不可夾住電源線或把電源線放在尖角或邊緣上。
7. 小心觸電!電源線如有損壞,必須聯絡客戶服務及維修中心更換。
8. 小心觸電!切勿用濕手觸摸電源插頭、插座、電線或咖啡機。切勿以拉扯電源線的方式拔掉插
頭,拔出時必須握住插頭。
9. 如需使用延長線,請確保它適用於咖啡機(3極接地,1.5m㎡ 導線截面),並鋪設好電線以避免
絆倒。
10. 小心燙傷!操作期間切勿移動咖啡機!
11. 切勿在沒有水的情況下操作咖啡機。
12. 確保水箱中的水不低於最低水位。
13. 小心燙傷!切勿觸摸咖啡機的高溫部份(例如操作期間的沖泡裝置)。
14. 小心燙傷!請勿觸摸蒸汽或水流。
15. 小心燙傷!當咖啡機製作咖啡時,請勿移動拉桿。
16. 如果出現以下情況,請勿使用本機:
- 操作錯誤;
- 電源線損壞;
- 墜落後產品破損等;
- 在這種情況下,如有必要,請立即聯絡客戶服務中心檢查和維修機器。
17. 安裝位置必須符合以下要求:
- 選擇乾燥、穩定且平坦的表面,不可直接位於電源下方;
- 距離洗手盆和水龍頭至少60厘米;
- 切勿放在易燃/易熔表面或設備上;
- 切勿將咖啡機或電源線放在高溫表面上,並與明火保持至少50厘米距離;
- 操作期間切勿蓋住機器。
18. 操作期間確保兒童遠離咖啡機。
19. 只可在乾燥的室內使用本機。
20. 小心絆倒!不要讓電源線垂下。
21. 清潔和維護前需拔出電源插頭,讓咖啡機完全冷卻。
22. 為防止損壞,切勿使用製造商不推薦的更換部件或配件。
23. 如果電源線損壞,必須由製造商,服務代理商或合格人員更換,以免發生危險。
24. 本產品僅適用於家用和類似用途,例如:
- 商店、辦公室和其他工作環境中的員工廚房區域;
- 農莊;
- 酒店、汽車旅館和其他住宅類型環境;
- 住宿加早餐型旅館。
1. 安全注意事項

P.16
2. 產品結構
1. 拉桿
2. 按鍵
3. 水箱蓋
4. 水箱
5. 咖啡槽
6. 接水盤蓋
7. 接水盤
1
2
3
4
5
6
7

P.17
3. 安裝說明
4. 操作說明
•從咖啡機上取下所有包裝。
•打開包裝後,請檢查是否包含以下部件:
- 水箱
- 咖啡機
- 說明書
- 咖啡槽2個
- 接水盤
- 打氣筒
•檢查您的家用電源電壓是否符合銘牌上標示的電壓。
•棄置所有塑膠袋,以防止兒童受到危險!
•保留包裝盒用來運輸機器(例如搬運、維修等)。
•您可能會在機器中發現少量水。
•為了確保機器正常運行,在出廠前已用水進行測試。
•有霜凍的危險。
初次使用前
注意:不當使用電氣設備會造成危險的,甚至可能致命。請注意本手冊中的安全注意
事項,尤其是以下內容:
- 小心熱水燙傷!
- 水箱沒水或水低於最低水位時請勿運行咖啡機。
- 沖泡咖啡期間,請勿拉起拉桿。
- 清潔機器前務必拔出電源插頭。
- 只能在乾燥的室內使用機器。
- 初次使用之前,先用清水徹底沖洗水箱,並使用濕布清潔主機。
- 初次使用時,首先在沒有膠囊的情況下運行機器一次。
請觀看視頻操作

P.18
4. 操作說明
1. 預熱
• 注滿水後,接通電源,然後按電源開關 ;
• 大概45秒後,三個按鍵都亮藍光,此時機器可開始製作咖啡。
“NESPRESSO”的商標持有人是Societe des Produits Nestle S.A.;本公司並不是該商標的特許持有人,
也和Societe des Produits Nestle S.A.的業務沒有關係。
水箱說明
不拆下水箱的情況下加水(圖1)
- 打開水箱蓋。
- 在水箱中加入冷水。水的最高溫度為35°C。最大容量為0.6公升。
- 蓋上水箱蓋。
拆下水箱進行加水(圖2)
- 從底座上提起水箱,以傾斜角度取出水箱。
- 在水箱中加入冷水。水的最高溫度為35°C。最大容量為0.6公升。
- 將水箱慢慢滑入水箱底座,對準底座的插口放入水箱,用力推以鎖住水箱。
隨機附送
適用於nespresso-type
或同款之膠囊咖啡
適用於已研磨的
乾燥咖啡粉
2. 選擇所需的咖啡槽
CMA-101-NS CMA-101-GD
圖1 圖2
注意:請注入至少20ml水,切勿超過最高水位線(max.)!
• 只可注入純淨水,不可注入熱水、未經過濾的自來水或其他液體。

P.19
4. 操作說明
建議使用幼磨咖啡粉以取得較佳的萃取效果,較幼細的咖啡粉可使咖啡味道較香濃。選購咖啡前,可
參考包裝標明的研磨度。
3. 把咖啡放入咖啡槽
• 選擇相應咖啡槽沖泡您要的咖啡;
• 在咖啡槽的相應位置放入研磨咖啡粉或咖啡膠囊;
• 將咖啡槽放回咖啡機;
• 將咖啡杯放在咖啡出口下方接咖啡,可開始製作咖啡。
4. 按鍵
5. 製作咖啡
根據個人需要,按鍵選擇大杯或小杯;
• 大杯咖啡預設時間約25秒,約40-65毫升;
• 小杯咖啡預設時間約47秒,約20-30毫升;
注意:選擇的咖啡類型不同,所需時間及份量可能不同。
設置咖啡份量
根據個人習慣,使用者可按大杯鍵 或小杯鍵 調整每次咖啡的份量。預熱並且機器可開始製作
咖啡後(開關鍵、小杯鍵和大杯鍵都亮藍光):
• 按小杯鍵 調整咖啡份量:根據所需份量,長按小杯鍵 (至少10秒,至多90秒),鬆開按
鍵,機器將記住製作時長。下次製作咖啡時,所花時間將為該時長;
• 按大杯鍵 調整咖啡份量:根據所需份量,長按下大杯鍵 (至少10秒,至多90秒),鬆開
按鍵,機器將記住製作時長。下次製作咖啡時,所花時間將為該時長;
份量 按鍵 按鍵時長
小杯
(預設份量約20-30ml)
大杯
(預設份量約40-65ml)
小杯鍵 可調範圍
10秒-90秒
可調範圍
10秒-90秒
大杯鍵
開關鍵
小杯鍵
大杯鍵

P.20
4. 操作說明
待機模式
在出廠的默認待機模式下,咖啡機將在使用後15分鐘關閉,所有指示燈將熄滅。
如果咖啡機處於待機模式,請按開關鍵再次啟動機器。
設置待機模式
- 同時按住小杯鍵和大杯鍵,並將插頭插入插座。
- 開關鍵將亮起。
- 按小杯鍵,小杯燈滅,待機模式取消。
- 再按小杯鍵,小杯燈亮,待機模式開啟。
>15分鐘
Table of contents
Other German pool Coffee Maker manuals