Germid BC50 User manual

5.0 Inch Video Baby Monitor
QUICK START GUIDE
Q: Cannot connect to camera.
A: 1. Please ensure the camera is charging.
2. Make sure the camera and the monitor are within the effective distance.
3. Please confirm if the antenna is tightened
Q: The video changed to unclear.
A: 1. Please try to remove the camera near to monitor.
2. Please clear the obstacle between camera and monitor.
Q: The baby monitor has some noise.
A: 1. The camera and monitor may be too close. Move them further apart.
2. Please adjust the angle of the antenna to minimize wireless interference.
Q: How long this monitor can standby?
A: After charged fully, the monitor can standby about 12 hours.
Q: Can I hear my baby’s voice when turn off the screen?
A: Yes. You should turn on VOX, and it will wake up the screen if a loud sound
is detected.
Q: Picture is black and white?
A: The Night Vision Mode will be activated if the camera worked in a dark
environment. Turn on room light can force monitor out of night vision mode.
14
FAQ

WARNING
1. Strangulation Hazard - Children have strangled in cords. Keep this cord out
of the reach of children (more than 3 feet away).
2. Never Place the Camera of Cord in or Near Crib or Playpen. Secure the cord
at least three feet away from crib or playpen.
3. Never use the transmitter or receiver near water, including near a bathtub,
sink, laundry tub, wet basement, etc.
4. Use the Power Adapter(s) provided by us ONLY. Using unauthorized
charging cables and Power Adapters may result in overheat even explosion.
5. Adult assembly is required. Keep small parts away from children.
6. This product is not a toy. Do not allow children to play with it.
7. This product is not intended to replace proper adult supervision of children.
15. Before using this product, read and follow all instructions and warnings
contained in this booklet.
9. This product is intended for indoor use only.
10. This product is not intended for use as a medical monitor and its use should
not replace adult supervision.
11. Test monitor before use and after changing camera location. Check
reception regularly. Obstacles, such as concrete walls, may shorten the wireless
signal transfer range.
12. Always unplug AC adapters from wall outlets and power sources during
periods of non-use.
13. Do not touch the plug contacts with sharp or metal objects.
14. Do not allow water damage to the monitor unit, charging port, or charging
cable which cause overheat of the charging components.
8. You must check your child’s activity regularly, as this product will not alert
parents to silent activities of a child.
1

PACKING LIST GETTING STARTED
BC50 Camera BC50 Monitor Power Adapter x2
Power Cable x2
Antenna Quick Start Guide
5.0 Inch Video Babay Monitor
QUICK START GUIDE
Step 1: Charge the monitor by connecting the Power Adapter to the monitor
and a socket. The monitor takes about 10 hours to be fully charged (Enlarged
6000 mAh battery), and it lasts about 12 hours.
Step 2: Connect the Power Adapter to the camera and a socket to power on
the camera.
Step 3: Place the camera at least 3ft/1m away from your baby.
Step 4: Long press the Power button to turn on the monitor, then you can see
the monitoring interface.
2 3
ICONS EXPLANATION
Signal strength
No signal connection
Feeding reminder enabled
Zoom in
Two-way talk enabled
Night vision enabled
Current room temperature
Sound detection enabled
Lullabies enabled
Mute
Current camera
Battery Level
Mount Kit

OVERVIEW
1. Camera Unit
2. Parent Unit
1. Light sensor 5. Antenna interface
2. IR LED lights 6. Power cable interface
3. Lens 7. Pair button
4. Speaker
12. Antenna interface11. Speaker
13. Power cable interface 14. Support Stand
1
2
3
4
5
6
7
1 2 3
8 9
6
7
5
4
10 11
12
13
14
1. Light indicator
2. Menu/Back: Press to enter menu page in the monitoring image
or press as a Back button in menu page.
3. Lullaby/Confirm: Press to play lullabies in the monitoring image
or press as a Confirm button in menu page.
4. Left: Press to pan the camera leftward in the monitoring image
or to change your selection leftward in menu page.
5. Up: Press to tilt the camera upward in main interface
or to change your selection upward in menu page.
6. Right: Press to pan the camera rightward in the monitoring image
or to change your selection rightward in menu page.
7. Down: Press to tilt the camera downward in the monitoring image
or to change your selection downward in menu page.
8. Zoom: In the monitoring image, long press to zoom in/out,
short press to switch temperature unit.
9. Talk: Press to talk to your baby in the monitoring image.
10. Power/Sleep Button: Long press to turn on/off the monitor;
short press to turn on/off the screen.
4 5

You do not need to pair it again unless the Camera Unit loses its link with the
Monitor Unit or pair to a new Camera Unit.
If it shows “Lost Link!!!” after turning on the monitor, this is likely due to the far
disstance between the monitor and camera, or the unsuccessful factory
pairing. Please move the monitor closer to the camera, or manually pair the
monitor with the camera following the next section accordingly.
PAIR THE CAMERA
MENU SETTINGS
VOX
VOX
1. Press “ “ to enter the menu page.
Choose ” “ and press ”OK”.
3. Select “ “, then press ”OK”. you will
see the prompt paired.
NOTED: “About step 3”, a cyan-blue icon indicates that there is no camera paired
with this channel, while a red icon indicates there is a camera paired with this
channel.
2. Select “ “ , then press ”OK”.
13 42
Press PAIR on cam
24. Long press “Pair Button” on the top
of the camera.
5. if the pairing is successful, the monitor screen will prompt “PAIR SUCCEED”.
Pair Button
DELETE CAMERAS
1. Press “ “ to enter the menu page.
Choose ” “ and press ”OK”.
2. Select “ “ , then press ”OK”.
3. Select a paired camera “ “ , then
press ”OK”.
1. Press “ “ to enter the menu page.
Choose ” “ and press ”OK”.
2. Select “ “ , then press ”OK”.
3 421
14. Your camera is deleted.
6 7
CAMERAS DISPLAY MODE
VOX

The monitor has a voice operated switch, also known as VOX. If you enable this
function, it will turn on the screen when the sound over a certain threshold is
detected. There are 4 options to adjust the sensitivity of sound detection:
VOX SETTING
This function is to remind you of feeding your baby. OFF means you shut down
the function; 2 hour means it reminds you every 2 hours and so on for the
other options.
FEEDING TIMER
NOTED: This function is used in conjunction with "Auto LCD Off". For "Auto LCD
Off", please refer to "SYSTEM SETTING" on page 10.
1. Press “ “ to enter the menu page.
Choose ” “ and press ”OK”.
2. Select the item you want.
8 9
OFF , LOW , MEDIUM and HIGH .
1. Press “ “ to enter the menu page.
Choose ” “ and press ”OK”.
2. Select the item you want.
OFF
1H3H4H2H
4 cameras at most can be connected to one monitor. When you have more than
1 Camera Unit paired (For example 4). The following display modes are
available.
MODE 1:
When selects or or , CAM1, CAM2, CAM3 can display separately.
12
1 2
34
112
2
34
1 2 3
MODE 2:
When selects , CAM1, CAM2, CAM3 will split screen display.
MODE 3:
When selects , Two of CAM1, CAM2, and CAM3 are displayed on the left
and right side of split screen. There are totally 6 display modes, which can be
switched by pressing and button.
12
MODE 4:
When selects , scan camera function will be activated. It automatically cycles
through your paired camera channels to display each camera for 20 seconds.

NOTED: If you restore the monitor to Factory Reset, the camera paired before will be
deleted. It's required to pair the camera and monitor again for image streaming.
Therefore, please do it with caution.
10 11
This function is to set System Date & Time, LCD Auto Off, and Factory Reset.
SYSTEM SETTINGS
This function is to comfort your baby when needed. The volume and type of
each lullaby are distinctive, please select the best one for your baby.
You can also quickly turn on the function of playing lullaby by pressing “ ”
in the monitoring image.
“ ”mean loop playing the lullabies in the system; “ ” means you shut down
the function.
LULLABIES
System Date & Time
1. Press “ “ to enter the menu page.
Choose ” “ and press ”OK”.
2. Select “System Date & Time“ ,
then press ”OK”.
3. Press ” “ and ” “ to change the
value. Press “ “ to finish setting.
4. Press ” “ and ” “ to Switch to the
next item; Press “ “ to finish setting.
System Date & Time
Auto LCD Off
Factory Reset
2020 / 08 / 20
10 :48
2020 / 08 / 20
11 :25
LCD Auto Off
1. Select “LCD Auto Off“, press ”OK”. 2. Select the item you want.
System Date & Time
Auto LCD Off
Factory Reset
1M2M3M4MOFF
Factory Reset
1. Select “Factory Reset“, press ”OK”. 2.Confirm “YES” to reset.
System Date & Time
Auto LCD Off
Factory Reset
Reset to default setting
YES NO
VOX 1 2 3
4OFF
OFF
1. Press “ “ to enter the menu page.
Choose ” “ and press ”OK”.
2. Select the lullaby you want; Select
“ ” to play the lullabies in a loop.
Tip:

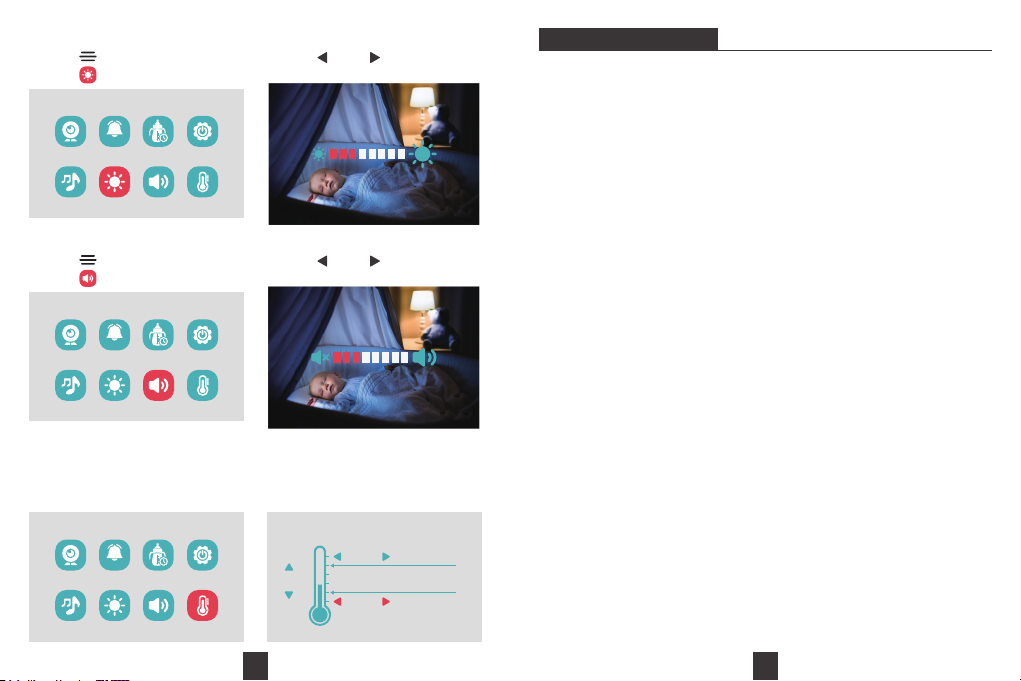
You can set a comfort zone, when the indoor temperature is higher or lower
than the temperature you set, the monitor will emit a “Bi..Bi” sound to alarm
you. You can also switch the temperature unit.
12 13
BRIGHTNESS SETTING
1. Press “ “ to enter the menu page.
Choose ” “ and press ”OK”.
VOX
2. Press ” “ and ” “ to decrease or
increase screen brightness.
VOLUME SETTING
1. Press “ “ to enter the menu page.
Choose ” “ and press ”OK”.
VOX
2. Press ” “ and ” “ to decrease or
increase system volume.
TEMPERATURE SETTING
VOX 36 OC
11 OC
HOT ZONE ALARM
COLD ZONE ALARM
COMFORT ZONE
OF
Changes or modifications not expressly approved by the party responsible for
compliance could void the user's authority to operate the equipment.
This equipment has been tested and found to comply with the limits for a
Class B digital device, pursuant to Part 15 of the FCC Rules. These limits are
designed to provide reasonable protection against harmful interference in a
residential installation. This equipment generates uses and can radiate radio
frequency energy and, if not installed and used in accordance with the
instructions, may cause harmful interference to radio communications.
However, there is no guarantee that interference will not occur in a particular
installation. If this equipment does cause harmful interference to radio or
television reception, which can be determined by turning the equipment off
and on, the user is encouraged to try to correct the interference by one or
more of the following measures:
-- Reorient or relocate the receiving antenna.
-- Increase the separation between the equipment and receiver.
-- Connect the equipment into an outlet on a circuit different from that to
which the receiver is connected.
-- Consult the dealer or an experienced radio/TV technician for help.
This device complies with part 15 of the FCC rules. Operation is subject to the
following two conditions (1)this device may not cause harmful interference,
and (2) this device must accept any interference received, including
interference that may cause undesired operation.
This equipment complies with FCC radiation exposure limits set forth for an
uncontrolled environment. This equipment should be installed and operated
with minimum distance 20cm between the radiator & your body
FCC STATEMENT
Table of contents