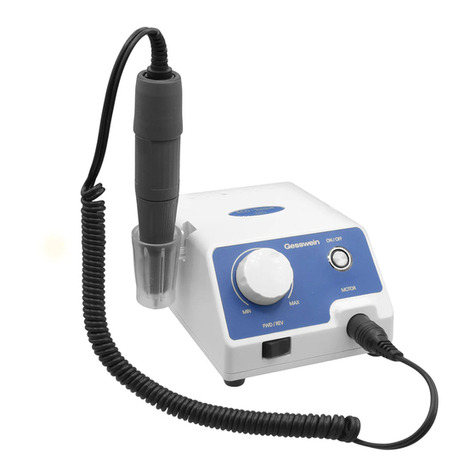
Gesswein PHP35 User manual

Instruction Manual
for
Marathon System
Controller: Marathon
Handpiece: PHP35
Variable Foot Rheostat: TPF-77
®

2 3
1. Marathon Controller
The Gesswein Power Hand 2X Marathon
Controller features a Voltage Selector Switch that
allows operation at either 110V or 220V. Please
check the Selector Switch to ensure it is set at the
proper Mains AC voltage.
Handpiece speed is controlled by the Dial
Rheostat or Variable Foot Rheostat. Before first
use, run the handpiece at half speed without load
for 30 minutes to properly break it in for smooth
operation. It is recommended to turn the unit OFF
before changing handpiece rotation direction.
Front Panel
A. Main Power Switch
B. Power ON and Overload Indicator Lamp.
Turns green when Main Power Switch is ON,
red when handpiece overloads. To reset, turn
Main Power Switch OFF then back to ON.
C. Direct/Remote Switch. Set to HAND when
controlling handpiece speed by Dial Rheostat.
Set to FOOT when using the Variable Foot
Rheostat.
D. Forward/Reverse Switch. Handpiece runs
counterclockwise in FWD, clockwise in REV.
Turn Main Power Switch OFF before changing
handpiece rotation direction.
E. Handpiece Receptacle. For Handpiece
PHP35 or any Gesswein Power Hand 2X
Handpiece.
F. Dial Rheostat. Controls handpiece speed
from minimum to maximum RPM.
Back Panel
A. Variable Foot Rheostat Receptacle –
Depressing Foot Rheostat operates handpiece
at any speed set on dial rheostat or from zero
to maximum speed when dial rheostat is set to
MAX.
Constant Speed Feature: Much like On/Off
Foot Switch, Foot Rheostat can run handpiece
at constant speed. Before beginning operation,
set dial rheostat on controller to desired speed.
With Direct/Remote Switch (Fig. 1, C) set to
FOOT, depress Foot Rheostat fully. Speed will
increase to dial setting and hold steady. For new
constant speed, reset dial rheostat and depress
Foot Rheostat fully. Speed will increase to new
dial setting and hold steady.
B. Voltage Selector Switch – Ensure switch is
set at proper Mains AC Voltage.
C. AC Power Cord and Plug
D. Ventilation Vents
E
F
Fig. 1
A
B
C
D
Front Panel
Specifications
Model Marathon
Input Voltage 110VAC, 50/60Hz
or 220VAC, 50/60Hz
Output Voltage 30V DC or 35VA
Dimensions 110mmW x 148mmD
x 96mmH
Weight 1.6kg (3.5 lbs.)
Fig. 2
A
B
C
D
Back Panel
2. PHP35 Handpiece
Handpiece PHP35 is supplied with a collet and a Test Pin. When not
using the handpiece, leave the Test Pin or a tool in the collet to keep it
in good condition.
Changing Tools
PHP35 has a quick-tool-change mechanism for rapid tool changes. To
change tools, turn the Collet Release Ring fully to the “R” release posi-
tion (fig. 3) until a “click” sound is heard. The collet is then fully open and
ready to accept a tool.
To secure the tool, turn the Collet Release Ring to the “S” secure posi-
tion. Again, a “click” sound will be heard, indicating the collet is fully
closed and the tool is secure.
*Do not turn the Collet Release Ring while the handpiece is running as damage may
occur and the tool can fly loose from the collet.
Collet Removal
To change collets, turn the Collet Release Ring fully to “R,” place the
triangular cutout of the Collet Wrench over the collet (fig. 4), and turn
counterclockwise to loosen or clockwise to tighten. Tighten the collet with
the Collet Wrench until just tight.
A tight collet can be loosened by placing the wrench over the collet and
tapping the wrench with a solid tool (fig. 5).
If the above procedures do not loosen a tight collet, then the HandCap
must be removed. To do so, put the Collet Release Mechanism in the
“S” position, hold the handpiece in one hand, and turn the HandCap
counterclockwise until it separates from the handpiece (fig. 6). The Coil
Spring (Part 114) should remain in the Collet Release Ring.
Insert the Chuck Joint Wrench fully into the Connector (Part 122), hold
the HandCap and Chuck Joint Wrench in one hand, and with the Collet
Wrench in place on the collet, loosen by turning the Wrench counter-
clockwise. Tighten the collet by turning the Collet Wrench in a clockwise
direction until just tight.
Replacing HandCap
To replace the HandCap, screw it into the Collet Release Ring in a
clockwise direction until fully seated.
Check for Proper Collet Installation
Turn the Collet Release Mechanism to “S”, and rotate the collet by
hand. If the collet does not rotate freely, it is not fully seated in the Joint
Shaft (Part 122). Repeat the collet removal-replacement procedure.
Replacement of Carbon Brushes
PHP35 uses a spring tension-type carbon brush assembly (a pair of
brushes is supplied with the Marathon). Expected brush life is 800-
1,000 hours. Worn brushes should be replaced when the handpiece no
longer runs at maximum speed or sounds as though it is “running out
of gas.” It is important that both brushes be replaced at the same time.
Replacement of only one carbon brush will cause motor damage. To
replace worn brushes, unscrew the Carbon Housing Cover (Part 174) in
a clockwise direction (fig.7). Using a small Phillips Screwdriver, unscrew
each brush assembly. The brush tension spring will push the assembly
out of the brush well so it can be lifted clear. The two new carbon brush-
es should be installed by gently pushing them into the brush well. Screw
the assembly in securely, and replace the Carbon Housing Cover.
Collet
Wrench
HandCa
p
Collet
Release
Ring
Fig. 4
Fig. 3
Collet Wrench
HandCap
Chuck Joint
Wrench
Fig. 6
Fig. 5
Carbon
Housing
Cover
Armature
Cooling
Vents
Fig. 7

4 5
3. PHP35 Handpiece #510-5144 and #510-5145 Parts List
When ordering parts, always specify part# (or item# if applicable) and description.
PHP35
No. Part # Description
1 PHP35-2-101 HAND CAP COVER
23 PHP35-6-125 BEARING BUSH COLLAR COIL SPRING
2 PHP35-3-401 HAND CAP WASHER
24 PHP35-4-128 ROLLER BODY
3 PHP35-5-402 HAND CAP O-RING SLEEVE
25 PHP35-4-130 ROLLER GUIDE
4 PHP35-7-403 HAND CAP O-RING
26 PHP35-2-131 SET RING
5 PHP35-3-405 HAND CAP WAVE WASHER
27 PHP35-3-133 SLIDE WASHER
6 PHP35-3-404 HAND CAP C-RING
28 PHP35-2-134 SLIDE BODY
7 PHP35-3-104 CHUCK HOUSING C-RING
29 PHP40-5-141 MOTOR CASE
8 PHP35-5-105 COLLAR
30 PHP35-8-205 MOTOR CASE BOLT`
9 PHP35-5-106 BEARING FIX WASHER
31 PHP35-3-144 COPPER WASHER
10 PHP35-3-107 1260 WAVE WASHER
32 PHP35-3-145 1030 WAVE WASHER
11 PHP35-3-111 1260 WASHER
33 510-3073 BALL BEARING(1030ZZ)
12 510-3074 BALL BEARING(1260ZZ)
34 PHP35-3-149 1030 COPPER WASHER
13 PHP35-5-112 BUSH
35 PHP35-3-150 1030 TEFLON WASHER
14 510-3072 BALL BEARING(1480ZZ)
36 PHP40-2-209 AMARTURE ASS'Y
15 PHP35-2-113 SPRING SHEET
37 PHP35-3-001 TEFLON WASHER
16 PHP35-6-114 COIL SPRING
38 PHP35-2-172 BEARING HOUSING
39 PHP35-4-164 CARBON BRUSH SET (2 PCS.)
40 PHP35-3-266 TERMINAL (L&R)
41 510-3073 BALL BEARING(1030ZZ)
18
510-0100 COLLET CHUCK (Dia. 2.35mm)
42 PHP35-5-468 BEARING BUSH BOLT
510-0106 COLLET CHUCK (Dia. 3.0 mm)
43 PHP35-6-173 MOTOR CORD
510-0105 COLLET CHUCK (Dia. 3.175 mm)
44 PHP35-2-174 CARBON HOUSING COVER
19 PHP35-5-115 CHUCK HOUSING
45 PHP35-1-115 SPINDLE ASS'Y
20 PHP35-6-118 CHUCK SPRING
46 510-0180 CHUCK WRENCH
21 PHP35-5-122 JOINT SHAFT
47 510-0179 CHUCK JOINT WRENCH
22 PHP35-5-124 BEARING BUSH COLLAR

6
4. Precautions
A. Before operating the Marathon, be sure
that the Voltage Selector Switch is set to
the voltage you will be running the unit
from.
B. Use Marathon in a suitable location in
temperature of 32-104°F (0-40°C). Using
it in an excessively dusty, warm or humid
location can damage the controller.
C. Ensure the controller ventilation vents are
not obstructed.
D. Before operating the handpiece, be sure
the Collet Release Ring is in the “S” secure
position. If the handpiece is in the “R”
release position, the motor will stall and
could possibly be damaged.
E. Do not attempt to change tools or rotate the
Collet Release Ring while the handpiece
is running. This action will stop the motor
abruptly, causing damage of parts and
possible motor damage.
F. Avoid stalling the motor by pushing too hard
on the workpiece or exceeding the torque
capacity of the handpiece motor. This will
cause excessive carbon brush and motor
armature commutator wear.
G. Do not exceed the maximum rotation
speed (RPM) specified by the manufactur-
er/distributor of the tool being used.
H. Handpiece collets are manufactured to
close tolerances. Use tools with a shank
size that corresponds to the collet being
used.
I. Insert a tool fully into the collet until it bot-
toms the back of the collet. Using a tool not
fully inserted is dangerous and can cause
the tool to vibrate or the tool shank to bend.
J. Never use tools out-of-round or with bent
shanks.
K. Periodically check to see that the collet is
fully tightened. A loose collet will cause the
handpiece to run slower.
L. Do not use the handpiece in water or oil,
and never allow any oil, water or other fluids
to enter the handpiece. Avoid having dirt or
excessive wood dust enter the inner casing.
Failure to keep foreign matter out of the
inner casing will cause damage to the ball
bearing assemblies. See Maintenance (p.
7) for cleaning instructions.
M. Before operating the Forward/Reverse
Selector Switch turn the controller to OFF.
Make the selection, then turn the unit back
ON.
N. Take care not to drop the handpiece.
Handpiece bearings may be damaged and
tool shanks bent.
O. To avoid electric shock, never plug or
unplug the Power Cord with wet hands.
P. Do not subject the handpiece cord to sharp
bending or rough treatment. This can cre-
ate an open wire or damage the cord con-
nection pins.
Q. While operating the handpiece, wear pro-
tective safety glasses or goggles at all
times. Eyewear should meet ANSI Z87.1
and GSA Z94.3 standards.
R. When not in use, put the handpiece in the
rubber cradle rest. It is also recommended
to put a tool or Test Pin in the collet when
not using the handpiece.
5. Maintenance
Ensure the Marathon controller ventilation vents
(black panel) are not covered or obstructed. If
compressed air is available, use it on the vents.
If air is not available, blow into the vents and
use a soft, dry brush to remove excess dust.
Periodically remove excessive dust that accu-
mulates in the Carbon Housing Cover (Part
174). To remove this dust, unscrew the Cover
in clockwise direction. Blow air into the Cover
and the Armature Cooling Vents (fig. 7). Dust
can also be removed with a soft, dry brush. If
necessary, use a clean cloth moistened with
detergent to clean the Carbon Housing Cover
inside and out. Do not use any volatile liquid as
a cleaner (i.e., paint thinner or alcohol).
Periodically cleaning the inner threads of the
handpiece collet will ensure easy collet removal
when changing from one to another. Twist a
clean rolled-up piece of tissue paper in and out
of the collet threads.
Do not lubricate your handpiece. All handpiece
bearings are sealed and permanently lubricated.
Contact Gesswein for assistance in the event
of a fault or needed repair. Gesswein offers a
standard mechanical handpiece warranty of 90
days for parts subject to wear and 6 months for
the balance of the handpiece. The controller is
covered by a full one-year warranty from date
of purchase.
#890-2063/1014
201 Hancock Ave. Bridgeport, CT 06605, USA
orders 800.243.4466 |203.366.5400 |fax 203.366.3953
This manual suits for next models
1
Other Gesswein Controllers manuals
Popular Controllers manuals by other brands

Distech Controls
Distech Controls DA-004N024PX installation instructions

NexWatch
NexWatch PW-5000 installation manual

Mitsubishi
Mitsubishi FX0S Series quick start guide

Sunlight Supply
Sunlight Supply Titan Controls Atlas 4 instruction manual

Malmbergs
Malmbergs 99 170 21-23 instruction manual

Carel
Carel pCO2 Series user manual