Gesswein ECO-Torque 280 User manual


2
ECO-TORQUE 280 INSTRUCTION MANUAL
Model ECO-Torque 280
Input Voltage 110V AC, 50/60Hz or 220V AC, 50/60Hz
Output Voltage 30V-DC/0.5A
Dimensions 112 mmW x 147 mmD x 78 mmH (4.4”W x 580“D x 3.1” H)
Weight 1.25kg (2.75 lbs.)
Eco-Torque Specications
Table of Contents
Eco-Torque Specications 2
Proper Collet Installation 8
ECO-Torque 280 Controller 3
Carbon Brushes 8
Front Panel Guide 4
Replacing Carbon Brushes 8
Back Panel Guide 5
Safety Precautions 9
Changing Tools 6
SDE-H37L1 Handpiece 6
Safety Precautions (con’t) 10
Collet Removal 6
Maintenance and Cleaning 11
Loosening the Collet 7
Warranty and Contact Us 12
Removing the Hand Cap 7
Replacing the Hand Cap 7

3
ECO-TORQUE 280 INSTRUCTION MANUAL
ECO-Torque 280 Controller
• The Gesswein ECO-Torque 280 Controller has a Voltage Selector
Switch that lets you use it with either 110V or 220V electricity.
• Control the handpiece speed using the Dial Rheostat or the On/O
Foot Switch.
• Direct/Remote Switch - Set to HAND when controlling handpiece
speed by Dial Rheostat. Set to FOOT when using the On/O Foot
Pedal.
QUICK TIPS
Before You Start
Check the Selector Switch to be sure it is set at the proper AC voltage.
Warm Up
Before rst use, run the handpiece at a slower speed without any load for 30
minutes. This will help ensure a smooth operation.
Important Note
Always turn the machine OFF prior to changing the handpiece direction.
4
ECO-TORQUE 280 INSTRUCTION MANUAL
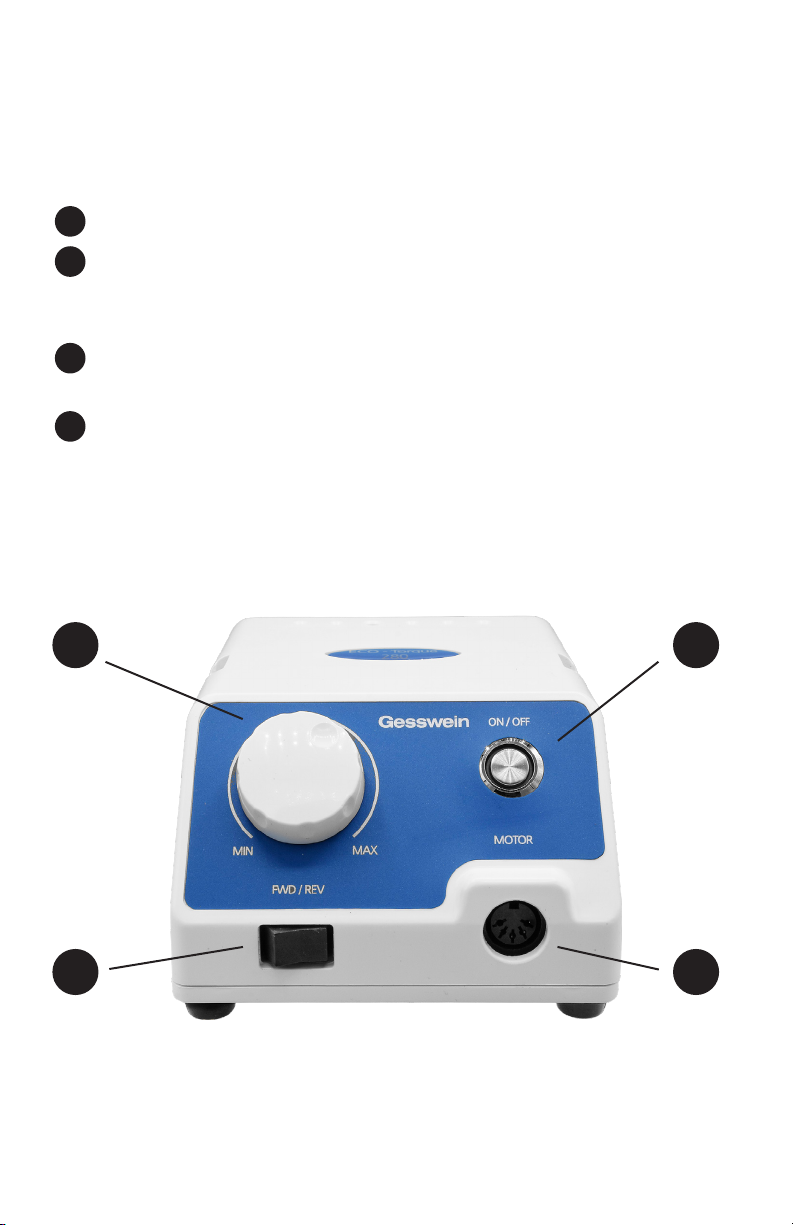
Front Panel Guide
1. Main Power
2. Forward/Reverse Switch - Handpiece runs counterclockwise
in FWD, clockwise in REV. Turn Main Power Switch OFF before
changing handpiece rotation direction.
3. Handpiece Receptacle - For Handpiece H37L1 or any Gesswein
Power Hand 2X and Gesswein Power Hand 3 Handpieces.
4. Dial Rheostat - Controls handpiece speed from minimum to max-
imum RPM.
Fig. 1
2
4
3
1
4
3
2
1
5
ECO-TORQUE 280 INSTRUCTION MANUAL
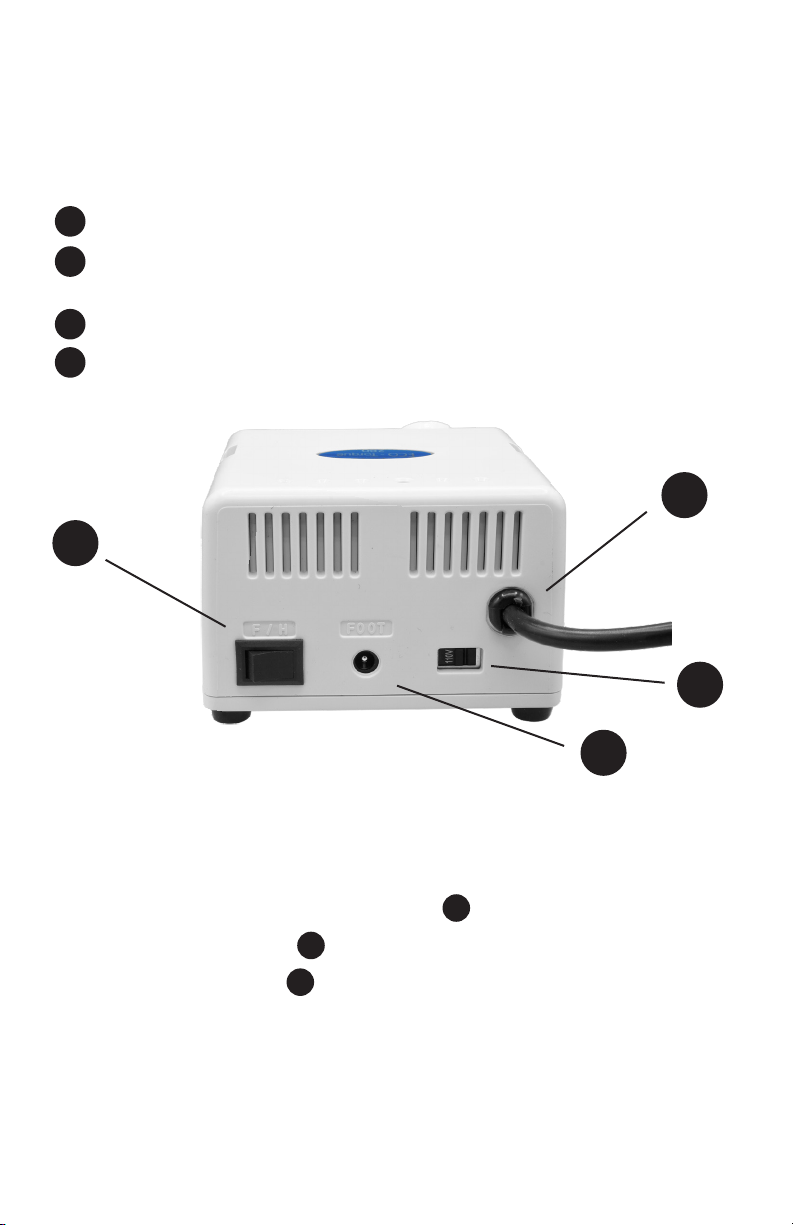
Back Panel Guide
5. On/OFootSwitchInput
6. Voltage Selector Switch – Ensure the switch is set at proper AC
Voltage.
7. Foot Control/Hand Control Selector Switch
8. AC Power Cord and Plug
Fig. 2
7
6
5
8
8
7
6
5
Handpiece operation with On/O Switch
1. Plug On/O Foot Switch into its receptacle on the rear of the controller.
2. Turn main power switch on by pushing button.
3. Turn the Dial Rheostat to a desired handpiece speed (0 min. - 35,000
max).
4. Depressing the Foot Switch brings the handpiece to the speed selected on
the Dial Rheostat.
5. To change handpiece speed, select a new setting with the Dial Rheostat.
5
1
4

6
ECO-TORQUE 280 INSTRUCTION MANUAL
SDE-H37L1 Handpiece
The Handpiece H37L1 is supplied with a 3/32” (2.35 mm) Collet and a
Test Pin*.
QUICK TIP
When not using the handpiece, leave the Test Pin or a 3/32” shank tool in the
Collet to ensure optimal condition.
Changing Tools
1. Turn the Collet Release Ring* to the “R”
release position until a “click” is heard (Fig. 3).
2. The Collet is now open and ready for a new
tool.
3. Add a new tool in and secure by turning the
Collet Release Ring to the “S” secure position
until a “click”is heard.
4. After “click” the new tool is fully secure.
Collet Removal*
1. Turn the Collet Release Ring fully to “R”
2. Place the triangular cutout of the Collet
Wrench over the Collet (Fig. 4)
3. Turn counterclockwise to loosen or clockwise
to tighten.
4. Tighten the Collet with the Collet Wrench
until just tight.
* Reducing Collets can be used in lieu of removing/ changing a
HandpieceCollettoaccommodateadierentsizeshanktool.
Having trouble loosening the tight Collet? Check the next page for help.
QUICK TIP
Do not turn the Collet Release Ring while the
handpiece is running as damage may occur
and the tool can y loose from the Collet.
Fig. 4
Fig. 3
R
S

7
ECO-TORQUE 280 INSTRUCTION MANUAL
Loosening the Collet
A tight collet can be loosened by placing the
wrench over the collet and tapping the wrench
with a solid tool. (Fig. 5)
Removing the Hand Cap
If the previous procedures do not loosen a tight
collet then the Hand Cap must be removed using
the following steps:
1. Turn the Collet Release Mechanism to the
“S” position (Fig. 5).
2. Unscrew the hand cap by turning it
counterclockwise while holding the
handpiece (Fig. 6).
3. Keep the Coil Spring in the Collet Release
Ring.
4. Insert the Chuck Joint Wrench fully into the
Connector.
5. Hold the Hand Cap and Chuck Joint Wrench
in one hand, and with the Collet Wrench in
place on the Collet, loosen by turning the
Wrench counterclockwise (Fig. 6).
6. Tighten the Collet by turning the Collet
Wrench clockwise until snug.
To replace the Hand Cap, screw it into the Collet Release Ring in a clockwise
direction until fully seated.
Replacing the Hand Cap
Collet Wrench
HandCap
Chuck Joint
Wrench
Fig. 6
Fig. 5
R
S

8
ECO-TORQUE 280 INSTRUCTION MANUAL
Replacing Carbon Brushes
Replacement Carbon Brushes
SKU: 5105094
1. Be sure to replace both brushes at the
same time. Replacement of only one
carbon brush will cause motor damage.
2. To replace worn brushes, unscrew
the Carbon Brush Housing Cover in a
clockwise direction (Fig. 7).
3. Using a small Phillips Screwdriver,
unscrew each brush assembly.
4. The brush tension spring will push the
assembly out of the brush well so it can
be lifted clear.
5. The two new Carbon Brushes should be
installed by gently pushing them into the
brush well.
6. Screw the assembly in securely, and
replace the Carbon Brush Housing Cover
Expected brush life is 800–1,000 hours. Worn brushes should be replaced
when the handpiece no longer runs at maximum speed or sounds as though it
is “running out of gas.”
Carbon Brushes
Fig. 7
Carbon
Brush
Housing
Cover
Armature
Cooling
Vents
Loosen Tighten
Screw
Proper Collet Installation
1. Set the Collet Release Mechanism to “S”, and rotate the Collet by hand
2. If the Collet does not rotate freely, it is not fully seated in the Joint Shaft.
3. Repeat the Collet removal-replacement procedure.
Check proper Collet installation:

9
ECO-TORQUE 280 INSTRUCTION MANUAL
Safety Precautions
Read all safety precautions thoroughly to ensure proper and safe use.
Safety Precautions Suggestions
Set Voltage Selector
Switch
Before operating, be sure that the Voltage Selector
Switch is set to the voltage you will be running the unit
from.
Suggested
Temperature and
Environment
Suggested temperature range: 32–104°F (0–40°C).
Avoid use in dusty, warm, or humid environments to
prevent controller damage.
F/H Switch Make sure you have the F/H Switch on the proper
mode based on intended use.
Clear Controller
Ventilation
Ensure the Controller Ventilation Vents on the back of
the unit are not obstructed.
Prevent Stalling and
Damaging Motor
Ensure the Collet Release Ring is in the secure “S”
position before operating the handpiece. Operating
with the ring in the “R” release position may stall the
motor and cause damage.
Prevent Damage To
Motor
Avoid altering tools or rotating the Collet Release Ring
during handpiece operation, as it may cause the motor
to abruptly stop which can result in damage to both
parts and the motor itself.
Prevent Carbon
Brush and
Motor Armature
Commutator Wear
Avoid stalling the motor by pushing too hard on the
workpiece or exceeding the torque capacity of the
handpiece motor. This will cause excessive carbon
brush and motor armature commutator wear.
Do Not Exceed Max
RPM
Do not exceed the maximum rotation speed (RPM)
specied by the manufacturer/distributor of the
tool being used and adhere to the safe/ maximum
operating speeds.
Check Proper Shank
Size
Handpiece Collets are manufactured to close
tolerances. Use tools with a shank size that
corresponds to the Collet being used.

10
ECO-TORQUE 280 INSTRUCTION MANUAL
Safety Precautions (con’t)
Safety Precautions Suggestions
Prevent Shank From
Bending
Insert a tool fully into the Collet until it bottoms at the
back of the Collet. Using a tool not fully inserted is
dangerous and can cause the tool to vibrate or the tool
shank to bend.
Tool Precaution Never use tools out-of-round or with bent shanks.
Consistently Tighten
Collet
Periodically check to see that the Collet is fully
tightened. A loose Collet will cause the handpiece to
run slower.
Do Not Use Water
or Oil to Clean
Handpiece
Avoid using the handpiece in water or oil and keep
foreign matter out of the inner casing. This includes
dirt and excessive wood dust. Failure to do so may
result in damage to the ball-bearing assemblies.
Refer to Maintenance for cleaning instructions.
Forward/Reverse
Selector Switch to
OFF
Before operating the Forward/Reverse Selector
Switch, turn the controller OFF. Make the selection,
then turn the unit back ON
Do Not Drop
Handpiece
Take care not to drop the handpiece. Handpiece
bearings may be damaged and tool shanks bent.
Prevent Electric
Shock
To avoid electric shock, never plug or unplug the
Power Cord with wet hands.
Proper Safety
Glasses or Goggles
While operating the handpiece, wear protective safety
glasses or goggles at all times. Eyewear should meet
ANSI Z87.1 and GSA Z94.3 standards.
When Not in Use
Put the handpiece on the rubber cradle rest provided
or into the handpiece holder on the side of the unit.
Put a tool or Test Pin in the Collet when not using the
handpiece.
No Overload
Notication
Please note: there is no overload alert. Overloading
may cause the handpiece to continue until it
stops providing power. To restart, turn o the unit
briey before restarting. Monitor usage to prevent
overloading and damage to handpiece.
This manual suits for next models
1
Table of contents
Other Gesswein Controllers manuals

Popular Controllers manuals by other brands

Digiplex
Digiplex DGP-848 Programming guide

YASKAWA
YASKAWA SGM series user manual

Sinope
Sinope Calypso RM3500ZB installation guide

Isimet
Isimet DLA Series Style 2 Installation, Operations, Start-up and Maintenance Instructions

LSIS
LSIS sv-ip5a user manual

Rockwell Automation
Rockwell Automation 1769-L31 installation instructions


