gfm CDC500C3GF User manual

User Manual
CDC500C3GF
5MP Digital Camera

Table of contents
Introduction ................................................................................................... 3
Overview.................................................................................................. 3
Features................................................................................................... 3
Package contents..................................................................................... 4
Computer system requirement for windows............................................. 4
Getting to know on your camera .............................................................. 5
Icons on your LCD.................................................................................... 6
Prepare your camera for using..................................................................... 7
Battery installation.................................................................................... 7
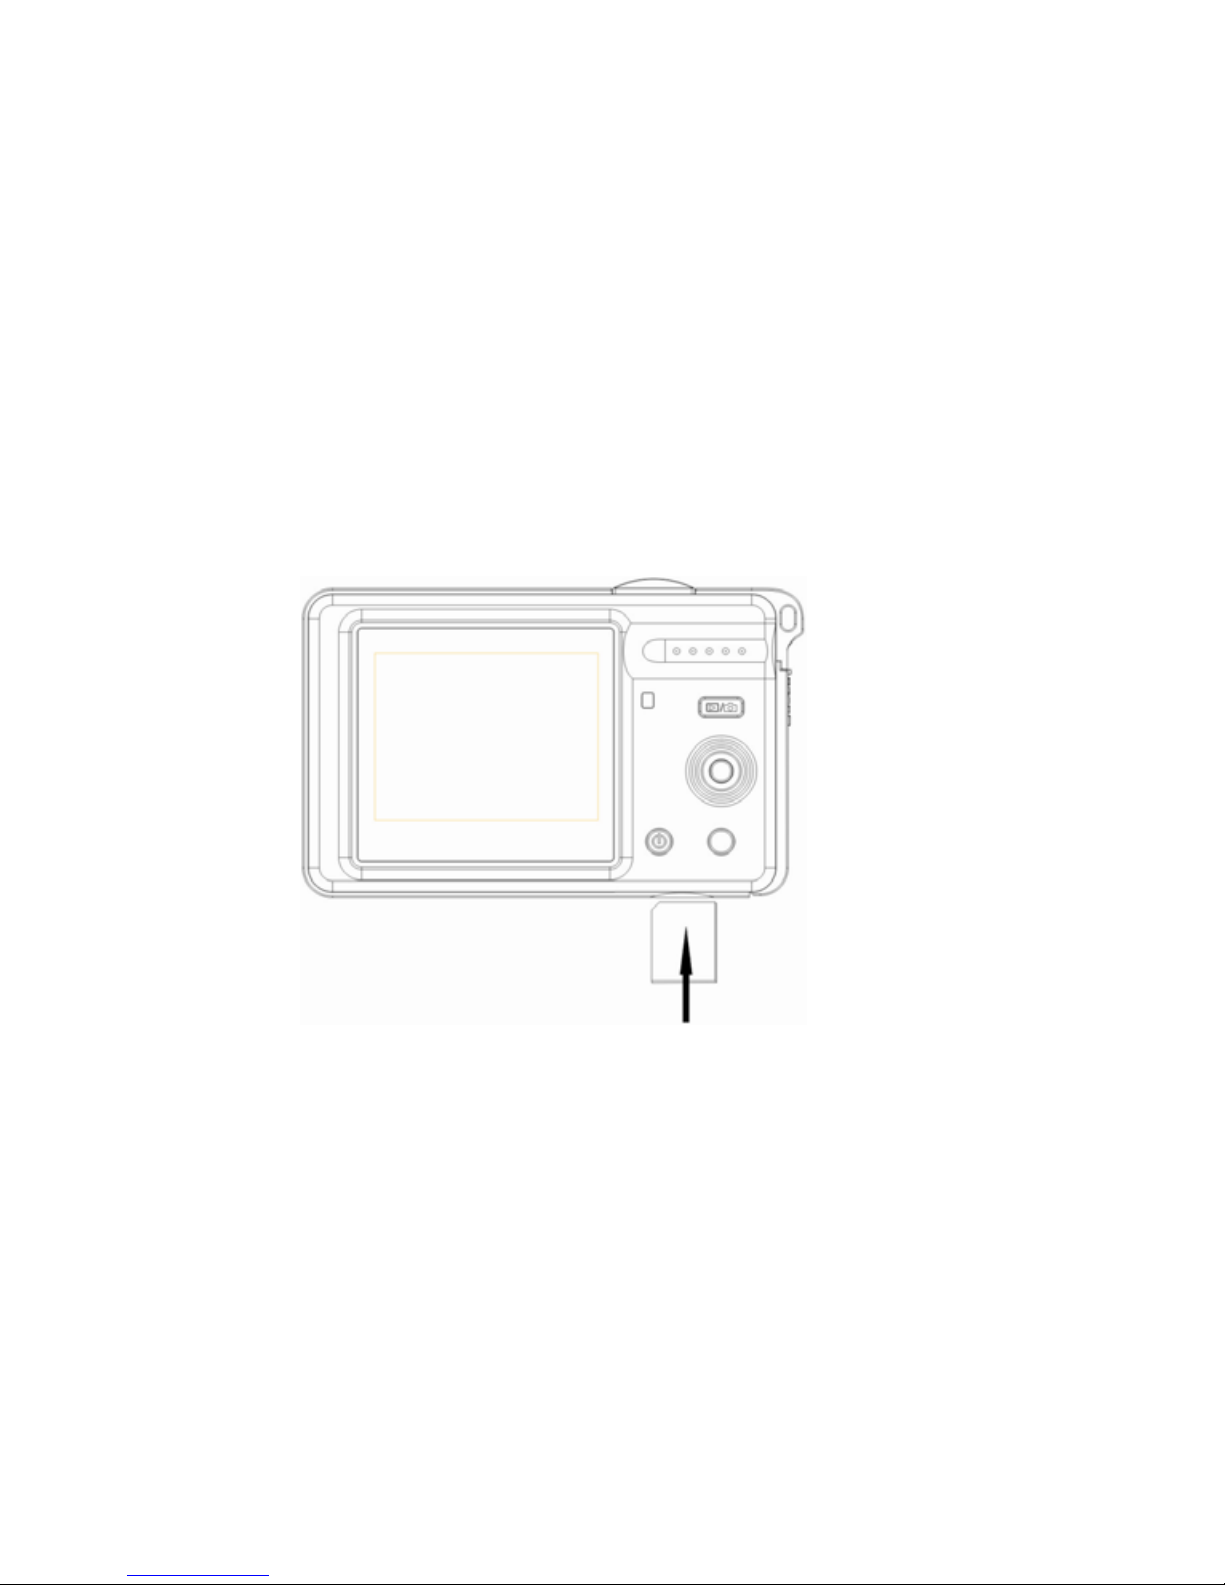
Installing SD Memory Card ...................................................................... 8
OSD in every mode................................................................................ 10
How to operate your camera .......................................................................11
Power on/off............................................................................................11
System setting up....................................................................................11
Camera Mode ........................................................................................ 18
Video Mode............................................................................................ 20
Playback Mode....................................................................................... 21
Software installation.................................................................................... 25
1

Install PhoTags Express......................................................................... 25
Register online ....................................................................................... 27
Browse CD............................................................................................. 28
Every thing you need to get the most from your photos......................... 28
Downloading photos................................................................................... 30
Download photos directly from windows ................................................ 30
Download photos using PhoTags Express............................................. 31
Owner manual for PhoTags Express......................................................... 36
Specifications.............................................................................................. 37
GFM Guarantee............................................................................................ 39
2

Introduction
Overview
Thanks for purchasing this digital camera. Everything you need to take
quality photos is included with your camera. Please read this manual carefully
first in order to get the most out of your digital camera.
Features
zDigital Video VGA&QVGA.
z8.0 Mega pixels camera with choice of 5 digital camera resolutions-
8M,5M,3M,1.3M,VGA.
z2.0 inch Color LCD monitor
z4x digital zoom
zBuilt-in SDRAM Memory
zSD Memory Card Slot accepts SD/MMC cards.
zBuilt-in flash
zPhoTags Express software for managing and enhancing your photos,
printing, sending photos by e-mails and much more.
3

Package contents
zCamera
zPhoTags Express CD
zUSB cable
zUser’s manual
zStrap
zPouch
zAC Adapter
● Li-ion Battery
Computer system requirement for windows
To be able to download photos to your PC you will need the following
minimum configuration:
zPentium processor or above with Windows 98SE / 2000 / XP / Vista
z64MB RAM, 128MB free disk space or more
zCD-ROM driver
zRecommended screen resolution 1024x768 pixels or greater
z64K color or higher display adaptor
4

Getting to know on your camera
5

Icons on your LCD
our LCD
Battery power lever
Mode Digital Zoom
Economy
Standard
Fine
Full battery power
Medium battery power
Low battery power
Photo quality
6

Prepare your camera for using
Battery installation
Your camera requires lithium battery (3.7V). Insert the battery into the
camera:
1. Slide the cover of the battery compartment open.
2. Please make sure that the correct battery is inserted with the correct
polarity facing up.
3. Please refer to the diagram below for the correct insertion method.
4. Close battery door.
7

Note: 1. When the Low Battery icon is flashing on the LCD screen,
you need to charge your battery:
a. Turn off your camera.
b. Connect your camera to the PC correctly.
c. The LED light will be on, it indicate the battery is charged.
d. The battery is full charging when the LED light is off.
2. If you don’t intend to use your camera for an extended period,
remove the battery for safety.
Installing SD Memory Card
Your camera has a memory card slot that enables you to insert any SD
compatible memory card. Adding a memory card will allow you to take more
photos and videos before you have to transfer photos/videos to a PC. Photos
and videos stored in this manner will not be lost regardless of any change in
battery power.
1. Locate the Memory card slot( on the bottom of the camera) as illustrated
below.
2. Insert the memory card into the slot, label side down and metal contacts
up.
3. Push the card in until you feel it “click” into position. The top of the card
8

should be flush with the surface of the camera. A “C” icon will be display
on the LCD screen. Indication that an external memory card is installed.
4. Once an external memory card is inserted in the camera all the images
taken will be stored on the external memory card.
9

OSD in every mode
There are four modes in your camera: Camera mode, Video mode, Self timer
mode and Play back mode.
Camera mode: Video mode:
Selftimermode: Playbackmode:
10

How to operate your camera
Power on/off
1. Press and hold the Power button to start the camera. The LCD will light up
and the camera will sound a beep. It confirms that your camera is on and ready
for using.
2. Press and hold the power button about 3 seconds to turn off the camera.
System setting up
Power on your camera, the camera will be in the camera mode, press Mbutton
to have some individual settings:
A. Capture menu
You can set image size, image quality, white balance and sharpness per your
request.
zImage Size
There are 5 resolutions for choosing: VGA, 1.3M, 3M, 5M, 8M.
1. Press Mbutton.
2. Select “Size” by pressing M button up/downward.
3. Press M button.
4. Press Mbutton again to confirm your selection. Or press Flash/Exit
button to exit the menu without any changing.
11

zImage quality
You can set quality you want: Fine, Standard, Economy.
1. Press Mbutton
2. Select “Quality” by pressing M button up/downward.
3. Press Mbutton.
4. Press M button up/downward to select: Fine/Standard/Economy. Or press
Flash/Exit button to exit the menu without any changing.
zEV
This setting allows you to control the brightness of your images.
1. Press M button.
2. Select “EV” by pressing M button up/downward.
3. Press Mbutton.
4. Press M button up/downward to select your value from +2 to -2.
5. Press Mbutton to confirm your selection. Or press Flash/Exit button to
exit the menu without any changing.
12

zWhite Balance
This setting allows the camera to adjust the color of your photos according to
the color of your light source.
1. Press Mbutton.
2. Select “White Balance” by pressing Mbutton upward/downward.
3. Press Mbutton.
4. Press M button up/downward to select:
Auto/Daylight/Cloudy/Tungsten/Fluorescent.
5. Press M button to confirm your selection. Or press Flash/Exit button to
exit the menu without any changing.
zSharpness
This setting allows you to adjust the sharpness of your images, making edges
more or less distinct.
1. Press M button.
2. Select “Sharpness” by pressing Mbutton up/downward.
3. Press Mbutton.
4. Press Mbutton up/downward to select: Hard/Normal/Soft.
5. Press Mbutton to confirm your selection. Or press Flash/Exit button to
exit the menu without any changing.
13

B. Set up menu
1. Press Mbutton.
2. Press Mbutton rightward to select Set up menu.
zLight Frequency
Fluorescent light oscillation can affect the quality of your photos. Set the
camera for the correct frequency for the country that you are in. your camera
has 2 Frequency settings: 60HZ and 50HZ.
To change the frequency:
1. Press Mbutton downward to select Light Freq.
2. Press Mbutton.
3. Press Mbutton up/downward to select 50/60HZ.
4. Press Mbutton to confirm your selection. Or press Flash/Exit button to
exit the menu without any changing.
14

zDate Time
PhoTags Express software makes it possible for you to keep track of the dates
of your photos. The date you shot the image is recorded by the camera and will
appear automatically on the photo when you download it to your computer
using the PhoTags Express software.
The date function can be turned on and off both in camera and PhoTags
Express software.
1. Press Mbutton downward to select Date Time.
2. Press Mbutton.
3. Press Mbutton up/downward to select: On Photo/Off Photo.
4. Press Mbutton to confirm your selection. Or press Flash/Exit button to
exit the menu without any changing.
In step 3, select the Set Time option to set:
Year/Month/Day/Hour/Minute/Second
1. Press M button up/downward to select
Year/Month/Day/Hour/Minute/Second.
15

2. Press Mbutton right/leftward to set the value.
3. Press M button to confirm. Or press Flash/Exit button to exit the menu
without any changing.
zAuto Off
The Auto Off is a special battery-saving feature which allows the camera to
turn itself off when not in use.
You can choose how long time the LCD screen will remain on while idle before
automatically shutting off.
1. Press Mbutton up/downward to select Auto Off.
2. Press Mbutton.
3. Press Mbutton up/downward to select: 1Min/2Min/3Min/Off.
4. Press M button to confirm. Or press Flash/Exit button to exit the menu
without any changing.
zTFT State
If you want to save power and keep the camera is on, then you can realize it
via this function.
1. Press M button up/downward to select TFT State.
2. Press Mbutton.
16

3. Press Mbutton up/downward to select Clear/Close/Normal.
4. Press M button to confirm. Or press Flash/Exit button to exit the menu
without any changing.
zBeep
You will hear beep sound when you click any button in every mode. You can
switch on or off it per your request.
1. Press M button up/downward to select Beep.
2. Press Mbutton.
3. Press Mbutton up/downward to select On/Off.
4. Press M button to confirm. Or press Flash/Exit button exit the menu
without any changing.
zFormat
This function reformats the memory card and will erase all files in memory
including files that have protected.
1. Press Mbutton up/downward to select Format.
2. Press Mbutton.
3. Press Mbutton up/downward to select Cancel/Execute.
4. Press Mbutton to confirm. Or press Flash/Exit button to exit the menu
17

Note: Formatting will delete all data in your camera or SD card including
protected files, it’s decided by the device selected. Please make sure
that you want to delete all date in camera or SD card, otherwise once
the data is deleted, it cannot be resumed.
zSys. Reset
You can reset the system value to camera default.
1. Press M button up/downward to select Sys. Reset.
2. Press Mbutton.
3. Press M button up/downward to select Cancel/Execute.
4. Press M button to confirm. Or press Flash/Exit button to exit the menu
without any changing.
Camera Mode
Taking photos
Hold the camera steady and press the Shutter button to take photo. There
will be a short delay while the camera saves the photo to memory.
After each photo is shot (when the camera returns to icon mode) the numbers
of photos left to at this resolution is displayed at the top left of the LCD screen.
18

When the camera’s memory is (photo capacity) is full. The LCD screen will
display “MEMORY FULL”. If you attempt to take a photo when the memory is
full, the camera will beep continuously.
Digital zoom
You can magnify subject up to 4 times using the digital zoom. Press M button
upward to zoom in the subject up to 4X. Press Mbutton downward to zoom out
back.
Flash
In low light conditions, it is best to use the built-in flash. You can also use the
flash to compensate for back conditions.
To set flash
1. Press Flash/Exit button, the icon will appear on the LCD screen. This
means the flash function has been “forced on” (manual flash). If the flash
is not ready, a red LED will light up and the icon will flash repeatedly.
Wait until the flash is ready before taking a photo. A low battery warning
will appear on the LCD screen if there is insufficient battery power to
operate the flash.
2. Press Flash/Exit button repeatedly, select icon appears on the LCD
19
Table of contents
Other gfm Digital Camera manuals
Popular Digital Camera manuals by other brands

Sony
Sony DSC-WX200 instruction & operation manual

BlackVue
BlackVue DR750S-2CH IR user guide

Olympus
Olympus STYLUS-7030 quick start guide

Quanta Computer
Quanta Computer EY5 Pi SOLO user manual

Canon
Canon 0206b003 - EOS Digital Rebel XT Camera SLR instruction manual

Tyco
Tyco Illustra Flex Gen 3 quick start guide