GGM gastro WKM335SN User manual

ENG
USERS GUIDE
WKM335SN

ENG
1
Table of Contents
1. Product characteristics ..........................................................................................................2
1.1 Purpose....................................................................................................................................2
1.2 Device description ...................................................................................................................2
1.3 Technical data .........................................................................................................................3
1.4 Surface of the device ..............................................................................................................3
1.5 Requirements for electrical connection ...................................................................................4
2. Operation of the device...........................................................................................................5
2.1 Setting and installing ...............................................................................................................5
2.2 Connection of the sewing machine .........................................................................................6
2.3 Storage of products in the device ............................................................................................6
2.4 Starting the device....................................................................................................................7
2.5 Temperature adjustment .........................................................................................................7
3 Maintenance of the appliance .................................................................................................9
3.1 Cleaning the device .................................................................................................................9
3.2 Condenser cleaning ...............................................................................................................9
4.Comments...............................................................................................................................11
5. Electrical diagram .................................................................................................................12
Icon indicating information for the user’s safety.
Icon indicating key information for the correct operation of the device.
Users manual - Wall cooling shelf

ENG
2
1. PRODUCT CHARACTERISTICS
1.1 PURPOSE
The cooling rack is a universal device designed for storing and presenting previously cooled
food products at a reduced temperature.
1.2 DEVICE DESCRIPTION
The cooling shelves’ body is made of electrolytically galvanized sheet steel, powder coated and
is placed on a base of a steel section. The insulating layer of the body is an ecological
polyurethane foam. The sides of the rack are made of sheet metal and have an insulating layer
made of eco-logical polyurethane foam. The device is designed to be powered by an internal
condensing unit. The device works in the network in the protection system against electric shock
by grounding. The rack must be connected to a socket with a protective contact.
Note: The manufacturer reserves the right to make design changes and components used, which
do not affect the device’s parameters.
Users manual - Wall cooling shelf

ENG
3
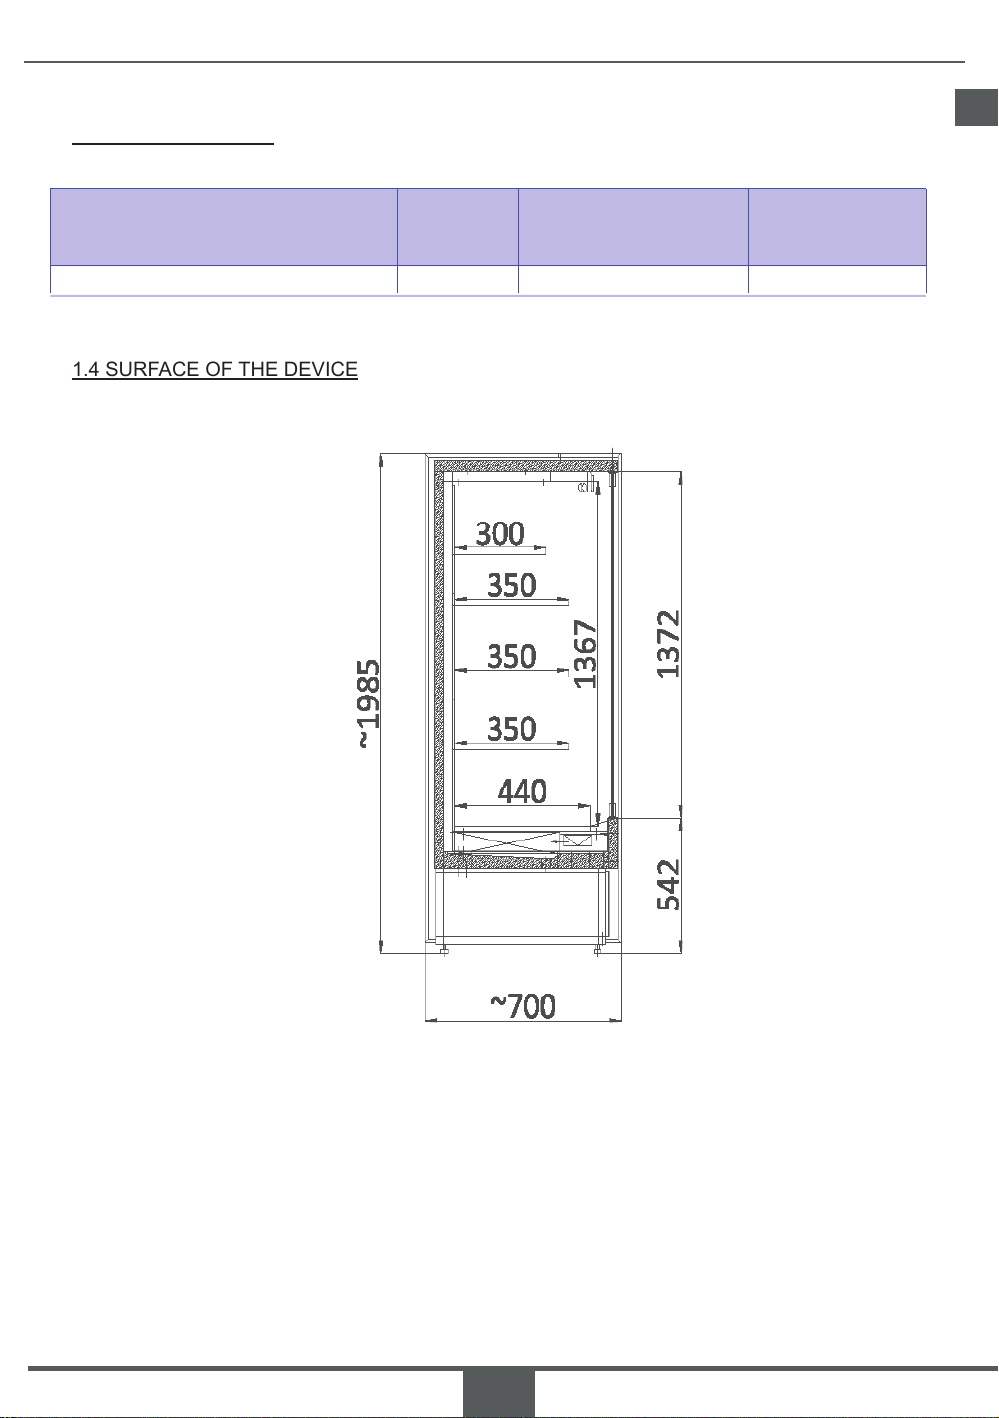
1.4 SURFACE OF THE DEVICE
1.3 TECHNICAL DATA
MODEL TEMPERATURE
RANGE [°C]
DIMENSIONS
(LENGTH x DEPTH x HEIGHT) [mm] DISPLAY AREA [m2]
WKM335SN +1 do +10 °C 1960 x 700 x 1985 mm 3,35
Users manual - Wall cooling shelf

ENG
4
1.5 REQUIREMENTS FOR ELECTRICAL CONNECTION.
The power supply of the cooling rack should be made of a separate low voltage circuit. The
installation is made in a grounding protection system.
Before starting the device it is necessary to check whether the electrical installation to
which the device will be connected meets the conditions of fire protection effectiveness
confirmed by the results of measurements carried out with the applicable regulations.
The device is designed to operate at a network voltage in the range of 210 - 240 V. The
use of the device outside of the given voltage ranges can lead to irreversible damage,
which is not subject to a complaint.
Do not connect the device to the mains using a multi-socket extension cable. The power
cord must not come into contact with parts and materials with a temperature above 70 ° C.
Route the power cord so that it is not damaged, with particular attention to the possibility
of tripping the user.
ATTENTION!
Improper electrical installation may result in electric shock to users and fire.
Users manual - Wall cooling shelf

ENG
5
2. OPERATION OF THE DEVICE
2.1 SETTING AND INSTALLING
Before installing the device, it must be delivered to the target place of work. Remove the protec-
tive foil from the device’s components.
After setting the device, it should be leveled. To do this, screw in or unscrew the feet of the
device. Accurate horizontal positioning of the rack prevents noisy operation and ensures
proper water drainage during defrosting.
After setting up the device, you must provide access to the power cord plug. It is not al-
lowed to place the refrigeration device in the immediate vicinity of the elements that emit
large amounts of heat (radiators, air heaters, etc.)
Inside the chamber for storing food products, you must not use electrical appliances of
a different type than those recommended by the manufacturer. Protect the refrigeration
circuit against damage.
After unpacking and setting the device and before it is put into operation, the first wa-
shing should be carried out. The water used for washing should not exceed 40ºC with the
addition of neutral cleaning agents. It is forbidden to use agents containing chlorine and
sodium of different varieties, these agents can destroy the protective layer and compo-
nents of the device!
When cleaning the device, you can not use a water jet. The device should be washed
using a damp cloth.
The device should be left at rest for at least 2 hours after the completed installation before it is
turned on (applies to devices with an internal unit), then the oil level is leveled and it prevents
problems with the start-up of the refrigeration unit!
In devices with an internal unit special attention should be paid not to block the inlet holes in the
aggregate chamber (perforation in the lower part of the rack), used for cooling the air of the unit.
Accurate horizontal positioning of the rack prevents noisy operation and ensures proper water
drainage during defrosting.
Users manual - Wall cooling shelf

ENG
6
In order to connect the device to the sewage system, appropriate sanitary elements should be
fitted to the siphon installed in the device, which enables attaching it to the drain. After connecting
the device to the sewerage network, check the connections for leaks.
Device siphon.
Attention! Before carrying out any maintenance, turn off the cooling rack from the mains
(disconnect the plug from the socket by holding the socket with the other hand).
2.3 STORAGE OF PRODUCTS IN THE DEVICE
Before brewing, run the empty device and leave it working until the desired temperature is
reached. Once it has been reached, you can start to load the goods. When stacking goods
on shelves, leave space between them to allow air to circulate inside the device. Do not place
non-refrigerated products in the device. In the event of a power failure of the device, all products
should be emptied. If the device will not be used for a longer period of time, disconnect it from
the mains, empty, wash and leave the door ajar.
2.2 CONNECTION OF THE SEWING MACHINE.
During the cyclical defrosting process, the ice accumulated on the evaporator of the device melts.
The water created as a result of the process must be removed from the device. The place of re-
moving water is the siphon located under the device.
Users manual - Wall cooling shelf

ENG
7
2.4 STARTING THE DEVICE.
After correct installation and leveling (see points 1.5 and 2.1 of the manual), you can start the
device.
Electric switches and a digital thermostat at the top of the front of the rack are used to start and
operate the device.
1. Digital thermostat
2. Power aggregate on / off switch.
3. Rack lighting switch on / off.
In order to start the device, turn on the power supply (button 2).
2.5 TEMPERATURE ADJUSTMENT
Attention! The temperature range of the device’s chamber and the operating cycles of
the condensing unit can fluctuate - this is related to many factors, such as: ambient tem-
perature, relative humidity, temperature of the products put in and their number, etc.
To adjust the set temperature in the device, use a digital thermostat. The operating parameters
of the temperature controller necessary for the proper functioning of the device are introduced at
the production stage by the manufacturer. The user should check the set temperature before the
first start-up of the device and change its value if necessary.
ATTENTION! In the case of displaying the flashing message „OFF” alternately with the tempera-
ture value, start the device with the UP / ON OFF key - hold it for 3 seconds.
Users manual - Wall cooling shelf

ENG
8
1. Display with the current temperature inside the device.
2. SET / MUTE button
3. UP / ON OFF button
4. DOWN / DEFROST button
5. Diode No. 5 - when it is lit, it informs about the work of the compressor. During the blinking
cycle, two blinks indicate that the continuous operation mode has been activated. The flashing
LED indicates a delayed start (protective procedure).
6. Diode No. 6 - when it is lit it informs about activating the device defrosting function. The fla-
shing diode informs about the delay of the defrost cycle (from the outside of the external
switch-off or starting in the course of another procedure).
7. Diode No. 7 - when it is lit it indicates the active alarm function.
8. Diode No. 8 - when it is lit, informs about turning on the fans installed on the device’s evapo-
rator. The flashing diode informs about the start delay of the fans (from the external switch-off or
start-up in the course of another procedure).
FOR THE SETTING OF THE REQUEST TEMPERATURE YOU MUST:
1. Press for 1 second , thermostat display will show the currently set temperature.
2. To reduce or increase it, use or for obtaining the desired value.
3. To confirm the changes and save them in the thermostat memory, press again. .
MANUAL FORWARDING THE DEFENSE CYCLE:
The defrost cycle is carried out in the device in an automated way. The user can
force the device to defrost. To do this, press and hold for 5
second button.
In order to speed up the defrosting process, it is not allowed to use other mechanical means than
those recommended by the manufacturer.
Users manual - Wall cooling shelf

ENG
9
3. MAINTENANCE OF THE APPLIANCE
3.1 CLEANING THE DEVICE.
Attention! Before carrying out any maintenance, turn off the cooling rack from the mains
(disconnect the plug from the socket by holding the socket with the other hand).
Attention ! Protect the device from water. Do not use a water jet for cleaning. Protect the
electrical installation of devices from moisture.
Use a damp cloth to clean the device.
Cleaning of sharp objects is forbidden.
It is not allowed to use chemically active substances, in particular those containing chlori-
ne, soda and other destructive protective layers and elements of the device.
This also applies to stainless steel.
3.2 CONDENSER CLEANING (Version with internal unit)
Keeping the condenser clean is essential for the proper operation of the refrigeration unit.
Contamination of the condenser causes a change in the heat exchange characteristics, which
increases the consumption of electricity, and the compressor may also fail.
The condenser should be cleaned at least once every 2 months. If
the condenser gets faster, the processing process should be more
often.
Contamination of the compressor on the condenser is dirty
and as a result, an emergency device, which is not a guarantee!
Attention! Before carrying out any maintenance, switch off the device from the mains
(disconnect the plug from the socket by holding it with the other hand).
Users manual - Wall cooling shelf

ENG
10
The device condenser is located at the bottom of the device. When cleaning the condensers,
be especially careful !! .
Attention! Do not touch the condenser part directly. Failure to follow the instructions may
cause injury.
To remove impurities from the condenser, use a soft brush or brush. In the case of heavy
soiling it is advisable to use a vacuum cleaner / compressed air to suck / bleed dirt located
between the fins. It is not recommended to use hard brushes for cleaning the condenser
- this causes dirt to get in between the blades and may result in a completely clogged
condenser.
Users manual - Wall cooling shelf

ENG
11
4. COMMENTS
1. Making repairs by the user on their own and not following the rules contained in the instruction
manual will void the manufacturer’s warranty.
2. The equipment is not intended for use by persons (including children) with limited physical,
mental and sensory ability, as well as persons who do not have knowledge of the device, unless
it is supervised or in accordance with the instruction manual of the equipment provided by
persons responsible for their use security.
3. Pay special attention to children not to play with the device.
4. Lighting repairs can only be made to the same as the one used by the manufacturer.
5. All repairs and adjustments in the electrical and refrigeration system may be performed by an
authorized tter - an authorized service technician
6. If any faults such as sparking, electric shock etc. occur, immediately switch o the device from
the power supply by removing the plug from the mains socket and call an electrician to eliminate
the defects. When replacing the power cord, it must be replaced by a qualied electrician of the
same type.
7. Dispose of the equipment in accordance with environmental protection regulations.
8. Do not place explosive substances in the device.
9. It is forbidden to place in the device substances with corrosive, acid-derivatives, chlorine-
derivative and sodium-containing properties in reaction with the components of the device.
Failure to follow this rule may result in irreparable damage to the device, which is not covered by
the warranty.
Users manual - Wall cooling shelf

ENG
12
5. ELECTRICAL DIAGRAM
PJEZC - Temperature controller
WG - Main switch
WS - Illumination switch
LS - Lighting (LED option)
SM - Compressor motor
M1 - Generator fan motor
WP - Evaporator (option)
PP - Evaporator sensor
KK - Chamber sensor
WT - Fan
Users manual - Wall cooling shelf

ENG
14
NOTES
.............................................................................................................
.............................................................................................................
.............................................................................................................
.............................................................................................................
.............................................................................................................
.............................................................................................................
.............................................................................................................
.............................................................................................................
.............................................................................................................
.............................................................................................................
.............................................................................................................
.............................................................................................................
.............................................................................................................
.............................................................................................................
.............................................................................................................
.............................................................................................................
.............................................................................................................
.............................................................................................................
.............................................................................................................
.............................................................................................................
.............................................................................................................
.............................................................................................................
.............................................................................................................
.............................................................................................................
.............................................................................................................
.............................................................................................................
.............................................................................................................
.............................................................................................................
.............................................................................................................
.............................................................................................................
.............................................................................................................
.............................................................................................................
.............................................................................................................
.............................................................................................................
Users manual - Wall cooling shelf

ENG
15
NOTES
.............................................................................................................
.............................................................................................................
.............................................................................................................
.............................................................................................................
.............................................................................................................
.............................................................................................................
.............................................................................................................
.............................................................................................................
.............................................................................................................
.............................................................................................................
.............................................................................................................
.............................................................................................................
.............................................................................................................
.............................................................................................................
.............................................................................................................
.............................................................................................................
.............................................................................................................
.............................................................................................................
.............................................................................................................
.............................................................................................................
.............................................................................................................
.............................................................................................................
.............................................................................................................
.............................................................................................................
.............................................................................................................
.............................................................................................................
.............................................................................................................
.............................................................................................................
.............................................................................................................
.............................................................................................................
.............................................................................................................
.............................................................................................................
.............................................................................................................
.............................................................................................................
Users manual - Wall cooling shelf

Table of contents
Other GGM gastro Refrigerator manuals