Giacomini KPM36Y003 User manual

EN
The optional KPM36Y003 board is used to interface all of the KPM30/KPM31 controllers, to an Ethernet network.
The following sheet refers to software release A1.2.6 – B1.1.4, as read on the HTML configuration pages.
Installation
The board is installed in the KPM30/KPM31 controller, when off, as follows:
1. remove the “Serial Card” cover from the KPM30/KPM31 using a screwdriver (Fig. 1);
2. insert the board in the corresponding plug-in connector, making sure it is sully inserted and in contact with the two supports
located on the case of the KPM30/KPM31 (Fig. 2). This operation may be difficult due to the limited space, consequently, it is
recommended to insert the board at an angle and then turn it until aligning the connectors;
3. close the cover again, using the cover supplied with the board, lining up the connector on the serial board with the opening
in the cover (Fig. 3);
4. (optional): stick one or both labels supplied outside and/or inside the electrical panel near the KPM30/KPM31, so that the MAC
ADDRESS can be read without needing to open the electrical panel;
5. for the connection to the Ethernet network, use an S/FTP cable, category 5e or higher.
Connection to the Ethernet network
The KPM36Y003 board is used to connect the KPM30/KPM31 controller to a 10 Mbps Ethernet network and consequently
perform the following functions:
• access the information on the KPM30/KPM31 (network variables and parameters) using an Internet browser, such as Internet
Explorer™ installed on a PC and connected to the KPM36Y003 via TCP/IP (see Web server);
• connection to a supervisory network that uses one of the following standard protocols:
- SNMP v1 & v2c; - BACnet Ethernet ISO8802-2/8802-3; - BACnet/IP (Addenda A/Annex J).
Using the default parameters
In order to access the configuration (see the Configuration section), the KPM36Y003 can be started using the “factory
bootswitch parameters”:
- IP address= 172.16.0.1; - Net mask= 255.255.0.0; - “root” user password: froot; - “httpadmin” user password: fhttpadmin;
- “carel” user password: fcarel; - “guest” user password: fguest.
To start the KPM36Y003 with these parameters, proceed as follows:
• when the KPM36Y003 is off:
- switch on the KPM30/KPM31 controller with the KPM36Y003 already inserted and hold the button for at least 20 s, until the
status LED starts flashing SLOWLY 3 times, red-dark;
- release the button while the LED is flashing, after having flashed 3 times the LED turns green, then, to confirm the recognition
of the button, the LED will fl ash QUICKLY 3 times, red-dark.
To complete the KPM36Y003 boot phase, wait around another 50 s until the status LED flashes regularly; from this moment on
the KPM36Y003 can be accessed via the network.
• when the KPM36Y003 is already on:
- restart the KPM36Y003 software (see “Restarting the software”);
- after restarting, proceed as above for when the KPM36Y003 is off (see above).
IMPORTANT: in “factory bootswitch parameters” mode, the KPM36Y003 does not save the parameters recalled, but simply uses them,
and therefore, when next restarted without pressing the button, it will use the parameters set by the user (if just acquired, with DHCP).
Restarting the software
To restart the software when the board is in stable operation (that is, with the status LED fl ashing regularly), press and hold the
button for between 5 and 10 seconds; after around 10 s from releasing the button, the status LED will stop flashing, and after a
further 15 seconds the software on the board will restart (see “starting sequence”, “User interface” section).
Configuration
Important: before connecting the KPM36Y003 to an Ethernet network, it is strongly recommended to contact the network
administrator, as the incorrect confi guration of the KPM36Y003 may temporarily shutdown the entire network. For the correct
operation of the KPM36Y003, a number of basic parameters need to be set, such as the IP address and Netmask; each device
connected to an Ethernet network, to communicate with a host, must have a unique IP address. KPM36Y003 is supplied with
the DHCP function already active. Therefore, in a network served by a DHCP server, KPM36Y003 will automatically acquire the
necessary parameters without requiring configuration, while, in the case of a network without DHCP, the parameters need to
be configured manually (see the “Accessing the user configuration...” section).
Accessing the user configuration (via Ethernet network and configuration web pages)
Automatic network configuration (DHCP): ask the network administrator for the address that has automatically been assigned
to the KPM36Y003 already connected; the administrator will need to know the MAC ADDRESS of the KPM36Y003 (see Fig. 4).
Network without DHCP: when first using the board, it is recommended to connect KPM36Y003 directly to a computer using a
crossed Ethernet cable; then start the board with the “factory bootswitch” parameters (see “Pushbutton”).
To allow the PC to access the KPM36Y003:
• the PC used for the configuration must be in the same sub-network as the KPM36Y003; set the network parameters on the
PC as follows:
- IP address= if DHCP: ask the network administrator; with “factory bootswitch parameters”: 172.16.xxx.xxx (with xxx.xxx as
desired, as long as different from the 0.1 already used by KPM36Y003);
- Netmask= 255.255.0.0.
IT
La scheda opzionale KPM36Y003 permette l’interfacciamento di tutti i controllori della serie KPM30/KPM31, ad una rete Ethernet.
Il seguente foglio fa riferimento alla release software A1.2.6 – B1.1.4, leggibile tramite pagine HTML di configurazione.
Installazione
L’installazione nel KPM30/KPM31 si ottiene a macchina non alimentata secondo la seguente procedura:
1. togliere lo sportellino “Serial Card” del KPM30/KPM31 con un cacciavite (Fig. 1);
2. inserire la scheda nel corrispondente connettore a pettine, assicurandosi che sia ben inserita e a contatto dei due appoggi
posti sul contenitore del KPM30/KPM31 (Fig. 2). Questa operazione può risultare difficoltosa a causa dello spazio esiguo, si
consiglia, quindi, di inserire obliquamente la scheda e di farla poi ruotare fino a far combaciare i connettori.
3. richiudere lo sportellino, utilizzando quello in dotazione alla scheda facendo combaciare il connettore della scheda seriale
con il foro presente sullo sportellino (Fig. 3);
4. (opzionale): incollare una o entrambe le etichette in dotazione all’esterno e/o all’interno del quadro elettrico in prossimità del
KPM30/KPM31, in modo che il MAC ADDRESS sia consultabile anche senza necessità di aprire il quadro elettrico.
5. Per la connessione alla rete Ethernet utilizzare un cavo del tipo S/FTP categoria 5e o migliore.
Connessione a rete Ethernet
La scheda KPM36Y003 consente di collegare il controllore KPM30/KPM31 ad una rete Ethernet 10 Mbps e di realizzare le
seguenti funzioni:
• accesso alle informazioni del KPM30/KPM31 (variabili di rete e parametri) mediante un browser per Internet come Internet
Explorer™ installato su un PC e collegato in rete via TCP/IP a KPM36Y003 (vedi Web server);
• collegamento a rete di supervisione che utilizzi uno dei seguenti protocolli standard:
- SNMP v1 & v2c; - BACnet Ethernet ISO8802-2/8802-3; - BACnet/IP (Addenda A/Annex J).
Utilizzo parametri di fabbrica
Al fine di accedere alla configurazione (si veda la sezione Configurazione), è possibile avviare KPM36Y003 con i seguenti valori
“factory bootswitch parameters”:
- IP address= 172.16.0.1; - Net mask= 255.255.0.0; - “root” user password: froot; - “httpadmin” user password: fhttpadmin;
- “carel” user password: fcarel; - “guest” user password: fguest.
Per avviare KPM36Y003 con questi parametri procedere come indicato di seguito:
• da KPM36Y003 spenta:
- accendere il controllore KPM30/KPM31 con KPM36Y003 già inserita e mantenere premuto il pulsantino a lungo per almeno 20
sec, fino a che il LED status inizia a lampeggiare LENTAMENTE 3 volte rosso-buio;
- lasciare il tasto mentre il LED sta lampeggiando, dopo aver concluso i 3 lampeggi il LED diventa verde, quindi, per confermare
il riconoscimento del tasto, il LED lampeggerà RAPIDAMENTE 3 volte rosso-buio.
Per il completo avvio di KPM36Y003 saranno necessari circa altri 50 sec f no ad ottenere il LED Status regolarmente
lampeggiante, solo da questo momento in poi sarà possibile accedere via rete a KPM36Y003.
• da KPM36Y003 già accesa:
- riavviare il software di KPM36Y003 (vedi “Riavvio del software”);
- dopo il riavvio, procedere come da KPM36Y003 spenta (vedi sopra).
IMPORTANTE: nella modalità “factory bootswitch parameters” KPM36Y003 non memorizza i parametri così richiamati ma li
utilizza soltanto, per cui, al successivo riavvio senza pressione del pulsante riutilizzerà i parametri impostati dall’utente (nel caso
appena acquistata, DHCP).
Riavvio del software
Per ottenere un riavvio del software da scheda a regime (cioè con LED Status regolarmente lampeggiante), tenere premuto il
pulsante per un numero di secondi compresi tra 5 e 10, dopo circa 10 sec dal rilascio il LED Status smetterà di lampeggiare, e
dopo altri 15 il software sulla scheda si riavvierà (si veda “sequenza di avvio” sezione “Interfaccia Utente”).
Configurazione
Attenzione: prima di connettere KPM36Y003 ad una rete Ethernet si consiglia vivamente di contattare l’amministratore di rete, in
quanto una errata configurazione di KPM36Y003 può temporaneamente bloccare tutta la rete. Per un corretto funzionamento
di KPM36Y003 devono essere impostati alcuni parametri di base, quali indirizzo IP e Net mask; ogni dispositivo collegato ad una
rete Ethernet, per comunicare con un host deve avere un indirizzo IP univoco. KPM36Y003 viene fornito con funzionalità DHCP
già attiva. Pertanto, in una rete servita da server DHCP KPM36Y003, acquisirà in automatico i parametri necessari senza bisogno
di configurazione, mentre, nel caso di una rete senza DHCP, è necessario configurare i parametri manualmente (vedi sezione
“Accesso alla configurazione Utente...”).
Accesso alla configurazione Utente (tramite rete Ethernet e pagine Web di configurazione)
Rete con DHCP: chiedere all’amministratore di rete l’indirizzo che è stato attribuito in automatico a KPM36Y003 già collegata, il
quale avrà bisogno di conoscere il MAC ADDRESS di KPM36Y003 (vedi Fig. 4).
Rete senza DHCP: al primo utilizzo della scheda si consiglia di connettere direttamente KPM36Y003 ad un computer via cavo
Ethernet utilizzando un cavo incrociato; avviare quindi la scheda con i parametri “factory bootswitch” (vedi “Tasto Pushbutton”).
Per permettere al PC di accedere al KPM36Y003:
• il PC utilizzato per la configurazione deve stare sulla stessa sottorete di KPM36Y003; impostare i parametri di rete del PC nel
seguente modo:
- IP address= se DHCP: chiedere all’amministratore di rete; se con “factory bootswitch parameters”: 172.16.xxx.xxx (con xxx.xxx a
piacere purché diversi da 0.1 già utilizzato da KPM36Y003);
- Netmask= 255.255.0.0.
Scheda di interfaccia Ethernet per modulo di regolazione KPM30/KPM31
Ethernet interface for KPM30/KPM31 regulation unit
KPM36Y003
Fig. 2
Fig. 1
Fig. 3

• il browser sul PC deve avere l’opzione relativa all’utilizzo di un server proxy disabilitata.
Se le impostazioni di rete del PC e quelle del browser sono corrette, digitando sulla barra degli indirizzi del browser l’indirizzo IP
di KPM36Y003, si otterrà accesso alla home page di default di KPM36Y003. Entrare quindi nell’area riservata all’amministratore
utillizzando l’apposito link (Go to Administrator Area) e il seguente account preimpostato:
- username= admin;
- password= fadmin.
I parametri di base per la comunicazione e gli accessi si trovano nell’area “Configuration”. Scegliere “Network”: sarà possibile
impostare l’indirizzo IP primario della scheda e tre alias. Per configurare la funzionalità DHCP scrivere “DHCP” al posto dell’IP
address. Se la rete non utilizza DHCP, chiedere all’ amministratore di rete un indirizzo IP ed una Net mask validi per la rete locale
a cui il KPM30/KPM31 andrà collegato.
Nota: i parametri richiamabili con il tasto “Pushbutton” non possono essere modificati e non devono essere confusi con
quelli modificabili da utente. Per una completa descrizione di tutti i parametri impostabili si rimanda al manuale per l’utente
che trovate nel sito www.ksa.carel.com sezione “Download/Support/SoftwareUtilities”, dove si potranno anche scaricare
aggiornamenti software.
Web server
Il Web server integrato in KPM36Y003 è “thttpd”, è conforme alle specifi che HTTP 1.1 e permette di visualizzare pagine HTML
direttamente sul vostro browser Internet. Una applicazione client può quindi controllare e monitorare da remoto il controllore
KPM30/KPM31 su cui la scheda KPM36Y003 è installata. Le pagine HTML possono essere facilmente realizzate e scaricate in
KPM36Y003 dall’utente finale utilizzando un qualsiasi client FTP. Si possono utilizzare programmi di ampia diffusione sia per
creare le proprie pagine HTML (es. Macromedia® DreamWeaver™ o Microsoft® FrontPage™) sia per scaricarle sul KPM36Y003
(es. SmartFTP™ (www.smartftp.com)).
Accesso al sistema operativo tramite autenticazione
È possibile accedere al sistema tramite terminale telnet o via FTP.
Ad ogni accesso viene richiesto di autenticarsi con nome utente e password. Gli utenti registrati sono i seguenti:
nome descrizione password di factory permessi
root amministratore del sistema operativo froot nessuna limitazione
httpadmin amministratore web fhttpadmin accesso alla directory http in lettura/scrittura;
ogni altra directory
carel usato da KPM30/KPM31 controller fcarel accesso solo ai servizi KPM30/KPM31
guest guest fguest
Le password possono essere modificate tramite l’accesso alla pagina dell’amministratore. Nota: le password richiamabili con il
tasto “Pushbutton” non verranno modificate e non devono essere confuse con quelle modificabili da utente.
Da questa pagina è inoltre possibile impostare restrizioni di accesso a ciascuna delle varie directory presenti nell’albero http.
Collegandosi quindi via FTP e autenticandosi come amministratore web nel seguente modo:
- username= httpadmin;
- password= fhttpadmin (nota “f” come “factory” come prima lettera).
si avrà accesso al file system utente di KPM36Y003.
Le pagine personalizzate vanno inserite nella seguente cartella: /usr/local/root/flash/http.
IMPORTANTE: le pagine scaricate nel KPM36Y003 devono avere i corretti proprietari e permessi per poter essere visualizzate con
un browser, impostare in modo corretto tali attributi via FTP risulta difficoltoso, per questo è disponibile la funzione di “auto-
settaggio degli attributi” all’interno delle pagine dell’amministratore e per attivarla è sufficiente cliccare sul link “Adjust HTML
pages attributes”, si consiglia di farlo ogni volta che si modifica una o più pagine HTML.
Caratteristiche generali
Condizioni di funzionamento: 0T55 °C, 20/80% U.R. non condensante;
Condizioni di immagazzinamento: -20T70 °C, 20/80% U.R. non condensante;
Grado di inquinamento ambientale: normale;
Interfaccia Ethernet: connettore RJ45 per Ethernet 10BaseT; utilizzare un cavo schermato classe 5, max 100 m.
Protocolli gestiti: HTTP, FTP, SNMP v1, v2c, DHCP, DNS, BACnet Ethernet ISO8802-2/8802-3, BACnet/IP (Addenda A/Annex J).
Memoria: 16MB RAM, 8 MB Flash (3MB disponibili per pagine web e dati utente).
CPU: ARM7 TDMI@74MHz clock
Sistema operativo: LINUX 2.4.21.
AVVERTENZE:
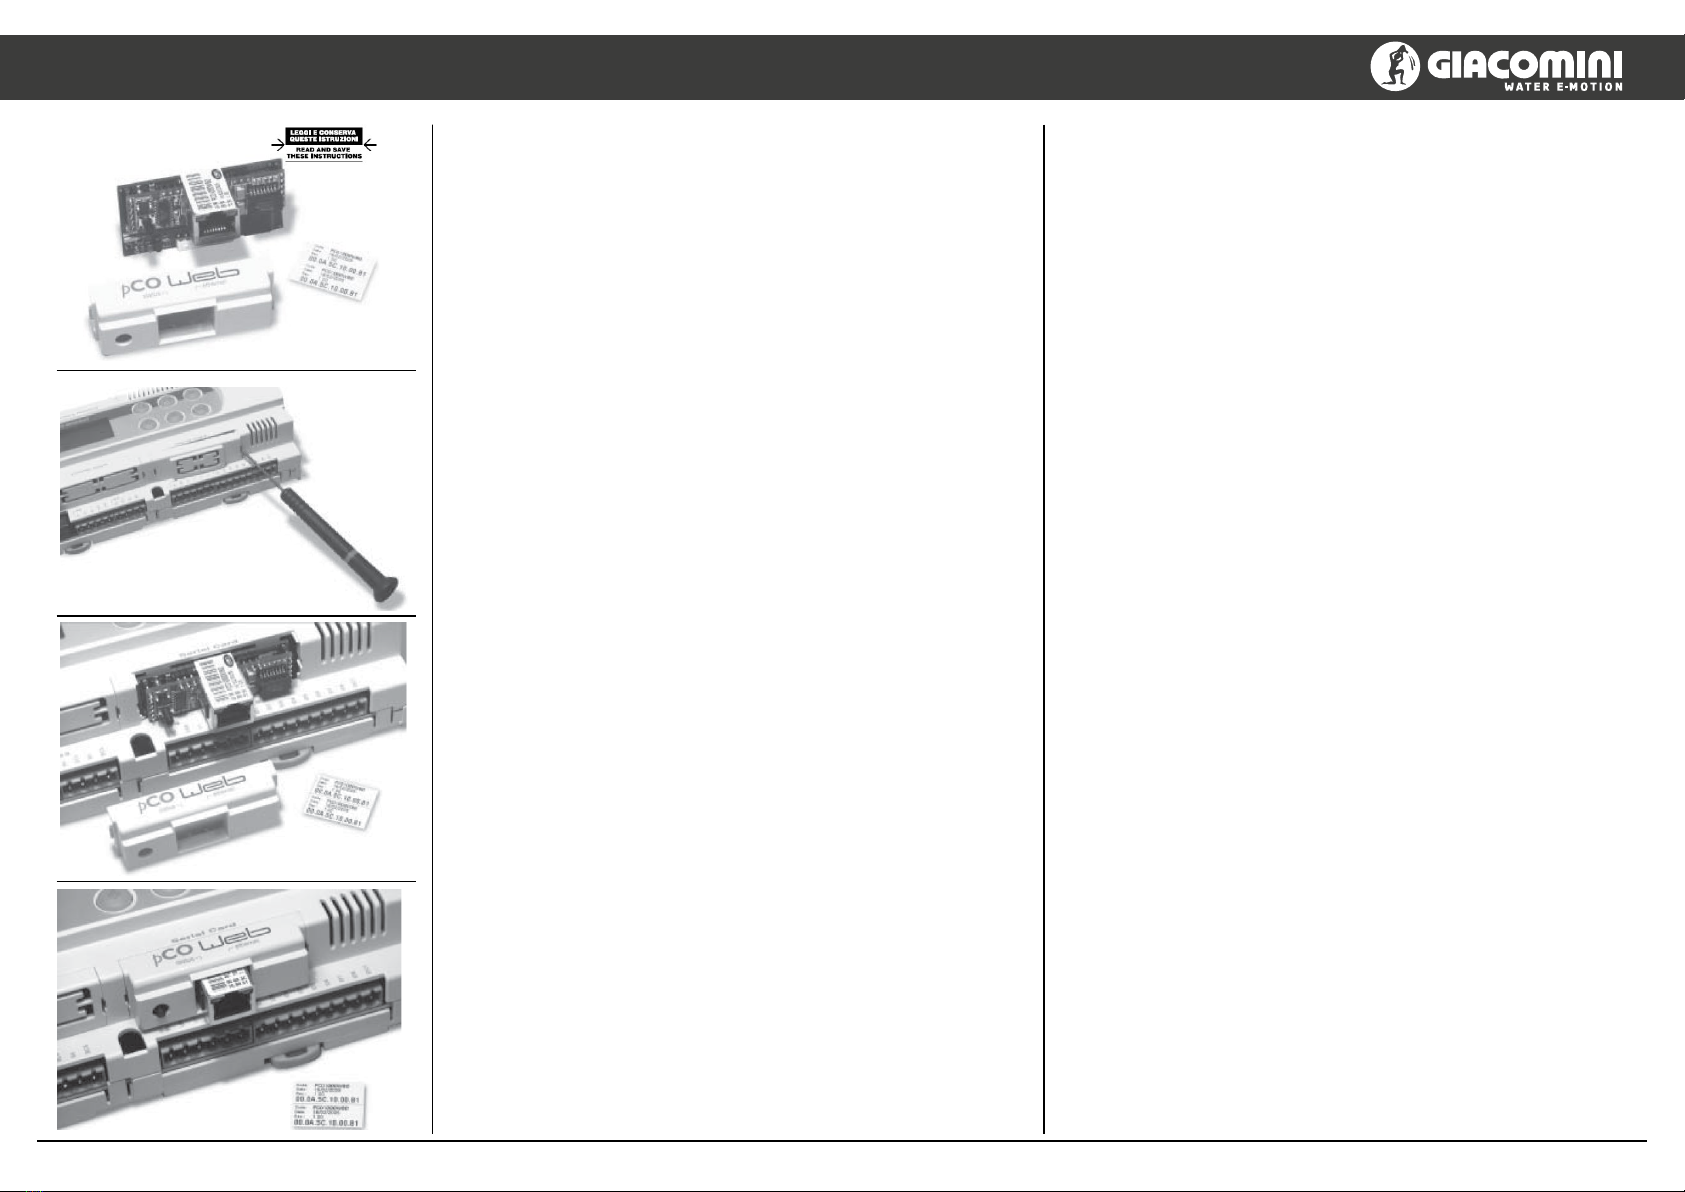
Precauzioni nel maneggiare la scheda.
I danneggiamenti elettrici che si verificano sui componenti elettronici avvengono quasi sempre a causa delle scariche elettrostatiche
indotte dall’operatore. È quindi necessario prendere adeguati accorgimenti per queste categorie di componenti, ed in particolare:
• prima di maneggiare qualsiasi componente elettronico o scheda, toccare una messa a terra (evitare il contatto con un
componente non è sufficiente in quanto una scarica di 10.000 V, tensione molto facile da raggiungere con l’elettricità statica,
innesca un arco di circa 1 cm);
• i materiali devono rimanere per quanto possibile all’interno delle loro confezioni originali. Se necessario, prelevare la scheda
da una confezione e trasferire il prodotto in un imballo antistatico senza toccare con le mani i lati della scheda su cui sono
montati i componenti elettronici;
• evitare nel modo più assoluto di utilizzare sacchetti in plastica, polistirolo o spugne non antistatiche;
• evitare nel modo più assoluto il passaggio diretto tra operatori (per evitare fenomeni di induzione elettrostatica e conseguenti scariche).
Nota: Tutti i marchi registrati sono proprietà dei rispettivi titolari.
• the browser on the PC must have the option corresponding to the use of a proxy server disabled. If the network settings on
the PC and the browser are correct, typing the IP address of the KPM36Y003 in the address bar will access the default home
page of the KPM36Y003. Then enter the area reserved for the administrator, using the special link (Go to Administrator Area)
and the following pre-set account:
- username= admin;
- password= fadmin.
The basic parameters for communication and access are located in the “Configuration” area. Choose “Network”: the primary IP
address of the board and three aliases can be set.
To configure the DHCP function type “DHCP” in the place of the IP address. If the network does not use DHCP, ask the network
administrator for a valid IP address and Netmask for the local network that the KPM30/KPM31 will be connected to.
Note: the parameters recalled with the “Pushbutton” cannot be modified and must not be confused with the values that
are modifiable by the user. For a complete description of all the parameters that can be set, refer to the user manual,
available at ww.ksa.carel.com, “Download/ Support/Software Utilities” section, which also has software upgrades to be
downloaded.
Web server
The web server included in the KPM36Y003 is “thttpd”, compliant with the HTTP 1.1 specifications, and is used to display HTML
pages directly on the Internet browser. A client application can thus control and monitor the KPM30/KPM31 controller that the
KPM36Y003 board is installed on, from a remote location.
The HTML pages can be easily created and downloaded to the KPM36Y003 by the end user with any FTP client. Common
programs can be used to create the custom HTML pages (e.g. Macromedia® DreamWeaver™ or Microsoft® FrontPage™) and
download them to the KPM36Y003 (e.g. SmartFTP™ (www.smartftp.com)).
Accessing the operating system by authentication
The system can be accessed via a telnet terminal or via FTP.
Authentication with user name and password is required for each access. The following users are registered:
user name description default password allowed
root administrator of the operating system froot no limitation
httpadmin web administrator fhttpadmin read/write access to the http directory; read-
only to the other directories
carel used by KPM30/KPM31 controller fcarel access only to the KPM30/KPM31 services
guest guest fguest
The password can be modified by accessing the administrator page. Note: the password recalled with the “Pushbutton”
function will not be modified and must not be confused with the passwords that are modifiable by the user.
This page can also be used to set the access restrictions for each of the various directories in the http tree.
Consequently, connecting via FTP and logging in as the web administrator, as follows:
- username= httpadmin;
- password= fhttpadmin (note “f” as in “factory” as the first letter).
will access the KPM36Y003 user file system.
The customised pages should be saved in the following directory: /usr/local/root/flash/http.
IMPORTANT: the pages downloaded to the KPM36Y003 must have the correct properties and be able to be displayed with
a browser; setting these attributes correctly via FTP is quite difficult, and consequently the “auto-set attributes” function
is available in the administrator pages. To activate this function, simply click the “Adjust HTML pages attributes” link; it is
recommended to do this whenever modifying one or more HTML pages.
General characteristics
Operating conditions: 0T55 °C, 20/80 % RH non-condensing;
Storage conditions: -20T70 °C, 20/80 % RH non-condensing;
Degree of environmental pollution: normal;
Ethernet interface: RJ45 connector for Ethernet 10BaseT; use a class 5 shielded cable, max 100 m.
Protocols managed: HTTP, FTP, SNMP v1, v2c, DHCP, DNS, BACnet Ethernet ISO8802-2/8802-3, BACnet/IP (Addenda A/Annex J).
Memory: 16 MB RAM, 8 MB Flash (3 MB available for web pages and user data).
CPU: ARM7 TDMI@74 MHz clock
Operating system: LINUX 2.4.21
WARNINGS
Precautions when handling the board.
The electrical damage that occurs to electronic components is almost always due to electrostatic discharges caused by the
operator. Consequently, suitable precautions must be taken when handling these components, in particular:
• before handling any electronic component or board, touch an earthed object (avoiding contact with a component is not
sufficient, as a 10,000 V discharge, a voltage that can easily be reached by static electricity, creates an arc of around 1 cm);
• the materials must remain as long as possible inside their original packages. If necessary, remove the board from the
packing and then place the product in antistatic packaging without touching the sides of the board containing the electronic
components;
• always avoid using plastic, polystyrene or non-antistatic materials;
• always avoid passing the board between operators (to avoid the phenomena of electrostatic induction and consequent
discharges).
Note: All registered brands are the property of their respective owners.
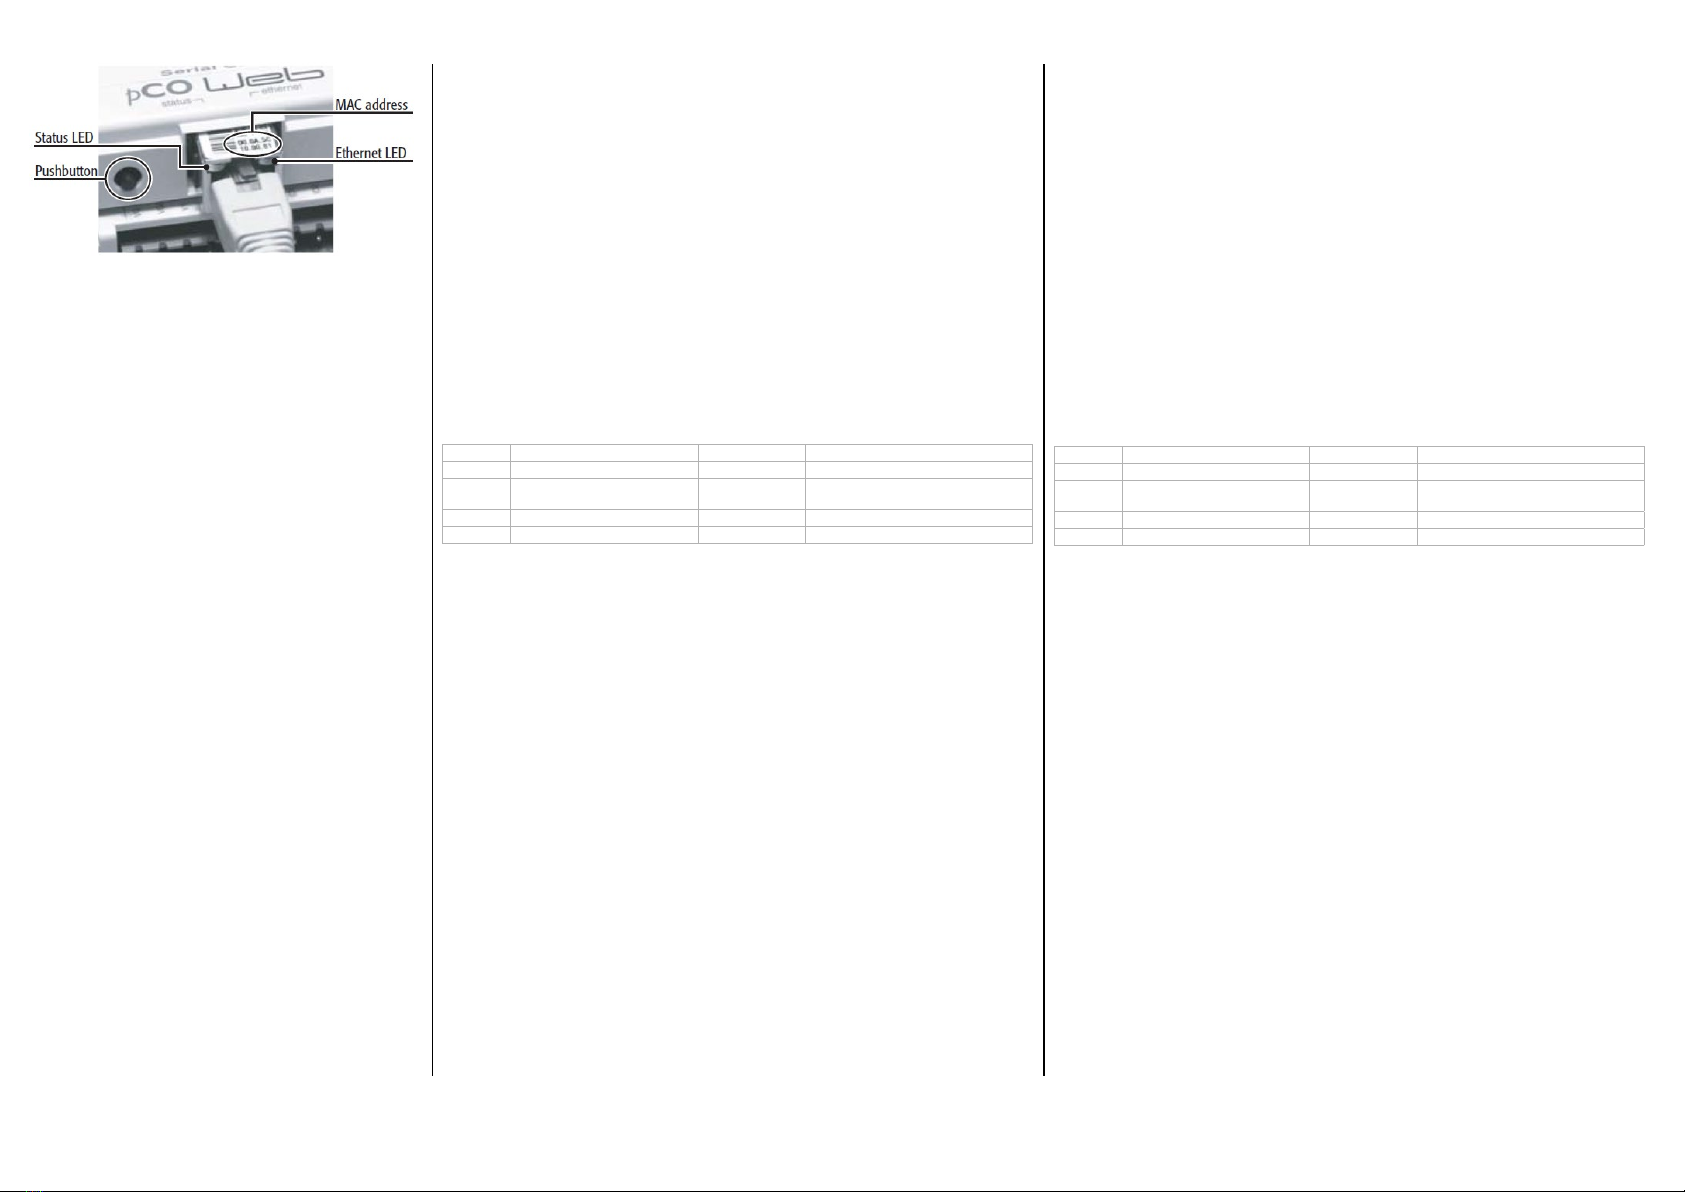
Il LED Status riassume lo stato della comunicazione con il controllore e mostra
anche alcuni stati della scheda (Fig. 5).
• Sequenza di avvio: all’accensione o dopo un riavvio del software il LED esegue la
seguente sequenza:
- spento;
- dopo 2 s dall’avvio: rapido lampeggio rosso-verde;
- dopo 5 s dall’avvio: verde fisso;
- dopo 62 s dall’avvio (scheda a regime): lampeggiante (colore lampeggio: vedi
“stato della comunicazione con KPM30/KPM31”).
• Stato della comunicazione con KPM30/KPM31: a regime il LED lampeggia per
indicare la qualità della comunicazione con KPM30/KPM31:
- rapido verde-buio: comunicazione con KPM30/KPM31 ok (KPM30/KPM31 ON-LINE);
- lento rosso-buio: comunicazione con KPM30/KPM31 non stabilita (KPM30/KPM31
OFF-LINE);
- verde/rosso: rileva errori o temporanea mancanza di risposta da KPM30/KPM31.
Il LED Ethernet (Fig. 5) mostra lo stato della comunicazione con la rete Ethernet,
assume i seguenti stati:
- verde: comunicazione ok, lampeggiante verde durante lo scambio di dati;
- rosso: comunicazione non stabilita (cavo interrotto, problemi all’altro capo del cavo).
Nota: il colore rosso di questo LED non dipende dalla corretta impostazione dei
parametri di comunicazione di KPM36Y003, ma solo da problemi di connessione
elettrica o di non rilevamento dei segnali di collegamento alla rete, quest’ultimo
caso potrebbe essere dovuto al dispositivo all’altro capo del cavo che potrebbe
essere spento o non collegato. Tasto Pushbutton (Fig. 5), la cui pressione svolge
la funzione di Riavvio del software o di Utilizzo parametri di fabbrica (“factory
bootswitch parameters”).
The Status LED shows the status of communication with the controller, as well as
the status of the board (Fig. 5).
• Starting sequence: on power-up or after restarting the software, the LED performs
the following sequences:
- off;
- 2 s after starting: quick red-green flash;
- 5 s after starting: green steady;
- 62 s after starting (board operating): flashing (colour: see “status of communication
with the KPM30/KPM31”).
• Status of communication with the KPM30/KPM31: in stable operation, the LED
flashes to indicate the quality of communication with the KPM30/KPM31:
- fast green-dark: communication with KPM30/KPM31 ok (KPM30/KPM31 ON-LINE);
- slow red-dark: communication with KPM30/KPM31 not established (KPM30/
KPM31 OFF-LINE);
- green/red: temporary errors, lack of response from KPM30/KPM31.
The Ethernet LED (Fig. 5) shows the status of communication with the Ethernet
network, with the following possibilities:
- green: communication ok, flashing green when exchanging data;
- red: communication not established (cable broken, problems at the other end
of the cable).
Note: the fact that this LED may be red does not depend on the correct setting of
the KPM36Y003 communication parameters, but only on electrical problems or the
failure to read to the network connection signals; the latter case may be due to the
device at the other end of the cable, which may be off or disconnected.
Pushbutton (Fig. 5); pressing this restarts the software or loads the manufacturer
parameters (“factory bootswitch parameters”).
Fig. 4

Altre informazioni. Per ulteriori informazioni consultare il sito giacomini.com o contattare il servizio tecnico. Questa comunicazione ha valore indicativo.
Giacomini S.p.A. si riserva il diritto di apportare in qualunque momento, senza preavviso, modiche per ragioni tecniche o commerciali agli articoli contenuti
nella presente comunicazione. Le informazioni contenute in questa comunicazione tecnica non esentano l’utilizzatore dal seguire scrupolosamente le
normative e le norme di buona tecnica esistenti.
Additional information. For more information, go to giacomini.com or contact our technical assistance service. This document provides only
general indications. Giacomini S.p.A. may change at any time, without notice and for technical or commercial reasons, the items included herewith. The
information included in this technical sheet do not exempt the user from strictly complying with the rules and good practice standards in force.
IT
AVVERTENZE PER IL CORRETTO SMALTIMENTO DEL PRODOTTO
QuestoprodottorientranelcampodiapplicazionedellaDirettiva2012/19/UEriguardantelagestionedeiriutidi apparecchiature
elettriche ed elettroniche (RAEE).
L’apparecchio non deve essere eliminato con gli scarti domestici in quanto composto da diversi materiali che possono essere
riciclati presso le strutture adeguate.
Informarsi attraverso l’autorità comunale per quanto riguarda l’ubicazione delle piattaforme ecologiche atte a ricevere il
prodotto per lo smaltimento ed il suo successivo corretto riciclaggio.
Si ricorda, inoltre, che a fronte di acquisto di apparecchio equivalente, il distributore è tenuto al ritiro gratuito del prodotto
da smaltire.
Il prodotto non è potenzialmente pericoloso per la salute umana e l’ambiente, ma se abbandonato nell’ambiente impatta
negativamente sull’ecosistema.
Leggere attentamente le istruzioni prima di utilizzare l’apparecchio per la prima volta.
Si raccomanda di non usare assolutamente il prodotto per un uso diverso da quello a cui è stato destinato, essendoci pericolo
di shock elettrico se usato impropriamente.
Il simbolo del bidone barrato, presente sull’etichetta posta sull’apparecchio, indica la rispondenza di tale prodotto
alla normativa relativa ai riuti di apparecchiature elettriche ed elettroniche.
L’abbandono nell’ambiente dell’apparecchiatura o lo smaltimento abusivo della stessa sono puniti dalla legge.
EN
IMPORTANT INFORMATION FOR CORRECT DISPOSAL OF THE PRODUCT
This product falls into the scope of the Directive 2012/19/EU concerning the management of Waste Electrical and
Electronic Equipment (WEEE).
This product shall not be dispose in to the domestic waste as it is made of dierent materials that have to be recycled
at the appropriate facilities.
Inquire through the municipal authority regarding the location of the ecological platforms to receive the product for
disposal and its subsequent correct recycling.
Furthermore, upon purchase of an equivalent appliance, the distributor is obliged to collect the product for disposal
free of charge.
The product is not potentially dangerous for human health and the environment, but if abandoned in the environment
can have negative impact on the environment.
Read carefully the instructions before using the product for the rst time.
It is recommended that you do not use the product for any purpose rather than those for which it was intended, there
being a danger of electric shock if used improperly.
The crossed-out wheeled dustbin symbol, on the label on the product, indicates the compliance of this product
with the regulations regarding Waste Electrical and Electronic Equipment.
Abandonment in the environment or illegal disposal of the product is punishable by law.
12/2018
047U54168
Other Giacomini Recording Equipment manuals