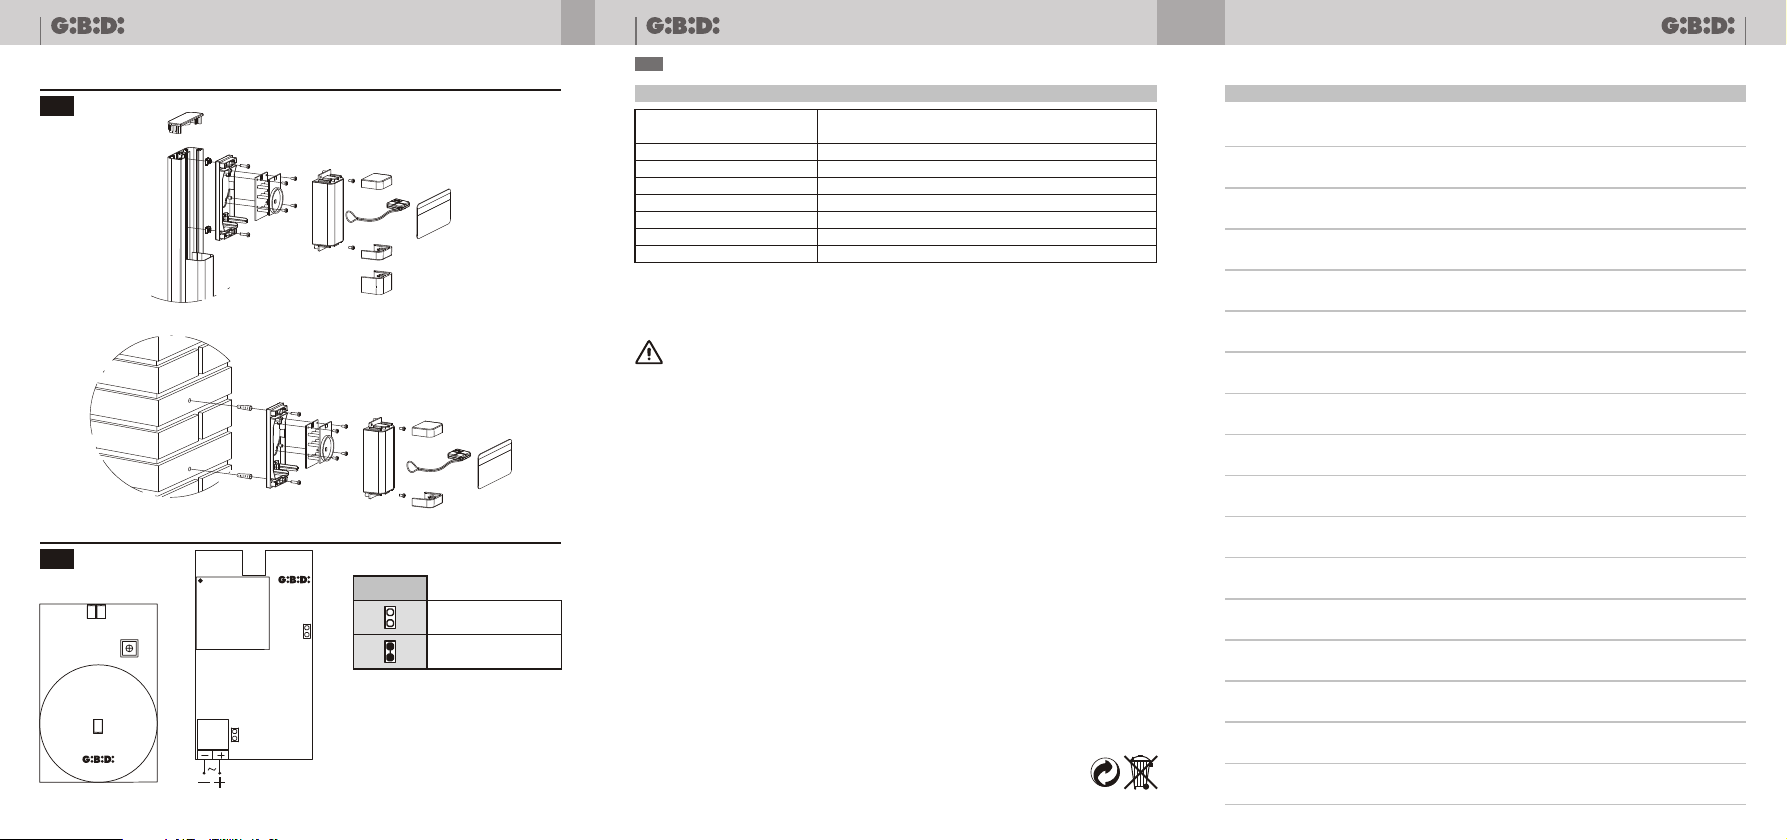
GiBiDi DCX100 Guide

DCX
I UK F E
D P NL GR
Transponder
ISTRUZIONI PER L’INSTALLAZIONE
Transponder
INSTRUCTIONS FOR INSTALLATIONS
DCX100 - (AU05000)
DCX200 - (AU05024)
GI.BI.DI. S.r.l.
46025 Poggio Rusco (MN) - ITALY
Tel. +39.0386.52.20.11
Fax +39.0386.52.20.31
E-mail: [email protected]
Numero Verde: 800.290156
Via Abetone Brennero, 177/B
w w w . g i b i d i . c o m
Cod. AIC6598 - 01/09 - Rev. 00
NOTE
DCX

DCX DCX
2DCX 31
NOTE
I
CARATTERISTICHE TECNICHE
Modello / Articolo
Distanza di attivazione
Frequenza Transponder
Frequenza RF
Alimentazione
Assorbimento
Temperatura di utilizzo
IP
DCX200 / AU05024
20 mm
125 KHz
433,92 MHz
12/24 V dc/ac
60 mA
-20 ÷ +60 °C
DCX100 / AU05000
54
• Eseguire i collegamenti facendo riferimento alle tabelle seguenti e alla serigrafia allegata. Fare molta
attenzione a collegare in serie tutti i dispositivi che vanno collegati allo stesso ingresso N.C. (normalmente
chiuso) e in parallelo tutti i dispositivi che condividono lo stesso ingresso N.A. (normalmente aperto). Una
errata installazione o un uso errato del prodotto può compromettere la sicurezza dell’impianto.
• Tutti i materiali presenti nell’imballo non devono essere lasciati alla portata dei bambini in quanto
potenziali fonti di pericolo.
• Il costruttore declina ogni responsabilità ai fini del corretto funzionamento dell'automazione nel caso non
vengano utilizzati i componenti e gli accessori di propria produzione e idonei per l'applicazione prevista.
• Al termine dell’installazione verificare sempre con attenzione il corretto funzionamento dell’impianto e
dei dispositivi utilizzati.
• Questo manuale d’istruzioni si rivolge a persone abilitate all’installazione di “apparecchi sotto tensione”
pertanto si richiede una buona conoscenza della tecnica, esercitata come professione e nel rispetto
delle norme vigenti.
• La manutenzione deve essere eseguita da personale qualificato.
AVVERTENZE: Questo prodotto è stato collaudato in GI.BI.DI. verificando la perfetta corrispondenza
delle caratteristiche alle direttive vigenti.
GI.BI.DI. S.r.l. si riserva la facoltà di modificare i dati tecnici senza avviso, in funzione dell’evoluzione del
prodotto.
LEGGERE ATTENTAMENTE QUESTO MANUALE PRIMA DI PROCEDERE
ALL’INSTALLAZIONE.
Grazie per avere scelto GIBIDI.
SMALTIMENTO: GI.BI.DI. consiglia di riciclare i componenti in plastica e di smaltire in
appositi centri abilitati i componenti elettronici evitando di contaminare l'ambiente con
sostanze inquinanti.
006G0
JP2
JP1
12/24 Vac/dc
005G0
SW1
D4 D3
D2
1
2
24 Vac - dc
12 Vac - dc
JP1

IMPOSTAZIONI
RICONOSCIMENTO CODICE E MEMORIZZAZIONE DELLE CARD/TAG
DCX 3
I
JUMPER JP1 ALIMENTAZIONE 12/24V ac/dc.
Selezionare in funzione della tensione di alimentazione del ricevitore.
Posizione aperto = 24V ac/dc.
Posizione chiuso = 12V ac/dc.
Il transponder può funzionare in due modalità differenti, dipendenti da quale dispositivo (CARD oppure
TAG) viene avvicinato alla prima alimentazione.
CARD: codice HCS fisso
TAG: rolling code
Se alla prima alimentazione viene avvicinata una CARD il transponder riconoscerà il codice HCS fisso.
Se alla prima alimentazione viene avvicinato un TAG il transponder riconoscerà il codice variabile (rolling
code).
ATTENZIONE: non è possibile gestire contemporaneamente CARD e TAG.
Procedere come descritto:
All'installazione di un nuovo TRANSPONDER è necessario cancellare il contenuto della memoria per
eliminare eventuali impostazioni presenti (vedere CANCELLAZIONE TOTALE).
Con il TRANSPONDER alimentato:
1.Effettuata la cancellazione occorre attendere un lampeggio dei led D3 e D4
2.Avvicinare una CARD o un TAG al transponder. Se il primo dispositivo avvicinato è una CARD il
transponder riconoscerà il codice HCS fisso, risponderà con 2 lampeggi dei led D3 e D4 e da questo
momento memorizzerà e funzionerà solo con CARD a codice HCS fisso. Se il primo dispositivo
avvicinato è un TAG rolling code, il transponder riconoscerà il tipo di codice, risponderà con 1 lampeggio
dei led D3 e D4 e da questo momento memorizzerà e funzionerà solo con TAG rolling code.
3.Per porre il transponder in memorizzazione premere e quindi rilasciare il pulsante LEARN. Il led bianco
D3 si accende e rimane acceso.
4.Posizionare di fronte al TRANSPONDER, in corrispondenza del led bianco centrale D2 la PRIMA
CARD/TAG da memorizzare. L'accensione dei LED bianchi D3 e D4 indicherà la corretta
memorizzazione.
ATTENZIONE: La prima CARD/TAG memorizzata diventerà MASTER, non attiverà la trasmissione
del TRANSPONDER ma consentirà la memorizzazione di altre CARD/TAG.
5. Posizionare di fronte al TRANSPONDER le successive CARD/TAG da memorizzare entro 6 s.
6. Attendere lo spegnimento del led D3 ed il TRANSPONDER è pronto all'uso.
Se il TRANSPONDER esce dalla memorizzazione è possibile memorizzare altre CARD/TAG premendo il
pulsante LEARN e ripetendo il punto 3.

I
DCX
4
Sono possibili 2 differenti tipi di cancellazione:
1.CANCELLAZIONE TOTALE DELLA MEMORIA: vengono cancellate tutte le impostazioni ed il
TRANSPONDER viene impostato con i valori di fabbrica.
1.Togliere alimentazione al TRANSPONDER
2.Premere e tenere premuto il pulsante LEARN
3.Alimentare il TRANSPONDER (i led bianchi D3 D4 si accendono contemporaneamente)
4.Attendere lo spegnimento del led bianco D3 (circa 5 sec.) e rilasciare il pulsante
Il TRANSPONDER è tornato alle impostazioni di fabbrica.
2.CANCELLAZIONE CARD/TAG: vengono cancellati solo le card e i tag precedentemente memorizzati,
lasciando inalterate le impostazioni del TRANSPONDER.
Con il TRANSPONDER alimentato;
premere il pulsante LEARN (il led bianco D3 si accende). Tenere premuto il pulsante fino allo spegnimento
del led (circa 5 sec.). A questo punto la memoria del TRANSPONDER non contiene alcuna CARD/TAG.
I TRANSPONDER della serie: MANAGER sono predisposti anche per il funzionamento
“personalizzato”, ovvero impostazione del codice dell'impianto, dell'utente, della sostituzione
automatica di un trasmettitore smarrito, etc.
Per tali impostazioni rifarsi alle istruzioni del Programmatore: MANAGER.
CANCELLAZIONE
1. Attivare la memorizzazione sul ricevitore radio presente nell'impianto, impostando opportunamente il
canale desiderato (vedi istruzioni ricevitore radio).
2. Entro 6 sec. attivare il TRANSPONDER con una card precedentemente memorizzata.
3. Verificare la memorizzazione avvenuta sul ricevitore radio (attivazione dell'uscita desiderata).
MEMORIZZAZIONE DEL TRANSPONDER NELL'IMPIANTO
Con il TRANSPONDER alimentato:
1.Posizionare di fronte al TRANSPONDER, in corrispondenza del led bianco centrale D2, la CARD/TAG
MASTER. Si accenderanno i 2 led bianchi D3 e D4.
2. Allontanare la CARD/TAG master (il led bianco D3 resterà acceso per 6 s).
3. Posizionare di fronte al TRANSPONDER entro 6 s le successive CARD/TAG da memorizzare.
4. Attendere lo spegnimento del led (uscita dalla memorizzazione) ed il TRANSPONDER è pronto all'uso.
MEMORIZZAZIONE PER MEZZO DELLA CARD/TAG MASTER

UK
PLEASE READ CAREFULLY THIS MANUAL BEFORE PROCEEDING WITH
THE INSTALLATION.
Thank you for choosing GI.BI.DI.
• Before proceeding with installation, fit a magnetothermal or differential switch with a maximum
• Make the connections referring to the following tables and to the attached screen-print. Be extremely
careful to connect in series all the devices that are connected to the same N.C. (normally closed) input,
and in parallel all the devices that share the same N.O. (normally open) input. Incorrect installation or
improper use of the product may compromise system safety.
• Keep all the materials contained in the packaging away from children, since they pose a potential risk.
• The manufacturer declines all responsibility for improper functioning of the automated device if the
original components and accessories suitable for the specific application are not used.
• After installation, always carefully check proper functioning of the system and the devices used.
• This instruction manual addresses persons qualified for installation of “live equipment”. Therefore, good
technical knowledge and professional practice in compliance with the regulations in force are required.
• Maintenance must be carried out by qualified personnel.
WARNINGS: This product has been tested in GI.BI.DI. verifying the perfect correspondence of the
characteristics to the current directive.
Gi.Bi.Di. S.r.l. reserves the right to modify the technical data without prior notice depending on the product
development.
TECHNICAL SPECIFICATIONS
433,92 MHz
60 mA
-20 ÷ +60 °C
DCX100 - AU05000
DCX200 - AU05024
54
IP
Model/Item
Power supply
Absorption
Operating temperature
20 mm
125 KHz
12/24 V dc/ac
DISPOSAL: GI.BI.DI. advises recycling the plastic components and to dispose of them at
special authorised centres for electronic components thus protecting the environment
from polluting substances.
DCX 5
Enabling distance
Frequenza Transponder
Frequenza RF

UK
DCX
6
SETTINGS
CODE RECOGNITION AND CARD/TAG STORAGE
JUMPER JP1 POWER SUPPLY 12/24V ac/dc.
Select according to the receiver supply voltage.
Position open=24V ac/dc.
Position close=12V ac/dc.
The transponder can operate in two different modes, depending on which device (CARD or TAG) is
approached at first power on.
CARD: fixed HCS code
TAG: rolling code
If at first power on a CARD is approached, the transponder will recognise the fixed HCS code.
If at first power on a TAG is approached, the transponder will recognise the variable code (rolling code)
WARNING: It is not possible to manage CARD and TAG simultaneously.
Continue as described below:
1. Once the deletion has been completed you must wait for a flash of LEDs D3 and D4.
2. Approach a CARD or a TAG to the transponder.
If the first device approached is a CARD, the transponder will recognise the fixed HCS code and
respond with two blinks of the LEDs D3 and D4; from this moment on the CARD is stored and the
transponder will function only with fixed HCS code.
If the first device approached is a TAG, the transponder will recognise the rolling code and respond with
one blink of the LEDs D3 and D4; from this moment on the TAG is stored and the transponder will
function only with rolling code.
3. To set the transponder to storage mode, press and release the LEARN button. The white led D3 turns
on, and remains on.
4. Place the FIRST CARD/TAG to memorize in front of the TRANSPONDER, in correspondence of the
white central led D5. The white LED D3 and D4 will turn on to indicate the proper storage.
WARNING: The first CARD/TAG to be stored will work as MASTER, it will not enable the
TRANSPONDER transmission but it will permit the storage of other CARD/TAG.
5. Place the other CARD/TAG to memorize in front of the TRANSPONDER within 6 s.
6. Wait until the D3 led turns off and the TRANSPONDER is ready for use.
If the XP receiver leaves the storage, it is possible to store other CARD/TAG by pressing the LEARN key
and repeating step 3.

UK
DCX 7
2 possible deletions can be done:
1.COMPLETE DELETION OF THE MEMORY: all settings are erased, the TRANSPONDER is set with the
default values.
1. Cut off the power to the TRANSPONDER
2. Press and keep pressed the LEARN key
3. Restore the power to the TRANSPONDER
4. Wait until the white led D3 turns off (about 5 sec.) and release the key
The TRANSPONDER has gone back to the default settings.
2.CARD/TAG DELETION: only the cards and the tags already stored are erased, while the other settings
remain unchanged
If the TRANSPONDER is powered:
Press the LEARN key (the white led D3 turns on). Keep it pressed until the led turns off (about 5 sec.).
Now no CARD/TAG is stored in the TRANSPONDER memory.
The TRANSPONDER of the MANAGER line are preset also for customized use, that is instalment
code setting, user code setting, automatic substitution of a missing transmitter…
For these settings, see the MANAGER Consolle instructions.
DELETION
1. Enable the storage on the radio receiver in the installation, setting the desired channel (see radio
receiver instructions).
2. Enable the TRANSPONDER with a stored card within 6 sec.
3. Check the storage on the radio receiver (enabling of the desired output).
STORAGE BY MEANS OF THE TRANSPONDER IN THE INSTALLATION
If the TRANSPONDER is powered:
1. Place the CARD/TAG MASTER in front of the receiver, in correspondence of the white central led D2.
The D3 and D4 leds will turn on.
2. Move away the CARD/TAG master (the white led D3 will remain on for 6 s).
3. Place in front of the TRANSPONDER the CARD/TAG to memorize within 6 s.
4. Wait until the led turns off (storage phase exit) and the TRANSPONDER is ready for use.
STORAGE BY MEANS OF THE CARD/TAG MASTER

F
DCX
8
NOUS VOUS PRIONS DE BIEN VOULOIR LIRE ATTENTIVEMENT CE MANUEL
AVANT DE PROCÉDER À L’INSTALLATION.
Merci d’avoir choisi GI.BI.DI.
• Il faut effectuer les connexions en se référant aux tableaux suivants et à la sérigraphie jointe. Il faut faire
particulièrement attention à raccorder en série tous les dispositifs qui doivent être connectés à la même
entrée N.F. (normalement fermée) et en parallèle tous les dispositifs qui partagent la même entrée N.O.
(normalement ouverte). Une mauvaise installation ou une mauvaise utilisation du produit peut
compromettre la sécurité de l'installation.
• Tous les matériaux se trouvant dans l'emballage ne doivent pas être laissés à la portée des enfants, car
ils peuvent être dangereux.
• Le constructeur décline toute responsabilité, quant au bon fonctionnement de l'automation, en cas d'utili-
sation de composants et d'accessoires n'étant pas de sa production et inappropriés à l'utilisation prévue.
• Après la mise en place, il faut toujours contrôler avec attention, le bon fonctionnement de l'installation et
des dispositifs utilisés.
• Ce Manuel d'instructions s'adresse aux personnes autorisées à effectuer la mise en place “d'appareils
sous tension”. Il faut donc avoir une bonne connaissance de la technique, exercée comme profession et
conformément aux réglementations en vigueur.
• La maintenance doit être effectuée par un personnel qualifié.
AVERTISSEMENT: Ce produit a été testé chez GI.BI.DI. afin de contrôler la correspondance parfaite des
caractéristiques avec les règles en vigueur.
Gi.Bi.Di. S.r.l. se réserve la faculté de modifier les données techniques sans aucun préavis suivant
l’évolution de ses produits.
ELIMINATION: GI.BI.DI. conseille de recycler les composants en plastique et de remettre
les composants électroniques à des centres spécialisés pour éviter de polluer
l'environnement avec des substances polluantes.
CARACTERISTIQUES TECHNIQUES
-20 ÷ +60 °C
54
IP
Modèle/Article
Alimentation
Courant absorbé
Température de service
12/24 V cc/ca
433,92 MHz
60mA
DCX100 - AU05000
DCX200 - AU05024
20 mm
125 KHz
Distance d'activation
Fréquence Transponder
Fréquence RF

DCX 9
F
POSITIONS
RECONNAISSANCE CODE ET MEMORISATION DES CARD/TAG
JUMPER JP1 ALIMENTATION 12/24V ac/dc.
Sélectionner en fonction de la tension d'alimentation du récepteur.
Position ouvert = 24V ac/dc.
Position fermé = 12V ac/dc.
Le transpondeur peut fonctionner de deux manières différentes, qui dépendent du dispositif (CARD ou
TAG) étant approché lors la première alimentation.
CARD: code HCS fixe
TAG: rolling code
Si lors de la première alimentation c'est une CARD qui est approchée, le transpondeur reconnaitra le code
HCS fixe.
Si lors de la première alimentation c'est un TAG qui est approché, le transpondeur reconnaitra le code
variable (rolling code)
ATTENTION: il est impossible de gérer en même temps CARD et TAG.
Procéder comme suit :
1. Une fois la suppression a été complété, vous devez attendre un flash LED de D3 et D4.
2. Approcher une CARD ou un TAG au transpondeur.
Si le premier dispositif approché est une CARD, le transpondeur reconnaitra le code HCS fixe,
répondra par 2 clignotements des témoins lumineux D3 et D4 et à partir de ce moment là mémorisera et
fonctionnera seulement avec CARD à code HCS fixe.
Si le premier dispositif approché est un TAG rolling code, le transpondeur reconnaitra le type de code,
répondra par 1 clignotement des témoins lumineux D3 et D4 et à partir de ce moment là mémorisera et
fonctionnera seulement avec TAG rolling code.
3. Pour placer le transpondeur en mémorisation, il faut presser et relâcher le bouton LEARN. Le led blanc
D3 s'allume et reste allumé.
4. Positionner devant le TRANSPONDER, en correspondance du led blanc central D5, la PREMIERE
CARD/TAG à mémoriser. L'allumage de la LED blanches D3 et D4 indiquer le stockage.
ATTENTION: La première CARD/TAG mémorisée deviendra MASTER, n'activera pas la
transmission du TRANSPONDER, mais permettra la mémorisation d'autres CARD/TAG.
5. Positionner devant le récepteur les successives CARD/TAG à mémoriser dans 6 s.
6. Attendre la coupure du led D3 et le TRANSPONDER est prêt à l'usage.
Si le TRANSPONDER sort de la mémorisation, c'est possible mémoriser autres CARD/TAG, appuyant sur
le bouton SW1 et répétant le point 3.

DCX
10
F
On peut effectuer deux différents types d'effacement :
1.EFFACEMENT TOTAL DE LA MEMOIRE: on efface toutes les positions et le TRANSPONDER est
posé avec les valeurs de fabrique.
1.Enlever l'alimentation au TRANSPONDER.
2.Appuyer et tenir appuyé le bouton SW1.
3.Alimenter le TRANSPONDER.
4.Attendre la coupure du led blanc D3 (à peu près 5 sec.) et relâcher le bouton.
Le TRANSPONDER est retourné aux positions de fabrique.
2.EFFACEMENT CARD/TAG: on efface seulement les card et les tag mémorisés en précédence,
laissant inaltérées les positions du TRANSPONDER.
Avec le TRANSPONDER alimenté :
appuyer sur le bouton SW1 (le led blanc D3 s'allume). Tenir appuyé le bouton jusqu'à la coupure du led (à
peu près 5 sec.). A ce point-ci la mémoire du TRANSPONDER ne contient aucune CARD/TAG.
Les récepteurs XP de la série: MANAGER sont prédisposés même pour le fonctionnement
«personnalisé», c'est-à-dire position du code de l'installation, de l'usager, du remplacement
automatique d'un émetteur perdu, etc.
Pour cette position-ci voir les instructions de la Console: MANAGER.
EFFACEMENT
1.Activer la mémorisation sur le récepteur radio présent dans l'installation, posant opportunément le canal
désiré (voir instructions récepteur radio).
2.Dans 6 sec. activer le TRANSPONDER avec une card mémorisée en précédence.
3.Vérifier la mémorisation faite sur le récepteur radio (activation de la sortie désirée).
MEMORISATION DU TRANSPONDER DANS L'INSTALLATION
Avec le TRANSPONDER alimenté:
1.Positionner devant le récepteur, en correspondance du led blanc central D2, la CARD/TAG MASTER.
Les deux led blancs D3 et D4 s'allumeront.
2.Eloigner la CARD/TAG master (le led blanc D3 restera allumé par 6 s).
3.Positionner devant le récepteur dans 6 s les successives CARD/TAG à mémoriser.
4.Attendre la coupure du led (sortie de la mémorisation) et le TRANSPONDER est prêt à l'usage.
MEMORISATION PAR LA CARD/TAG MASTER

DCX 11
• Realice las conexiones consultando las siguientes tablas y la serigrafía adjunta. Preste suma atención a
conectar en serie todos los dispositivos que deben conectarse a la misma entrada N.C. (normalmente
cerrada) y, en paralelo todos los dispositivos que comparten la misma entrada N.A. (normalmente
abierta). La instalación o utilización incorrecta del equipo puede afectar la seguridad del equipo.
• Todo material presente en el embalaje debe mantenerse fuera del alcance de los niños, ya que
constituye una posible fuente de peligro.
• El fabricante declina toda responsabilidad relativa al funcionamiento correcto de la automatización si no
se utilizan los componentes y accesorios originales específicamente destinados a la aplicación prevista.
• Al terminar la instalación, compruebe siempre con atención que el equipo y los dispositivos utilizados
funcionen correctamente.
• Este manual de instrucciones está destinado a personas capacitadas para la instalación de “equipos
bajo tensión”. Por lo tanto, se requiere un buen conocimiento técnico, ejercido como profesión y
respetando las normas vigentes.
• El mantenimiento debe ser realizado por personal capacitado.
ADVERTENCIAS: Este producto ha sido ensayado en GI.BI.DI. averiguando la perfecta correspondencia
de las características a las normas vigentes.
La empresa Gi.Bi.Di. S.r.l. se reserva el derecho de modificar los datos técnicos sin previo aviso, en
función de la evolución del producto.
Gracias por haber elegido GI.BI.DI.
POR FAVOR LEER CON ATENCIÓN ESTE MANUAL ANTES DE PROCEDER
CON LA INSTALACIÓN.
ELIMINACION: GI.BI.DI. aconseja reciclar los componentes de plástico y llevar los
componentes electrónicos a los centros de recogida correspondientes evitando de esta
manera la contaminación ambiental con sustancias perjudiciales.
CARACTERÍSTICAS TÉCNICAS
-20 ÷ +60 °C
54
12/24 V dc/ac
Modelo/Artículo
Alimentación
Absorción
Temperatura de funcionamiento
IP
E
433,92 MHz
60 mA
DCX100 - AU05000
DCX200 - AU05024
20 mm
125 KHz
Distancia de activación
Frecuencia Transponder
Frecuencia RF

DCX
E
12
CONFIGURACIONES
RECONOCIMIENTO DEL CÓDIGO Y MEMORIZACIÓN DE LAS CARD/TAG
JUMPER JP1 ALIMENTACION 12/24 V ac/dc.
Seleccionar en función de la tensión de alimentación del receptor.
Posición abierto = 24V ac/dc.
Posición cerrado = 12V ac/dc.
El transpondedor puede funcionar en dos modos distintos, dependiendo del dispositivo (CARD o TAG)
que se acerque a la primera alimentación.
CARD: código HCS fijo
TAG: código variable (rolling code)
Si a la primera alimentación se acerca una CARD, el transpondedor reconocerá el código HCS fijo.
Si a la primera alimentación se acerca un TAG, el transpondedor reconocerá el código variable (rolling
code).
ATENCIÓN: No es posible gestionar simultáneamente CARD y TAG.
Proceda de la siguiente manera:
1. Una vez que la supresión se ha concluido que debe esperar de un flash de LED D3 y D4.
2. Acerque una CARD o un TAG al transpondedor.
Si el primer dispositivo acercado es una CARD, el transpondedor reconocerá el código HCS fijo,
responderá con 2 destellos de los leds D3 y D4 y, a partir de ese momento, memorizará y funcionará
sólo con CARD de código HCS fijo.
Si el primer dispositivo acercado es un TAG de código variable, el transpondedor reconocerá el código,
responderá con 1 destello de los leds D3 y D4 y, a partir de ese momento, memorizará y funcionará sólo
con TAG de código variable.
3. Para poner el transpondedor en condiciones de memorización, pulse y suelte la tecla LEARN. El led
blanco D3 se enciende y queda encendido.
4. Posicionar frente al TRANSPONDER, en corrispondencia del led blanco central D5, la PRIMERA
CARD/TAG a memorizar. El encendido de los LEDs blancos D3 y D4 indican el correcto
almacenamiento.
CUIDADO: La primera CARD/TAG memorizada se hace MASTER, no activará la transmisión del
TRANSPONDER, pero permitirá la memorización de otras CARD/TAG.
5. Posicionar frente al TRANSPONDER las sucesivas CARD/TAG a memorizar dentro de 6 s.
6. Esperar que el led D3 se apague y el TRANSPONDER está listo para ser utilizado.
Si el TRANSPONDER sale de la memorización, es posible memorizar otras CARD/TAG apretando el
botón SW1 y repitiendo el punto 3.

DCX 13
E
Son posibles dos diferentes tipos de cancelación:
1.CANCELACION TOTAL DE LA MEMORIA: se cancelan todas las configuraciones y el
TRANSPONDER se configura con los valores de fábrica.
1.Cortar alimentación al TRANSPONDER
2.Apretar y tener apretado el botón SW1.
3.Alimentar el TRANSPONDER.
4.Esperar que el led blanco D3 se apague (unos 5 seg.) y soltar el botón.
El receptor vuelve a las configuraciones de fábrica.
2.CANCELACION CARD/TAG: se cancelan sólo las card y los tag memorizados en precedencia,
dejando inalterardas las configuraciones del TRANSPONDER.
Con el TRANSPONDER alimentado;
Apretar el botón SW1 (el led blanco D3 se enciende). Tener apretado el botón hasta que el led se apague
(unos 5 seg.). A este punto la memoria del TRANSPONDER no contiene ninguna CARD/TAG.
Los TRANSPONDER de la serie: MANAGER están predispuestos también por el funcionamiento
“personalizado”, o sea configuración del código de la instalación, del usuario, de la sostitución
automática de un transmisor perdido, etc.
Por estas configuraciones ver las instrucciones de la Consola: MANAGER.
CANCELACION
1.Activar la memorización sobre el receptor radio presente en la instalación, configurando
oportunamente el canal deseado (ver instrucciones receptor radio).
2.Dentro de 6 seg. activar el TRANSPONDER con una card memorizada en precedencia.
3.Verifiar la memorización hecha sobre el receptor radio (activación de la salida deseada).
MEMORIZACION DEL TRANSPONDER EN LA INSTALACION
Con el TRANSPONDER alimentado:
1.Posicionar frente al TRANSPONDER, en correspondencia del led blanco central D2, la CARD/TAG
MASTER. Se encenderán los dos led blancos D3 y D4.
2.Apartar la CARD/TAG master (el led blanco D3 quedará encendido por 6 s).
3.Posicionar frente al TRANSPONDER dentro de 6 s las sucesivas CARD/TAG a memorizar.
4.Esperar que el led se apague (salida de la memorización) y el TRANSPONDER está listo para ser
utilizado.
MEMORIZACION POR MEDIO DE LA CARD/TAG MASTER

DCX
D
• Die Verbindungen ausführen, wobei die folgenden Tabellen und der beigefügte Siebdruck zu beachten
sind. Besonders darauf achten, dass alle Vorrichtungen, die denselben N.C. (normalerweise
geschlossenen) Eingang teilen, hintereinandergeschaltet und alle Vorrichtungen, die denselben N.O.
(normalerweise offenen) Eingang teilen, parallelgeschaltet werden. Falsche Installation oder
fehlerhafte Verwendung des Produkts können die Anlagensicherheit beeinträchtigen.
• Sämtliche in der Verpackung enthaltenen Materialien dürfen keinesfalls in der Reichweite von Kindern
aufbewahrt werden, da es sich um potentielle Gefahrenquellen handelt.
• Der Hersteller weist jede Haftung für die Funktionstüchtigkeit der Automatisierung von sich, falls nicht
die von ihm selbst hergestellten bzw. die für die geplante Anwendung passenden Komponenten und
Zubehörteile verwendet werden.
• Nach Abschluss der Installation stets sorgfältig den korrekten Betrieb der Anlage und der verwendeten
Vorrichtungen überprüfen.
• Diese Gebrauchsanweisung wendet sich an Fachkräfte, die zur Installation von “unter Spannung
stehenden Geräten” befugt sind, daher werden ausreichende Fachkenntnisse im Sinne einer
ausgeübten Berufstätigkeit sowie die Einhaltung und Kenntnis der geltenden Normen vorausgesetzt.
• Die Wartung hat durch Fachpersonal zu erfolgen.
WARNUNGEN: Dieses Produkt wurde in GI.BI.DI. geprüft um die perfekte Entsprechung der merkmäle
an die geltende vorschriften zu prüfen.
Gi.Bi.Di. S.r.l. behält sich das recht vor, die technischen daten der produktentwicklung entsprechend
ohne voranzeige abzuändern.
Vielen Dank, dass Sie sich für GI.BI.DI. entschieden haben.
BITTE LESEN SIE VORSICHTIG DIESEN MANUAL BEVOR MIT DER ANGLAGE
VORZUGEHEN.
ENTSORGUNG: GI.BI.DI. empfiehlt, Kunststoffkomponenten dem Recycling zuzuführen
und elektronische Komponenten in behördlich genehmigten Zentren zu entsorgen, um
die Verschmutzung der Umwelt durch Schadstoffe zu verhindern.
TECHNISCHE DATEN
-20 ÷ +60 °C
54
12/24 V DC/AC
Modell/Artikel
Stromversorgung
Aufnahme
Einsatztemperatur
IP
14
433,92 MHz
60 mA
DCX100 - AU05000
DCX200 - AU05024
20 mm
125 KHz
Aktivieren der Abstand
Transponder Frequenz
RF Frequenz

DCX 15
D
EINSTELLUNGEN
WIEDERERKENNUNG DES CODES UND SPEICHERUNG DER CARD/TAG
JUMPER JP1 STROMVERSORGUNG 12/24V ac/dc.
Den Empfänger je nach Versorgungsspannung des Empfängers auswählen.
Offene Position = 24V ac/dc.
Geschlossene Position = 12V ac/dc.
Der Transponder kann in zwei verschiedenen Modi betrieben werden, abhängig davon, welche
Vorrichtung (CARD oder TAG) bei der ersten Übertragung angenähert wird.
CARD: Fester Code HCS
TAG: Rolling Code
Wenn bei der ersten Übertragung eine CARD angenähert wird, erkennt der Transponder den festen Code
HCS.
Wenn bei der ersten Übertragung ein TAG angenähert wird, erkennt der Transponder den variablen Code
(Rolling Code)
ACHTUNG: CARD und TAG können nicht gleichzeitig verwendet werden.
Wie beschrieben vorgehen:
1. Nach der Streichung wurde müssen Sie warten, für eine Flash-LEDs D3 und D4.
2. Eine CARD oder einen TAG an den Transponder annähern. Wenn die erste angenäherte Vorrichtung
eine CARD ist, erkennt der Transponder den festen Code HCS, antwortet mit 2 Blinksignalen der LED
Anzeigen D3 und D4 und ab diesem Moment ist nur die CARD mit festem Code HCS gespeichert und
funktionstüchtig. Wen die erste angenäherte Vorrichtung ein TAG Rolling Code ist, erkennt der
Transponder diesen Art von Code, antwortet mit 1 Blinksignal der LED-Anzeigen D3 und D4 und ab
diesem Moment ist nur der TAG Rolling Code gespeichert und funktionstüchtig.
3. Um den Transponder in den Speichermodus zu versetzen, die Taste LEARN drücken und wieder
loslassen. Die weiße LED-Anzeige D3 schaltet sich ein und bleibt an.
4. Die ERSTE zu speichernde CARD/TAG in Übereinstimmung mit der mittleren weißen LEDAnzeige D2
vor dem TRANSPONDER positionieren. Die Zündung der weißen LEDs D3 und D4 die richtige
Lagerung.
ACHTUNG: Die erste gespeicherte CARD/TAG wird zur MASTER Card; die Übertragung des
Transponders wird nicht aktiviert, aber die Speicherung von anderen CARD/TAG wird ermöglicht.
5. Die anderen zu speichernden CARD/TAG innerhalb von 6 s vor dem TRANSPONDER positionieren.
6. Warten, bis die LED-Anzeige D3 erlischt; nun ist der TRANSPONDER betriebsbereit.
Wenn der TRANSPONDER aus der Speicherung tritt, können andere CARD/TAG durch Drücken der
Taste LEARN und Wiederholung des Punktes 3 gespeichert werden.

D
DCX
16
Die Löschung kann auf 2 Arten erfolgen:
1.GESAMTE LÖSCHUNG DES SPEICHERS: Alle Einstellungen werden gelöscht und der
TRANSPONDER wird mit den Werkseinstellungen versehen.
1.Die Stromversorgung zum TRANSPONDER abtrennen
2.Die Taste LEARN drücken und gedrückt halten
3.Den TRANSPONDER mit Strom versorgen
4.Warten, bis sich die weiße LED-Anzeige ausschaltet (ca. 5 Sek.) und die Taste loslassen
Der TRANSPONDER hat die Werkseinstellungen angenommen.
2.LÖSCHUNG DER CARD/TAG: Nur die zuvor gespeicherten Card und Tag werden gelöscht,
die Einstellungen des TRANSPONDER bleiben unverändert
Bei mit Strom versorgtem TRANSPONDER;
die Taste LEARN drücken (die weiße LED-Anzeige schaltet sich ein). Die Taste gedrückt halten, bis sich
die LED-Anzeige ausschaltet (ca. 5 Sek.). Nun enthält der Speicher des TRANSPONDER keine
CARD/TAG.
Die TRANSPONDER der Serie: MANAGER sind auch für den „personalisierten“ Betrieb, d.h. die
Einstellung des Anlagencodes, des Abnehmers, den automatischen Ersatz eines verloren
gegangenen Senders usw. voreingestellt. Für diese Einstellungen ist auf die Betriebsanleitungen
des Programmierers Bezug zu nehmen: MANAGER geändert werden.
LÖSCHEN
1.Die Speicherung auf dem auf der Anlage angebrachten Radioempfänger aktivieren, indem der
gewünschte Kanal entsprechend eingestellt wird (siehe Anleitungen Radioempfänger).
2.Den TRANSPONDER innerhalb von 6 Sek. mit einer zuvor gespeicherten Card aktivieren.
3.Die auf dem Radioempfänger erfolgte Speicherung überprüfen (Aktivierung des gewünschten
Ausgangs).
SPEICHERUNG DES TRANSPONDER AUF DER ANLAGE
Bei mit Strom versorgtem TRANSPONDER:
1.Die MASTER CARD/TAG in Übereinstimmung mit der mittleren weißen LED-Anzeige D2 vor dem
TRANSPONDER positionieren. Die 2 weißen LED-Anzeigen D3 und D4 schalten sich ein.
2. Die Master CARD/TAG entfernen (die weiße LED-Anzeige D3 bleibt 6 s lang eingeschaltet).
3. Die weiteren zu speichernden CARD/TAG innerhalb von 6 s vor dem TRANSPONDER positionieren.
4.Warte, bis die LED-Anzeige erlischt (Austritt aus der Speicherung); nun ist der TRANSPONDER
betriebsbereit.
SPEICHERUNG MITTELS MASTER CARD/TAG

DCX
P
LER COM ATENÇÃO ESTE MANUAL ANTES DE PROCEDER COM A INSTALAÇÃO.
Obrigado por ter escolhido a GI.BI.DI.
• Efectuar as ligações fazendo referência às seguintes tabelas e às serigrafias em anexo. Ter muita
atenção em ligar em série todos os dispositivos que devem ser ligados à mesma entrada N.C.
(normalmente fechado) e em paralelo todos os dispositivos que partilham a mesma entrada N.A.
(normalmente aberta). Uma instalação errada ou uma utilização errada do produto pode comprometer a
segurança do sistema.
• Todos os materiais presentes na embalagem não devem ser deixados ao alcance das crianças
enquanto fontes potenciais de perigo.
• O construtor declina qualquer responsabilidade no que diz respeito ao correcto funcionamento do
automatismo caso não sejam utilizadas as componentes e os acessórios de sua produção e adequados
à aplicação prevista.
• No fim da instalação verificar sempre com atenção o funcionamento correcto do sistema e dos
dispositivos utilizados.
• O presente manual de instruções destina-se a pessoas habilitadas à instalação de “aparelhos sob
tensão”, exige-se portanto um bom conhecimento técnico em termos profissionais e o respeito das
normas em vigor.
• A manutenção deve ser efectuada por pessoal qualificado.
ADVERTÊNCIA: Este produto foi testado em GI.BI.DI. verificando a correspondência perfeita das
características ao normas vigentes.
A Gi.Bi.Di. S.r.l. reserva-se o direito de modificar os dados técnicos sem pré-aviso em função de evolução
do produto.
ELIMINAÇÃO: GI.BI.DI. Aconselha a reciclar as componentes em plástico e a eliminar as
componentes electrónicas em centros habilitados evitando desta forma poluir o ambiente
com substâncias poluentes.
CARACTERÍSTICAS TÉCNICAS
-20 ÷ +60 °C
54
12/24 V cd/ca
Modelo/Artigo
Temperatura de utilização
Alimentação
Absorção
IP
17
433,92 MHz
60 mA
DCX100 - AU05000
DCX200 - AU05024
20 mm
125 KHz
Ativando distância
Transponder freqüência
RF freqüência

P
DCX
18
CONFIGURAÇÕES
RECONHECIMENTO DO CÓDIGO E MEMORIZAÇÃO DAS CARD/TAG
JUMPER JP1 ALIMENTAÇÃO 12/24V ac/dc.
Seleccionar em função da tensão de alimentação do receptor.
Posição aberto = 24V ac/dc.
Posição fechado = 12V ac/dc.
O transponder pode funcionar em dois modos diferentes, dependendo do dispositivo (CARD ou TAG) ao
qual se aproximar durante a primeira alimentação.
CARD: Código HCS fixo
TAG: rolling code
Se na primeira alimentação for aproximada uma CARD o transponder reconhecerá o código HCS fixo.
Se na primeira alimentação for aproximado um TAG o transponder reconhecerá o código variável (rolling
code).
ATENÇÃO: não é possível gerir simultaneamente CARD e TAG.
Proceder conforme descrito:
1. Após a eliminação, foi concluído que você deve esperar por um flash de LED D3 e D4.
2. Aproximar uma card ou um tag ao transponder. Se o primeiro dispositivo aproximado for uma CARD o
transponder reconhecerá o código HCS fixo, responderá com 2 sinais luminosos intermitentes dos leds
D3 e D4 e a partir deste momento memorizará e funcionará somente com CARD de código HCS fixo.
Se o primeiro dispositivo aproximado for um TAG rolling code o transponder reconhecerá o tipo de
código, responderá com 1 sinal luminoso intermitente dos leds D3 e D4 e a partir deste momento
memorizará e funcionará somente com TAG rolling code.
3. Para passar a memorizar o transponder premir e largar o botão LEARN. O led branco D3 acende e
permanece aceso.
4. Colocar de frente para o TRANSPONDER, em relação ao led branco central D2 o PRIMEIRO
CARD/TAG a memorizar. A ignição dos LEDs brancos D3 e D4 indicam a boa conservação.
ATENÇÃO: O primeiro CARD/TAG memorizado tornar-se-á MASTER, não activará a transmissão
do TRANSPONDER, mas permitirá a memorização de outros CARD/TAG.
5. colocar de frente para o TRANSPONDER os CARD/TAG seguintes para memorizar dentro de 6 seg.
6. esperar que o led D3 se desligue e o TRANSPONDER está pronto a usar.
Se o TRANSPONDER sair da memorização é possível memorizar outros CARD/TAG premindo o botão
LEARN e repetindo o ponto 3.

DCX
P
19
São possíveis 2 tipos diferentes de cancelamento:
1. CANCELAMENTO TOTAL DA MEMÓRIA: são canceladas todas as definições e o TRANSPONDER é
definido com os valores de fábrica.
1.Cortar a alimentação ao TRANSPONDER
2.Premir e manter premido o botão LEARN
3.Alimentar o TRANSPONDER.
4.Esperar que o led branco D3 se apague (cerca de 5 seg.) e soltar o botão
O TRANSPONDER volta às definições de fábrica.
2. CANCELAMENTO DO CARD/TAG: apenas são cancelados os card e os tag anteriormente
memorizados, deixando inalteradas as definições do TRANSPONDER.
Com o TRANSPONDER alimentado:
premir o botão LEARN (o led branco D3 acende). Manter premido o botão até que o led se apague (cerca
de 5 seg.). Neste ponto a memória do TRANSPONDER não contém qualquer CARD/TAG.
Os TRANSPONDER da série: MANAGER também estão preparados para o funcionamento
personalizado”, ou seja, definição do código da instalação, do utilizador, da substituição
automática de um transmissor perdido, etc.
Para tais definições fazer referência às instruções do Programador: MANAGER.
CANCELAMENTO
1. Activar a memorização no receptor de rádio existente na instalação, definindo convenientemente o
canal pretendido (ver instruções do receptor de rádio).
2. Dentro de 6 seg. activar o TRANSPONDER com um card anteriormente memorizado.
3. Verificar a memorização ocorrida no receptor de rádio (activação da saída pretendida).
MEMORIZAÇÃO DO TRANSPONDER NA INSTALAÇÃO
Com o TRANSPONDER alimentado:
1. Colocar de frente para o TRANSPONDER, em relação ao led branco central D2, o CARD/TAG MASTER.
Acender se-ão os 2 led brancos D3 e D4.
2. Afastar o CARD/TAG master (o led branco D3 continuará aceso durante 6 seg.).
3. Colocar de frente para o TRANSPONDER dentro de 6 seg. os CARD/TAG seguintes para memorizar.
4. Esperar que o led se apague (saída da memorização) e o TRANSPONDER está pronto a usar.
MEMORIZAÇÃO ATRAVÉS DO CARD/TAG MASTER

DCX
• Voer de verschillende aansluitingen uit. Baseer U hiervoor op de volgende tabellen en de bijgevoegde
serigrafie. Opgelet: alle voorzieningen die aangesloten moeten worden aan dezelfde ingang NC (normaal
gesloten) moeten in serieschakeling met elkaar verbonden worden en alle voorzieningen met dezelfde
ingang NO (normaal open) moeten in parallelschakeling met elkaar verbonden worden. Een verkeerde
installatie of een verkeerd gebruik van het product kan de veiligheid van het apparaat in gevaar brengen.
• Alle verpakkingsmaterialen moeten vanwege het mogelijke gevaar buiten het bereik van kinderen worden
gehouden.
• De fabrikant wijst elke verantwoordelijkheid af voor een niet correcte werking van de automatisatie
indien er geen originele onderdelen en accessoires werden gebruikt die geschikt zijn voor de voorziene
toepassing.
• Na de installatie moet U steeds grondig controleren of zowel het apparaat als de
veiligheidsvoorzieningen correct werken.
• Deze gebruiksaanwijzing richt zich tot personen die bevoegd zijn om “apparaten onder spanning” te
installeren, een goede kennis van deze techniek is dus vereist. De installatie moet uitgevoerd worden
door vakmensen en de geldige wetgeving dient gerespecteerd te worden.
• Het onderhoud moet uitgevoerd worden door bekwaam personeel.
WAARSCHUWINGEN: Dit product werd gekeurd in Gi.Bi.Di. Er werd nauwlettend gecontroleerd of de
kenmerken van het product perfect overeenkomen met de geldige richtlijnen.
Gi.Bi.Di. S.r.l. behoudt zich het recht voor de technische gegevens te wijzigen zonder waarschuwing
vooraf, als dat nodig is voor de evolutie van het product.
Dank u voor uw keuze van GI.BI.DI.
LEES DEZE GEBRUIKSAANWIJZING ZEER AANDACHTIG ALVORENS DE
INSTALLATIE AAN TE VATTEN.
VERWERKING: GI.BI.DI. adviseert om de kunststof componenten te recycleren en de
elektronische componenten af te voeren naar erkende inzamelpunten, om te voorkomen
dat het milieu verontreinigd wordt door vervuilende stoffen.
TECHNISCHE EIGENSCHAPPEN
-20 ÷ +60 °C
54
12/24 V dc/ac
Model/Artikel
Gebruikstemperatuur
Voeding
Opname
IP
NL
20
433,92 MHz
60mA
DCX100 - AU05000
DCX200 - AU05024
20 mm
125 KHz
Machtigingsverordening afstand
Transponder frequentie
RF frequentie
This manual suits for next models
1
Table of contents
Languages: