Gibson Robot Interface Pack User manual
Gibson Robot
Gibson Robot
Interface Pack (RIP)
Interface Pack (RIP)
Owner’s Manual Version 1.0

Important Safety Instructions
We value you as a customer—and want our products to give you an inspiring, and
gratifying, experience. So, to insure your safety and protect your investment in the
Gibson RI , please read and follow all safety warnings and operating instructions before
using this product, and keep all documentation for future reference.
Environmental Factors
Heat and moisture can harm your Gibson RI . lease do not install or operate this
product near sources of moisture, such as sinks, damp basements, leaky roofs, etc. and
never store it near heat sources, such as heaters or radiators. Both you and your RI
will be much happier if you store and operate this product under safe conditions.
Power Sources
Use only the power sources recommended in this manual. Make sure any power supply
cords are not located where they are likely to be safety hazards, such as on the floor
where people might walk, or in locations where they may receive pressure from items
placed upon or against them. Also, be very careful with any power source connections,
such as where the AC adapter connects to the wall outlet and where it plugs into RI . If
these are jostled loose, RI may experience extreme power differentials, which can
potentially harm you and the product.
Service
lease do not attempt to service RI yourself. Opening the case may expose you to
high voltages (besides, there are no user-serviceable parts), so let our expert
technicians handle any repairs for you.
Speaking of experts, always send the RI to an authorized service technician if any of
the following occurs (contact numbers for service centers are at the end of this section):
●Any foreign object (especially liquid) has gotten into the case
●RI has been exposed to water, dropped, or otherwise damaged
●A marked changed in RI ’s performance
●You hear anything rattling around inside if you shake the RI gently

Warranty Protection
It is very important to us that you are satisfied with your Gibson product. Register it and
activate your warranty protection by mailing the warranty card included with Dark Fire to
Gibson USA, Department W, .O. Box 100087, Nashville, TN 37210-0087. If you
encounter any kind of problem, contact us as soon as possible so we can make things
right.
Once you your warranty protection is active, RI ’s electronic components are warranted
to be free from defects in materials and workmanship for a period of one (1) year from
the date of original purchase. Your warranty covers the cost of both labor and materials
on any repair deemed necessary by our Customer Service Representative for the
warranty period, subject to the limitations below. lease note that our warranty belongs
to the original retail purchaser only, and may not be transferred or assigned to
subsequent owners.
If RI malfunctions as a result of faulty materials or workmanship, Gibson will determine
whether repair or replacement is more appropriate. In case the original materials are no
longer available for repair, Gibson reserves the right to use materials regularly utilized at
the time of repair.
If we determine that replacing RI best serves your interests, or in the unlikely event
that it is destroyed, lost, or damaged beyond repair while in our possession for repairs,
we will replace the product. If it is no longer available, it will be replaced with the most
similar product whose value does not exceed your original product’s purchase price.
Remember—as a necessary condition to the warranty coverage described in this
section, you must activate your warranty by mailing the warranty card included
with Dark Fire to Gibson USA, Department , P.O. Box 100087, Nashville, TN
37210-0087.
Warranty imitations
Unfortunately, it is not possible for your product warranty to cover any of the following:
Any product that has been altered or modified in any way, or upon which any
serial or registration number has been tampered with or altered in any way.
Any product whose warranty card has been altered or contains false information.
Any product that has been damaged due to misuse, negligence, accident or
improper operation or storage.
Any product damaged during shipment. Inspect the package immediately upon
receipt, and notify the carrier immediately if there is damage.
Any product damaged as a result of extreme temperature, humidity, or the use of
an improper power source.

Any product not purchased through an authorized dealer, or any product that has
had repairs, modifications or alterations made by an unauthorized service
technician.
Wear and tear based on normal usage.
Factory installed electronics after more than one year following the original date
of purchase.
Gibson makes no other express warranty of any kind. All implied warranties,
including warranties of merchantability and fitness for a particular purpose that
exceed the specific provisions of the warranty, are expressly and specifically
disclaimed and excluded from the warranty. Note, however, that some states and/or
countries do not allow the exclusion or limitation of implied warranties, so this paragraph
may not apply to you. In particular, if you purchased your product outside of the United
States, contact your local distributor for the handling and resolution of all warranty
issues, as the warranty described here is not always applicable.
And of course, Gibson shall not be liable for any special, indirect, consequential,
incidental or other similar damages to you or to any third party, including, without
limitation, damages for loss of profits or business, or damages resulting from use or
performance of the product, whether in contract or tort, even if Gibson or its authorized
representative has been advised of the possibility of such damages, and Gibson shall
not be liable for any expenses, claims or suits arising from or relating to any of the
foregoing.
To obtain warranty service, contact the service center nearest you:
US (Toll Free) 1-800-4GIBSON
US (Local) 1-615-871-4500
Email - [email protected]m
Europe 00800-4GIBSON1
Email - service.europe@gibson.com
Japan 03-3434-5670
Email - service.[email protected]
China 800-820-8841 (in China only)
Email - service.[email protected]m
Please do not send a unit in for repair before contacting your customer service
center. They will advise you of the proper procedure for a quick and efficient repair, as
well as provide information on where and how to send the product.
Gibson®
is a trademarkof t .he Gibson Guitar Corp
FireWire®
, .is a trademarkof Apple Computer Inc
Windows®
and Windows XP®
, .are registered trademarks of Microsoft Inc

Chapter 1: Introduction
We know you don’t like to read manuals—you just want to play! And we certainly
understand. So, you have two options.
If you’re familiar with computers and driver installation: The printed Quick Start
guide is probably all you need. But after you’re up and running, return to this manual
and read about the Console application and the various tips and tricks.
If you’re new to computer-based music: lease read this manual in its entirety so you
can get the most out of Dark Fire and RI .
Overview: What Is RIP?
The Robot Interface ack (RI ) can send all available Dark Fire signals (magnetic
pickups, piezo pickup, and hex pickup) into a computer for recording or live use. RI is
compatible with virtually all current Mac and Windows computers, as well as many older
models.
Setting up RI involves three main steps:
Installing RIP’s software on your computer. On Windows, this includes drivers
—small programs that let RI communicate with the computer. Mac OS X
already includes suitable drivers. For both computers, a virtual mixing Console
program—very much like a hardware digital mixer—lets you adjust the RI ’s
levels and routing within the computer.
Hooking Up RIP. RI transfers audio to the computer via an industry-standard
FireWire (also called IEEE1394) cable. This physically connects RI ’s FireWire
port to a similar port on your computer. Most computers include a FireWire port,
but you can add FireWire ports to desktop and laptop computers via accessory
cards. See Appendix B for information on doing this, as well as other helpful
FireWire tips. RI also needs power from the included AC adapter.
Customizing RIP for your particular computer or application. This involves
making adjustments to the virtual mixing Console.
Although RI is designed and optimized for music programs, it can also provide
traditional “sound card” capabilities for Windows computers (see Appendix E).

RIP Package Contents
The RI package includes:
Gibson RI interface box
FireWire cable
6-pin to 4-pin FireWire adapter
DVD-ROM containing:
A ReadMe file with important instructions
Windows and Mac RI software
This DF Owner’s Manual
Ableton Live Lite 7 Gibson Studio Edition
Native Instruments Guitar Rig 3
Note: The RI ’s AC adapter is included with the Dark Fire guitar. RI will not operate
without this AC adapter.
Minimum System Requirements
Using RI requires a desktop or laptop computer with:
Unused FireWire 400 port (four-pin or six-pin—described later)
At least 256MB RAM (512MB or more highly recommended)
A fast, high-capacity IDE, SCSI, SATA or FireWire hard disk drive for recording
audio
DVD-ROM drive for program installation
Mac: Mac OS X 10.3.9 or later. (Gibson does not officially support operation
under Boot Camp, although most users report that it works well.)
indows: Either X Home, X rofessional, X rofessional x64 Edition, Vista
32-bit, Vista 64-bit, Server 2003, or Server 2003 x64 Edition. X must have at
least Service ack 2 installed and Vista, Service ack 1. Newer versions of these
operating systems are also supported.

Chapter 2: Important General Installation
Instructions (Mac and Windows)
Check the Gibson Website for Updates
Gibson is committed to enhancing RI ’s performance. For the latest updates, go to
www.gibson.com/darkfire/downloads/software. This is where you’ll also find updated
documentation on exciting new features that Gibson will be adding. lease download
the latest version of this manual to make sure you’re taking advantage of everything RI
has to offer.
Installing from a Downloaded File Instead of the DVD-ROM
When downloading new software, the downloaded file will create an icon where you
saved the software (e.g., the computer’s Desktop or Finder). Treat this icon as you
would the icon on the installation DVD-ROM (referred to in subsequent chapters).
FireWire 400 Port Types
There are two main types of FireWire 400 ports: 4-pin (usually found in laptops), and 6-
pin (found in desktops). RI uses a 6-pin port, and the included cable connects RI to
6-pin FireWire ports. If your computer has a 4-pin port, patch the enclosed 4-pin to 6-
adapter between your computer’s 4-pin port and the included 6-pin cable connector. If
you prefer not to use an adapter, cables are available at consumer electronics stores
with a 4-pin connector on one end and a 6-pin connector on the other.
RI is also compatible with 9-pin FireWire 800 ports. However, you will need an
appropriate physical adapter.
Caution: FireWire Connector Orientation
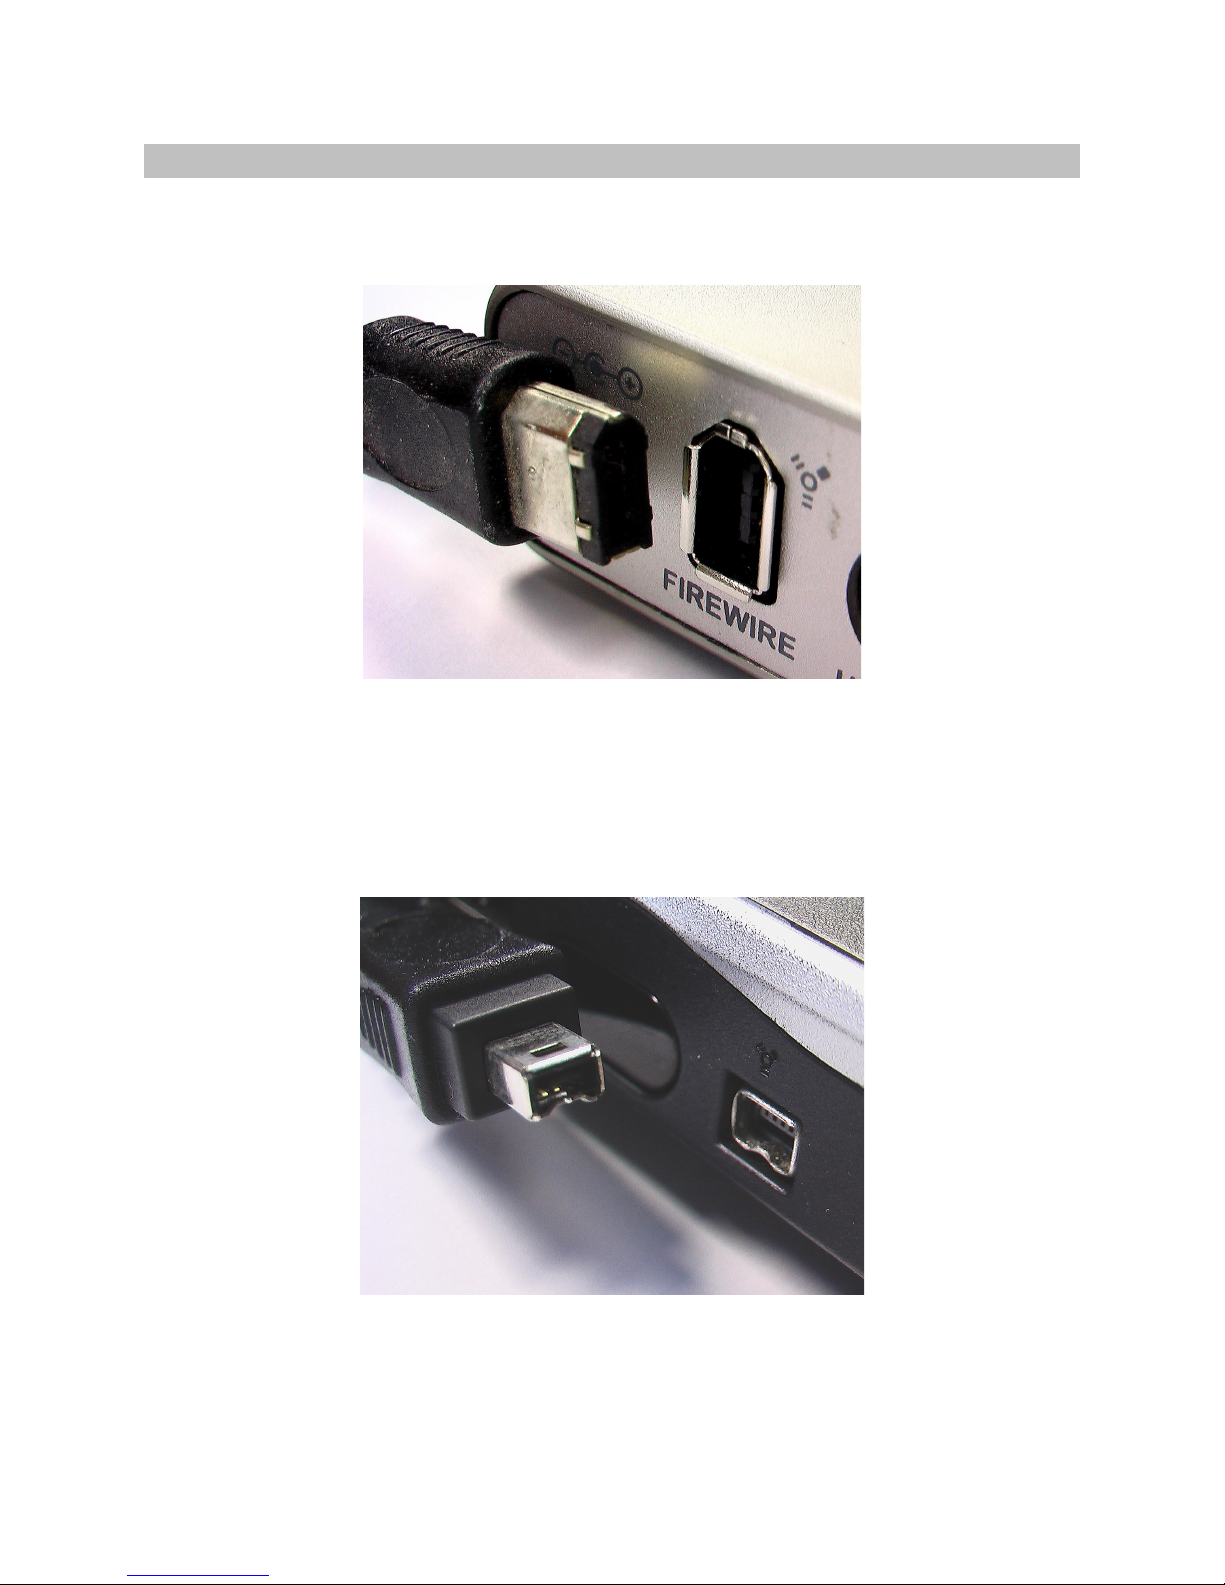
6-pin FireWire connectors have one straight edge and one curved edge. These fit into
matching straight and curved sections in the computer’s FireWire port.
6-pin FireWire connectors (male on the left, female on the right). Note how the bottom is
straight, and the top is curved (angled). ake sure the male and female connectors
match up when you plug in.
4-pin FireWire connectors have a small “notch” in one side. This fits into a matching
“ridge” in the computer’s FireWire port.
4-pin FireWire connectors (male on the left, female on the right). Note how the bottom of
the male connector has a groove that fits into the corresponding ridge in the female
connector.

lug the cable straight in. If you feel that you need to force it, stop immediately and look
carefully at the connectors to make sure they’re aligned properly. lugging in either type
of cable incorrectly could damage your RI , computer, FireWire adapter, or all three.
RIP Requires Its AC Adapter
Bus-powered FireWire devices obtain their power from the FireWire port itself. RI is not
bus-powered because it also needs current to charge Dark Fire’s battery. Always use
RI with the AC adapter provided with Dark Fire. Do not use other AC adapters.
Make FireWire Connections When the Computer and RIP
Are Turned Off
In theory, you can plug and unplug FireWire devices with power applied (called “hot-
swapping”). In practice, this is not always true and may damage your computer’s
motherboard or the RI . Make connections when the computer is turned off to prevent
potential damage.
Connect to a FireWire Port on the Computer Itself, or a
FireWire Card Installed in the Computer
Some FireWire devices, such as hard drives, have two FireWire ports so you can
“daisy-chain” additional peripherals. Do not use these. RI wants the most direct path
possible to your computer.
RIP Automatic Fault Detection
RI can detect faulty cables or bad FireWire connections. If you open the Gibson RI
virtual mixing Console and the console GUI (Graphic User Interface) does not appear,
check your connections. If the Console disappears for no apparent reason while the
application is open, the FireWire cable has likely been unplugged, become slightly
unseated from its connector, or the RI ’s AC adapter has been disconnected. Restoring
these connections restores the Console’s GUI.
Read the FireWire Tips in Appendix B
Even if you’re not having trouble with RI and your computer, these tips may help you
optimize performance.

Chapter 3: Macintosh Installation
1. With the Mac powered off and RI ’s AC adapter disconnected, plug the included
FireWire cable between the FireWire port on the back of the RI , and an empty
FireWire port on your Mac (there is usually one on the Mac’s front panel;
otherwise, check the rear panel).
2. Make sure you have selected the proper AC adapter plug that fits into the type of
wall socket used in your country, then connect the AC adapter to RI .
3. lug in the RI AC adapter, then power-up your Mac.
4. Insert the installation DVD-ROM into your Mac’s DVD-ROM drive.
5. Double-click on the DVD-ROM’s icon when it appears on the Desktop.
6. Locate the DVD-ROM file called “Gibson RI Console,” then drag its icon into the
Applications folder shortcut next to the Console icon. (If for any reason this does
not work, locate the top menu bar in the Mac’s Finder, click on Go, then select
Applications. The Applications folder opens; drag the “Gibson RI Console” file
icon into this folder.)
7. Double-click on the Gibson RI Console icon in the Applications folder.
8. The RI Console appears.
Macintosh installation is now complete, and the virtual mixing Console opens
automatically.
If a window appears that says “The firmware for this device is out of date,”
proceed to Chapter 6, “Updating RI Firmware.”
If this window does not appear, proceed to Chapter 7, “Connecting to Dark Fire.”
Table of contents
Other Gibson Accessories manuals


