Giga-Byte Communications GSmart Roma RX User manual

Roma RX|0
GSmart Roma RX
User Manual

Roma RX|1
Copyright
All mobile products by GIGA-BYTE COMMUNICATIONS INC. mentioned in this document,
including the device, accessories, software, text, music, and pictures, are owned by, or
authorized by original manufacturers to GIGA-BYTE COMMUNICATIONS INC. Reproduction,
transfer, distribution, or storage of part or all of the contents in this document in any form
without the prior written permission of GIGA-BYTE COMMUNICATIONS INC. is prohibited.
GIGA-BYTE COMMUNICATIONS INC.

Roma RX|2
General Information
This section contains important information on safe and efficient operation. Please read this
information before using the device. Ignorance of the following notices may lead to violations
of the law.
Before using the device, please make sure you have fully charged the battery.
Do NOT remove the battery from the device during charging.
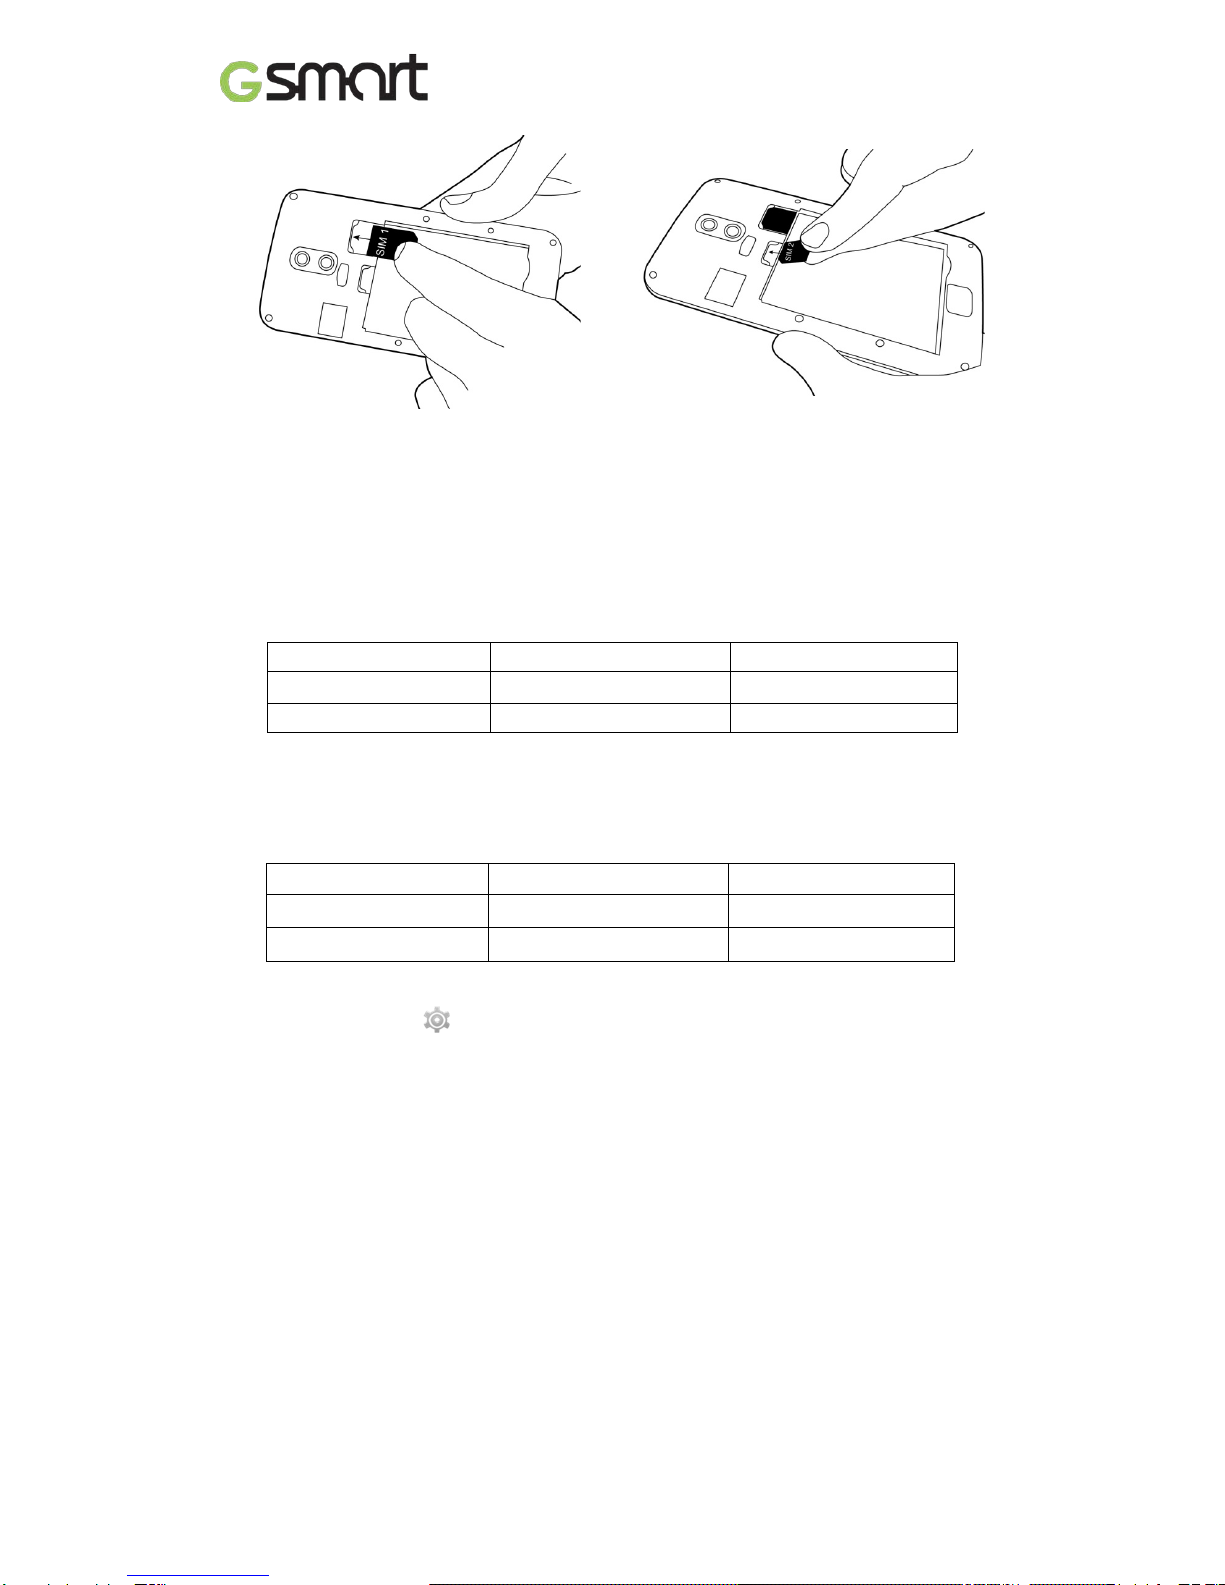
Before inserting SIM card into the device, make sure that the device is switched off.
Keep the battery in low battery status for long time might cause battery over-discharged or
even reduce battery life. To maintain battery in good lifecycle please recharges it once in
low battery.
Please fully charge the battery if you are going to leave the phone without use for long time
to prevent battery goes over-discharged.
Do NOT attempt to dissemble the device on your own. This should be done by an
authorized person.
Use the device in accordance to instructions when in public facilities.
In some countries, it is a violation against the law to record phone conversations. Always
ask permission of the other party when you are going to record a conversation.
To protect your ears, turn down the volume before you use stereo headsets or other audio
devices.
To avoid damaging the touch screen and the device, do NOT apply excessive pressure on
them, and remove the device from your pants’ pocket before you sit down. It is also
recommended that you only use the stylus or your finger to interact with the touch screen.
It is not covered by the warranty that you crack the touch screen because of the improper
usage.
When you use the device for a long time, such as talking on the phone, browsing online, or
charging the battery, the device may become warm. In most cases, this condition is
normal.
Refer servicing to the provider, or an authorized technician under the following conditions:
1. The device has been damaged. 2. When you follow the instructions to use your device,
it does not operate normally. 3. The device has been exposed to water. 4. Liquid has been
spilled or an object has fallen onto the device.
Do NOT push unauthorized objects into slots and openings in your device.
The device should be placed away from heat sources such as stoves, radiators, heat
registers, or other products that produce heat.
Condensation may form on or within your device, when you move your device between
environments with very different temperature and/or humidity ranges. To avoid damaging
your device, make the moisture to evaporate before you use the device.
To avoid damaging your device, do NOT put your device on an unstable table, stand,
bracket, or other places.
Before you clean your device, unplug it, please. Use a damp cloth for cleaning, but do
NOT use water, liquid cleaners, or aerosol cleaners to clean the touch screen.

Roma RX|3
Table of Contents
Copyright
1
General Information
2
1. Getting Started 4
1.1 Your Phone 4
1.2 Installing or uninstalling the SIM Card, Battery, and Memory Card 4
1.3Charging the Battery 6
1.4 Turning the Phone On or Off 7
1.5Lock/Unlock 7
1.6 Contacts 7
1.7 The Home Screen 7
2. Phone Functions &Messages 11
2.1 Voice Calls
11
2.2Creating and sending a text message
11
2.3Multimedia Message 12
3.Wi-Fi & Bluetooth 13
3.1Wi-Fi
13
3.2 Bluetooth
13
4.Multimedia Applications 15
4.1 Camera
15
4.2 Music
16
5. Pre-Installed Programs Introduction 17
6.Managing Your Phone 19
6.1 Protecting Your Phone
19
6.2 Backup or Reset Your Phone
19
7.Specifications 20

Roma RX|4
1. Getting Stared
1.1 Your Phone
This section introduces you to the hardware of the device.
No items No Items
1
Micro-USB Port
9
Menu
2
Earphone Jack
10
Home
3
Receiver
11
Return
4
Front Camera
12
Microphone
5 Proximity Sensor/ Light
Sensor
13 Camera
6
Volume Key
14
Flash LED
7
Power Key
15
Battery Cover
8
Display &Touch Screen
16
Speaker
1.2 Installing or uninstalling the SIM Card, Battery, and Memory Card
To install the SIM card
There are two SIM card slots.The right slot is SIM1(to use with MiniSIM card) andleft slot is
SIM2(to use with MicroSIM card).
To install the SIM1 card:The gold contact is facing downand the cut-off corner is facing
toward the outside. Slide the SIM card into the slot andpush it to the end.
To install the SIM2 card:The gold contact is facing downand the cut-off corner is facing
toward the inside.Slide the SIM card into the slot and push it to the end.
1
2
9
12
3
4
5
6
13
14
15
16
7
8
10
11

Roma RX|5
To install the SIM1 card To install the SIM2 card
To remove the SIM card
Please turn off your phone first, and use your finger to slide the SIM card out of card slot.
NOTE:
SIM Card Data Switch
3G (GSM+WCDMA) is set in SIM1 by default however switchable to SIM2 by manual
setup.
SIM1 SIM2
Default Setting GSM+WCDMA GSM
User Switchable GSM GSM+WCDMA
Tap Applications tab > More… > Mobile networks > 3G service > Enable 3G. Choose one
SIM card for WCDMA+GSM, then the other one will be for GSM automatically.
If you insert singal SIM card, the default setting will be set up as GSM+WCDMA.
SIM1 SIM2
SIM1 inserted GSM+WCDMA X
SIM2 inserted X GSM+WCDMA
Data ON/OFF Switch
Tap Applications tab > >SIM management > Data connection. Choose the same SIM
card as3G (GSM+WCDMA) SIM card.
Battery
Your phone comes with a rechargeable battery. Battery life varies depending on the network,
used applications, and the type of connections attached to your phone.
To install the battery
Make sure the contact of the battery is close to connectors in the battery slot.

Roma RX|6
To remove the battery
Use your fingertip to lift the battery, and then remove it.
To replace the back cover
(1) Insert the cover into the slot from the bottom.
(2) Then, press all around back cover fully until hearing clicks.
Memory card
You may need a microSD card to store photos, music, videos and other data.
To install the memory card
(1) Insert the memory card with the gold contact facing down.
(2) Push the memory card until it clicks into slot.
To remove the memory card
(1) For safe removal, tap Applications tab > Settings >Storage >UnmountSD card>OK.
(2) Push the memory card to eject it from the slot.
1.3 Charging the Battery
When you take your phone out of box for the first time, the battery isn’t at full power. Please
charge the battery fully before using.
(1) Connect the USB cable to the AC adapter, and then, connect to the device via the USB
cable.
(2) Plug the AC adapter to a socket to start the charge.
(3) For phone’s safety, please only use the original charger that comes with your device. Any
possible damage caused by using non-original charger or any other equipment will not be
under GIGABYTE Communication Inc.’s responsibility.

Roma RX|7
NOTE:
To ensure safety, do not remove the battery from the phone while the AC adapter is
connected or while it is being charged.
1.4 Turning the Phone on or off
To turn on your phone
Press and hold the power button until the displayappears “GSmart” logo.
To turn off your phone
(1) Press and hold the power button for several seconds.
(2) A pop-up window appears, then tap “Power off”.
(3) Select “OK” to confirm.
To set your phone to the sleep mode
To set your phone to the sleep mode, press the power button briefly. It will turn the display off.
To turn the display on, press the power button briefly again.
1.5 Lock/Unlock
Unlock the device
Drag G icon on screen and slide to unlock icon for unlocking the device.
1.6Contacts
“Contacts”is your phonebook that you can store friends’ names, phone numbers, e-mail
addresses and other information.”Contacts” can connect to your Googleaccount, corporate
accounts, and integrate your contact information.

Roma RX|8
Adding a Contact
(1) Tap Applications tab > .
(2) Tap >to add a new contact.
(3) Choose where you want to synchronize the new contact with Google account, Phone,
SIM1 or SIM2.
(4) A new contact screen appears.
(5) Tap each field to fill out the contact information.
(6) Tap ”DONE”to save it.
NOTE:
The SIM card contact can’t add picture to contact information.
Searching for Contacts
On Contact Screen, do any of the following to easily search for contacts:
• Tap to type the first few letters of the contact name to search. The list is filtered when
typing. When finishingsearching, you could tap to go back to the contacts screen.
1.7 The Home Screen
On Home Screen, you can quickly access common features and view notifications of missed
calls, received messages, battery, and the status of the connection.
Default Home Screen: Main functions.
You can slide the Home Screen from the left side to the right side or from the right side to the
left side to switch it. The icons located at the bottom of the home page have different functions:
Self-defined Home Screen: You can add the shortcuts and widgets.
Icons Descriptions
Favorites Tray can keep your
most important shortcuts and
folders.
Tap to launch
ApplicationDrawer.
Icons Functions
Tethering or hotspot active
Tap to turn on/ off network.
Enable/disable Wi-Fi.
Enable/disable Bluetooth.
Enable/disableGoogle Location Service™.
Enable/disable Data Synchronization.
Tap to adjust the brightness.

Roma RX|9
Status Icons
The icons of the status bar indicate different types of information. Tap the status bar and scroll
down to view notifications or view system information.
Types Icons Descriptions
Phone call
Call is in progress.
Your call is on hold.
Mute the call.
Speaker is on.
Volume Vibration is on.
Wired microphone headset connected.
Battery
Battery is full.
Battery is low.
Battery is very low.
Battery is charging.
Network
and
Connection
Maximum signal strength. Fewer bars indicate lower signal strength.
Left icon is SIM1 signal. Right icon is SIM2 signal.
GPRS\EDGE\ 3G\ HSPA is in progress.
Wi-Fi is connected.
Wi-Fi is in progress.
Wi-Fi Network is activated.
Airplane mode.
Portable Wi-Fi hotspot is activated.
Both USB tethering and Portable Wi-Fi hotspot are activated.
Bluetooth is on.
The device is connected to PC via the USB cable.
Notification
New text message.
New e-mail.
New Gmail™.
Alarm.
Event notification.

Roma RX|10
Types Icons Descriptions
Notification
Missed call.
General notification.
FM radio is on.
Playing a song.
Downloading an application.

Roma RX|11
2. Phone Functions &Messages
2.1 Voice Calls
To make a call from the Phone screen
(1) Go to the Phone screen.
(2) Use the keypad to input phone numbers.
(3) Tap to make the phone call.
NOTE:
1. Tap to delete a number. Tap and hold to erase entire numbers.
2. If you insert SIM1 and SIM2 at the sametime, the Voice service will be set as default.
You can setthedefault from the status bar on Phone screen.
To make a call from Contacts
(1) Tap Applications tab> .
(2) Tap .
(3) Tap a contact you want to call.
To make emergency calls
You have to unlock your device before making an emergency call. Enter the international
emergency number 112to make the emergency call.
Answering a call
When there is an incoming call:
The phone will ring with the ring volume is turned on.
A notification message will appear on thescreen.
Ending a call
Tap . It’s the end icon to end a call.
2.2 Creating and sending a text message
Your phone offers several ways to create and send a new text message.
From Message screen
(1) Tap Applications tab > .
(2) Tap to create anew message.
(3) In the “Type name or number” field, enter the recipient’s phone numbers or tap to add
from your contacts.
(4) Type your message in the “Type text message”field.
(5) Tap to send your message.
NOTE:
If you insert SIM1 and SIM2 at the sametime, the Message service will be set as default.
You can setthe default fromthe status bar .
From Contact screen
(1)Tap Applications tab > .
(2)Tap a contact to display the contact information.
(3)Tap the icon to send the message.
(4)Compose your message.
(5)Tap to send your message.
NOTE:
If you exit Messages before sending, unsent message will be saved as a
draftautomatically.

Roma RX|12
Google™ keyboard
2.3 Multimedia Message
A Multimedia message or MMS can contain letters, an image, an audio, or a videofile.
To send MMS from Message screen
(1) Tap Applications tab> .
(2) Tap to create a new message.
(3) Enter the recipient’s phone numbers in the “Type name or number” field
(4) Tap to attach picture, video, record audio, contact, pictures, videos, audio or calendar.
The message converts to a MMS message automatically.
(5) Enter your message with the on-screen keyboard in “Type text message” filed.
(6) Tap to send your message.
Icons Function
Tap to active Capital letter mode.
Tap to activate the symbols and numerical
keyboard.
Tap to input something by voice.
Tap to delete words.

Roma RX|13
3. Wi-Fi & Bluetooth
3.1 Wi-Fi
Your device can connect to the detected network through Wi-Fi.
(1) Tap Applications tab > > Wi-Fi.
(2) Switchto turn “Wi-Fi” on or off.
To connect to a Wi-Fi network
(1) Tap “WI-FI”, check Wi-Fi function and turn it on. Begin to search the available Wi-Fi
networks.
(2) Detected networks are displayed below. Tap one network then tap “Connect”.
(3) If you select an open network, the connection is establishedautomatically.
(4) To connect a secured connection, you will be prompted for the password. Enter the
password then tap “Connect”.
(5) When Wi-Fi is connected, the connection icon will be displayed on the status bar.
To add Wi-Fi network
(1)Tap Applications tab> > Wi-Fi.
(2)In Wi-Fi screen, tap . An on-screen window will pop-up.
(3) Follow the on-screen instructions and enter the necessary information, thentap “Save” to
save the settings.
3.2 Bluetooth
Bluetooth on your phone operates in three different modes:
On: Bluetooth is turned on. Your phone detects other Bluetooth devices, but your phone is
not visible to others.
Discoverable: Bluetooth is turned onand your phone is visible to other Bluetooth devices.
Off: Bluetooth is turned off.
To turn Bluetooth on or off
(1)Tap Applications tab> >Bluetooth.
(2)Switch or tap toturniton.
(3)Tap “Bluetooth” to view the menu options.
(4)Tapthe device’s name to make yourdevice visible to others.
To connect to Bluetooth devices
A connection to a Bluetooth device is called a partnership. You need to pair and create a
partnership with a Bluetooth device to exchange information.
(1) Tap Applications tab > >Bluetooth.

Roma RX|14
(2) Tap “SEARCHFORDEVICES” to search for a new device.
(3) Detected Bluetooth devices are displayed on the screen. Tap one device to connect.
(4) Start to pair, enter the password, and thentap “OK” to finish pairing.

Roma RX|15
4. Multimedia Applications
4.1 Camera
Your phone is equipped with an 5MP camera to take photos and videos.
Camera Function
Icon
Function
Icon
Function
Tap to take a
photo. Color effect
Tap to record
a video. Modeling
stickers
Switch
between
camera
mode and
record mode.
Switch
between
rear and
front
camera.
Configure
camera
settings.
Display the
flash mode.
Capture
mode. Displays the
last image.
Taking a photo
(1)Tap Applications tab > . The screen switches to landscape view automatically.
(2)Tap to take apicture.
Recording a video
(1) Tap Applications tab > .
(2) Switch to recorder mode.
(3) Aim the phone at the subject.
(4) Tap to start to record, tap again to stop recording.

Roma RX|16
4.2Music
You have to copy your audio files to the storage card before playing music, because the music
player only plays audio files saved in the storage card of your phone. Tap Applications tab >
.
Playback screen: Displays the playback area with the playback controls.
Icon Function
Album art picture or animation
The area of audio information
Slide to go forward or backward
To play the song
To pause the song
Previous song
Next song
Tap to go to playlists
To start or close shuffle function
To repeat the current song/ all songs

Roma RX|17
5. Pre-Installed Programs Introduction
Icons Programs Description
Icons
Programs Description
Best
Choice
Recommended the
best software and
functionality.
Browser
Browses the web
and download
files
from Internet.
Calculator
Performsarithmetic
functions, such as
addition, subtraction,
multiplication, and
division, etc.
Calendar
Creates and tracks
schedule or
appointments.
Camera Captures still images.
Chrome™ Browser service.
Clock Sets up alarmclock. People
Storesnames,
numbers, e-mail,
and other
information.
Downloads To view
filesanditems you've
downloaded. Email Sends and
receives e-mail
messages.
YouTube™
It is online video
streaming service
that to view, search,
and upload videos.
FM Radio Listen to
music/news on the
FM Radio.
File Manager Manages all files. Gmail™ Web-based e-mail
service.
Gallery Views and edits
photos and videos. Google Settings
Shortcuts to your
Google+™
settings, Maps™&
Location™,
Search™, and
Ads.
Google
Google
Now™service.
Hangouts™
Instant messaging
program.
Google+™
Checks friends’
updates and post
updates of your
own.
Messaging Sends and
receives all types
of messages.
Play Music Listening to your
music collection
anywhere.
Sound
Recorder Records a voice
note.
Maps™ Searching places
you want. Play Games Google™ game
center.
Music Plays and manages
the music and audio
files. Drive™
Google Drive™
to store files
withGoogle™
Docs.
Play
Newsstand Newsservices. Photos
Google™ service
to edit and back up
pictures.
Play Books Google™ e-book
Store . SIM Toolkit It enables the
SIM to initiate
actions.

Roma RX|18
Icons Programs Description
Icons
Programs Description
Play™ store
To find applications
which you can
download and install
on your phone.
ToDoTo save all the
tasks and daily
planning.
System
update
Checking the
system update
information.
Battery Doctor
To save juice and
extend battery life
significantly.
Videos Playing videos. News&Weather Understand news
and weather today
Voice
Search
Quickly to
search your phone,
the web, and nearby
locations by
speaking.
WPS Office Document
processing app
Clean Master
Clearing cache,
residual files,
privacy data and
uninstalling apps.
Phone Makes and
receives phone
calls.
CM Security Scan your device to
protect from virus Settings Set up your phone
Lock Screen Control how and
when the screen
locks
Play Movies &
TV Playing movies
and TV program.

Roma RX|19
6. Managing Your Phone
6.1 Protecting Your Phone
You can protect your phone from unauthorized users in a few different ways.
Set up PIN Protection
(1) Tap Applications tab > > Security > Screen lock >PIN.
(2) Enter your PIN, and then, tap “Continue”. Confirm your password, then, tap “OK”.
(3) If you want to disable screen lock security, please tap Application Drawer > > APPS tab
> Security > Screen lock. Confirm your PIN, and then, tap “Continue”. Tap “None” to
disable it.
Set up Password Protection
(1) Tap Applicationstab > > Security > Screen lock > Password.
(2) Enter your password, and then, tap “Continue”. Confirm your password, then, tap “OK”.
(3) If you want to disable screen lock security, please tap Application Drawer > >APPS tab
> Security > Screen lock. Confirm your password, and then, tap “Continue”. Tap “None” to
disable it.
Set up Unlock Pattern
You can further secure your data by locking the screen and requiring a screen unlock pattern
every time after your phone is turned on or it wakes up from the sleep mode every time (screen
is off ).
(1) Tap Applicationstab > >Security >Screen lock > Pattern.
(2) Draw the unlock pattern by connecting at least four dots. Then tap “Continue”.
(3) Draw the unlock pattern again, and then, tap “Confirm”.
(4) If you want to disable the function, please tap Applications tab > > Security > Screen
lock. Confirm the saved pattern, and then, tap “None” to disable it.
Set up Voice Unlock
You can use voice command to unlock your phone.
(1) Tap Applicationstab > >Security >Screen lock > Voice Unlock.
(2) Tap unlock command.
(3) Speak a command with 2-8 syllables, then repeat 3-6times.
(4) Tap Record button and speak out your voice command.
(5) Set up Pattern as the backup lock.
(6) If you want to disable the function, please tap Applications tab > > Security > voice
unlock. Confirm the saved pattern, and then, tap “None” to disable it.
Enable the PIN of the SIM card
When the PIN is enabled, you are required to enter the PIN before using the phone.
(1) Tap Applications tab > > Security > Set up SIM card lock.
(2) Tap “SIM1” or “SIM2”. (If SIM2 inserted).
(3) Check “Lock SIM card”. Input the PIN, and then, tap “OK”.
6.2Backup or ResetYour Phone
With Clean Boot, you can reset your phone to its factory defaults. When you reset your phone,
the data stored in your phone may be erased.
(1) Tap Applications tab > >Backup & reset.
(2) Tap Factory data reset>Reset phone > Erase everything to reset the phone.
NOTE:
Before resetting your device, please remember to back up all your data and information.
Table of contents
Other Giga-Byte Communications Cell Phone manuals

Giga-Byte Communications
Giga-Byte Communications GSmart Simba SX1 User manual

Giga-Byte Communications
Giga-Byte Communications GSmart Classic Pro User manual

Giga-Byte Communications
Giga-Byte Communications GSmart Tuku T2 User manual

Giga-Byte Communications
Giga-Byte Communications G1362 User manual

Giga-Byte Communications
Giga-Byte Communications GSmart G1315 User manual

Giga-Byte Communications
Giga-Byte Communications GSmart Alto A2 User manual

Giga-Byte Communications
Giga-Byte Communications GSmart F280 User manual

Giga-Byte Communications
Giga-Byte Communications GSmart F180 User manual

Giga-Byte Communications
Giga-Byte Communications GSmart F240 User manual