UTENSILS & COOKING CUSTOMER REVIEWS
HOW TO OPERATE
8 9
HOW TO OPERATE Ginnys.com • 1.800.544.1590
8 9
HOW TO OPERATE
CLEANING & CARE
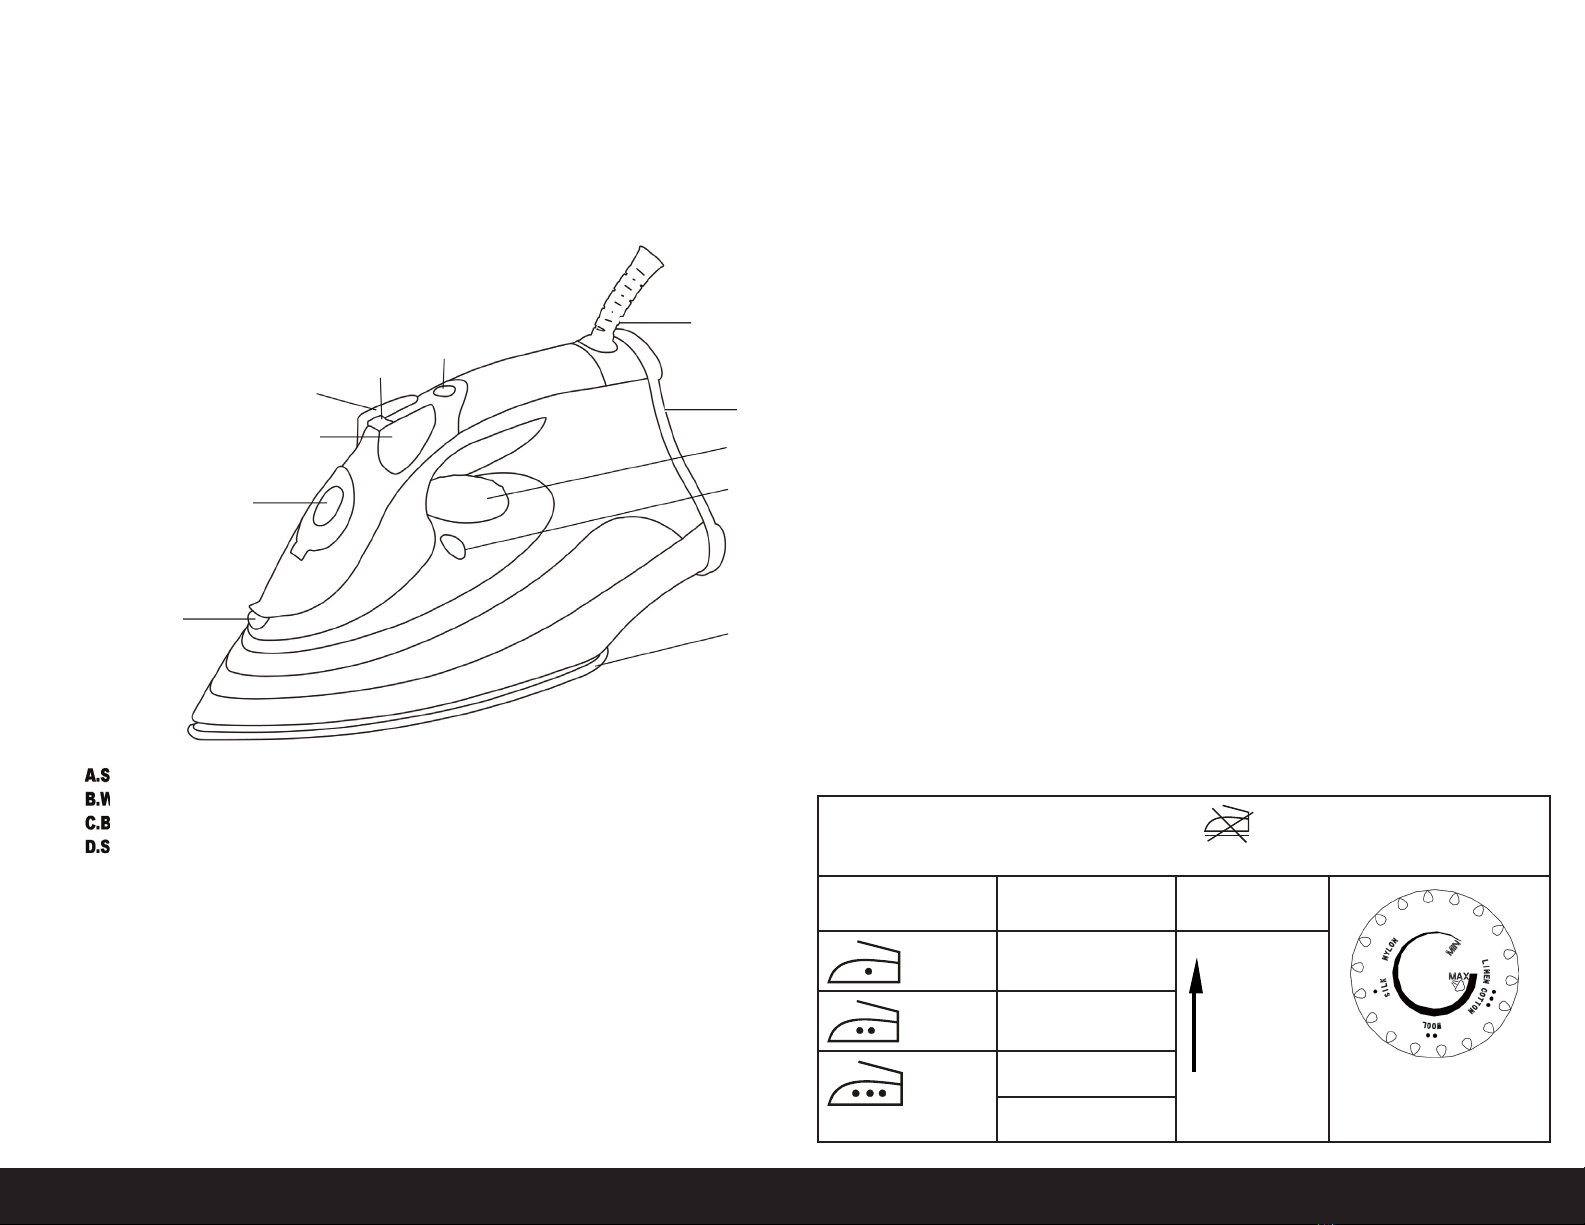
Filling with Water:
Make sure the iron is unplugged and the Temperature Knob is in the “MIN” posi-
tion. Place the iron on its Heel Rest, tilt forward to approximately a 45° angle and
pour water into the water-lling opening to the “MAX” position of the Water Tank.
Burst of Steam:
This function works well for tough wrinkles and heavy fabrics. By pressing the
Burst of Steam button, an intense burst of steam is emitted from the Soleplate.
This can be very useful when removing stubborn creases. For optimum results,
there should be 5 seconds of rest between each press of the Burst of Steam but-
ton.
*NOTE: To prevent water from leaking out of the soleplate, NEVER press the Burst
of Steam button continuously for more than 5 seconds.
Vertical Steam:
“Burst of Steam” can also be applied when holding the iron in the vertical position,
this is useful for removing creases from hanging clothes, curtains, etc.
Dry Ironing:
1. Set the Steam Control button to the “O” position (no steam).
2. Set to the correct ironing temperature as stated on clothing care label.
Spraying:
You can add moisture to the clothing/fabric that you are ironing at any time by
pressing the Spray Button a few times. Before pressing the Spray Button, make
sure that there is water in the Water Tank.
Steam Ironing:
1. Fill the Water Tank by following the “Filling with Water” instructions.
2. Position the Steam Control button to “O”.
3. Plug in the iron. The Power Indicator Light will ash to let you know that the
soleplate is heating. Adjust the Thermostat Knob to the appropriate setting
(according to the care label on your clothing or fabric). When the Power
Indicator Light goes off, the Soleplate has reached the selected temperature.
Press the Steam Control button to release steam and iron clothes or fabric.
4. To increase steam output, press the Steam Control button back. To decrease
steam output, press the Steam Control button forward.
Anti-Calc:
A special resin filter inside the water tank softens the water and prevents scale
buildup in the Soleplate. The resin filter is permanent and doesn’t need to be
replaced.
Anti-Drip:
There is an assembly inside the iron which closes the steam vents when the
temperature of the iron’s Soleplate becomes very low, preventing water leakage.
Auto Shut-Off:
The auto shut-off feature trips after the iron has been left in the upright position
for approximately 15 minutes, or if it has been unused for 30 seconds in the
horizontal position. The Auto Shut-Off Indicator Light will begin to ash to indi-
cate that the Auto Shut-Off feature has been tripped. As soon as you move the
iron, it turns on and will begin to work immediately.
Self-Cleaning:
Use the self-cleaning function once every 2 weeks when using the iron regularly.
If the water in your area is very hard, the self-cleaning function should be used
more frequently.
1. Make sure the iron is unplugged and set the Steam Control button to “O”.
2. Fill the Water Tank to the “MAX” position. Do NOT put vinegar or other
descaling agents in the Water Tank. Set the Temperature Dial to “MAX”
and plug the power cord into the electrical outlet.
4. Once the Power Indicator Light goes off, unplug from the outlet, hold the iron
over the sink and press and hold the Self-Cleaning button and gently shake
the iron back and forth. As steam and water is forced out of the iron, impurities
and akes (if any) will be ushed out. Release the Self-Cleaning button when
all of the water in the Water Tank has been drained out of the iron.
5. Repeat the self-cleaning process if there are still impurities in the iron.
6. When finished, plug the iron back into the wall outlet and allow the iron to
heat up so that the Soleplate will dry. Once the iron has reached the “MAX”
temperature and the Power Indicator Light goes off, unplug the iron and gently
move it over a piece of cloth to remove any water stains that may have formed
on the Soleplate.
7. Allow the iron to cool down before storing it.
Before cleaning, unplug and allow the iron to cool down.
1. Pour any remaining water out of the Water Tank, set the Steam Control Dial to
“O” and set the iron on its Heel Rest.
2. Wipe off the Soleplate with a warm, soapy cloth.
3. If there are fibers adhered to the Soleplate, use a damp cloth with vinegar to
wipe off the Soleplate.
4. NEVER use strong acid or alkali in order to avoid damaging the Soleplate.
5. If scale build-up blocks the Steam Vents, remove the build-up with a toothpick;
do NOT damage the surface of the Soleplate.