English
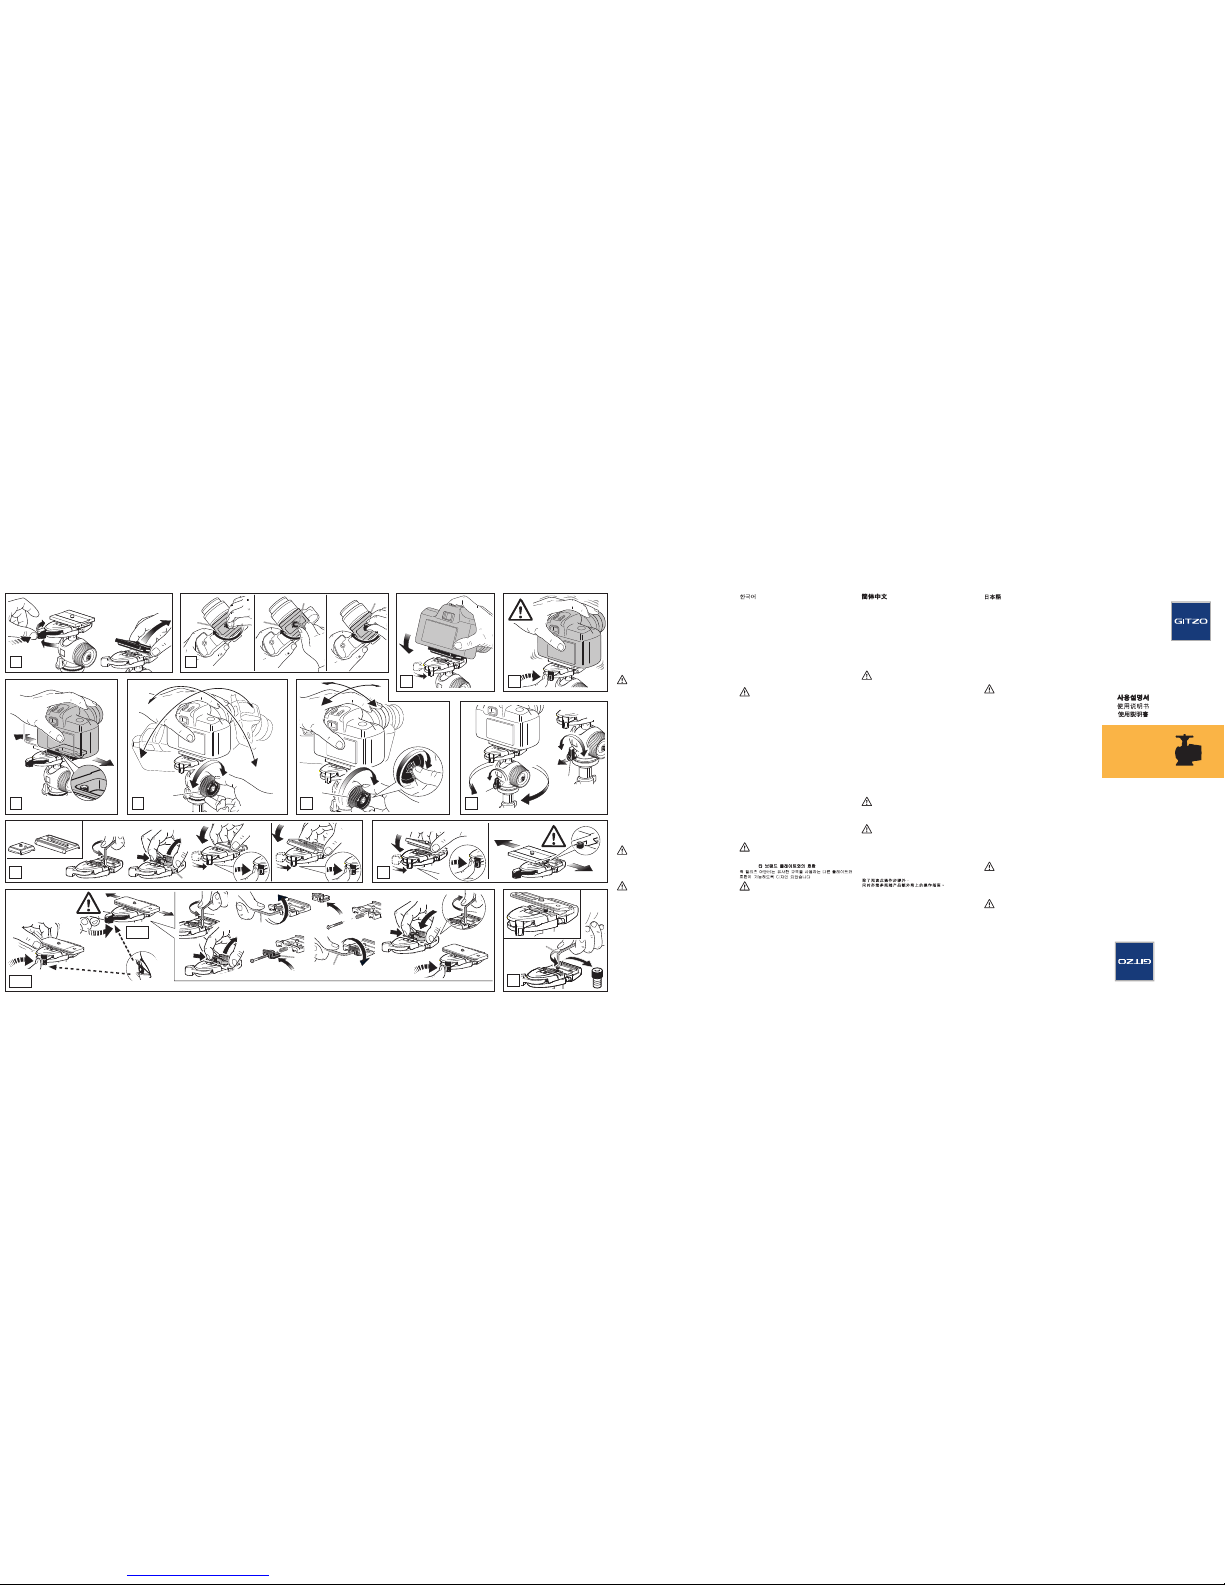
FIG. 1 - How to remove the camera plate
Hold the camera, press the safety button and rotate the
locking lever as showed in figure.
FIG. 2 - How to mount the camera on the plate
To tighten the plate “A”, you can use
- a coin
- hex key “E”
- the screw’s flip ring
FIG. 3-4 - How to mount the camera on the head
Insert the camera plate into the adaptor and then press
plate “A” downwards until the locking lever closes with an
audible click.
Make sure that plate is fully locked by pushing lever
(in the direction shown in fig. 4) and checking that
the camera is fitted securely.
FIG. 5 – How to slide the plate
The quick release adaptor allows the lateral sliding of
the plate when the locking lever is not fully locked, and
includes a safety pin that prevents accidental fallings of
the camera.
FIG. 6-7-8 – Locking / friction control (not supplied on
all models)
B Ball movement lock
H Ball friction control: rotate gear “B” until reaching the
friction desired, then rotate screw “H” until the stop
L Pan movement lock
Note: The angle of the lever on the ratchet knob “L” can
be repositioned as required without effecting the lock
itself. Pull the lever outwards, rotate as required and
release and it will locate in the new position.
FIG. 9 - Compatibility with Gitzo plates
The quick release adaptor is compatible with Gitzo “C
profile” plates (not included).
Remove the component "F" from the adaptor; you can
then mount the plate.
FIG. 10 - Compatibility with Arca Swiss plates
The quick release adaptor is compatible with Arca Swiss
plates.
NOTE: with these plates, the safety pin doesn’t
work, so please lock the plate fully.
FIG. 11A - Usage with other brand plates
The quick release adaptor is also designed to
accommodate some plates with similar dimensions.
Test your plate by mounting it on the adaptor.
See how far the locking lever rotates at the time of
mounting, push the lever for fully locking and check
that the plate does not slide.
Fig. 11B: If the locking lever does not rotate far enough
and the plate cannot be fully locked, try replacing to the
black component “C”.
FIG. 12 - Removing the safety pin
If you are using a non-Gitzo plate and the safety pin
blocks the mounting of the plate, or prevents the lateral
sliding of the plate, remove the safety pin following fig. 12.
In addition to reading these instructions, it is also important
to read the general instructions printed on the warranty
card packed with your product.
Italiano
FIG. 1 - Come rimuovere la piastra per la fotocamera
Reggendo la fotocamera, premere la sicura e ruotare la
leva di bloccaggio come mostrato in figura.
FIG. 2 - Come montare la fotocamera sulla piastra
Per fissare la piastra “A”, si può usare
- una moneta
- la chiave a brugola “E”
- l’anello pieghevole della vite
FIG. 3-4 - Come montare la fotocamera sulla testa
Inserire la piastra della fotocamera nell’adattatore e poi
premere la piastra “A” verso il basso fino a quando la leva
di bloccaggio si chiude con uno scatto.
Accertarsi che la piastra sia ben bloccata premendo
la leva (nella direzione mostrata in fig. 4) e verifican-
do che la fotocamera sia ben salda.
FIG. 5 – Come inserire la piastra
L’adattatore per piastra rapida permette lo scorrimen-
to laterale della piastra quando la leva di bloccaggio
non è completamente bloccata, oltre ad includere un
perno di sicurezza che previene cadute accidentali della
fotocamera.
FIG. 6-7-8 – Bloccaggio / controllo del frizionamento
(non fornito in tutti i modelli)
B Bloccaggio del movimento della sfera
H Controllo del frizionamento della sfera: ruotare la mano-
pola “B” fino a raggiungere il frizionamento desiderato,
quindi ruotare la vite “H” fino al fermo
L Bloccaggio del movimento in panoramica
Nota: L’angolazione della leva a ripresa “L” si può riposi-
zionare come richiesto senza pregiudicare il bloccaggio.
Tirare la leva verso l’esterno, ruotarla come richiesto e
quindi lasciarla andare nella nuova posizione.
FIG. 9 - Compatibilità con le piastre Gitzo
L’adattatore per piastra rapida è compatibile con le piastre
Gitzo “profilo C” (non incluse). Rimuovere il componente
“F” dall’adattatore; ora è possibile montare la piastra.
FIG. 10 - Compatibilità con le piastre Arca Swiss
L’adattatore per piastra rapida è compatibile con le piastre
Arca Swiss.
NOTA: con queste piastre, il perno di sicurezza non
funziona, per cui occorre bloccare completamente la
piastra.
FIG. 11A - Uso con piastre di altri marchi
L’adattatore per piastra rapida è progettato per accogliere
anche alter piastre di dimensioni simili.
Provare la piastra montandola sull’adattatore. Vedere
fino a che punto può ruotare la leva di bloccaggio
all’atto del montaggio, premendo a fondo la leva per
un bloccaggio completo e verificando che la piastra
non possa scorrere.
Fig. 11B: Se la leva di bloccaggio non ruota a sufficienza e
la piastra non risulta saldamente bloccata, provare a riposi-
zionare il componente nero “C”.
FIG. 12 - Rimozione del perno di sicurezza
Se state usando una piastra non Gitzo e il perno di
sicurezza blocca il montaggio della piastra, o previene lo
scorrimento laterale della piastra, rimuovere il perno di
sicurezza seguendo fig. 12.
Oltre a leggere le istruzioni del presente prodotto, è impor-
tante leggere le istruzioni generali fornite con il prodotto.
Français
FIG. 1 – Comment retirer le plateau rapide
Tenir l’appareil photo, presser le bouton de sécurité et
faire pivoter le levier comme montré sur l’image.
FIG. 2 – Comment fixer l’appareil photo sur le plateau
rapide
Pour serrer le plateau "A", vous pouvez utiliser :
- Une pièce de monnaie
- Une clé hexagonale "E"
- La bague de serrage repliable
FIG. 3-4 – Comment fixer l’appareil photo sur la rotule
Insérer le plateau rapide dans l’adaptateur et presser le
plateau "A" vers le bas jusqu’au verrouillage du levier
accompagné du bruit correspondant.
Bien s’assurer que le plateau rapide est totalement
verrouillé en poussant le levier (comme montré dans
la figure 4), puis vérifier que l’appareil photo est
bien fixé avec sécurité.
FIG.5 – Comment faire glisser le plateau rapide
L’adaptateur de plateau rapide autorise le glissement latéral
du plateau lorsque le levier de verrouillage n’est pas complé-
tement verrouillé, et intègre un loquet de sécurité afin d’éviter
toute chute accidentelle de l’appareil photo.
FIG. 6-7-8 – Verrouillage / contrôle de friction (non
disponible sur tous les modèles)
B Verrouillage du mouvement de la rotule
H Contrôle de la friction de la rotule : faire pivoter le bou-
ton rotatif "B" jusqu’à la friction désirée puis serrer la vis
"H" jusqu’au bout.
L Verrouillage du mouvement panoramique
Note : L’angle du levier de serrage "L" peut être modifié si
besoin et ce, sans modifier le verrouillage. Tirer le levier vers
vous puis faite le pivoter jusqu’à la position désirée. Ensuite
relâcher le levier dans la nouvelle position.
FIG. 9 - Compatibilité avec les plateaux rapides Gitzo
L’adaptateur de plateau rapide est compatible avec les
plateaux Gitzo à « Profil C » (non inclus). Retirer le com-
posant "F" de l’adaptateur ; vous pouvez alors positionner
le plateau.
FIG. 10 -
Compatibilité avec les plateaux rapides Arca
Swiss
L’adaptateur de plateaux rapides est compatible avec les
plateaux Arca Swiss.
NOTE : Avec ces plateaux rapides, le loquet de
sécurité ne fonctionne pas, il est donc indispen-
sable de bien vérifier le verrouillage du plateau.
FIG. 11A - Utilisation avec des plateau d’autres marques
L’adaptateur de plateau rapide est également dessiné pour
recevoir d’autres plateaux utilisant des dimensions proches.
Tester votre plateau en le montant sur l’adaptateur.
Vérifier la distance entre le levier de verrouillage au
moment de l’encliquetage, puis verrouiller au maxi-
mum ce même levier. S’assurer ensuite que le pla-
teau ne glisse pas.
Fig. 11B: Si le levier de verrouillage n’a pas une rotation
suffisante et que le plateau rapide n’est complètement ver-
rouillé, positionnez alors le composant "C" en lieu et place
du composant argenté.
FIG. 11 - Retirer le loquet de sécurité
Si vous utilisez un plateau rapide de marque autre que
Gitzo et que le loquet de sécurité empêche sa fixation ou
son glissement latéral, retirez le loquet de sécurité .
En plus de la lecture de ces instructions, il est également
important de lire attentivement et en totalité le livret d’utili-
sation général joint au produit.
Deutsch
ABB. 1 – Entfernen der Kameraplatte
Halten Sie die Kamera fest, drücken Sie den
Sicherheitsknopf und drehen Sie den Sicherungshebel wie
in der Abbildung gezeigt.
ABB. 2 – Anbringen der Kamera an der Platte
Um die Platte "A" zu befestigen, können Sie folgende
Hilfsmittel benutzen:
- eine Münze
- den Inbusschlüssel "E"
- den Ring der Schraube
ABB. 3-4 – Anbringen der Kamera am Kopf
Legen Sie die Kameraplatte in den Adapter und
drücken Sie dann die Platte "A" nach unten, bis der
Verschlusshebel mit einem hörbaren Klick einrastet.
Vergewissern Sie sich, dass die Platte gesichert ist,
indem Sie den Hebel in die in Abb. 4 gezeigte Richtung
schieben und kontrollieren, ob die Kamera sicher sitzt.
ABB. 5 – Schieben der Platte
Der Schnellwechsel-Adapter ermöglicht das seitliche
Herausschieben der Platte, wenn der Verschlusshebel
nicht vollständig geschlossen ist. Außerdem verfügt er
über einen Sicherheitsstecker, der verhindert, dass die
Kamera herunterfällt.
ABB. 6-7-8 – Kopfklemmung / Friktionseinstellung
(nicht bei allen Köpfen möglich)
B Kugel Better: fixierung
H Kugel-Friktionskontrolle: Drehen Sie das Zahnrad "B",
bis es die gewünschte Friktion(Widerstand) erreicht.
Drehen Sie dann die Schraube "H" bis zum Anschlag.
L Hebel zur Fixierung der Schwenkbewegung
Hinweis: Die Winkelstellung des Hebelarmes auf der
Ratschenmutter "L" kann nach Bedarf verstellt werden,
ohne die Sperre selbst zu betätigen. Dazu ziehen Sie den
Hebel heraus, drehen ihn wie gewünscht und lassen ihn
wieder los. Er wird in der neuen Position festgestellt.
ABB. 9 - Kompatibilität mit Gitzo-platten
Der Schnellwechsel-Adapter ist mit Gitzos „C-Profil-
Platten” kompatibel (nicht im Lieferumfang enthalten).
Entfernen Sie Teil "F" vom Adapter. Nun können Sie die
Platte anbringen.
ABB. 10 - Kompatibilität mit Arca Swiss-platten
Der Schnellwechsel-Adapter ist mit Arca Swiss-Platten
kompatibel.
HINWEIS: Mit diesen Platten funktioniert der
Sicherungsstift nicht. Ziehen Sie die Platte also bitte
ganz fest.
ABB. 11A - Nutzung mit Schnellwechselplatten von
anderen Herstellern
Der Adapter ist so entwickelt, daß er auch andere Platten
mit einer ähnlichen Größe aufnehmen kann. Testen
Sie Ihre Platte, in dem Sie sie am Adapter anbringen.
Kontrollieren Sie, wie weit sich der Sicherungshebel beim
Anbringen drehen lässt.
Drücken Sie den Hebel bis zur vollständigen
Verriegelung und prüfen Sie, ob die Platte sich nicht
verschieben lässt.
Abb. 11B: Wenn der Verriegelungshebel sich zu weit drehen
lässt und die Platte nicht vollständig verriegelt werden kann,
versuchen Sie, das schwarze Bauteil "C" auszutauschen.
ABB. 12 - Entfernen des sicherungsstifts
Wenn Sie eine Platte benutzen, die nicht von Gitzo ist und
der Sicherungsstift das Anbringen der Platte blockiert oder
das seitliche Herausschieben der Platte verhindert, dann ent-
fernen Sie den Sicherungsstift wie in Abb. 12 beschrieben.
Zusätzlich zu dieser Bedienungsanleitung ist es ebenso
wichtig die beigelegte Garantiekarte durchzulesen.
9
1
4
8
5 6 7
2
3
10
2
3
4
55 2
1
4
Compatibility with Arca Swiss plates
Gitzo C profile plates -
not included
12
2
3
Other brand plates 4
5
6
12
7
8
9
11
11A
11B
E
E
F
E
C
1
EE
10
1