Maintenance and adjustment of Gladiator Pool Cleaner
5
CLEAN THE FILTER BAG AFTER EVERY CLEANING CYCLE
a.
b.
c.
d.
e.
f.
Unplug the power supply. (Please keep the plug away from contact with water)
If the unit is in the pool, gently pull the cleaner toward you using the cable until the handle is within reach.
Use the handle (not the cable) to pull the cleaner out of the pool after allowing most of the water to drain from
the unit.
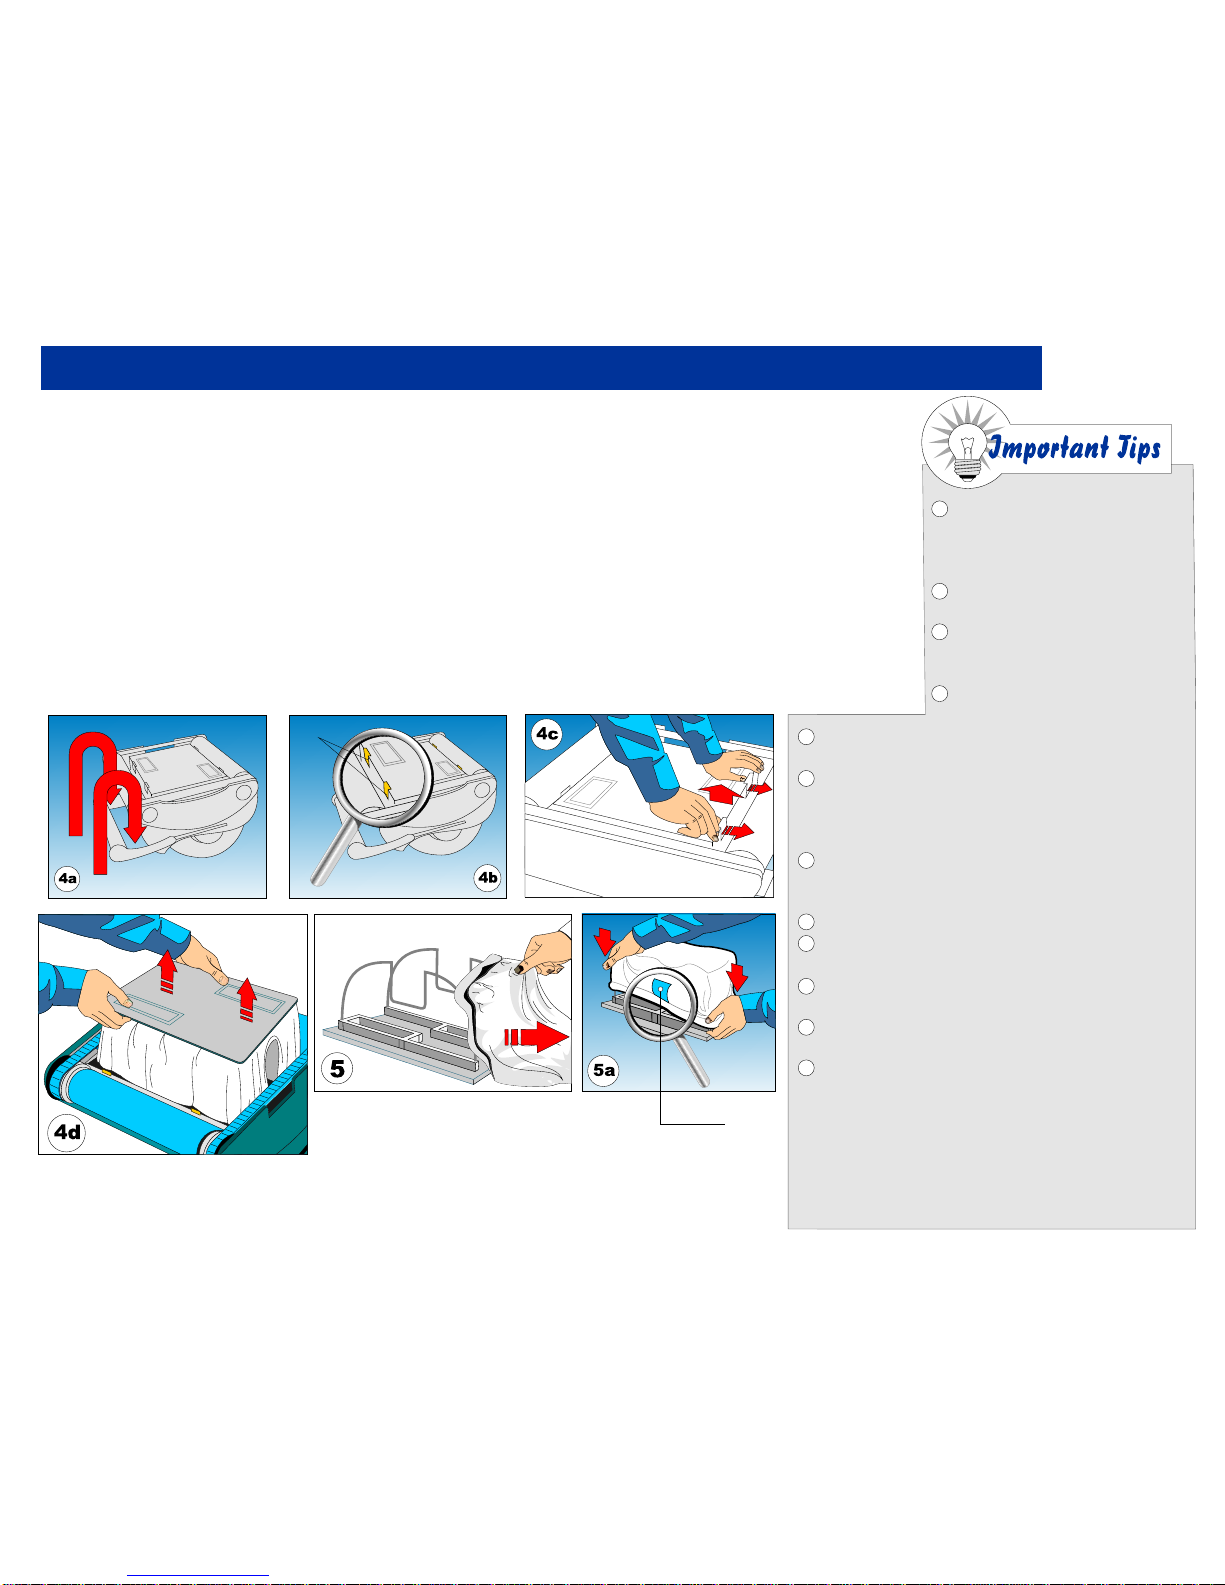
Lay the unit on its back on a smooth surface (in order to prevent scratches on the machine body), unlock and
remove the bottom lid assembly. (fig.4a, 4b, 4c, 4d)
Remove the filter bag from the support bars, turn it inside out and wash off all the dirt with a garden hose or
in a sink. Squeeze the bag gently until the rinse water is clear. If necessary, machine wash the bag using only
cold water with NO DETERGENT! (fig.5)
Re-install the bag on the support bars with the label in the center of one of the long sides of the bottom lid (5A)
Re-install the bottom lid assembly in the body. Push down on it until all 4 lock tabs will snap into place properly.
Shut off and unplug the
power supply every time you
remove the cleaner from the
water.
Clean the filter bag after
everycycle.
Reverse the handle after
everycleaningcycle toavoid
tangling thecable.
Periodically straighten out
thefloatingcable.
Replace worn brushes to ensure maximum
cleaningperformance
Make sure that your pool cleaner positions
itself properly on the wall. The machine
handle must rest parallel to the water line
uponreachingthesurfaceofthewater.
Save your cleaner's packaging for off-season
storage or for shipping the unit to your dealer
ifserviceisrequired.
Storetheunitandaccessoriesonthecaddy.
Leave your pool cleaner in the water for 15 to
20minutesaftereverycleaningcycle.
Do not leave your cleaner in direct
sunlightwhennotinuse.
Never leave the power supply in direct
sunlightandavoidleavingitintherain.
Occasionally,youshouldrinseyourcleanerin
clean, fresh water. This will lengthen the
service life of the drive belts, drive tracks and
scrubbingbrushes.
Maintenance and adjustment of Gladiator Pool Cleaner
5
CLEAN THE FILTER BAG AFTER EVERY CLEANING CYCLE
a.
b.
c.
d.
e.
f.
Unplug the power supply. (Please keep the plug away from contact with water)
If the unit is in the pool, gently pull the cleaner toward you using the cable until the handle is within reach.
Use the handle (not the cable) to pull the cleaner out of the pool after allowing most of the water to drain from
the unit.
Lay the unit on its back on a smooth surface (in order to prevent scratches on the machine body), unlock and
remove the bottom lid assembly. (fig.4a, 4b, 4c, 4d)
Remove the filter bag from the support bars, turn it inside out and wash off all the dirt with a garden hose or
in a sink. Squeeze the bag gently until the rinse water is clear. If necessary, machine wash the bag using only
cold water with NO DETERGENT! (fig.5)
Re-install the bag on the support bars with the label in the center of one of the long sides of the bottom lid (5A)
Re-install the bottom lid assembly in the body. Push down on it until all 4 lock tabs will snap into place properly.
Shut off and unplug the
power supply every time you
remove the cleaner from the
water.
Clean the filter bag after
everycycle.
Reverse the handle after
everycleaningcycletoavoid
tangling thecable.
Periodically straighten out
thefloatingcable.
Replace worn brushes to ensure maximum
cleaningperformance
Make sure that your pool cleaner positions
itself properly on the wall. The machine
handle must rest parallel to the water line
uponreachingthesurfaceofthewater.
Save your cleaner's packaging for off-season
storage or for shipping the unit to your dealer
ifserviceisrequired.
Storetheunitandaccessoriesonthecaddy.
Leave your pool cleaner in the water for 15 to
20minutesaftereverycleaningcycle.
Do not leave your cleaner in direct
sunlightwhennotinuse.
Never leave the power supply in direct
sunlightandavoidleavingitintherain.
Occasionally,youshouldrinseyourcleanerin
clean, fresh water. This will lengthen the
service life of the drive belts, drive tracks and
scrubbingbrushes.