Glen Dimplex Unbranded User manual

Unbranded
100cm Cooker Hood
User Guide


3
1. SAFETY
INFORMATION
For your safety and
correct operation of the
appliance, read this manual
carefully before installation
and use. Always keep these
instructions with the
appliance even if you move
or sell it. Users must fully
know the operation and
safety features of the
appliance.
The wire connection has
to be done by specialized
technician.
• The manufacturer will not be
held liable for any damages
resulting from incorrect or
improper installation.
• The minimum safety distance
between the cooker top
and the extractor hood is
650 mm (some models
can be installed at a lower
height, please refer to the
paragraphs on working
dimensions and installation).
• If the instructions for
installation of the gas hob
specify a greater distance,
this must be respected.
• Check that the mains voltage
corresponds to that indicated
on the rating plate xed to
the inside of the hood.
• Means for disconnection
must be incorporated in the
xed wiring in accordance
with the wiring rules.
• For Class I appliances,
check that the domestic
power supply guarantees
adequate earthing.
• Connect the extractor to the
exhaust ue through a pipe
of minimum diameter 120
mm. The route of the ue
must be as short as possible.
• Regulations concerning the
discharge of air have to be
fullled.
• Do not connect the extractor
hood to exhaust ducts
carrying combustion fumes
(boilers, replaces, etc.).
• If the extractor is used
in conjunction with non-
electrical appliances (e.g.
gas burning appliances), a
sucient degree of aeration
must be guaranteed in the
room in order to prevent the
backow of exhaust gas.
When the cooker hood is
used in conjunction with
appliances supplied with
energy other than electric,
the negative pressure in the
room must not exceed 0,04
mbar to prevent fumes being
drawn back into the room by
the cooker hood.
• The air must not be
discharged into a ue that is
used for exhausting fumes
from appliances burning gas
or other fuels.
• If the supply cord is
EN
USER MANUAL

4
damaged, it must be
replaced from the
manufacturer or its service
agent.
• The appliance must be
installed in such a way as
too allow disconnection from
the electrical power supply
with a contact aperture (3
mm) that ensures complete
disconnection in category III
overload conditions.
• Connect the product to the
mains using an omnipolar
switch.
• With regards to the technical
and safety measures to be
adopted for fume discharging
it is important to closely
follow the regulations
provided by the local
authorities.
WARNING: Before
installing the Hood,
remove the protective
lms.
• Use only screws and small
parts supplied with the hood.
WARNING: Failure to
install the screws or xing
device in accordance with
these instructions may
result in electrical
hazards.
• Do not look directly at the
light through optical devices
(binoculars, magnifying
glasses…).
• Do not ambè under the
range hood; risk of re.
• This appliance can be
used by children aged
from 8 years and above
and persons with reduced
physical, sensory or
mental capabilities or
lack of experience and
knowledge if they have
been given supervision or
instruction concerning use
of the appliance in a safe
way and understand the
hazards involved. Children
shall not play with the
appliance. Cleaning and
user maintenance shall not
be made by children without
supervision.
• Children should be
supervised to ensure that
they do not play with the
appliance.
• The appliance is not to be
used by persons (including
children) with reduced
physical, sensory or mental
capabilities, or lack of
experience and knowledge,
unless they have been given
supervision or instruction.
Accessible parts may
become hot when used
with cooking appliances.
• Clean and/or replace the
Filters after the specied
time period (Fire hazard).
See paragraph Care and
Cleaning.
• There shall be adequate

5
ventilation of the room when
the range hood is used at
the same time as appliances
burning gas or other fuels
(not applicable to appliances
that only discharge the air
back into the room).
• The symbol on the
product or on its packaging
indicates that this product
may not be treated as
household waste. Instead it
shall be handed over to the
applicable collection point
for the recycling of electrical
and electronic equipment.
By ensuring this product is
disposed of correctly, you
will help prevent potential
negative consequences
for the environment and
human health, which could
otherwise be caused
by inappropriate waste
handling of this product. For
more detailed information
about recycling of this
product, please contact
your local city oce, your
household waste disposal
service or the shop where
you purchased the product.
2. USE
• The extractor hood has been
designed exclusively for domestic
use to eliminate kitchen smells.
• Never use the hood for purposes
other than those for which it has
been designed.
• Never leave high naked ames
under the hood when it is in
operation.
• Adjust the ame intensity to direct
it onto the bottom of the pan only,
making sure that it does not engulf
the sides.
• Deep fat fryers must be continuously
monitored during use: overheated oil
can burst into ames.
3. CARE AND CLEANING
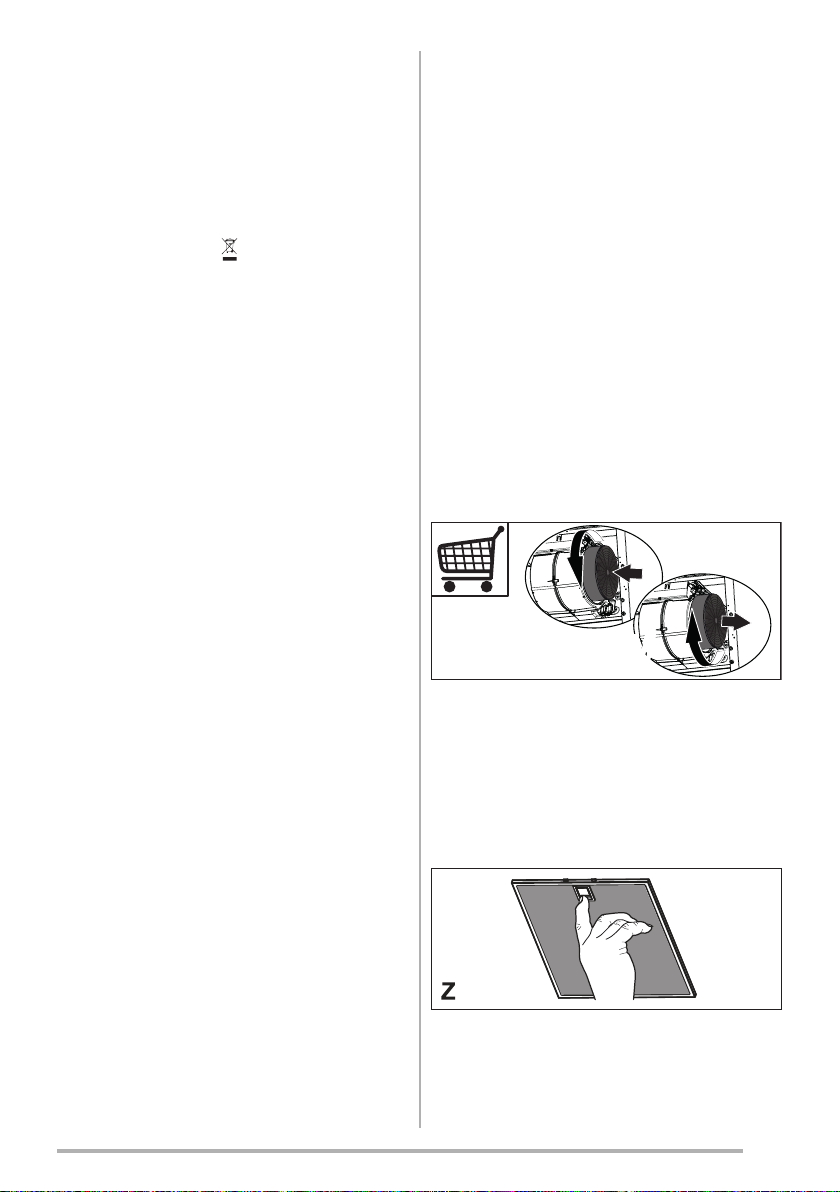
- The Activated charcoal lter is not
washable and cannot be regenerat-
ed, and must be replaced approxi-
mately every 4 months of operation,
or more frequently for particularly
heavy usage (W). Carbon lters
can be obtained from our Custom-
er Care (details at the rear of the
handbook).
WW
- The Grease lters must be cleaned
every 2 months of operation, or
more frequently for particularly
heavy usage, and can be washed in
a dishwasher (Z). The grease lters
may slightly change colour following
washing, however this does not
aect their performance.
• Clean the hood using a damp cloth
and a neutral liquid detergent.

6
4. CONTROLS
BUTTON FUNCTIONS
L Light Turns the Lighting System on and o.
V1 Speed Turns the Motor on at Speed one.
Turns the Motor o.
V2 Speed Turns the Motor on at Speed two.
V3 Speed Turns the Motor on at Speed three.
5. LIGHTING
Lamp Power (W) Socket Voltage (V) Dimension (mm) ILCOS Code
4 E14 220 – 240 107 x 37 DRBB/F-4-220-240-E14-35/100

EN
INSTALLATION MANUAL
Warning! Before proceeding with installation,
read the safety information in the User
Manual.

8
I = 8x
L = 8x
N = 4x
B
C

9
2x
ø 120 mm
ø 150 mm ø 150 mm
FPPLQ
FPPLQ
2x
Min.
650 mm
Min.
650 mm
W

10
1
1

11
2
Romani, Fabio
02-Dec-2019
Released
Romani, Fabio
02-Dec-2019
Released

12
3
56
34
21
12
34
56
177
125125
PP
>
6060
6060
220220
32
78
78
56
34
21
78
X8
X8
PP
I = 8x
45
L
OK!
5
mm
2x
Min.
650 mm
Min.
650 mm

13
[
8
67
2x
9
11
Ø150
Ø120
Ø120
10
L = 4x

14
15
14
16 17
13
12
B
N = 4x
L = 4x
B
B
C
N = 4x
W

15
18

16
Z

17


Glen Dimplex Home Appliances
Customer Care
_______________________________________________
Please keep this handbook in a safe place.
Please ll in the model number and serial number in the
spaces provided below as they will assist us should you
need to call.
0344 815 3747
When you dial this number you will hear a recorded message and
be given a number of options. This indicates that your call has been
accepted and is being held in a queue. Calls are answered in strict
rotation as our Customer Care Representatives become available.
Enter appliance numbers here for future reference:
Model Number:________________________________
Serial Number:________________________________
These numbers can be found on your appliances.
Outside the UK and Northern Ireland, refer to your local supplier.
Stoney Lane, Prescot, Merseyside, L35 2XW
991.0606.281_01 - 200110
D0000xxxx_00
Table of contents
Other Glen Dimplex Ventilation Hood manuals