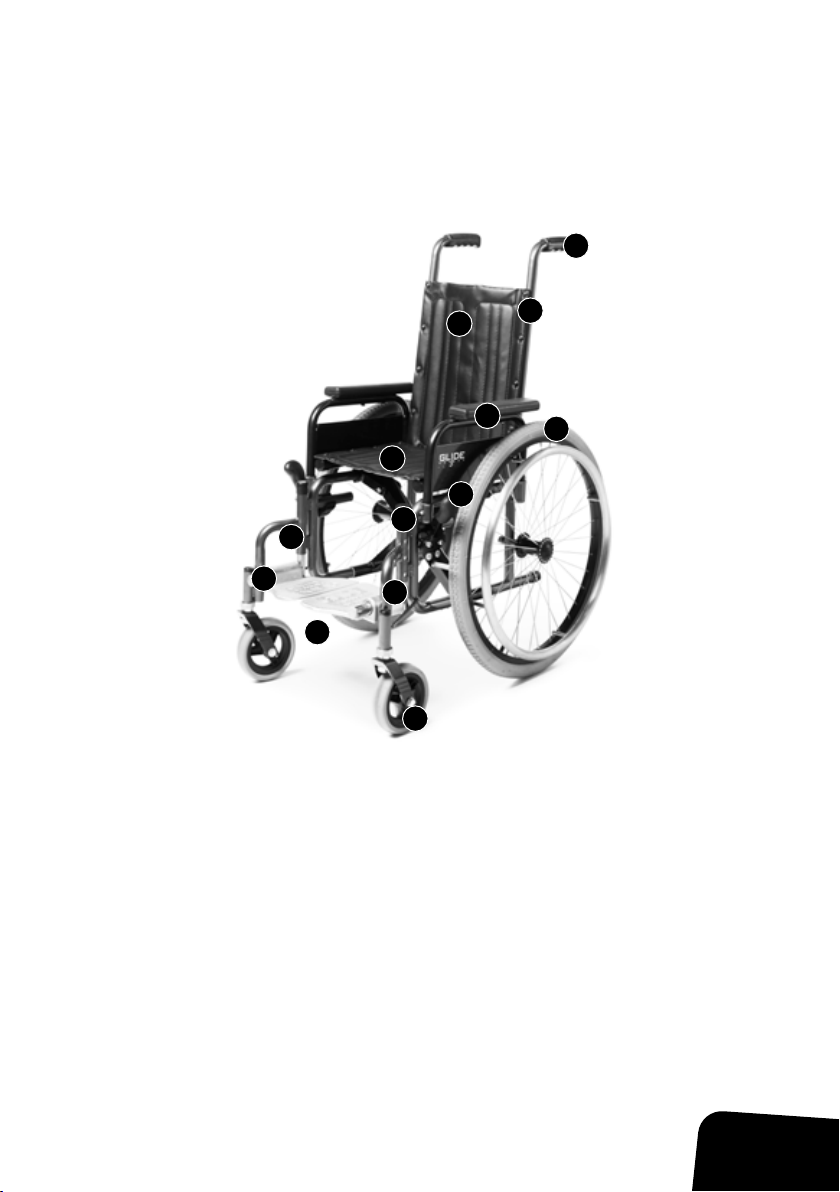
Glide NipperGlide User manual

PAGE 1
IMPORTANT
For your safety and comfort read carefully and
understand all of the features prior to using your
new Glide Rehabilitation Products chair.
NipperGlide
User Manual
2021 VERSION


Table of Contents
Section 1 Introduction 4
Section 2 Standard features 5
Section 3 Upholstery 6
Section 4 Wheelchair parts 7
Section 5 Unfolding and folding the wheelchair 12
Section 6 Operating your wheelchair 13
Section 7 Transferring your wheelchair 16
Section 8 Spare parts 17
Section 9 Routine maintenance 18
Section 10 Warranty 19

PAGE 4
SECTION 1
I
INTRODUCTION
Thank You For Choosing The
Nipperglide Wheelchair
Thank you for choosing the Glide Rehabilitation Products NipperGlide Wheelchair. An Australian
designed and manufactured product which complies with AS 3695 and EN 12183 Standards
(Type B classification) and has a manufacturers recommended user weight of 100kg for standard
G1 and G3. 180kg recommended maximum user weight for Heavy Duty G3 wheelchair. With
proper care and operation, your G1/G3 chair will provide years of trouble free use.
Please take the time familiarise yourself with the functions and features of your chair by reading
this owner/user manual. If you have any queries about the functions of the chair you can call
Glide Rehabilitation Products or your nearest Glide Rehabilitation Products dealer.
!Warning. Means you must read.
If you have a Vertical Lift model, it is essential you
read and fully understand Section 11 before use.

PAGE 5
SECTION 2
I
STANDARD FEATURES
The NipperGlide Wheelchair
1. Backrest upholstery
2. Handgrip
3. Backrest upright
4. Push rim
5. Cross brace
6. Brake
7. Castor wheel
8. Arm pad
9. Seat upholstery
10. Swingout
11. Calf strap
12. Foot stem
13. Caster fork
Identifying Parts on your Wheelchair (Fig 1)
1
2
3
4
5
6
7
8
9
10
11
12
13

PAGE 6
SECTION 3
I
UPHOLSTERY
Upholstery
With proper care your upholstery should give years of trouble free service. It is very important
to read the following:
• Regular (weekly) cleaning of back and seat upholstery is very important to remove body
oils which can cause hardening of the vinyl. To clean, wipe with a cloth or sponge, which
has been moistened in warm soapy water, and then dry with a soft, clean cloth. The use
of mild non-abrasive pure soap is recommended. Stubborn grime may require gentle
scrubbing with a soft brush.
Never use furniture polishes, abrasive cleaners or steel wool. Regular use of
cleaners containing hydrocarbons or similar additives may cause damage to the
vinyl and harden the surface.
• Always replace broken upholstery screws immediately to avoid possible tearing.
• Stretched, torn or split upholstery must be replaced for safety reasons
!

PAGE 7
SECTION 4
I
WHEELCHAIR PARTS
Armrests
To remove:
• Push button and hold in on front arm socket.
• Using other hand lift armrest upwards.
Note: Wheelchairs may be supplied without button locks.
To install:
• Replace armrest into front and rear arm sockets,
push button in and armrest down simultaneously
• Ensure armrest is secure and button has popped out.
Never lift wheelchair by armrest as damage may occur.
!
Armrest
Button
Lock
Arm cushion
Front Armsocket Rear Armsocket

PAGE 8
Footrests
To remove:
• Push lever inwards to unlock and swing outwards.
• Lift upwards to remove
To install:
• Insert footrest back on the two locating pins and swing inwards for automatic locking.
To adjust footplates:
• Remove hexagonal bolt.
• Move up or down. Line up the nearest hole for the desired height.
• Replace hexagonal bolt and tighten.
The footrests are designed to support the weight of the leg only.
Never stand on footplates.
!
PAGE 8
Hex
Bolt
Footstem
Lever
Footrest

PAGE 9
Forks and castors
Assembly:
• Press bearing housing into bottom of castor tube.
• Press castor bush into top of castor tube.
• Slide castor pintle through bearing housing the castor bush.
• Place circlip on castor pintle.
• Slide bearing on pintle and locate in bearing housing.
• Screw hex-nut until there is 1mm of up and down pintle movement.
• Place castor fork in position and tighten locknut.
Important:
Once tightened ensure 1mm of up and down movement and castor turns freely.

PAGE 10
Brakes
Brakes:
• Brakes are designed as a locking device only and should be applied when the
wheelchair is stationary. Do not use brakes for slowing the wheelchair. Use the
push rims as a means of braking.
Adjusting brakes:
• Inflate tyre to correct pressure before making adjustment to brakes.
• Loosen locking screws, using 5mm
• Allen key, on brake clamp and adjust brake so when the lever is in the
locked position the wheel is firmly held.
• Re-tighten locking screws using 5mm Allen key.
• Check that, when both brakes are applied, the wheelchair will not roll.
If rolling occurs re-adjust.
• When brakes are in the off position the bars should not rub against the tyre
Locked
Off

PAGE 11
Wheels
The large wheels are fitted with sealed ball bearings and should last many years without
replacement.
Large Wheels (fixed)
• To remove large wheels unscrew locknut and using a large screwdriver
unscrew axle and remove when free.
• Installation is the reverse procedure.
Large Wheels (quick release)
• To remove large wheels (quick release) push button in and slide wheel out
while button is still pushed in.
• To install push button in and slide wheel in.
• Wheels should be removed weekly and axles and sockets wiped clean with a
soft cloth to avoid jamming in socket. Smear axle with dri-lube stick before replacing.
Do not use wheelchair, unless button is fully out when wheels are in place.
!
Button
Spokes

PAGE 12
SECTION 5
I
FOLDING & UNFOLDING WHEELCHAIR
Assemble or Dissassemble Parts
Opening the wheelchair:
• Take a position at one side of the wheelchair, and then tilt the wheelchair towards you
until the wheels are off the ground on the opposite side.
• Press down in the centre of the upholstery bar nearest you.
Folding the wheelchair:
• Before folding flip footplates to the up position.
• Grasp the seat upholstery front and rear approximately centre and lift upwards.

PAGE 13
SECTION 6
I
OPERATING THE WHEELCHAIR
Crossbrace
The cross brace centre bolt must slide back and forwards 5mm to 10mm. This free play
enables the 4 wheels to be in contact with the ground.
Tyres / Castor Tyres
• Worn and under inflated tyres will render the wheelchair difficult to steer and propel.
Large wheel tyres and castor tyres should only be replaced as pairs.
• Tyre pressure for rear wheels 380kpa(55psi)
Anti-Tip Wheels
When anti-tip wheels are required,please contact your nearest Glide. Rehabilitation Products
dealer for correct fitting procedures.
Interference with kerbs may occur when
anti-tip wheels are fitted.
Dynamic Stability
Using the wheelchair in difficult situations such as steep downgrades, upgrades, side
cambered pathways and obstacles may be hazardous. The following methods should be used
to avoid tipping.
When climbing a gradient, the stability of the wheelchair can be improved greatly by leaning
the body forward.
On downgrades, the body should be in a straight position and the speed and direction of the
wheelchair controlled by the push rims (not brakes).
Under normal conditions (clean dry surface with no side camber) it is possible to climb slopes
safely of up to 13 degrees.
NOTE:
G1 - Maximum safe slope 13 degrees.
G3 - Maximum safe slope 10 degrees.
!

PAGE 14
Static Stability
Reaching forward, to the side or to the back of the wheelchair will affect the stability of the
wheelchair. Do not take risks, especially when the chair is not on level plane.
When climbing a gradient, lean the body forward.
On downgrades, the body should be in a straight position
When climbing a gradient, lean the body forward after the front wheel has made it over the
obstacle. Then propell the back wheel over, with your body wieght over the front wheel.

PAGE 15
Crossing Obstacles
If you are a first time user or don’t have the physical strength, it is advisable to have an
attendant assist you while crossing obstacles (e.g. sidewalk kerb). The attendant can tilt the
chair back using the hand grips and the rear tilt bar, then pushing large wheels as far as the
kerb, then lifting the wheelchair up over the kerb.
If you are an experienced user and have the physical strength, the following method may be
used. Place the wheelchair in front of the kerb. By moving the push rim quickly forward, the
castors will lift and the chair will surge forward enabling you to place the castors on top of the
kerb. Then by leaning forward ease the rear wheels up the kerb. If footplate touches obstacle,
perform same operation but lift the front castor just before the obstacle is reached.
Descending from obstacles
Descending from shallow obstacles can be dealt with by rolling forward and keeping the body
in an upright position. Higher obstacles can be dealt with by reversing. Bring the two large
wheels to the edge of the obstacle and slowing easing down using the push rim as a brake
and the body leaning forwards to avoid tipping.
Static ability
Reaching forward, to the side or to the back of the wheelchair will affect the stability of the
wheelchair. Do not take risks, especially when chair is not on a level plane.
Seat belt
If there is a need for a lap type posture restraining belt to be fitted to the G1/G3 Wheelchair
Chair we recommend that you contact your nearest agent or Glide Rehabilitation Products
direct for correct fitting procedures.

PAGE 16
SECTION 7
I
TRANSPORTING YOUR POWER CHAIR
How to Transport Wheelchair
Transporting your Power Chair in motor vehicles can
be easily achieved by the following method.
Sedan or Station Wagon
The Series 4 is easily transported in Sedans or Station wagons by the following method:
1. Removing battery pack from chair and folding together allowing you to lift into
boot or back of station wagon
Transporting in a Special Wheelchair Taxi, Bus
or Private Vehicle While the User is in the Chair.
To date there is no recognized Australian Standard that covers wheelchairs suitable for vehicle
transport while the user is in the chair. However the Series 4 is suitable for transport provided
the appropriate tiedown brackets are fitted to the chair and a 4 point restraint system (Unwin)
is used. Where possible, wheelchair occupants should be transferred into and use the proper
vehicle seat and restraints. However, if your chair is to be transported in a vehicle, your vehicle
restraint system must comply with AS2942 – 1994.
Do not use legrests or footplates as attachment points for your tie down system.
Do not use armrests as attachment points for your tie down system.
Unoccupied wheelchairs in vehicles must be safely secured or stored securely
outside the passenger compartment.
Posture Positioning Belts should not be used as vehicle restraint belts.
NOTE: Ensure that your restraint system complies with AS2942 and you fully understand the
manufacturer instructions on how your tie down system works and whether it is compatible
with the Glide Power Chair.
!

PAGE 17
SECTION 8
I
SPARE PARTS
Parts Library
Listed below are some of the common options available. Options can be supplied in lieu of
parts when ordering a new wheelchair or sold as a spare part at a later date.
• Elevating leg rests
• Tray
• Crutch holder
• Quick release hubs
• Arm trough
• Desk arms
• Adjustable height arms
• Heel loops
• Pneumatic castors
• Thorn resistant tubes (large wheel)
• Spoke guards
• Anti tip bars
• Oxygen bottle carrier
• Brake extension
• Lambs wool covers
• I.V. poles
• Head rest extension
• Stump support
• Wide castors
• Solid castors
• Seat belt

PAGE 18
SECTION 9
I
ROUTINE MAINTENANCE
Routine & Scheduled Maintenance
Weekly
1. Check tyre pressures
Front = 206KPA (30PSI)
Rear = 241KPA (35PSI)
2. Clean frame and vinyl parts with mild soapy solution.
3. Wipe upholstery with a clean damp cloth
4. Check function of electric brakes
5. Check all cables and connectors are secured; i.e. battery, motors and controller.
Monthly
1. Give the chair a general inspection for loose nuts and bolts.
2. Inspect and clean corrosion from battery terminals and cable connectors.
Coat with petroleum jelly
Annually
It is advisable to have an annual inspection of the Power Chair performed by an authorised
Glide Rehabilitation Products Agent. Their knowledge and experience enables them to identify
and correct problems that might otherwise go undetected. For any questions concerning
procedures or service, contact your nearest Glide Rehabilitation Products Agent or Glide
Rehabilitation Products direct.
NOTE: As stated in our warranty, we recommend that your wheelchair be returned to an
authorized Glide Rehabilitation Products agent for its free 3 month service check. This is a one
off free service calculated from date of purchase.

PAGE 19
SECTION 10
I
WARRANTY
Lendal Pty Ltd Warranty
Lendal Pty Ltd (trading as Glide Rehabilitation Products) warrants the following as listed:
Actuators - 12 months warranty.
Automatic replacement within six months of invoice. There afterwards, unit must be returned
for evaluation and possible repair before replacement.
Frame - 3-year warranty
S4 Frame sub-assembly or part of will be replaced.
Upholstery - 6 month warranty
This will cover against defects in materials or workmanship. Warranty does not cover against
normal wear or damage.
Tyres and Tubes - No Warranty
Spare Parts
All spare parts sold will have a 6 months warranty period from date of purchase. This warranty
does not extend to parts or electrical components damaged by misuse, neglect, accident
or improper installation, nor those tampered with, altered or serviced by an agency not
authorised by Lendal Pty Ltd.
The foregoing in lieu of all other warranties expressed, implied or statutory, Lendal Pty Ltd’s
sole liability shall be to repair or replace parts of components as specified above.

PAGE 20
IMPORTANT
Lendal Pty Ltd (trading as Glide Rehabilitation Products) does not warrant either expressly or
impliedly the suitability of the product for the purchaser or any intended user. Purchasers and
intended users are advised that advice from an appropriate registered medical practitioner
should be obtained prior to using the product.
Except insofar as is prohibited by statute, Lendal Pty Ltd shall not be responsible for damage,
injury or loss of any kind to any property or person howsoever caused arising from or in
connection with the product. All conditions and warranties that (but for this provision) would be
implied in favour of, and all rights and remedies that (but for this provision) would be conferred
upon the purchaser or other persons against Lendal Pty Ltd arising under or as a result of the
Trade Practices Act 1974, any other legislation or the general law are excluded and limited
to the maximum extent possible and in cases where Lendal Pty Ltd’s liability cannot be
completely excluded but may be limited, the liability of Lendal Pty Ltd is limited to one of the
following (at the option of Lendal Pty Ltd)
(a) The replacement of the product or the supply of an equivalent product
(b) The repair of the product
(c) The payment of the cost of replacing the product or of acquiring an equivalent product
(d) The payment of the cost of having the product repaired
Warranty could be voided if chair is not returned to Glide Rehabilitation Products or
authorized agent for it’s free service within 3 months of purchase date.
Table of contents
Other Glide Wheelchair manuals

Glide
Glide SERIES 8 User manual

Glide
Glide COMMODE User manual

Glide
Glide G1 Series User manual

Glide
Glide SPX User manual

Glide
Glide CentroGlide User manual

Glide
Glide COMFORT-PLUS DELUXE User manual

Glide
Glide Rehabilitation Products User manual

Glide
Glide G2 Series User manual

Glide
Glide TS TILT User manual

Glide
Glide 4 Series User manual