Global Industrial 989062 User manual

User's manual Manual del usuario Manuel de l'utilisateur
Customer Service
US: 1-800-645-2986
Servicio de atención al Cliente
US: 1-800-645-2986
Service à la clientèle
Canada: 888-645-2986
Battery Powered Scissor Lift
Model 989062 - Battery Powered Scissor Lift 40" x 20-1/2" Table 660 Lb. Cap.
Model 988854 - Battery Powered Scissor Lift 40" x 20-1/2" Table 1100 Lb. Cap.
Read this manual thoroughly prior to
installation, operation or maintenance.
Keep these instructions in a safe location
for future reference. For questions, visit
globalindustrial.com or contact Customer
Service at 1-800-645-2986.
1
1

Battery Powered Scissor Lift
Instruction Manual
READ THIS OPERATION MANUAL COMPLETELY BEFORE USING.
THOROUGHLY UNDERSTAND AND FOLLOW ALL SAFETY INSTRUCTIONS.
1. WARNING
1. DO NOT allow another person to stand in front of or behind lifter when it starts to move.
2. ALWAYS travel with table in lowered position. Load could fall down.
3. NEVER sit, stand or ride on platform. This can lead to SEVERE PERSONAL INJURY.
4. NEVER go under platform. This can lead to SEVERE PERSONAL INJURY or DEATH.
5. DO NOT use in area of multilevel floor surface that could create loss control and result in
SEVERE INJURY and PROPERTY DAMAGE.
6. DO NOT use lifter on slope, uneven or soft surface. Lifter may become
uncontrollable. This can lead to SEVERE PERSONAL INJURY and PROPERTY
DAMAGE.
7. KEEP FEET CLEAR of rolling wheels that could result in SEVERE PERSONAL INJURY.
8. DO NOT load one fork more than the other and DO NOT load tips on table. This can
lead to SEVERE PERSONAL INJURY and PROPERTY DAMAGE.
9. DO NOT overload lifter. ALWAYS stay within designated capacity and load center rating.
SEVERE PERSONAL INJURY and PROPERTY DAMAGE could result.
10. SHEARING HAZARD. NEVER place hands or feet under lowering table. This could
lead to SEVERE PERSONAL INJURY.
11. DO NOT use near fire.
12. HIGH VOLTAGE. Disconnect battery socket before opening control panel box.
13. DO NOT remove battery terminal cover. Short-circuit or electric shock could occur.
2
Battery Powered Scissor Li

2. CAUTION
1. Hazard or unsafe practice, which, if not avoided, may result in PERSONAL INJURY
and PROPERTY DAMAGE.
2. READ THE OPERATION MANUAL COMPLETELY BEFORE USING AND
THOROUGHLY UNDERSTAND AND FOLLOW ALL SAFETY INSTRUCTIONS.
3. This lifter is designed for use with stable uniform load on a solid lever floor. DO NOT use the
lifter for any other purpose than its intended use.
4. Only TRAINED personnel shall operate lifter. OPERATORS shall read this manual
completely and thoroughly understand the controls and operation of this equipment
BEFORE operating the lifter.
5. ALWAYS observe lifter and ALWAYS stay at the controls while the lifter is in motion. RELEASE
controls and STOP lifter immediately if load on lifter appears to become unstable. NEVER
leave the loaded lifter unattended unless the table is in the fully lowered position and the
lifter is locked.
6. DO NOT slide the load on or off the table. The lift may move allowing the load to fall. SEVERE
PERSONAL INJURY and PROPERTY DAMAGE could result.
7. DO NOT use lifter with unstable, unbalanced or loosely stacked load. Unbalanced loads
may become unstable and fall. This can cause SEVERE PERSONAL INJURY and
PROPERTY DAMAGE
8. Qualified personnel must perform ALL lifter service only.
9. ALWAYS keep feet, hands and fingers away from casters, load wheels and all moving
components.
10. ALWAYS perform maintenance and inspections with lifter unloaded.
11. Prolonged continuous working might cause damage of power pack.
12. Stop operation if temperature of hydraulic oil is too high.
The lifter is NOT waterproof and is intended to be used in a dry environment.
3. DAILY INSPECTION
Daily inspection is effective to find the malfunction or faulty on the lifter. Check the lifter on the
following points before the operation.
CAUTION
DO NOT use lifter if any malfunctions are found.
(1) Check for scratches, deformations, or cracks on the lifter.
(2) Ensure wheels move smoothly.
(3) Check if there is oil leakage.
(4) Check for vertical creep of the table.
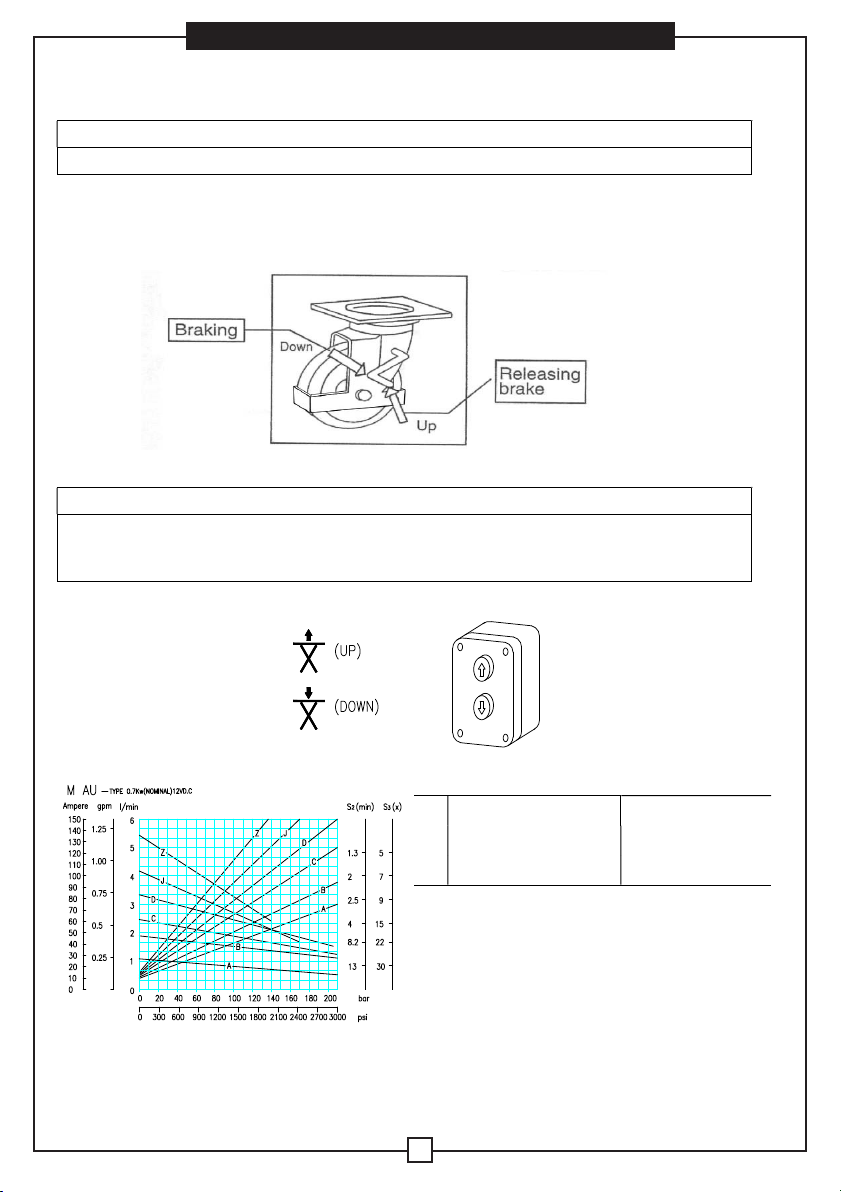
(5) Check the brakes.
(6) Check if all the bolts and nuts are tightened firmly.
Battery Powered Scissor Li
3

4. NAME OF PARTS
1.Handle
2.Switch
3.Brake Pedal
4.Platform
5.Link
6.Guide rail
4
Battery Powered Scissor Li

5. OPERATING LIFT TABLE
How to use the brake.
CAUTION
Use brakes when not moving the lifter to prevent sudden movement.
The brake is equipped with the swivel caster on the right side.
(1) Activate wheel brakes by pressing the brake pedal.
(2) Release the brake by lifting up the brake pedal.
6. LIFTING UP FORKS
CAUTION
1. DO NOT overload lifter. Stay within its rated capacity.
2. Prolonged continuous working might cause damage of hydraulic power pack.
3. Step operation if temperature of hydraulic oil is too high.
Push the button “UP” and the table lifts up.
TYPE OF PUMP
A GR.0.5 - 0.25 D GR.0.5 - 0.75
B GR.0.5 - 0.45 J GR.0.5 - 0.92
C GR.0.5 - 0.56 Z GR.0.5 - 1.26
——Curve S2 defines the maximum running time
of the D.C. Motor expressed in a minutes.
——Curve S3 expresses the on-off ratio in %
which has value S3 in a total work cycle (100%).
Battery Powered Scissor Li
5

7.LOWERING TABLE
CAUTION
DO NOT lower table with load too fast and stop suddenly. Impact load could be created and lifter
could be damaged.
8.MOVING THE LIFTER
WARNING
DO NOT move lifter on slope or inclined surface, otherwise lifter becomes uncontrollable
and dangerous
(1) Make the load stable to prevent it from falling.
(2) Lower the table down.
(3) Release the brake and move the lifter.
CAUTION
KEEP watching the condition of load. Stop operating lifter if load becomes unstable.
9.CHARGING THE BATTERY
(1) Check the quantity of Battery fluid. If it is insufficient, add the battery solution
according to battery operation manual.
(2) Disconnect the battery socket.
(3) Connect the charging port of battery socket to the battery charger.
10.REGULAR INSPECTION
Perform the regular inspection for the safety operation.
(1) Check the items expressed in daily inspection (daily).
(2) Lubricate with grease the guides where roller moves. Also, lubricate the grease nipples.(Every
month)
(3) Lubricate all the pivoting points and axles. (Every 6 months)
(4) Replace the hydraulic oil for the first time: Accumulated working ten hours’
(5) Replace the hydraulic oil. (Every 12 months)
11.TROUBLE SHOOTING
PROBLEMS POSSIBLE CAUSES POSSIBLE SOLUTIONS
Platform does not rise while motor
does not run.
1.Faulty wiring. 1.Check the wiring referring to the
actual wiring diagram.
2.Battery socket is disconnected 2.Connect the battery socket.
3.Battery charge is insufficient. 3.Charge the battery.
Platform does not rise while motor
runs.
1.Faulty adjustment of relief valve. 1.Adjust relief valve again.
2.Faulty hydraulic pump. 2.Replace power pack.
3.Shortage of hydraulic oil. 3.Add oil.
Vertical creep of table. 1.Oil leakage in power pack. 1.Replace lowering valve.
2.Oil leakage form hydraulic circuit. 2.Check hydraulic circuit and repair.
Oil leakage from cylinder. Faulty sealing. Replace sealing.
Oil leakage from piping or joint. Insufficient tightening or seal in valid. Tighten joint again or Replace seal.
Oil leakage from air breather. Excessive quantity of oil. Reduce oil quantity.
6
Battery Powered Scissor Li

12. SPECIFICATIONS
Model 989062 988854
Capacity (lbs) 660 1100
Table (inches) 40 x 20.5 40 x 20.5
Min. table height (inches) 19.5 19.5
Max. Table height (inches) 63 63.7
Lifting stroke (inches) 43.5 44.2
Motor (KW) 0.7 0.7
Work cycle of hydraulic power pack 3 times of table moving up-down per 10 min.
Approx. numbers of lifting at full charge
and with full load (times) 45 40
Approx. time required lifting up table.
(Sec) 15 15
Wheel (inches, diameter) .23 .23
Handle height (inches) 46.5 46.5
Weight (lbs) 403.4 403.4
13. HYDRAULIC CIRCUIT/WIRING DIAGRAM/ACTUAL WIRING DIAGRAM
Battery Powered Scissor Li
7

989062
8
Battery Powered Scissor Li

L
L
I
I
F
F
T
T
T
T
A
A
B
B
L
L
E
E
S
S
P
P
A
A
R
R
E
E
P
P
A
A
R
R
T
T
S
S
L
L
I
I
S
S
T
T
9
9
8
8
9
9
0
0
6
6
2
2
NO DESCRIPTION QTY NO DESCRIPTION QTY
1 Seal cover φ50×φ58×6.5 1 26 Charger 1
2 Y-ringφ50×φ58×8.2 1 27 Washer 5 10
3 Cylinder cover 1 28 Screw M5×10 4
4 Retainer ring 1 29 Screw M5×20 1
5 O-ring φ56×2.65 1 30 Fuse 1
6 Piston rod 1 31 Spring washer 5 6
7 Bushing 1 32 Nut M5 2
8 Bushing 2 33 Screw M5×16 1
9 Pin axle 1 34 Fuse 1
10 Snap ring 50 1 35 Screw M4×16 2
11 Cylinder 1 36 Nut M8 4
12 Prevent burst valve 1 37 Washer 8 16
13 Spring 1 38 Screw M10×16 2
14 Seal ring 18 1 39 Spring washer 10 20
15 Prevent burst joint 1 40 Washer 10 22
16 Seal ring 14 4 41 Switch 1
17 High pressure hose 1 42 Battery case weldment 1
18 Joint 2 43 Covering plate 1
19 Split Pin 1 44 Pad 1
20 Covering plate 1 45 Battery 1
21 Washer 4 10 46 Insulator pad 1
22 Spring washer 4 10 47 Insulation case 2
23 Screw M4x10 8 48 Screw M8×40 4
24 Battery indicator 1 49 Battery securing tag 4
25 Screw M3×10 4 50 Screw M5×16 2
Battery Powered Scissor Li
9

51 Connector block 1 78 Roller for table 2
52 Screw M5×10 2 79 Bushing 2
53 Fixing plate 1 80 Retaining ring for axle 20 6
54 Joint board 1 81 Internal scissors for table 1
55 Lifting limit switch 1 82 External scissors for table 1
56 Spring washer 6 4 83 Screw M8×16 5
57 Nut M6 4 84 Pin axle for scissors 4
58 Hydraulic power pack 1 85 Washer 4
59 Terminals 1 86 Split pin 3.2×26 4
60 Handle 1 87 Nut M16×1.5 4
61 Nut M4 2 88 Spring pin 8×30 2
62 Washer 2 89 Nut M10 2
63 Spring washer 12 2 90 Safety rod 2
64 Hex screw M12×30 2 91 Screw M10×40 2
65 Hex screw M6×20 4 92 Bushing 10
66 Washer 6 4 93 External scissors for chassis 1
67 Covering plate 1 94 Internal scissors for chassis
68 Nut M8 4 95 Bushing 2
69 Spring washer 8 8 96 Roller for chassis 2
70 Screw M8×20 4 97 Pin axle for chassis 1
71 Nut M10 16 98 Pin axle for table 1
72 Rear wheel 2 99 Bushing 2
73 Screw M10×25 16 100 Oil cup 5
74 Front wheel 2 101 Screw M6×16 2
75 Chassis 1 102 Cable 1
76 Screw M6x8 1 103 Cable velcro strap 1
77 Table 1
1
10
Battery Powered Scissor Li

988854
Battery Powered Scissor Li
11

L
L
I
I
F
F
T
T
T
T
A
A
B
B
L
L
E
E
S
S
P
P
A
A
R
R
E
E
P
P
A
A
R
R
T
T
S
S
L
L
I
I
S
S
T
T
9
9
8
8
8
8
8
8
5
5
4
4
NO DESCRIPTION QTY NO DESCRIPTION QTY
1 Seal cover φ60×φ68×6.5 1 26 Charger 1
2 Y-ringφ60×φ70×6 1 27 Washer 5 10
3 Cylinder cover 1 28 Screw M5×10 4
4 Retainer ring 1 29 Screw M5×20 1
5 O-ring φ65×2.65 1 30 Fuse 1
6 Piston rod 1 31 Spring washer 5 6
7 Bushing 1 32 Nut M5 2
8 Bushing 2 33 Screw M5×16 1
9 Pin axle 1 34 Fuse 1
10 Snap ring 60 1 35 Screw M4×16 2
11 Cylinder 1 36 Nut M8 4
12 Prevent burst valve 1 37 Washer 8 16
13 Spring 1 38 Screw M10×16 2
14 Seal ring 18 1 39 Spring washer 10 20
15 Prevent burst joint 1 40 Washer 10 22
16 Seal ring 14 4 41 Switch 1
17 High pressure hose 1 42 Battery case weldment 1
18 Joint 2 43 Covering plate 1
19 Split Pin 1 44 Pad 1
20 Covering plate 1 45 Battery 1
21 Washer 4 10 46 Insulator pad 1
22 Spring washer 4 10 47 Insulation case 2
23 Screw M4x10 8 48 Screw M8×40 4
24 Battery indicator 1 49 Battery securing tag 4
25 Screw M3×10 4 50 Screw M5×16 2
12
Battery Powered Scissor Li

51 Connector block 1 79 Bushing 2
52 Screw M5×10 2 80 Retaining ring for axle 20 6
53 Fixing plate 1 81 Internal scissors for table 1
54 Joint board 1 82 External scissors for table 1
55 Lifting limit switch 1 83 Screw M8×16 5
56 Spring washer 6 4 84 Pin axle for scissors 3
57 Nut M6 4 85 Washer 3
58 Hydraulic power pack 1 86 Split pin 3.2×26 5
59 Terminals 1 87 Nut M16×1.5 5
60 Handle 1 88 Spring pin 8×30 2
61 Nut M4 2 89 Nut M10 2
62 Washer 2 90 Safety rod 2
63 Spring washer 12 2 91 Screw M10×40 2
64 Hex screw M12×30 2 92 Bushing 8
65 Hex screw M6×20 4 93 External scissors for chassis 1
66 Washer 6 4 94 Internal scissors for chassis
67 Covering plate 1 95 Bushing 2
68 Nut M8 4 96 Roller for chassis 2
69 Spring washer 8 9 97 Pin axle 2
70 Screw M8×20 4 98 Bushing 2
71 Nut M10 16 99 Washing 2
72 Rear wheel 2 100 Pin axle for chassis 1
73 Screw M10×25 16 101 Pin axle for table 1
74 Front wheel 2 102 Bushing 2
75 Chassis 1 103 Oil cup 4
76 Screw M6x8 1 104 Screw M6×16 2
77 Table 1 105 Cable 1
78 Roller for table 2 106 Cable velcro strap 1
1
Battery Powered Scissor Li
13

OPERATION INSTRUCTION ENERGY
SERVICE-FREE ACID-LEAD
STORAGE BATTERY
1. Storage and Transportation
◇Uncharged ENERGY storage battery needs no maintenance,Please store it in dry
and frost-free place.
◇If the density of electrolyte in filled battery is less than 1.23kg/l, it shall be
recharged as soon as possible,If the density of electrolyte filled in is 1.23kg/l,the
storage battery shall be recharged when it is below1.18kg/l.
◇During transportation or storage,the filled storage battery shall be kept upright
vertically to prevent acid liquid from overflowing.
2. PUT INTO USE
◇Precharged but unfilled ENERGY storage battery can be put into use at once
without charging after electrolyte is filled in it.
◇When it is being filled,the temperature of battery and electrolyte should be 10℃
at least.
◇Each unit of battery shall be filled with special acid whose density is 1.28kg/l.
(1.23kg/l in the area of tropics),and be filled up to the line indicating the
maximum level or to the height of 15mm over the top of pole plate.
◇Let the battery sit for about 15 minutes,Then sway the battery gently several
times. Refill proper electrolyte if necessary.
◇Screw or press the sealing hole tightly.
◇Clean the acid liquid left on its surface.
◇The storage battery can be in good condition without any service within 5 years
at the temperature of 20℃.
14
Battery Powered Scissor Li

3. CHARGING
◇Before recharging,please take the battery down.
◇The storage battery is allowed to be charged with DC power.Connect the plus
pole and minus pole of storage battery correspondingly to the poles of the
charger.
◇Ensure to connect the poles correctly then switch on the charger.
◇When the battery is charged, remove the charger.
◇Recommended charging current is 1/10 of battery capacity
(e.g. 1/10 x 44 = 4.4A for the storage battery with capacity of 44 Ah.)
In the course of charging,the temperature of electrolyte is not allowed to be
above 55℃.
◇If the temperature of electrolyte is above 55℃,stop charging.
◇If the density of electrolyte and the voltage of the battery stop increasing for 2
hours,the storage battery could be fully charged.
◇When the charging is ended,please check the level of electrolyte,Add pure
water to the maximum level indicating line if necessary.
4. Maintenance
To ensure the service life of storage battery,the following points must be followed.
◇Keep battery surface clean and dry,When cleaning,only wet cloth can be
used,Make sure that the liquid level is in specified position and add pure water if
necessary.
◇Charge status can be checked by electrolyte density test.
◇If the density of electrolyte is below 1.23kg/l(1.18kg/l in the area of tropic), the
storage battery must be recharged.
◇At such density,freezing point of electrolyte is-15℃(at the density of 1.28kg/l.
freezing point is -70℃)
Battery Powered Scissor Li
15

WARNING AND SAFETY
◇Follow instructions described on the plate of the battery.
◇Wear safety glasses.
◇Keep children away from touching electrolyte and battery.
◇Explosive Hazard Easy-explosive mixture come to escape during charge,So fire
electric spark,uncovered bulb and fireworks are strictly inhibited,When
connecting wire-circuit,electric spark and short-circuit must be avoided.
◇Hazard of strong corrosion Electrolyte is strongly corrosive,So please wear
protective clothes and safety glasses,Do not tilt the storage battery otherwise
acid liquid will overflow.
◇Emergency Cure when the acid liquid spatters in the eyes,wash it with a large
quantity of clean water at once,then see a doctor,Acid liquid on skin and clothes
shall be washed with a large quantity of clean water as well,If acid liquid is
swallowed,please see a doctor at once.
◇Warning:
·Do not put the unprotected storage battery in the sun.
·Store batteries in a dry and frost-free environment.
◇Handling:
·Follow rules of transportation(GGVS)during transporting.
·Do not mix discarded battery with daily rubbish.
16
Battery Powered Scissor Li
This manual suits for next models
1
Table of contents
Other Global Industrial Scissor Lift manuals