Model no.: TD-4235B
Dimensions: 93(L) x 36(W) x 21.3(H) (mm)
Weight: 45.4 g (including battery)
Power source:One AAA Lithium battery
Display: LCD
Memory: 450 non-deletable memory sets with date and time
External output: USB cable
Automatic detection of electrode insertion
Automatic reaction time count-down
Auto switch-off after 3 minutes without action
Temperature warning
Operating conditions: 10°C to 40°C (50°F to 104°F), below 85% R.H.
Meter storage/Transportation conditions: -20°C to 60°C (-4°F to 140°F),below 95% R.H.
Strip storage/Transportation conditions: 4°C to 40°C (39.2°F to 104°F),below 85% R.H.
Measurement units: Fixed mmol/L
Measurement range: 1.1–33.3 mmol/L
Expected service life: 5 years
This device has been tested to meet the electrical and safety requirements of: IEC/EN
61010-1, IEC/EN 61010-2-101, EN 61326-1,EN 61326-2-6.
SPECIFICATIONS
MedNet GmbH
Borkstraβe 10, 48163 Mϋnster, Germany
TaiDoc Technology Corporation
B1-7F, No. 127, Wugong 2nd Rd.,
Wugu Dist., 24888 New Taipei City, Taiwan
www.taidoc.com
Distributed by GlucoRx Ltd
4 Wintonlea, Monument Way West,
Woking, Surrey, GU21 5EN, UK
Website: www.glucorx.co.uk
Customer careline: 01483 755133
For self-testing.
You can test on a variety of locations on your body.
Important: There are limitations with AST. Please consult your health-
care professional before you perform AST.
When to use AST?
Food, medication, illness, stress and exercise can affect blood glucose levels. Capillary
blood at the fingertip reflects these changes faster than capillary blood at other sites. Thus
when testing blood glucose during or immediately after a meal, physical exercise or any
other event, take a blood sample from your finger only.
We strongly recommend that you perform AST ONLY at the following times:
• In a pre-meal or fasting state (more than 2 hours since your last meal).
•Two hours or more after taking insulin.
•Two hours or more after exercise.
Do NOT use AST if:
•You think your blood glucose is low.
•You are unaware you have hypoglycaemia
•You are testing for hyperglycaemia
•Your AST results do not match the way you feel.
•Your routine blood glucose results often fluctuate.
ALTERNATIVE SITE TESTING (AST)
If the confirmation window is not filled completely before your meter begins to count down,
do not add more blood to the test strip. Discard the test strip and start again. If you have
trouble filling the test strip, please call GlucoRx on 01483 755133 for assistance.
Gently apply a drop of blood to the absorbent hole of your test strip at a titled angle.The
confirmation window should be completely filled if enough blood sample has been
applied. Do NOT remove your finger until you hear a beep sound.
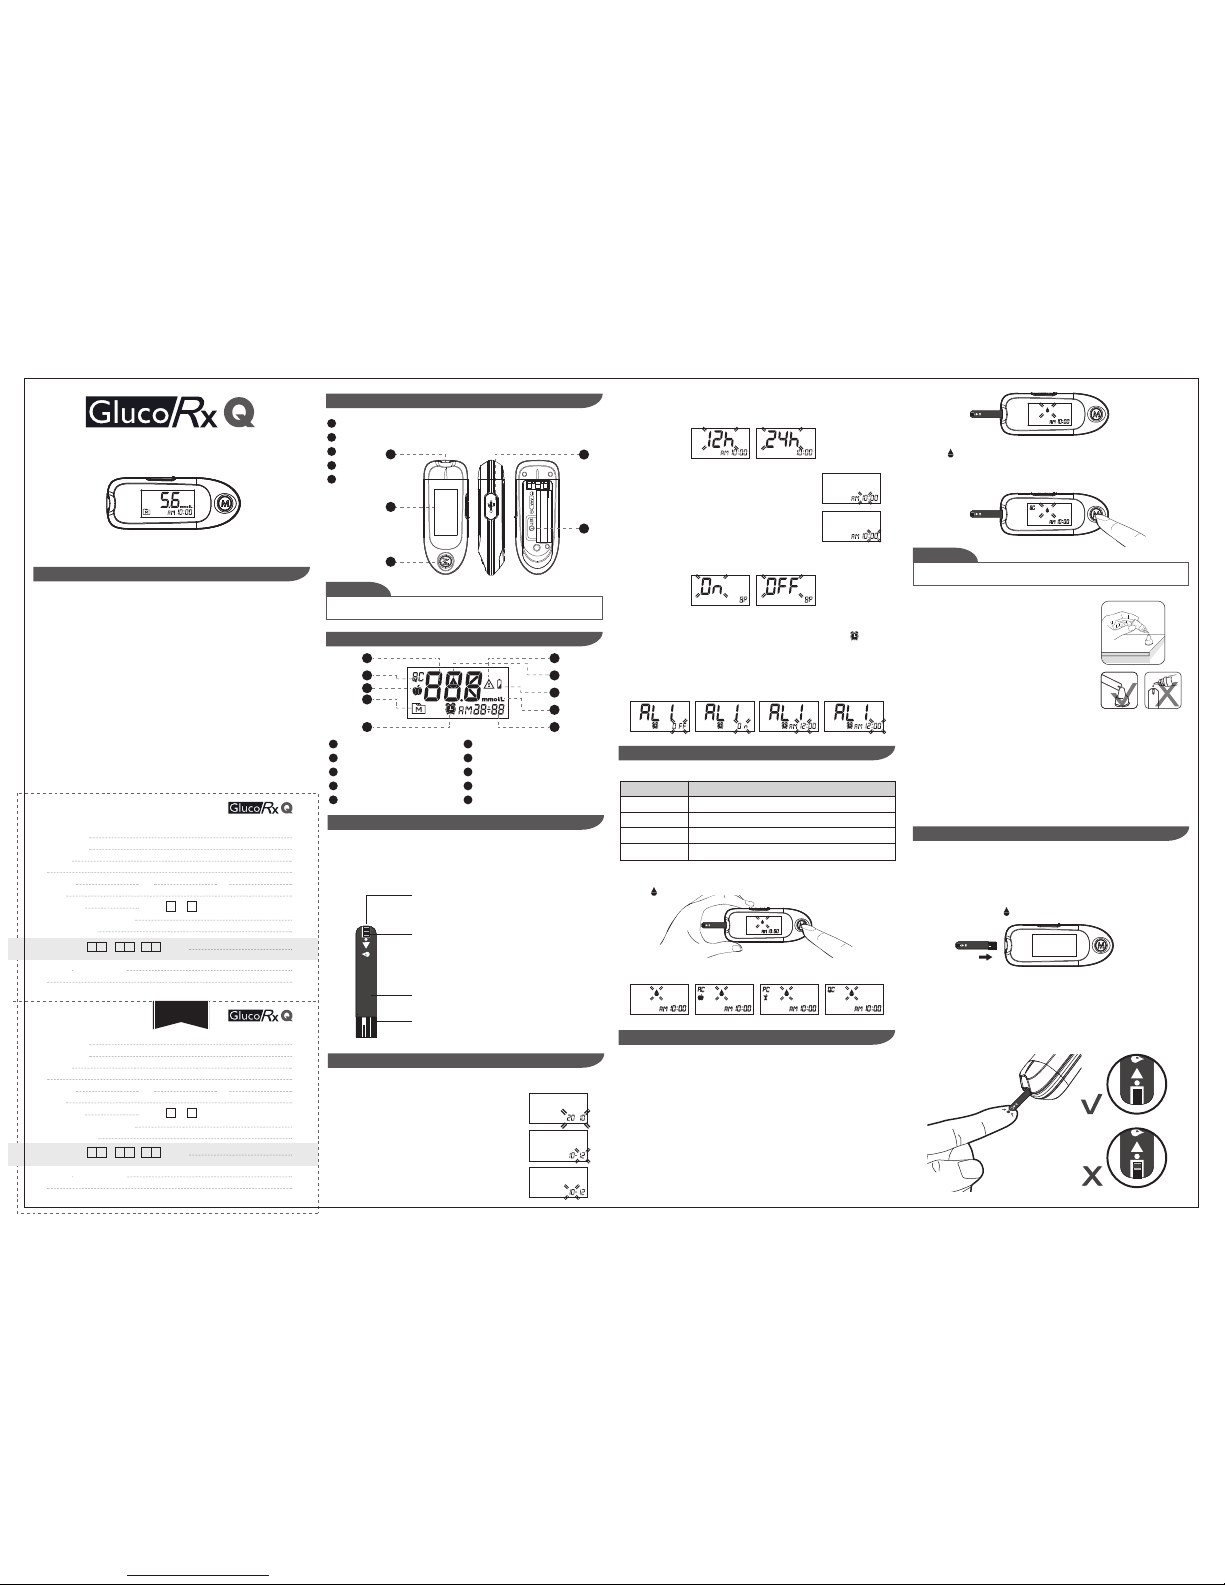
STEP 4. Get result
The blood glucose result will be stored in the memory automatically.
If you do not apply a blood sample within 3 minutes, your meter will turn itself off.You
must remove the test strip and insert it back into the meter to restart your test.
NOTE
1. Please do not change your treatment based on the result without first consulting
your healthcare professional.
2.Turn your meter off by removing the test strip.Discard the used test strip and lancet
carefully according to your local regulations.
Warning:
STEP 1. Enter the memory mode
With your meter turned off, press M twice. The first test
result will appear, indicating that you are in the memory
mode.
When using your meter for the first time “---” will appear,
indicating that there are no test results in the memory.
Viewing Results
Your Meter stores the 450 most recent blood glucose test results with date and time in its
memory.You can review the test results with these easy steps.
STEP 2. Recall test results
If you continue to press M, you can then review the last 450 tests in your memory.
When the memory is full, the oldest result will be deleted when the newest is added.
VIEWING YOUR METER MEMORY
WHAT IT MEANS
<1.1 mmol/L
>33.3 mmol/L
1.1 - 33.3 mmol/L
MESSAGE
For questionable results,please see test strip package insert for important information.
MESSAGE WHAT IT MEANS ACTION
The symbol appears with
this message.This means that
your battery does not have
enough power for a test.
Replace the battery immediately.
A used test strip is inserted,
or there is an electrical
problem.
Repeat test with a new test strip. If the error
message re-appears, please contact GlucoRx
for help.
The temperature of the
environment, meter or test
strip is outside your system’s
operating range. You cannot
perform a test until your
meter and test strip are
within the operating range of
10°C to 40°C (50°F to 104°F).
Repeat the test after your meter and
test strip are within the operating
temperatures.
Problem with your meter.
Review the instructions and try again with a
new test strip. If the problem persists, please
contact GlucoRx for help.
You may have removed the
strip after applying blood to
the absorbent hole.
Keep the test strip in your meter after it has
absorbed the blood until the meter displays
the test result.
SYMBOL INFORMATION
Referent
In vitro diagnostic medical device
Consult instructions for use
Temperature limitation
Use by
Batch code
Caution, consult accompanying
documents
ReferentSymbol
Manufacturer
Serial number
Authorized representative in the
European Community
CE mark
Humidity limitation
Collection for electrical and electronic
equipment
Symbol
• If you wish to exit the memory mode before your last result is displayed, press the Mfor
3 seconds.
• When your memory is full, the oldest test result will be replaced by the newest test
result.
• Control solution results are NOT included in the day average.
NOTE
The following is a summary of display messages. If your meter displays an error message,
please follow the actions for the error message as described in the table below. If the
problem persists, please contact GlucoRx on 01483 755133 for help.
DISPLAY MESSAGES AND PROBLEM-SOLVING GUIDE
STEP 3. Exit the memory mode
After displaying the last test result in memory, press the M again. Your meter displays
"End" and then turns off.
Meter Storage
• Storage conditions: -20°C to 60°C (-4°F to 140°F), below 95% relative humidity.
• Always store or transport your meter in its original storage case.
• Avoid dropping and heavy impact.
• Avoid direct sunlight and high humidity.
Meter Disposal
Your used meter should be treated as contaminated that may carry a risk of infection
during measurement.The batteries in this used meter should be removed and your meter
disposed in accordance with local regulations.
This meter falls outside the scope of the European Directive 2002/96/EC-Directive on
waste electrical and electronic equipment (WEEE).
Your meter comes with one 1.5V AAA size alkaline battery. If the low battery symbol
“ ”appears on your screen indicating that the battery is low, it is time to change the
battery.
• Replacing the battery does not affect your test results stored in the memory.
• As with all small batteries, these batteries should be kept away from children.
If swallowed, promptly seek medical assistance.
• Batteries may leak chemicals if unused for a long time. Remove the batteries if you are
not going to use your device for an extended period (i.e. 3 months or more).
• Properly dispose of the battery according to your local environmental regulations.
NOTE
The results of control solution tests are NOT stored in the memory. Stored results are
blood glucose results only.
NOTE
2. Connecting to a personal computer
3. Data transmission
To transmit data, follow the instructions provided with the software. Results will be
transmitted with date and time. Remove the cable and your meter will automatically
switch off.
Replacing the Battery
To replace the battery,make sure that your meter is turned off.
1. Press the edge of your battery cover and lift it up to remove.
2. Remove the old battery and replace with one 1.5V AAA size alkaline battery.
3. Close the battery cover.If your battery is inserted correctly,you will hear a “beep”
afterwards.
The “ ” appears with E-b, Error:
The power is not enough to do a test. Please change your battery
immediately.
While your meter is connected to a PC, it is unable to perform a blood glucose test.
Warning:
BATTERY
You can use your meter with a USB cable and the GlucoRx Healthcare Software System to
view test results on a personal computer. To learn more about the GlucoRx Healthcare
Software System or to obtain a USB cable separately, please contact GlucoRx customer
services by calling 01483 755133.
Connect the cable to a USB port on your
computer. With your meter switched off,
connect the other end of the USB cable to the
meter data port. "USb" will appear on your
meter display, indicating that the meter is in
communication mode.
1. Obtaining the required cable and installing the software
To download the GlucoRx Healthcare Software System,please visit GlucoRx website at
www.glucorx.co.uk.
1. Press and release M.
With your meter turned off,press and release M. Your 7-day average result measured in
general mode will appear on the display.
2. Press M to review 14-, 21-, 28-, 60- and 90- day average results stored in each measuring
mode in the order of Gen, AC then PC.
3. Exit the meter memory.
Keep pressing Mtogether and your meter will turn off.
DOWNLOADING RESULTS ONTO A COMPUTER
REVIEWING BLOOD GLUCOSE DAY AVERAGE RESULTS
Caring for Your Meter
Cleaning
1.To clean your meter exterior, wipe it with one disinfecting wipe (Example: Micro-Kill
Plus™) to clean exposed surfaces thoroughly and remove any visible dirt, blood or any
other body fluid with the wipe.Then dry the device with a soft, dry and clean cloth.
2. Do NOT rinse your meter with water.
MAINTENANCE
1.1 mmol/L
TERMS & CONDITIONS OF WARRANTY
1. GlucoRx warrants this product to be free of defects in workmanship and materials within the said warranty period
on the Warranty Certificate.
2. During the warranty period if this product is found to be defective, you may send it with the Warranty Certificate to
our office for warranty service. GlucoRx will then repair or replace defective parts, or exchange the whole product as
GlucoRx may choose, with no additional charge to the original owner. After such repair, replacement or exchange,
the product will be warranted for the remaining time of the warranty period.
3. This warranty is valid only if the Warranty Certificate and Warranty Registration Card are duly completed with date
of obtaining product, serial number and if the Warranty Registration Card is sent to our office (or you register on
our website www.glucorx.co.uk) no later than 6 months from the date obtained.
4. This warranty is void if this product has been repaired or serviced by an unauthorised person. This warranty does
not cover defects caused by misuse, abuse, accident, tampering, lack of reasonable care, fire or any other acts
beyond human control.
5. Except as stated in the above paragraphs, GlucoRx disclaim all other warranties, including those of merchantability
of fitness for a particular purpose with respect to the use of this product. GlucoRx shall not be liable for any direct,
consequential or incidental damages arising out of the use or inability to use this product.
GlucoRx Ltd
4 Wintonlea, Monument Way West,
Woking, Surrey, GU21 5EN, UK
Please cut off this 'Dealer's portion' of the Warranty Registration Card,
insert it in an envelope and post to: