Go groove FlexSMART 4i User manual

INSTRUCTION MANUAL
TM

What’s in the box?
Table of Contents
Thank you for purchasing the GOgroove® FlexSMART 4i,
the in-car charging mount and audio solution for your
iPod® or iPhone®. Charge your device on the road while
enjoying your favorite music through your car speakers!
The unique design of the FlexSMART 4i makes it an
extremely versatile product that will serve you for years
to come. Enjoy!
A) FlexSMART 4i FM Transmitter base
B) DC Flex Neck
C) Custom cushion for iPod nano
D) 3.5 mm cable
1 Warranty Oer
2 Welcome, Table of Contents, What’s in the Box,
3 Product Diagram
4 Operating Instructions: Quick Start, Connect the Flex-Neck
5 Fitting in Your Vehicle, Adjusting the Cradle
6 Connecting Your Device
7 For iPod nano, Tuning, Auto Seek
8 Presets, Connecting devices, Adjusting volume
9 Button Functions
10 Troubleshooting
11 Cautions, Specications
12 Follow Us, Contact Information
TM
A
B
C
D

Product Diagram
fig. 1
1- FM Preset 10- iPod / iPhone Support
2- Station DOWN Button 11- Cradle Wings
3- FM Preset 12- Cradle Wing Release Switch
4- LED Display 13- iPod / iPhone Support Knob
5- 3.5mm Audio Input 14- Base Release Button
6- FM Preset 15- Flex-Neck
7- Station UP Button 16- Power Button
8- FM Preset 17- Power Ring LED
9- Dock Connector 18- DC Socket Plug
19- Fuse (located inside plug)
-
3
3-

1. Plug the FlexSMART 4i’s DC barrel in to the car DC (cigarette lighter) outlet.
2. Tune your car FM stereo to an unused radio station. You will know that it is
unused because you will hear static. Adjust the FlexSMART 4i’s frequency to
match the station shown on your car FM stereo. If this has been done correctly,
the static should turn to silence as soon as the FlexSMART 4i and car FM stereo
stations are the same.
3. Put your iPhone or iPod into the FlexSMART 4i cradle and adjust the wings to
securely hold your device. Your device will begin charging.
4. Begin playing music from your device and you will hear the sound come
through your car speakers.
Position the Tongue on
the end of the (15) Flex-
Neck with the Groove on
back of the main body.
Lower the Tongue into the
Groove and slide forward
until you hear a click.
To separate, depress the
(14) Base Release Button
pull back and lift out.
Operating Instructions:
Quick Start
Connect the Flex-Neck to the main body of the Transmitter
-
4
4-

Simply insert the DC barrel of the FlexSMART 4i into your vehicle’s DC
(cigarette lighter) outlet.
Push the (12) Cradle Wing
release-switch on the back of
the FlexSMART 4i to widen
the (11) Cradle Wings.
Rotate the (13 ) iPod / iPhone
Support Knob to nd the support
setting that is best for your device
Fitting the FlexSMART 4i in your vehicle
Adjusting the FlexSMART 4i cradle
-OR -
Cradle
wings
release
switch
iPod /
iPhone
Support
Knob
BACK FRONT
-
5
5-

Carefully connect the iPod or
iPhone to the Dock Connector,
as shown here:
Adjust the (11) Cradle wings to securely grip the iPod or iPhone, as shown in the
following pictures:
Press the Power Button to turn on the FlexSMART 4i. The (17) Power Ring LED
indicator will turn BLUE as shown in the following picture:
Connecting your device
Power
Button
Ring of
Power
Indicator
light
-
6
6-

For iPod nano models
There is a PAD Attachment included in
the package so that the FlexSMART 4i
can accommodate iPod nano models.
Add the pad attachment as necessary
to t your device.
Tuning the FlexSMART 4i FM Transmitter and your Car Stereo
Auto Seek
Your FlexSMART 4i FM Transmitter is like a small FM radio tower. Once you set
your FlexSMART 4i to an FM station, it will then broadcast a signal to that par-
ticular FM frequency. All you have to do is match your car stereo to that same FM
station and you will be tuning into the FlexSMART 4i’s broadcast.
1- With your car stereo, nd an unused FM station that contains static.
2- Use the (7) UP and (2) DOWN frequency buttons to match your FlexSMART 4i’s
FM frequency to the one shown on your car stereo. You can hold either
button to scroll faster through the stations.
When you hear silence, this means that you have tuned the FlexSMART 4i and
your car FM stereo correctly.
Auto Seek is a feature which enables FlexSMART 4i to nd a clear, unused radio
station for you.
1 - Just press and hold the (7)UP and (2)DOWN Buttons at the same time for
about 3 seconds and the FlexSMART 4i will automatically search for a
frequency that is not used by other broadcasting radio stations.
2 - Adjust the frequency of car FM radio to match the frequency displayed on the
FlexSMART 4i.
3 - If there is frequency interference, please repeat the above steps 1-2 until you
nd a clear frequency.
-
7
7-

-
8
8-
Using and storing FM presets
Adjusting Volume
You can store up to 4 FM station presets to simplify tuning.
1- Select the desired frequency.
2- Press and hold the FM Preset (1, 2, 3 or 4) for about 5
seconds and release it when the corresponding LED
indicator is on.
3 - When frequencies are stored into corresponding
FM Preset Buttons, the LED indicators of all digital
buttons will be on.
4 - Once your FM preset is stored, press its
corresponding button for fast tuning.
Volume adjustment occurs dierently depending on which cables you have
connected between your device and the FlexSMART 4i.
a- If you only have the (9) Dock connector attached for charging and audio then
volume will be controlled only by your car stereo. The volume level on your
device has no aect on your car stereo.
b- If you are using the 3.5mm audio cable with your device, then you will be able
to adjust volume with both your car stereo and your device volume controls.
Connecting music players or cell phones to FlexSMART 4i
If you want to play music from other music players or cell
phones, you can use the 3.5mm to 3.5mm audio cable to
connect your device to the
FlexSMART 4i’s
(5) 3.5mm audio input

-
9
9-
Button Functions
Action Result
Press Power Button Toggle FlexSMART 4i ON/OFF
Press DOWN Button The frequency reduces 0.1MHz
Press UP Button The frequency increases 0.1MHz
Press and hold the DOWN Button The frequency reduces quickly
(0.1MHz/Step)
Press and hold the UP Button The frequency increases quickly
(0.1MHz/Step)
Press and hold UP and DOWN Button
together for about 3 seconds
Auto Seek
Press FM Preset 1,2,3,or 4 Selecting a preset frequency
Press and hold FM Preset 1,2,3,or 4
for about 3 seconds
Storing a preset frequency

-
10
10 -
Troubleshooting
How come the FlexSMART 4i won’t POWER ON?
1- Please make sure you have already pressed down the Power Button
on the FlexSMART 4i.
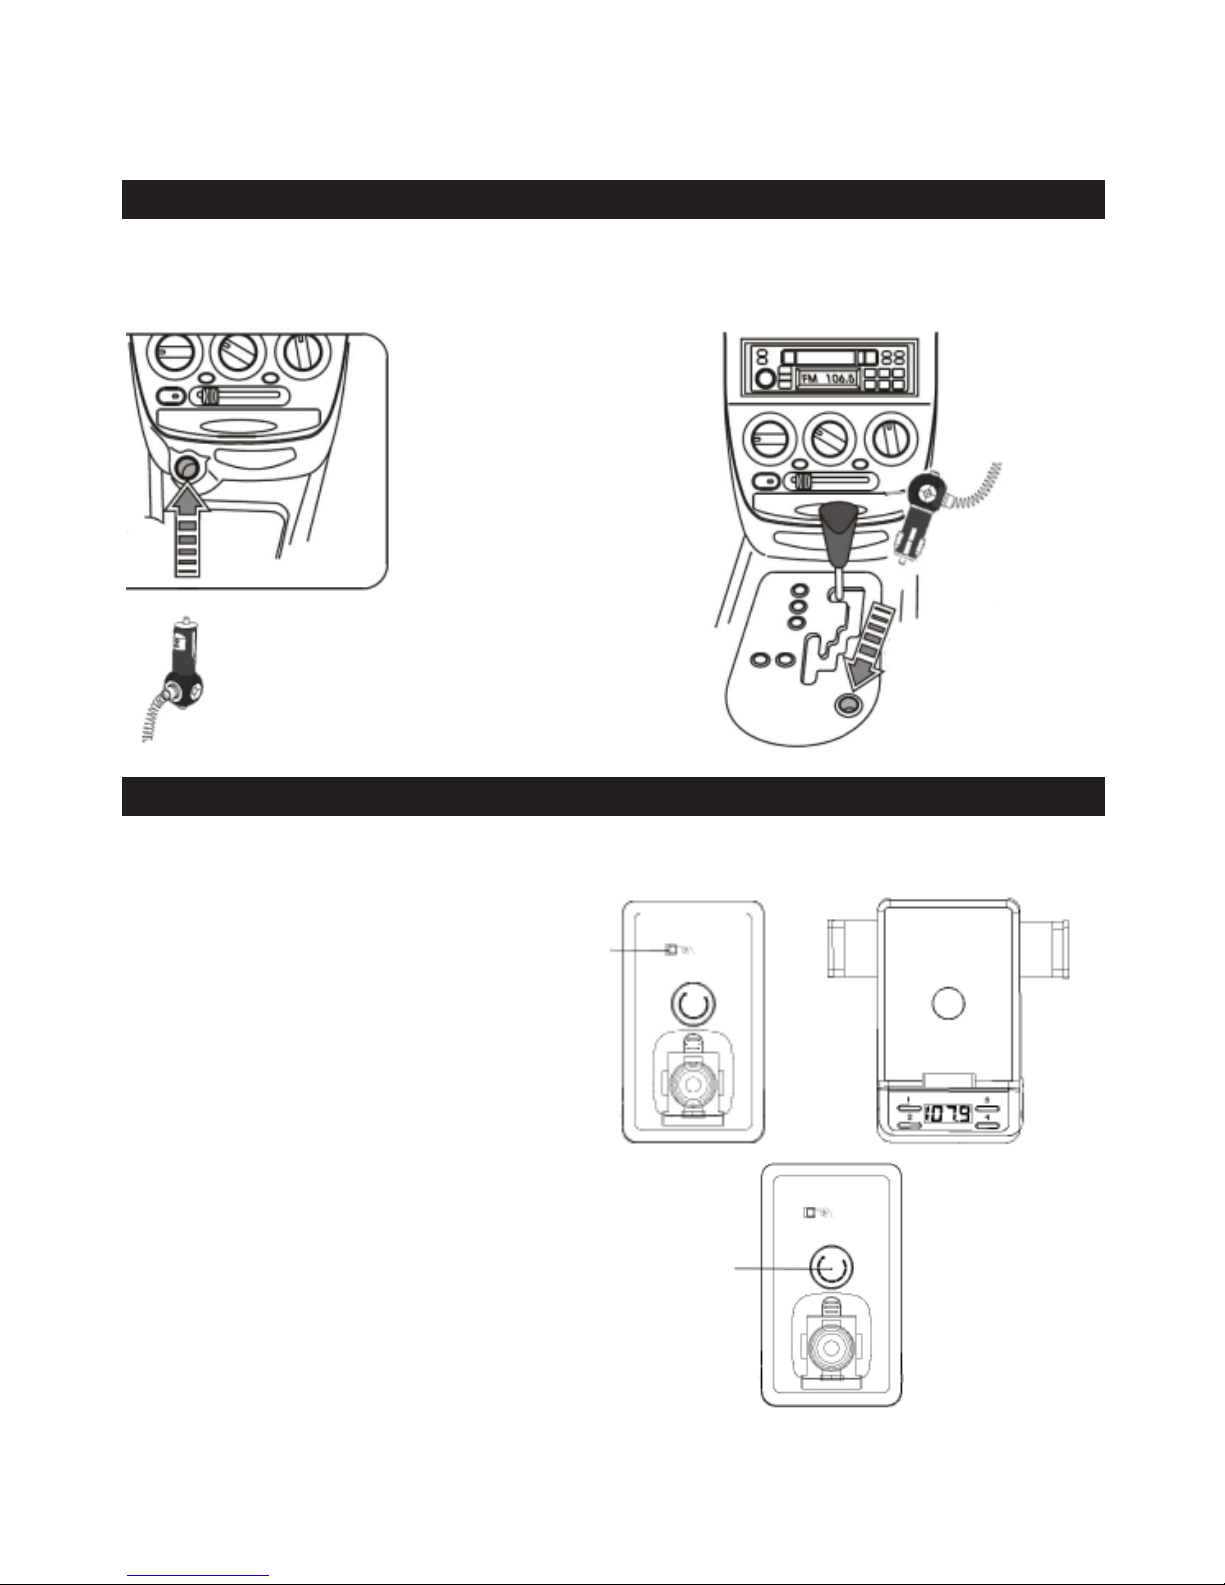
2- Please make sure the FlexSMART 4i is connected to a car power
source correctly.
3- Please make sure the car power socket is functioning properly.
The power sockets of some cars are only on when the car is running.
4- If the above doesn’t help, the built-in fuse of the FlexSMART 4i may
have been damaged, please try to replace the fuse. For further fuse
information please see page 3, number 19
How come the music is not playing?
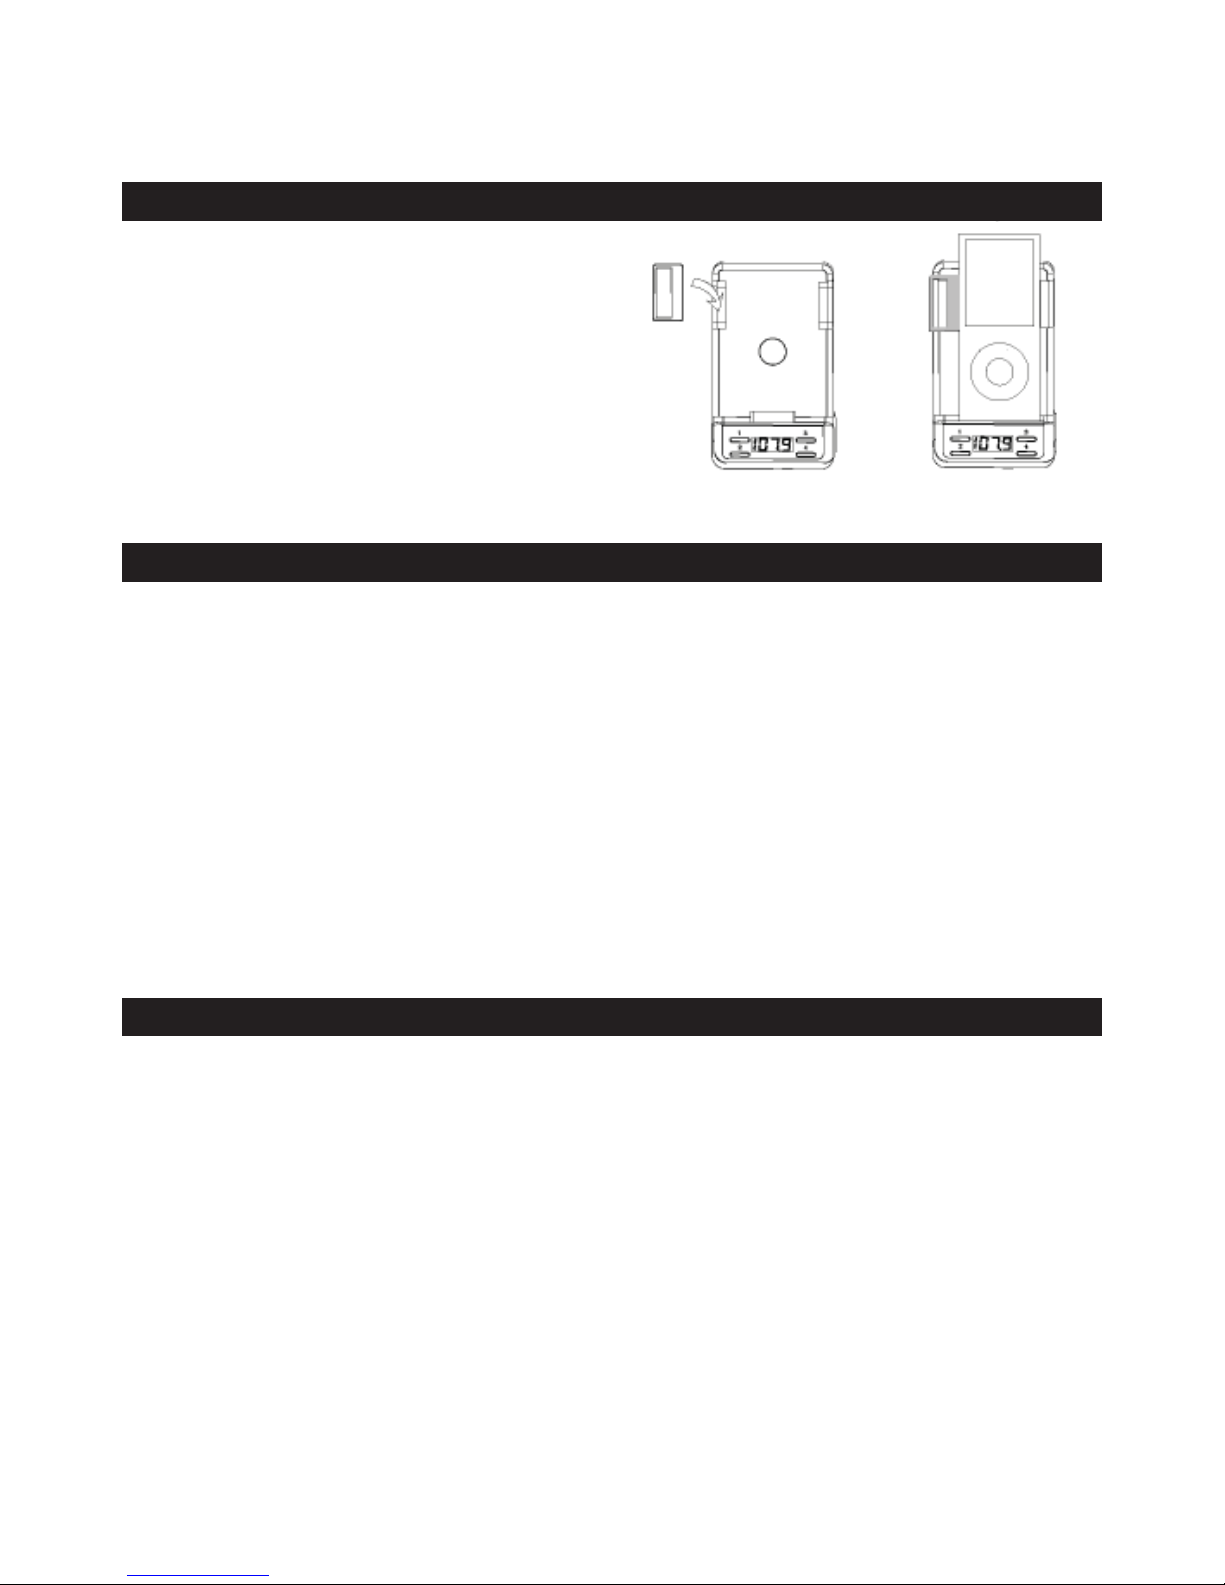
1- Please make sure the iPod or iPhone is properly connected.
2- Please make sure the frequency of the FM Radio coincides with the
frequency of the FlexSMART 4i
I can hear sound, but there is static…
1-Please try to adjust the radio station you are using. Many times there
are several stations that are unused, but some still work better than
others. Please try several stations.
2- Sometimes the 3.5mm audio cable can cause some interference.
Please disconnect it to see if the problem improves.
3- Sometimes when there are multiple cell phones in a close proximity
they create a lot of interference with audio signals. You may be
experiencing a combination of FM frequency interference and cell
phone interference. If you are driving, the problem will improve by
trying a new FM station and changing your location.

-
11
11 -
Cautions
Product Specications
- Do not expose the unit to dust, water, or extreme temperatures
- Do not attempt to disassemble the product.
- If the product is giving you problems, please contact the manufacturer
or retailer.
Audio Input: 30-pin connector, 3.5mm audio cable
FM frequency: 88.1-107.9MHz
Input: DC 12V/350mA
Output: DC 5V/1.0A
Weight: 7.2 ounces (201 grams)

©2010 ACCESSORY POWER
All trademarks and brand names are the property of their owners.
iPhone® and iPod® are trademarks of Apple, Inc, registered in the U.S.
and other countries.
“Made for iPod,” and“Made for iPhone mean that an electronic accessory
has been designed to connect specically to iPod and iPhone respective-
ly, and has been certied by the developer to meet Apple performance
standards. Apple is not responsible for the operation of
this device or its compliance with safety and regulatory standards.
Table of contents