Goldmaster GVC-7506 User manual

Elektrik Süpürgesi
GVC-7506

Önemli Uyarýlar .....................................................................................
Ürün Özellikleri ......................................................................................
Ürün Görünümü ....................................................................................
Ürünün Kullanýma Hazýrlanmasý ..........................................................
Toz Torbasýnýn Yerleþtirilmesi ............................................................
Esnek Hortumun Takýlmasý................................................................
Teleskopik Boru .................................................................................
Zemine Göre Ayarlanabilen Süpürme Baþlýðý ...................................
Dar Uçlu & Fýrçalý Süpürme Baþlýðý....................................................
Ürünün Kullanýmý ..................................................................................
Emiþ Gücü Ayarlama .........................................................................
Toz Torbasýnýn Deðiþtirilmesi ...............................................................
Filtrelerin Temizliði ve Deðiþimi .............................................................
HEPA Filtrenin Temizliði ve Deðiþimi ..................................................
Motor Koruma Filtresinin Temizliði ve Deðiþimi ..................................
Ürünün Temizliði ve Saklanmasý ...........................................................
Pratik Çözümler ....................................................................................
Teknik Özellikler ....................................................................................
2
3
4
5
5
5
6
6
6
7
7
7
8
8
8
9
9
10

Goldmaster marka elektrikli süpürgeyi tercih ettiðiniz için teþekkür ederiz.
Ürünü kullanmadan önce bu kullaným kýlavuzunu dikkatlice okuyunuz.
Bu cihaz ticari amaçlý ya da aðýr þartlarda kullaným için
uygun deðildir. Hatalý kullanýmdan dolayý meydana gelebilecek arýzalar
garanti kapsamý dýþýndadýr.
Daha sonraki kullanýmlarýnýza referans olmasý için kýlavuzu güvenli bir
yere saklayýnýz.
ÖNEMLÝ UYARILAR
– Ürünün üzerinde yazýlý voltajýn, bulunduðunuz yerin voltajýna uygun olup
olmadýðýna dikkat ediniz. Herhangi bir uyuþmazlýk durumunda meydana
gelebilecek arýzalardan firmamýz sorumlu tutulamaz ve bu arýza garanti
kapsamý dýþýnda iþlem görür.
– Ürün sadece evlerde kullaným içindir. Ticari ya da sanayi amaçlý
kullanýlmamalýdýr. Aksi takdirde, garanti kapsamý dýþýnda iþlem görecektir.
– Ürünü mutlaka topraklý bir prize takýnýz. Ürüne zarar vermemek için yetersiz
akým saðlayan uzatma kablolarý kullanmayýnýz.
– Ürünün fiþini; kullanýmdan sonra, aksesuarlarý takmadan, temizlik ve
bakýmdan önce mutlaka prizden çekiniz.
– Ürünü temizlemek için zararlý kimyasallar ve aþýndýrýcý temizleyiciler
kullanmayýnýz.
– Ürünü ýslak zeminlerde, su vb. sývýlarý emmek için kesinlikle kullanmayýnýz.
– Dikkat; Ürün ile yanan sigara, sigara külü veya kibrit çekmeyiniz.
– Dikkat; Ürünü benzin, tiner, alkol, gazyaðý vb. yanýcý sývýlar ile aþýndýrýcý
(asit vb) sývýlarý emmek için kullanmayýnýz.
– Ürünü çalýþýr durumda iken kesinlikle temizlemeyiniz, filtreyi deðiþtirmeyiniz.
– Ürünü çocuklar, deneyim ve bilgi eksikliði olan kiþiler, fiziksel (iþitsel, görsel)
veya zihinsel engelliler tarafýndan kullanýldýðýnda, güvenliklerinden sorumlu
bir kiþinin gözetimi altýnda olmalýdýrlar. Çocuklarýn ürün ile oynamadýklarýndan
emin olunmalýdýr.
– Ürünü kablosundan çekerek taþýmayýnýz.
– Ürünün fiþini prizden çýkarýrken kablosundan çekmeyiniz. Fiþi prizden tutarak
çýkartýnýz.
– Teleskopik boruyu ve hortumu kesinlikle suya daldýrarak temizleyiniz.
Hasarlý ise kesinlikle kullanmayýnýz.
– Ürünü kablosunun üzerinden geçirmeyiz, izolasyonuna zarar verebilirsiniz.
– Ürünü soba, fýrýn, ocak ve buna benzer ýsý kaynaklarýndan uzak tutunuz.

– Ürünün gövdesini hiçbir zaman suya daldýrmayýnýz ve ürünün üzerine
su dökülmesini engelleyiniz. Eliniz ýslakken fiþli kablosunu prizden
çýkarmaya çalýþmayýnýz.
– Kabloyu sararken fiþi elinizle tutunuz ve gövdeye çarpmasýný engelleyiniz.
– Ürünle, cam ve diðer kesici cisimleri temizlemeye çalýþmayýnýz.
– Merdivenleri temizlerken özellikle dikkat ediniz. Fiþli kablosunun, köþelere,
kapý eþiklerine sýkýþmamasýna keskin yüzeyli cisimler tarafýdan
kesilmemesine, sýyrýlmamasýna dikkat ediniz.
– Ürünün fiþli kablosunu prize takarken veya prizden çýkarýrken ürünün kapalý
olduðuna emin olunuz.
– Ürünün kablosu ve fiþi üzerinde herhangi bir hasar var ise ürünü
çalýþtýrmayýnýz. Hasarlý fiþ ve kabloyu deðiþtirmek üzere en yakýn yetkili
servisimize baþvurunuz.
– Arýzalý ürünü kullanmayýnýz ve kendiniz tamir etmeye çalýþmayýnýz. En yakýn
yetkili servisimize baþvurunuz. Sadece orjinal yedek parça kulanýnýz.
– Banyo vb. ýslak ve nemli ortamlarda asla uzatma kablosu kullanmayýnýz.
– Toner veya kurum gibi ince tozlarý süpürmeyiniz. Aksi takdirde bu, ürününüz
üzerindeki filtrenin kapasitesini azaltacaktýr. Ayrýca, ince tozlarý süpürmeyerek
ürününüzün zarar görmesini engellersiniz.
– Daima elektrik süpürgenizi kullandýktan sonra Toz Haznesini boþaltýnýz.
– Elektrik süpürgenizi, tasarlandýðý ve üretildiði kullaným alanlarý dýþýnda, baþka
amaçlar doðrultusunda veya hatalý kullanmanýzdan kaynaklanabilecek olasý
arýzalarda, üretici firma herhangi bir sorumluluk kabul etmeyecektir.
ÜRÜN ÖZELLÝKLERÝ
– 2400W motor gücü ile yüksek emiþ performansý
– Elektronik düðmeler ile hýz ayarý yapabilme
– Ýçerideki tozu hapseden HEPA filtre
– Yormadan temizlik saðlayan hafif aluminyum teleskopik boru
– Hareket kolaylýðý saðlayan özel dörtlü tekerlek sistemi
– Toz kalkmasýný engelleyen özel tasarýmlý dikey hava çýkýþ yönü
– 2lt kapasiteli geniþ toz haznesi
– Motor koruma filtresi
– Esnek hortum
– Ayarlanabilen hýz kademesi gürültü oranýný düþürme imkaný
– Otomatik kablo sarma özelliði
– Boru üzerinde aksesuar yuvasý
– Yatay ve dikey park imkaný
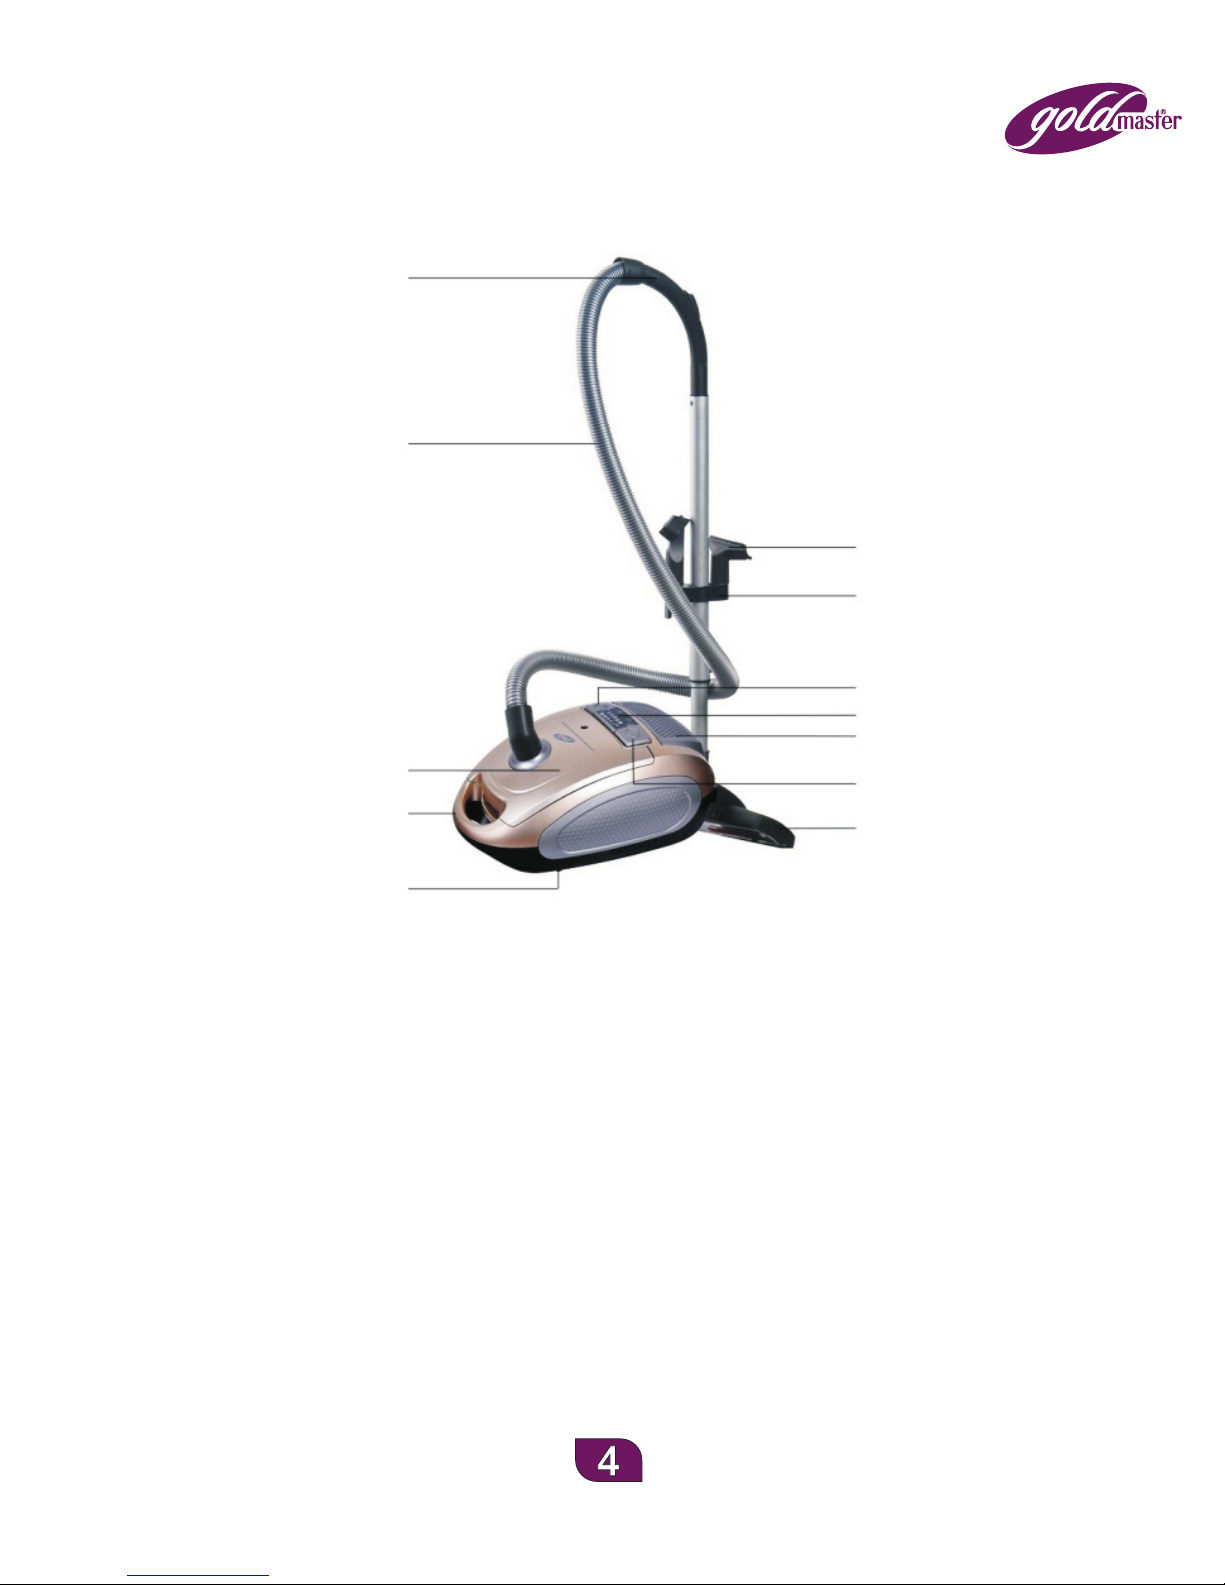
1.
2. Esnek hortum
3. Dar uçlu&fýrçalý süpürme baþlýðý
4. Aparat yuvasý
5. Kablo sarma düðmesi
6. Elektronik emiþ ayar düðmeleri
7. Hepa filtre üst kapaðý
8. Toz haznesi kapaðý
9. Açma/kapatma düðmesi
10. Ürün tutma sapý
11. Zemine göre ayarlanabilen süpürme baþlýðý
12. Tekerlek
Hortum tutma sapý
ÜRÜN GÖRÜNÜMÜ
1
2
3
4
5
6
7
89
10 11
12
ÜRÜNÜN KULLANIMA HAZIRLANMASI
Parça ve aksesuarlarý takmadan ya da çýkarmadan önce mutlaka fiþi
prizden çekiniz.
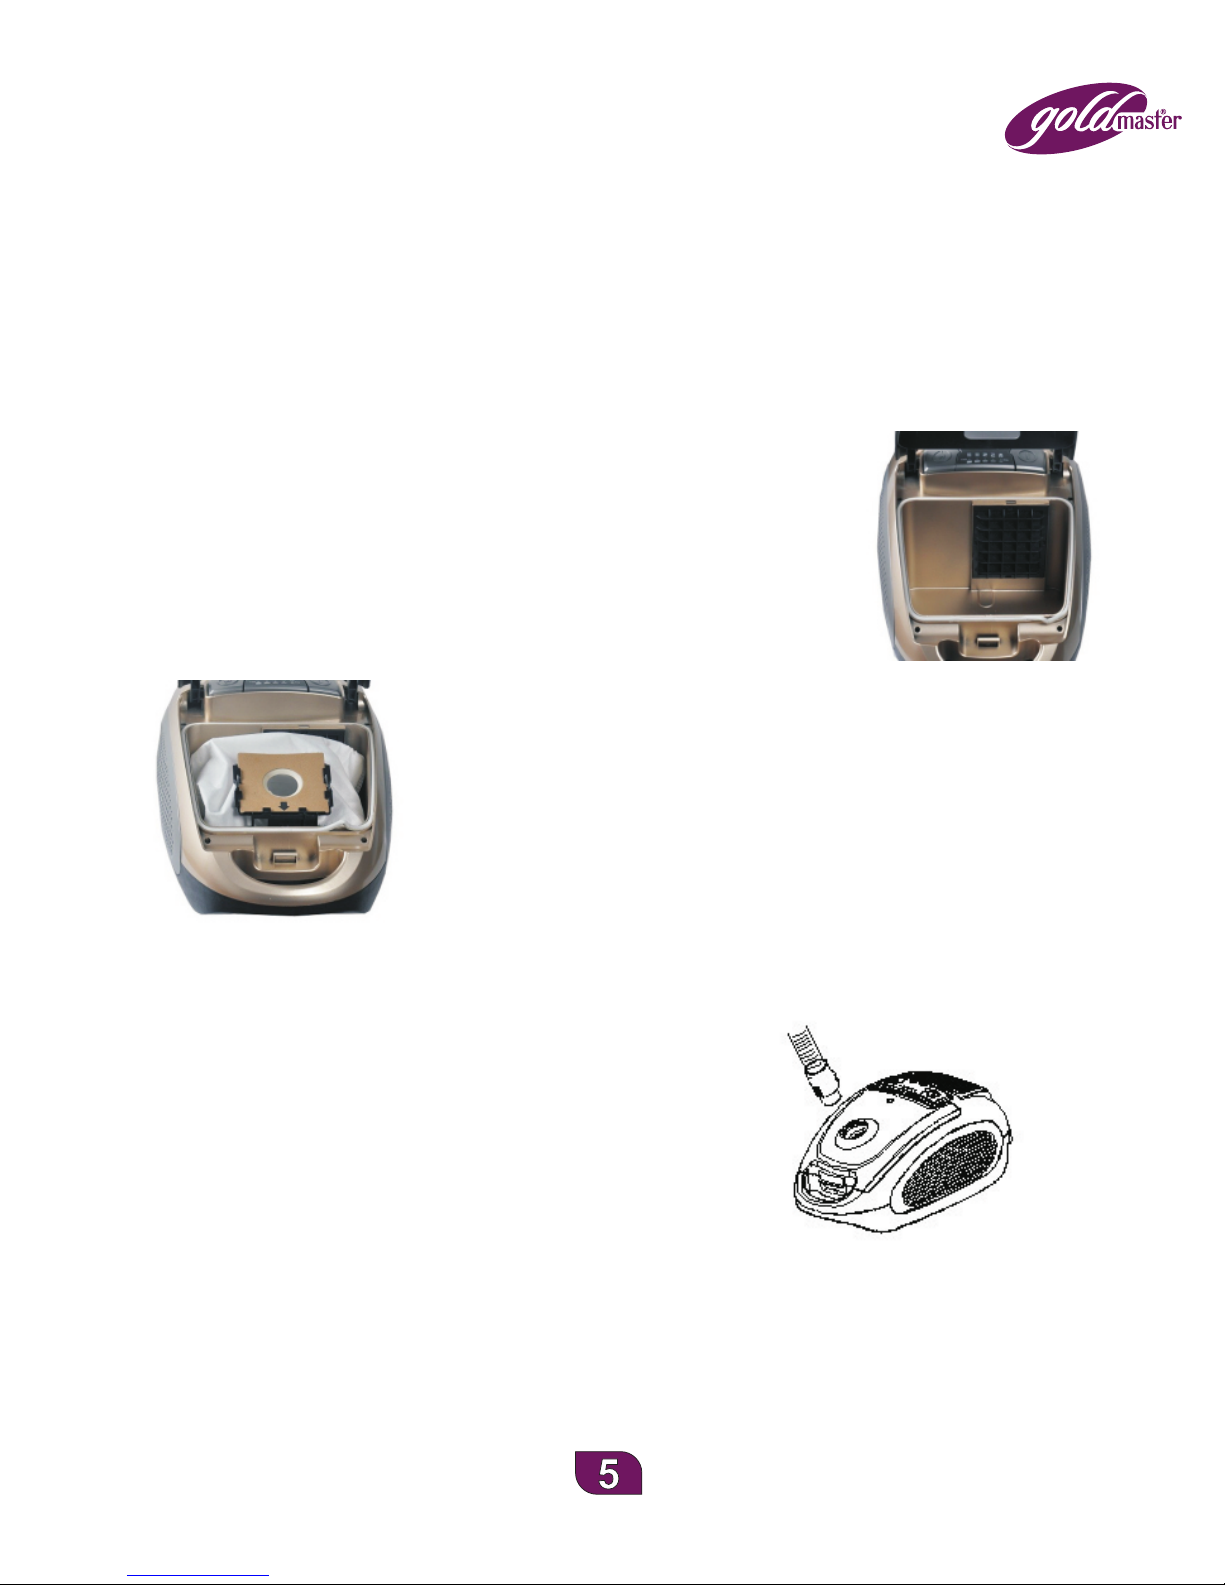
Toz Torbasýnýn Yerleþtirilmesi
Ürünün kapalý olduðuna ve prize takýlý olmadýðýna emin olunuz. Toz torbasý ve
motor koruma filtrelerini yerleþtirmeden önce kesinlikle ürünü çalýþtýrmayýnýz.
1. Toz torbasýnýn bulunduðu haznenin kapaðýný kaldýrýnýz.
2. Hazne içerisindeki motor koruma filtresinin kontrol
ediniz. Resimdeki gibi takýlý olmasý geremektedir.
Takýlý deðilse kutu içerisinden bulup yerine yerleþtiriniz.
3. Toz torbasýný nazikçe geniþletin.
4. Toz torbasýný þekildeki gibi yerleþtiriniz
5. Plastik çerçevenin mukavva kýsýmla tam oturuðuna
emin olunuz.
Esnek Hortumun Takýlmasý
– Hortumu, hortum ucu giriþ aðzýndaki
yuvasýna saat yönünde çevirerek
yerleþtiriniz.
– Hortumu çýkarmak için öncelikle ürünün
fiþini prizden çýkarýnýz. Hortum
baþlýðýný saat yönünün tersine doðru
çevirerek çekiniz.

Dar Uçlu & Fýrçalý Süpürme Baþlýðý
Bu süpürme baþlýðýný, teleskopik boru ya da hortum ucuna takarak
kullanabilirsiniz. Koltuk köþeleri, radyatör vb. ulaþýlmasý güç yerlerde
kullanýlýr. Ayrýca bilgisayar, kitap rafý gibi yerlerin temizliði için de kullanýlýr.
– Teleskopik borunun boyunu ayarlamak için
Þekil 2’de gösterilen ayarlama sürgüsüne
bastýrarak ileriye doðru itiniz. Ýstediðiniz
boya ayarlayýnca sürgüyü býrakýnýz.
– Temizleyeceðiniz yere göre teleskopik
borunun ucuna süpürme baþlýðýný takýnýz.
Zemine Göre Ayarlanabilen Süpürme Baþlýðý
Sert ve yumuþak yüzeylerin kuru olarak temizlenmesinde kullanýlmaktadýr.
Fýrça dýþardayken sert zeminleri (parke, marley vb.), fýrça içerdeyken yumuþak
zeminleri (halý, kilim vb.) temizleyebilirsiniz.
Teleskopik Boru
– Teleskopik boruyu hortum ucunda
bulunan tutma sapýna yerleþtiriniz.

ÜRÜN KULLANIMI
– Ürünü kullanmadan önce, kablosunu dýþarýya doðru çekip uygun
uzunluða getiriniz ve fiþi uygun deðerdeki prize takýnýz.
– Ürünü açma/kapatma düðmesine basarak çalýþtýrýnýz.
Emiþ Gücü Ayarlama
Ürünün emiþ gücünü iki farklý yöntem ile ayarlayabilirsiniz:
– Hortum tutma sapýnda yer alan hava ayar sürgüsü sayesinde hava ayarý
yaparak tül, perde gibi yüzeyleri daha rahat temizleyebilirsiniz.
– Gövde üzerinde bulunan (+) ve (-) düðmeleriyle emiþ gücünü ürünü
kullandýðýnýz zemine göre ayarlayabilirsiniz.
– Temizleyeceðiniz bölgeye göre uygun baþlýðý hortum veya uzatma borusu
ucuna yerleþtiriniz.
– Ürün ile iþiniz bittikten sonra fiþi prizden çýkarýnýz. Kablo sarma düðmesine
basýnýz. Kablo sarma iþlemi sýrasýnda bir takýlma söz konusu olursa, kabloyu
çok az elinizle kendinize doðru çekerek kablo sarma düðmesine tekrar basýnýz.
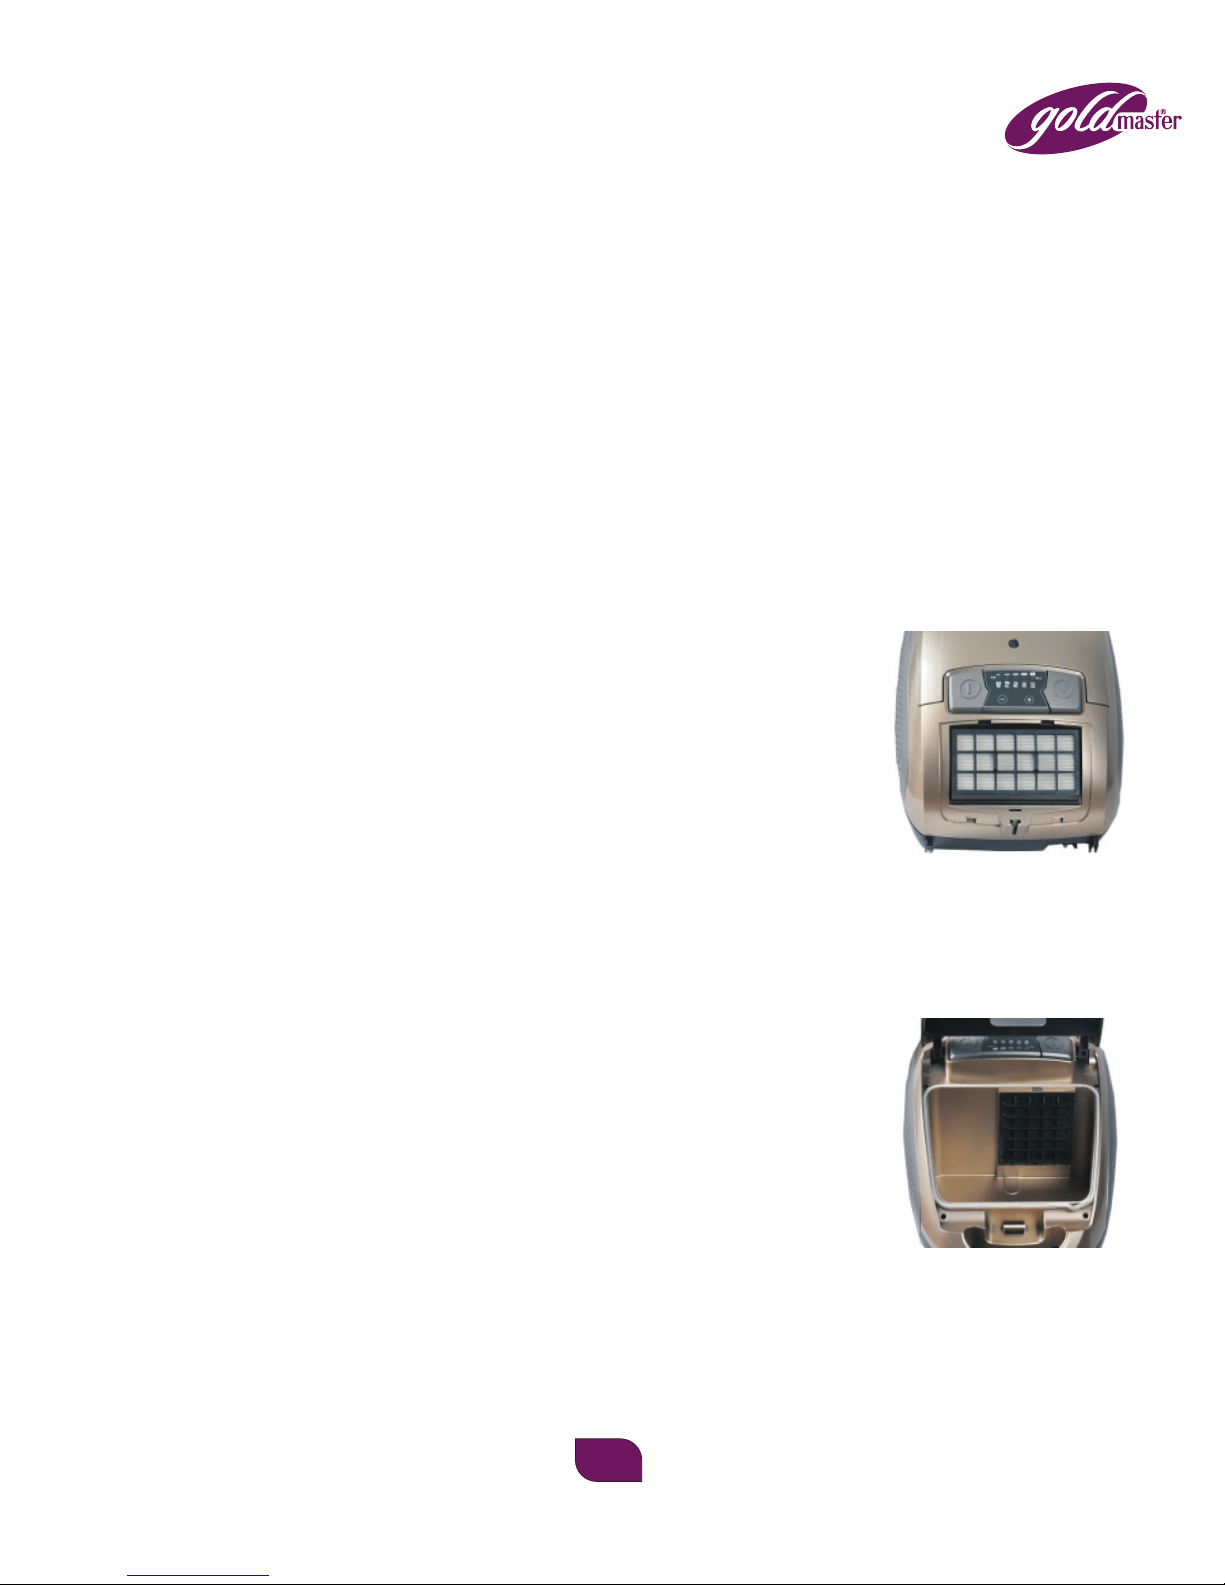
TOZ TORBASININ DEÐÝÞTÝRÝLMESÝ
Toz torbasýný deðiþtirmeden önce ürünün kapalý konumda olmasýna ve prize
baðlý olmamasýna dikkat ediniz.
Üst bölgedeki toz torbasý dolum göstergesi ile doluluk durumunu kontrol ediniz.
Kullaným durumunuza göre belirli aralýklarla toz torbanýzý deðiþtirmeniz
gerekmektedir. Aksi takdirde ürün performansý azalýr ve saðlýksýz kullaným
nedeniyle ürün ömrü azalýr.
- Dolu toz torbasýný deðiþtirmek için ürün kapaðýný
kaldýrýnýz. Kilit
- Toz torbasýný þekilde görüldüðü gibi çekerek
çýkarýnýz ve yerine boþ toz torbasý takýnýz.
FÝLTRELERÝN DEÐÝÞÝMÝ VE TEMÝZLÝÐÝ
Ürün üst bölgesinde bulunan HEPA filtre ve hazne içinde bulunan
koruma filtresi olmak üzere iki adet filtre bulunmaktadýr.
Süpürgenizin emiþ gücünü düþük hissettiðiniz zaman filtreleri temizleyiniz.
Bu iþlemi yaparken ürünü kapalý konuma getiriniz ve fiþi prizden çýkarýnýz.
Hortum baþlýðýný saat yönünün tersine doðru çevirerek çýkarýnýz.
HEPA Filtrenin Temizliði ve Deðiþimi
HEPA filtrenin ve filtre kapaðýnýn düzenli aralýklarla temizlenmesi gerekmektedir.
Ayrýca temizlik sýklýðýna göre belirli aralýklarla HEPA filtrenizi deðiþtirmenizi
öneririz. Toz torbasýný deðiþtireceðiniz zamanlarda filtre temizliði yapmak sizin
için pratik bir yöntem olacaktýr.
8
–
– Hepa filtreyi fýrça yardýmý ile suya tutarak temizleyiniz.
– Hepa filtreyi oda sýcaklýðýnda, yaklaþýk 15 saat
kurumasý için bekletiniz. HEPA filtre tamamen
kurumadan yerine yerleþtirmeyiniz.
– Eðer HEPA filtre kullanýlmayacak kadar kirli ise, ürüne
yeni filtre takýnýz.
Üst bölümdeki filtre kapaðýný kaldýrarak HEPA filtrenizi
çekerek çýkarýnýz.
Bu sayede ürün performansý
düþmeden saðlýklý bir þekilde kullanýma devam edebilirsiniz.
Motor Koruma Filtresinin Temizliði ve Deðiþimi
– Motor filtresi her 100 saat kullanýmdan sonra yenisi
ile deðiþtirilmelidir. Filtrenin temizliði ve deðiþimi için
toz haznesini üründen çýkarýnýz.
– Motor filtresini suya tutarak temizleyiniz.
– Motor filtresini tamamen kuruyuncaya kadar bekletiniz.
Motor filtresini tamamen kurumadan yerine
yerleþtirmeyiniz.
– Eðer motor filtresi kullanýlmayacak kadar kirli ise, ürüne
yeni motor filtresi takýnýz.
Not: Filtreler takýlý olmadan ürünü kesinlikle çalýþtýrmayýnýz!

9
ÜRÜNÜN TEMÝZLÝÐÝ VE SAKLANMASI
– Ürün ile iþiniz bittikten sonra fiþi prizden mutlaka çýkarýnýz. Kablo sarma
düðmesine basýnýz. Kablo sarma iþlemi sýrasýnda bir takýlma söz konusu
olursa, kabloyu çok az elinizle kendinize doðru çekerek kablo sarma
düðmesine tekrar basýnýz.
– Ürünün temizliðinden önce mutlaka bütün parçalarý üründen çýkarýnýz.
– Ürünün mekanik parçalarýný kesinlikle su ile ya da herhangi bir kimyasal
madde ile yýkamayýnýz. Aksi halde ürüne zarar verebilir ya da kötü koku
yaymasýna neden olursunuz.
– Ürün ve parçalarýný sadece nemli bez ile siliniz.
Toz haznesini temizleyiniz.
Hava ayar sürgüsünü
kapatýnýz.
Ürünün fiþini þebeke
prizine takýnýz.
Yetkili servisimize
baþvurunuz.
Filtreleri temizleyiniz.
Týkalý olan bölgeyi
temizleyiniz.
Emiþ gücü seviyesini
artýrýnýz.
Çözüm
Emiþ Gücü ayar düðmesi
minumun seviyede olabilir.
Ürünün kablosu prize
baðlý deðildir.
Priz ya da ürünün fiþi
arýzalýdýr.
Toz haznesi dolmuþtur.
Süpürme baþlýðý,
teleskopik boru ya da
hortum týkalý olabilir.
Hortum tutma sapýnda
bulunan hava ayar
sürgüsü açýk olabilir.
Filtreler týkanmýþtýr.
Olasý Neden
PRATÝK ÇÖZÜMLER
Emiþ Gücü yetersiz
Ürün çalýþmýyor.
Problem
Table of contents
Languages:
Other Goldmaster Vacuum Cleaner manuals


