Goldmedal 2114XE User manual

© 2017 Gold Medal Products Co. Part No. 79064XE
Instruction Manual
10700 Medallion Drive, Cincinnati, Ohio 45241-4807 USA
Bucket Oil Pump
Export Model No. 2114XE, 2114XD

Bucket Oil Pump Export Model No. 2114XE, 2114XD
Page 2
gmpopcorn.com
SAFETY PRECAUTIONS
DANGER
Machine must be properly grounded to prevent electrical shock to personnel.
Failure to do so could result in serious injury, or death.
DO NOT immerse any part of this equipment in water.
DO NOT use excessive water when cleaning.
Keep cord and plug off the ground and away from moisture.
Always unplug the equipment before cleaning or servicing.
Make sure all machine switches are in the OFF position before plugging the
equipment into the receptacle.
008_051514
DANGER
Improper installation, adjustment, alteration, service, or maintenance can
cause property damage, injury, or death. Any alterations to this equipment
will void the warranty and may cause a dangerous condition. This appliance
is not intended to be operated by means of an external timer or separate
remote-control system. NEVER make alterations to this equipment. Read the
Installation, Operating, and Maintenance Instructions thoroughly before
installing, servicing, or operating this equipment.
014_020416
WARNING
To avoid burns, DO NOT touch heated surfaces.
DO NOT place or leave objects in contact with heated surfaces.
009_092414
WARNING
ALWAYS wear safety glasses when servicing this equipment.
010_010914
WARNING
No user serviceable parts inside. Refer servicing to qualified service
personnel.
011_051514
WARNING
Read and understand operator’s manual and all other safety instructions
before using this equipment. To order copies of the operator’s manual go to
gmpopcorn.com or write to Gold Medal Products Co., 10700 Medallion Drive,
Cincinnati, OH 45241 USA 1-(800)-543-0862
022_060215

Bucket Oil Pump Export Model No. 2114XE, 2114XD
Page 3
gmpopcorn.com
SAFETY PRECAUTIONS (continued)
WARNING
DO NOT allow direct contact of this equipment by the public when used in
food service locations. Only personnel trained and experienced in the
equipment operation may operate this equipment.
Carefully read all instructions before operation.
012_010914
WARNING
This machine is NOT to be operated by minors.
007_010914
This appliance is not intended for use by persons (including children) with reduced
physical, sensory or mental capabilities, or lack of experience and knowledge, unless they
have been given supervision or instruction concerning use of the appliance by a person
responsible for their safety.
Note: Improvements are always being made to Gold edal’s equipment. This information
may not be the latest available for your purposes. It is critical that you call Gold edal’s
Technical Service Department at 1-800-543-0862 for any questions about your
machine operations, replacement parts, or any service questions. (Gold edal
Products Co. does not assume any liability for injury due to careless handling and/or
reckless operation of this equipment.) General images may be used in manual for
reference only.

Bucket Oil Pump Export Model No. 2114XE, 2114XD
Page 4
gmpopcorn.com
INSTALLATION INSTRUCTIONS
Inspection of Shipment
After unpacking, check thoroughly for any damage which may have occurred in transit. Claims
should be filed immediately with the transportation company. The warranty does not cover
damage that occurs in transit, or damage caused by abuse, or consequential damage due to the
operation of this machine, since it is beyond our control (reference warranty in back of manual).
Manual
Read and understand the operator’s manual and all other safety instructions before using this
equipment. To order copies of the operator’s manual go to gmpopcorn.com or write to Gold
edal Products Co., 10700 edallion Drive, Cincinnati, OH 45241 USA 1-(800)-543-0862.
Model Description
2114XE: Export Bucket Oil Pump; features a Teach Timer.
2114XD: Export Bucket Oil Pump; features a Dual Teach Timer.
Items Included with this Unit
Setup
This unit has been tested at the factory. Remove all packaging and tape prior to operation.
2 Cup Acrylic Measure
2 ft. Norprene A-60-F ubing with
two Hose Clamps

Bucket Oil Pump Export Model No. 2114XE, 2114XD
Page 5
gmpopcorn.com
Electrical Requirements
The following power supply must be provided:
2114XE, 2114XD: 230 V~, 550 W, 50/60 Hz.
DANGER
Machine must be properly grounded to prevent electrical shock to personnel.
Failure to do so could result in serious injury, or death.
DO NOT immerse any part of this equipment in water.
DO NOT use excessive water when cleaning.
Keep cord and plug off the ground and away from moisture.
Always unplug the equipment before cleaning or servicing.
Make sure all machine switches are in the OFF position before plugging the
equipment into the receptacle.
008_051514
This machine is intended to be used with a Gold edal popcorn popper. The popcorn machine
will have a proper power cord to connect to the pump.
A certified electrician must furnish sufficient power for proper machine operation. We
recommend the popper powering this unit be on a dedicated and protected circuit. Failure to
wire properly will void the warranty and may result in damage to the machine. It is Gold edal
Products Co.’s recommendation that the machine powering this pump be plugged directly into a
wall outlet. The use of extension cords is not recommended due to safety concerns, and may
cause sacrificed and/or reduced performance.
Before You Plug In Machine
1. ake sure all machine switches on the popper are in the OFF position before plugging
the equipment into the popper.
2. ake sure the popcorn machine can accept the grounded plugs (where applicable) on
the power supply cord.
3. The wall outlet for the popcorn machine must have the proper polarity. If in doubt,
have a competent electrician inspect the outlet and correct if necessary.
4. DO NO use a grounded to un-grounded receptacle adapter on the popper (where
applicable).
5. Install the unit in a level position.

Bucket Oil Pump Export Model No. 2114XE, 2114XD
Page 6
gmpopcorn.com
Preparing the Pump for Operation
1. Place the Bucket Oil Pump in a pre-melted bucket of oil.
Note: To prevent possibility of damage to the heat element, we recommend
pre-melting the oil in the bucket with Gold edal’s Hot Wand (Item No. 2018EX)
before inserting the bucket pump.
2. Attach one end of the Norprene A-60-F Tubing to the Quick Disconnect on the Bucket
Pump using the hose clamp provided (see image below).
3. Attach the other end of the Norprene A-60-F Tubing to the metal oil delivery tube
(located in popper) using the hose clamp provided.
4. Connect the power cord socket (located under the popper) to the 6 prong plug on the
back of the pump.
5. The unit is now ready to be programmed for the oil dispense volume to be delivered to
the popper (see Program the EZ Set Timer section).
Quick
Disconnect
6 Prong Plug (on back of pump)
Norprene A-60-F ubing
with Hose Clamps
Attach one end of tubing
to Bucket Pump’s Quick
Disconnect.
Attach the other
end of tubing to oil
line on popper unit.

Bucket Oil Pump Export Model No. 2114XE, 2114XD
Page 7
gmpopcorn.com
Program the E-Z Set Timer
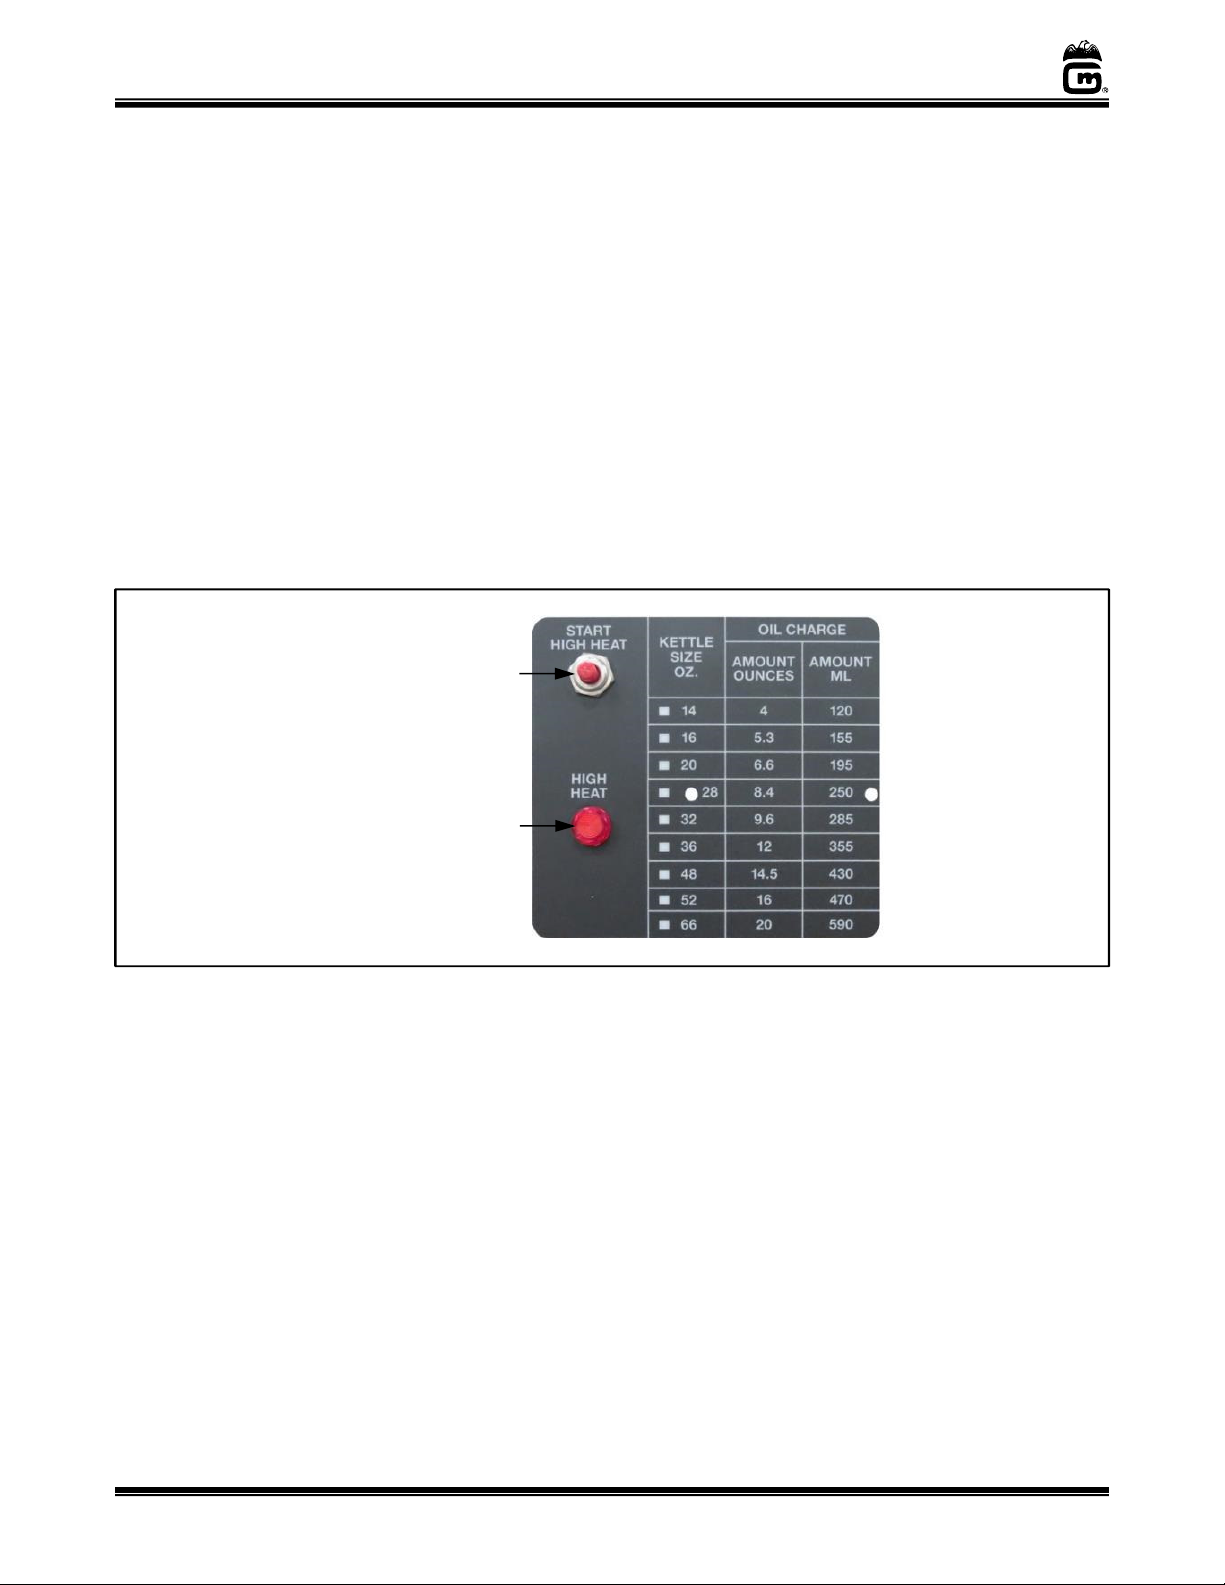
Follow the steps below to program the timer to dispense the oil amount needed to pop a batch of
popcorn. It is recommended to set the oil volume to approx. 30% of the raw popcorn charge used.
To program, use the Oil Dispense Switch and the Oil System aster Switch located on the control
panel of the popper.
Note: Take volume measurements from oil delivery tube located in popper above the
kettle. Allow kettle to cool completely prior to taking volume measurements.
Priming the Unit:
1. Turn Oil System aster Switch ON.
2. Hold a cup under the oil delivery tube in popper, PUSH and RELEASE the Oil Dispense
Switch to START dispensing oil.
3. As soon as oil flows steady, turn Oil System aster Switch OFF; unit is now primed.
Wait 30 seconds to allow oil to settle/drain before programming.
Programming the Unit:
4. Hold down Oil Dispense Switch and turn Oil System aster Switch ON, continue to hold
Oil Switch for 5 seconds until the indicator light (OIL Light or LOAD/DU P Light) on
popper starts to blink ON-OFF, then release switch; unit now in program mode.
5. Hold a measuring cup under the oil delivery tube in popper; PUSH and RELEASE the
Oil Dispense Switch to START oil flow.
6. When correct amount of oil has been dispensed, PUSH and RELEASE Oil Dispense
Switch again to STOP oil flow. The Oil Switch may be pushed ON/OFF as many times as
needed to finalize (“top off”) the oil amount.
7. Turn Oil System aster Switch OFF, then back ON to SAVE the setting. Unit will now
dispense the “programmed” amount of oil when the Oil Dispense Switch is pushed. The
Oil Light on the popper will light continuously when oil pump is dispensing.
8. Wait 30 seconds to allow oil to settle/drain, then re-check the oil quantity.
Dual imer Note: Units with two oil timer settings available must be set for Flexi-Pop, if
available on the unit (Flexi-Pop option not available on Cornado units). Otherwise, the
two settings must be used for Salt/Sweet. Select one corn amount and program the first
timer; then select the other corn amount and program the second timer. (Pumps with
a single timer will only remember the last setting programmed.)
Manual Mode (Oil only dispenses when the Oil Dispense Switch is held IN):
OPTIONAL - Use to manually dispense oil, or for cleaning. Follow Step 4 then skip to Step 6.
o use a timer setting after using Manual Mode, the unit MUS be reprogrammed.

Bucket Oil Pump Export Model No. 2114XE, 2114XD
Page 8
gmpopcorn.com
OPERATING INSTRUCTIONS
Controls and Their Functions
This unit is controlled using the Oil System aster Switch (powers the dispenser), and the Oil
Dispense Push Button Switch (dispenses oil) located on the control panel of the popper.
(Reference the Controls section in the Popper’s anual.)
HIGH HEA PUSH BU ON SWI CH
Pressing the High Heat Push Button Switch activates the heating element for High Heat
Cycle. The High Heat Cycle is factory set at 20 minutes (reference High Heat Cycle section
on next page).
HIGH HEA LIGH
When lit, the red indicator light signals the pump is in High Heat Cycle.
Operating Instructions
With the pump in a melted bucket of oil (see High Heat Cycle section), follow the steps below to
turn on the pump:
Note: To prevent the possibility of damage to the heat element, we recommend
pre-melting the oil in the bucket with Gold edal’s Hot Wand (Item No. 2018EX)
before inserting the bucket pump.
1. Turn Oil System aster Switch ON (switch is located on control panel of the popper).
The pump is now ready to dispense the programmed amount of oil. The heat element
will maintain the oil in a liquid form. (Reference Program the EZ Set Timer section to
adjust the amount of oil dispensed.)
2. To stop all oil heating, the Oil System aster Switch must be in the OFF position.
High Heat Push
Button Switch
High Heat Light

Bucket Oil Pump Export Model No. 2114XE, 2114XD
Page 9
gmpopcorn.com
High Heat Cycle
The High Heat Cycle is used for a new bucket of oil, or at the beginning of the day, to get oil in the
bucket to proper operating consistency. The High Heat Cycle is factory set at 20 minutes.
1. Turn Oil System aster Switch ON (switch is located on control panel of the popper).
2. To start the High Heat Cycle, press the High Heat Push Button Switch located on front
of the Bucket Oil Pump.
3. To stop the High Heat Cycle before cycle completes, turn the Oil System aster Switch
OFF, wait 5 seconds, then turn the switch back ON.
Note: With the High Heat Cycle off, the heat element will continue to provide minimal
heat to maintain the oil in the bucket in a liquid form.
4. To stop all oil heating, the Oil System aster Switch must be in the OFF position.

Bucket Oil Pump Export Model No. 2114XE, 2114XD
Page 10
gmpopcorn.com
Care and Cleaning
DANGER
Machine must be properly grounded to prevent electrical shock to personnel.
DO NOT immerse in water. DO NOT clean appliance with a water jet.
Always unplug the equipment before cleaning or servicing.
025_111616
WARNING
To avoid burns, DO NOT touch heated surfaces.
DO NOT place or leave objects in contact with heated surfaces.
009_092414
Good sanitation practice demands that all food preparation equipment be cleaned regularly (only
use non-toxic, food grade cleaners). A clean looking, well-kept machine is one of the best ways of
advertising your product.
Follow the directions below to clean and sanitize the unit.
Exterior Surface Cleaning
1. With the machine OFF, unplug the unit and allow it to cool before attempting to clean.
2. The exterior surfaces can be cleaned by wiping oil spills with a dry towel, then wiping
with another towel dampened with mild soap and warm water.
3. Wipe stainless steel parts with a clean cloth and cleaner designed for stainless steel,
such as Gold edal Watchdog Stainless Cleaner (Item No. 2088).
DO NO use oven cleaners or abrasive materials as they will damage parts of machine.
Sanitizing the Tubing and Pump
Items Needed: (2) Empty Oil Pails (thoroughly cleaned)
(1) 6-Ft Piece of 5/16” ID ubing and Clamp (Item No. 102187 and 41163)
Gold Medal Chlor- ech Sanitizer (Item No. 1109)
Measure Cup (for priming unit)
NO E: If using a five-gallon bucket, adjust lid collar on pump so unit does not rest on
element (loosen thumbscrews on collar, place pump on bucket, then adjust collar
position and retighten thumbscrews).
1. With machine off, unplug unit and allow oil pump and popper kettle to cool completely
before attempting to clean (always have power disconnected when wiping unit off).
2. Fill a clean, empty pail half-full with hot water and Gold edal Chlor-Tech Sanitizer
(reference instructions on sanitizer container for appropriate amount).

Bucket Oil Pump Export Model No. 2114XE, 2114XD
Page 11
gmpopcorn.com
3. Lift bucket pump from oil pail and allow oil to drain from pump, then wipe off any
excess oil with a clean cloth.
4. Place pump in pail of solution.
5. Let pump soak for ten minutes, lift pump from solution and wipe down with a clean,
solution soaked cloth. Return pump to bucket.
6. Attach the 6-ft piece of tubing to oil dispense tube above popper kettle (see image below).
7. Place other end of drain hose in empty pail.
8. Using the “Red” Oil Dispense PB Switch (located on the control panel of the popper),
dispense solution until tubes are clean and free of oil.
9. When cleaning is complete, discard the dirty solution, then clean pail and refill with
clean, hot water.
10. Lift pump from pail of solution and allow to drain, then place pump in pail of clean, hot
water.
11. Switch drain hose to solution pail.
12. Using the “Red” Oil Dispense PB Switch, dispense hot water until tubes are clean and
free of sanitizer solution.
13. When cleansing is complete, remove drain hose from oil dispense tube above kettle.
14. Remove pump from water pail and allow it to drain completely of any water, then
wipe pump thoroughly dry with a clean cloth before placing back in oil.
15. Place pump in oil pail.
16. Using a measuring cup or medium sized container, the system has to be purged and
primed. Use the “Red” Oil Dispense PB Switch to dispense oil into the container until
all water has been expelled and tubes are primed with oil. Always discard priming oil
dispensed after cleaning.
17. Sanitize cleaning items for next use.
Cornado Unit View
Hanging Kettle Unit
Attach Drain
Hose ubing
w/Clamp
Attach Drain
Hose ubing
w/Clamp

Bucket Oil Pump Export Model No. 2114XE, 2114XD
Page 12
gmpopcorn.com
Troubleshooting
General unit troubleshooting issues are listed below, also reference the Troubleshooting section
in the popper manual.
Issue
Possible Cause
Solution
Oil Pump Does Not Deliver
Oil to Kettle
A.Oil System aster Switch A. Check to make sure the Oil System aster
Switch is ON.
B.Pump is not operating B. Check to make sure the power cord from the
popper is FIR LY plugged into the oil
dispense unit. If unit is plugged in, but not
operating, the pump may need to be replaced.
Check with qualified service personnel.
C. ini Circuit Breaker(s)
on popper tripped
(if equipped)
C. Check the ini Circuit Breaker(s) on the
popper; if reset, then trips again, the unit must
be inspected/repaired by qualified service
personnel.
D.Programmable Timer D. If oil is only dispensed while the Oil Dispense
Switch is pushed, unit may be in anual ode.
See Program the EZ-Set Timer section to
reprogram the timer.
If wrong oil amount is dispensed, timer needs
to be reprogrammed to correct amount.
If timer still dispenses incorrect amount, timer
may need to be replaced, have a qualified
service person inspect/replace control board.
High Heat (runs too long,
or not long enough)
A. High Heat Timer A. The High Heat Timer is preset at the factory
for 20 minutes. If timer needs adjustment,
contact qualified service personnel.

Bucket Oil Pump Export Model No. 2114XE, 2114XD
Page 13
gmpopcorn.com
MAINTENANCE INSTRUCTIONS
DANGER
Machine must be properly grounded to prevent electrical shock to personnel.
Failure to do so could result in serious injury, or death.
DO NOT immerse any part of this equipment in water.
DO NOT use excessive water when cleaning.
Keep cord and plug off the ground and away from moisture.
Always unplug the equipment before cleaning or servicing.
Make sure all machine switches are in the OFF position before plugging the
equipment into the receptacle.
008_051514
DANGER
Improper installation, adjustment, alteration, service, or maintenance can
cause property damage, injury, or death. Any alterations to this equipment
will void the warranty and may cause a dangerous condition. This appliance
is not intended to be operated by means of an external timer or separate
remote-control system. NEVER make alterations to this equipment. Read the
Installation, Operating, and Maintenance Instructions thoroughly before
installing, servicing, or operating this equipment.
014_020416
WARNING
No user serviceable parts inside. Refer servicing to qualified service
personnel.
011_051514
CAUTION
THE FOLLOWING SECTIONS OF THIS MANUAL ARE INTENDED ONLY
FOR QUALIFIED SERVICE PERSONNEL WHO ARE FAMILIAR WITH
ELECTRICAL EQUIPMENT. THESE ARE NOT INTENDED FOR THE
OPERATOR.
027_010914

Bucket Oil Pump Export Model No. 2114XE, 2114XD
Page 14
gmpopcorn.com
ORDERING SPARE PARTS
1. Identify the needed part by checking it against the photos, illustrations, and/or
parts list. (General images may be used in manual for reference only.)
2. Use only approved replacement parts when servicing this unit.
3. When ordering, please include part number, part name, and quantity needed.
4. Please include your model number, serial number, and date of manufacture (located
on the machine nameplate/data plate) with your order.
5. Address all parts orders to:
Parts Department
Gold edal Products Co.
10700 edallion Drive
Cincinnati, Ohio 45241-4807
Or, place orders by phone or online:
Phone: (800) 543-0862
(513) 769-7676
Fax: (800) 542-1496
(513) 769-8500
E-mail: inf[email protected]
Web Page: gmpopcorn.com

Bucket Oil Pump Export Model No. 2114XE, 2114XD
Page 15
gmpopcorn.com
Pump Exterior View
Item
Part Description Part Number
All Models
1 HIGH HEAT LABEL 79090
2 JUNCTION BOX COVER 79062
3 BUCKET PU P LID ASSE BLY 79030
4 THU BSCREW 10-24 X 1/4 112000
5 PU P OUNTING TUBE 79023
6 ONE EAR CLA P 2-1/8 100603
7 FILTER SCREEN 79016
8 ELE ENT RETAINER 79017
9
PU P ASSE BLY
79001
10 8-32 X 1/4 HX HD WHIZLOCK 42045
11 HEAT ELE ENT 230V 500/75W 79002EX
12 OIL DELIVERY TUBE 79015
13 3/8 X1/8 NPT CP REDUCER 79022
14 QUICK DISCONNECT KIT 79008
15 HANSEN PLUG NP 79251
16 HANSEN SOCKET NP 79250
17 HANSEN HOSE BARB NP 79252
12
11
10
5
4
13
14
16
17
15
Data Plate (located
on back of unit).
6
7
8
9
2
3
1
See Safety Labels section.

Bucket Oil Pump Export Model No. 2114XE, 2114XD
Page 16
gmpopcorn.com
Junction Box Interior – Left Side View
Item
Part Description Part Number
2114XE 2114XD
1 BUCKET PU P JUNCTION BOX 79089 79089
2 10 A P E I FILTER 13302 13302
3 CINCH PLUG 79004AX 79004AX
4 DIODE ASSE BLY 79888A 79888A
5 SPDT 240 VAC RELAY 48733EX
6 TEACH TI ER (Programmable Timer) 48732EX 48732EX
7 ADJ 20 IN SPDT TI ER 55047EX 55047EX
8 TI ER BRACKET ASSE BLY 79135 79135
9 TRANSIENT FILTER 89087 89087
10 TER INAL BLOCK 45098 45098
11 240 VOLT RED PILOT LIGHT 41032 41032
12 OIL PU P SWITCH 41031 41031
11
12
See Motor Components
3
2
4
1
6
7
9
10
8
Single imer Unit shown for
general reference only.
Relay (on Dual
imer Model only)
5
Diode
(ref.
Wire
Diagram)

Bucket Oil Pump Export Model No. 2114XE, 2114XD
Page 17
gmpopcorn.com
Motor Components
Item
Part Description Part Number
All Models
1 1/8 X 1 SS COTTER PIN 86574
2 BUCKET PU P DRIVE SHAFT 79043
3 PU P OTOR GASKET 79005
4 PU P OTOR 79077
1
2
3 4

Bucket Oil Pump Export Model No. 2114XE, 2114XD
Page 18
gmpopcorn.com
Safety Labels
Item
Part Description Part Number
All Models
1 2114 LABEL 79439
2 AIN GROUND LABEL 42375
Accessories
Item
Part Description Part Number
1 NORPRENE A-60-F TUBING 91703
2 HOSE CLA P W/SCREW 41163
3 2 CUP ACRYLIC EASURE 62807
1
3
1
2
2

Bucket Oil Pump Export Model No. 2114XE, 2114XD
Page 19
gmpopcorn.com
Wiring Diagram
Model No. 2114XE

Bucket Oil Pump Export Model No. 2114XE, 2114XD
Page 20
gmpopcorn.com
Model No. 2114XD
This manual suits for next models
1
Table of contents
Other Goldmedal Water Pump manuals
Popular Water Pump manuals by other brands

Kärcher
Kärcher SP 9.000 Flat manual

Wright Flow Technologies
Wright Flow Technologies Revolution R0150X Installation, operation and maintenance manual

KSB
KSB Filtra N Installation and operating manual

MSD
MSD Mallory 70 Series installation instructions

DAB
DAB GRINDER GL Instruction for installation and maintenance

Waterway
Waterway Power Defender PD-140C owner's manual