Goldwing GL1800 User manual

You will probably find that the MotoChello headset has a stronger volume
to begin with. Therefore, we suggest you start the intercom volume at
about “6” and make adjustments from there.
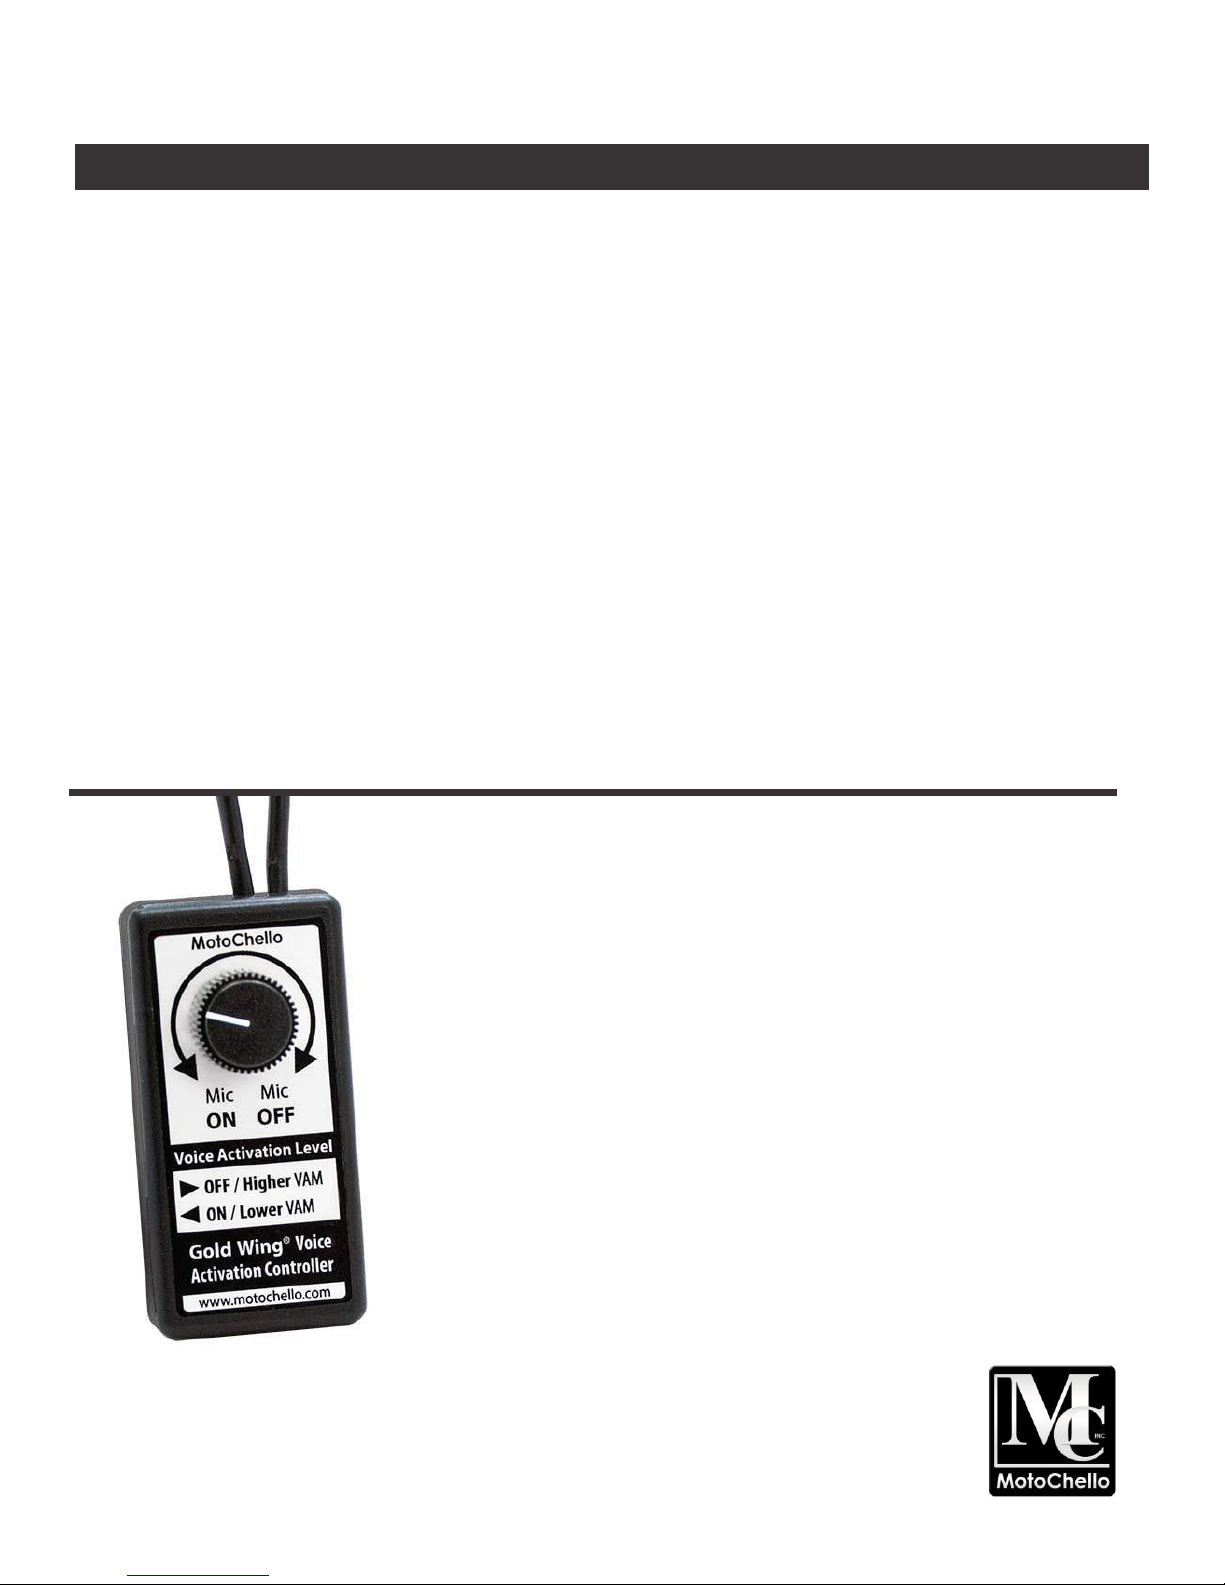
Turn the dial towards the “Mic ON” to decrease the VAM/VOX for the
microphone. Use this in low noise condions so the microphone is more
sensive, meaning it will take less volume to acvate it.
Turn the dial toward the “Mic OFF” posion to increase the amount of
noise to acvate it, or turn it all the way to turn the microphone completely
off. Use this for high noise condions or when to don’t want any
conversaon. Simply rotate the dial to turn it back on.
With a lile pracce you will soon find the seng you prefer, and you will
see how easy it is to adjust it at any me.
Enjoy your new headset with clearer music and voice. Should you have any
quesons or issues, please don’t hesitate to contact MotoChello for
assistance.
Gold Wing GL1800 Headset with VAM
Complete Helmet Headset with Voice Acvated Microphone (VAM)
©2015 MotoChello, Inc.
MotoChello, Inc. • Gardnerville, NV 89410 • 775 / 782-2203
www.motochello.com
Your Gold Wing audio system has many nice
features, but a voice acvated microphone isn’t one
of them. The microphones are always ON so riders
hear and share wind noise at all mes. This is why it
becomes difficult to talk as traveling speeds increase.
Oen, even 50 mph will greatly affect your voice
communicaons and the ability to hear music, even
without a cross wind.
MotoChello Gold Wing headsets have voice
acvated microphones that turn off when you are
not speaking so you won’t experience excessive
road noise or wind from your own and/or a
passenger microphone. In addion, your new
headset has premium, dynamic range speakers that
you will soon appreciate, especially if you like to
listen to music.
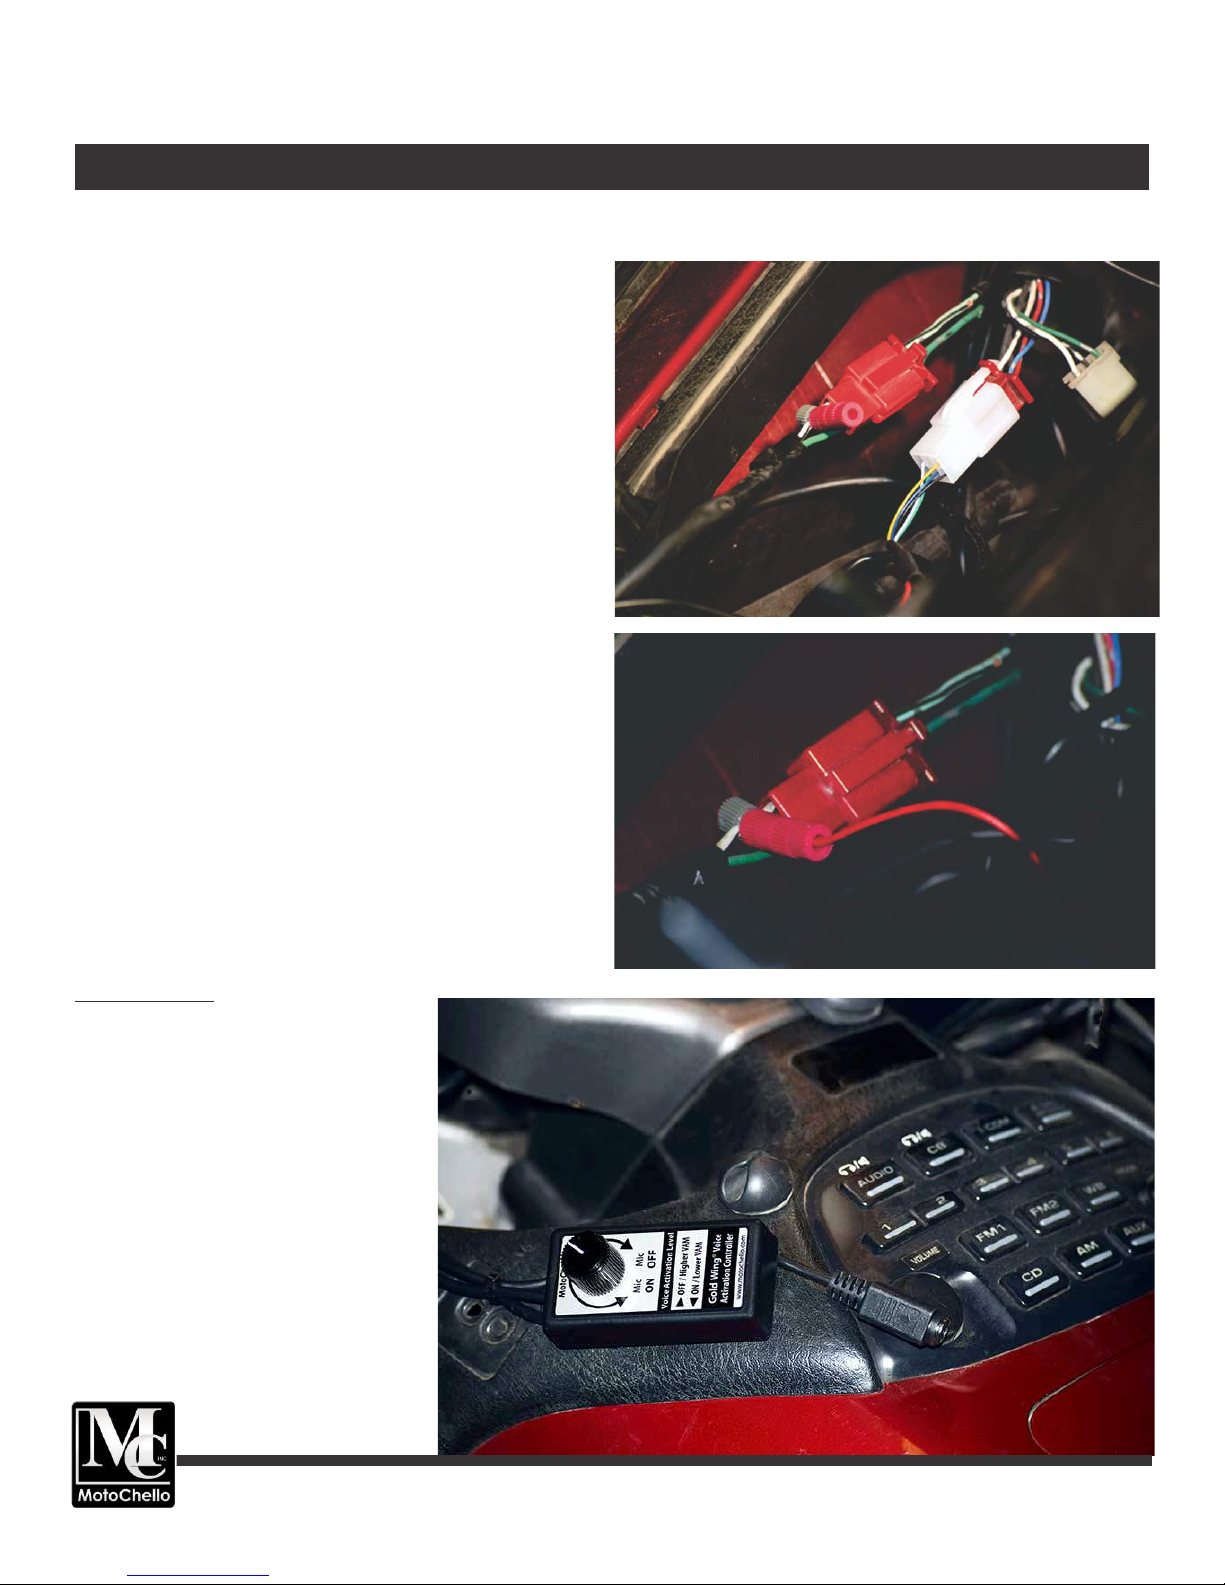
Each rider will have their own headset and controller.
This way you can connue to use any individual
volume adjusters or radio talk buons you may be
using now or in the future. The VAM controller does
interfere with them.
The MotoChello Gold Wing Headset wih VAM
control has firmware that filters out wind noise to
further assist with noise reducon. When it detects
constant wind (or other noise level), it will raise the
threshold to help reduce it. You can make manual
adjustments with the VAM controller as well.
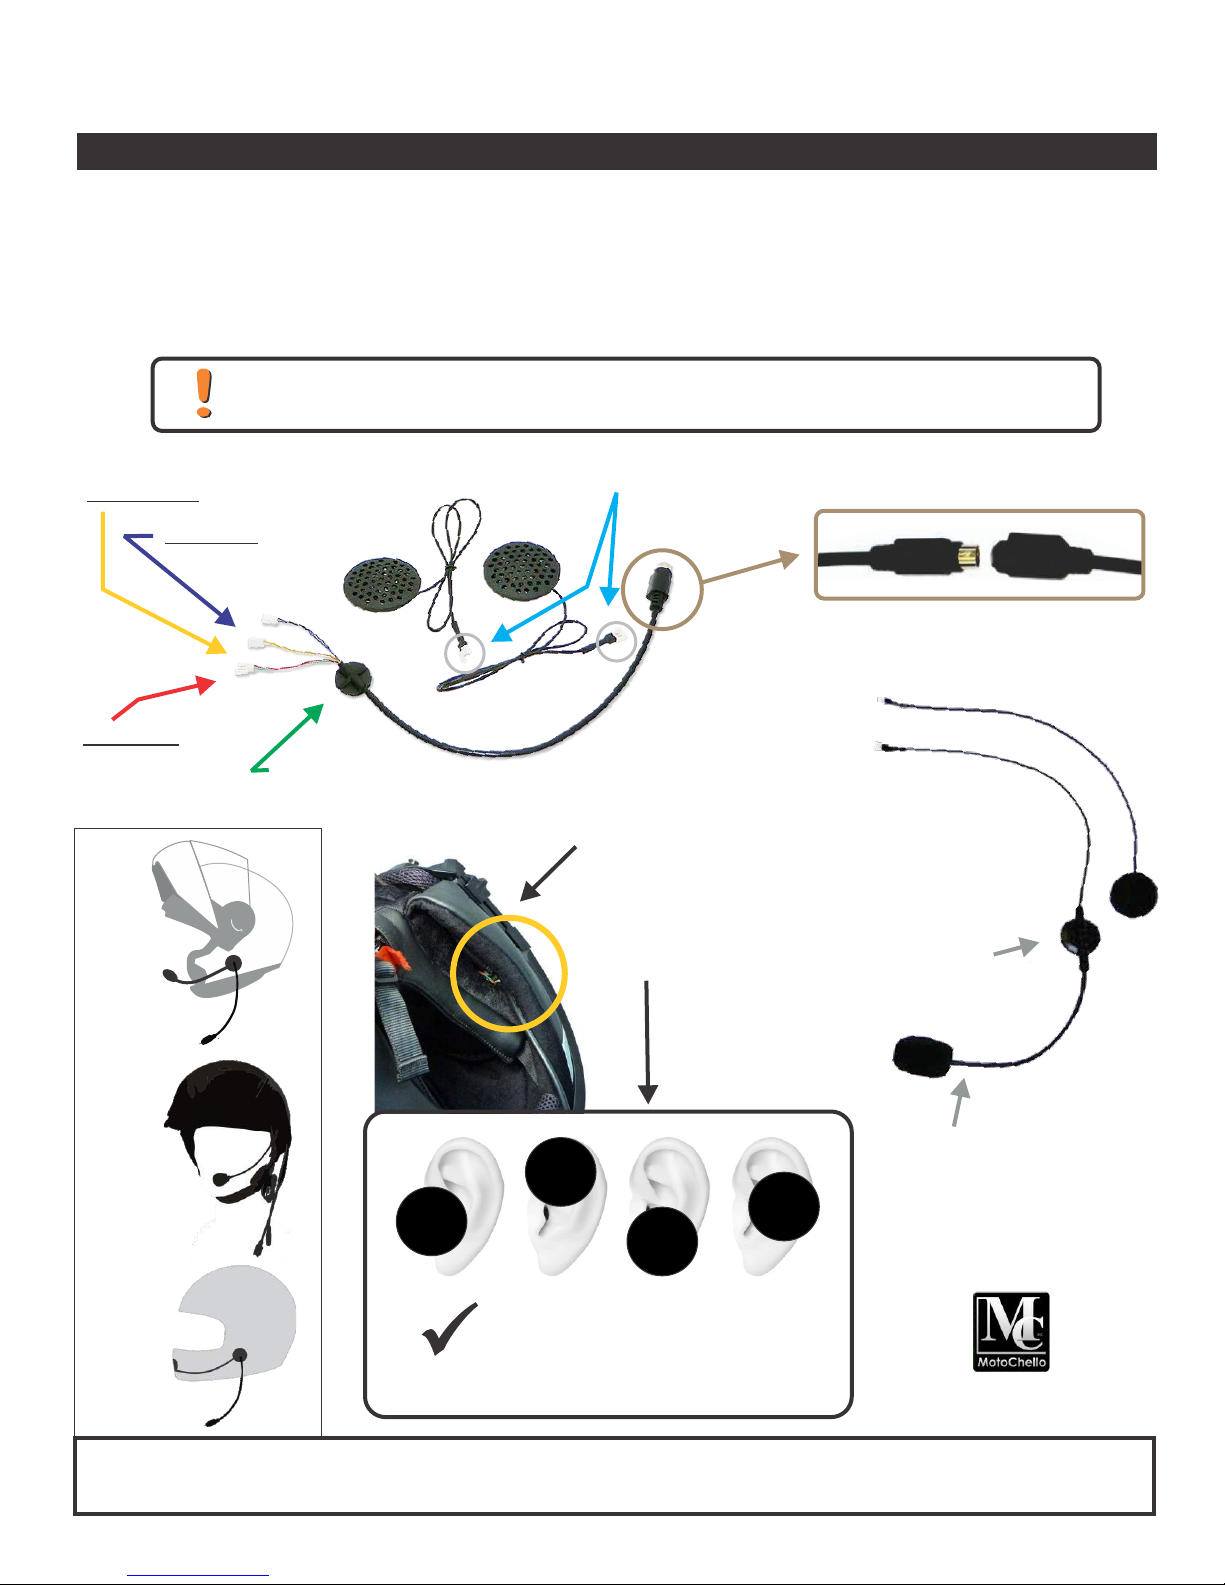
The included earphone adapter lets you switch
between headset speakers and earphones at any
me with plug and play convenience. Everything you
need is in the package.
Adjusting the VAM

Helmet Speakers
Slim speakers with foam
covers and velcro tabs for
helmet placement
HS Wire Harness
Easily connect speakers and
Microphone
Boom Microphone
For Open face and Hinged
helmet types
Button Microphone
For closed helmet only
Helmet Headset Contents
VAM Adjuster
With attached cables to install on your Wing
White = Connect HS Cable
Black = locate for Coiled Cable connection
Red wire = for power
Posi-Tap Connector
To connect red wire to bike accessory power
Velcro Dots
To place and x the adjustment dial at a
convenient location
VAM Adjuster Contents
Package Includes;
Complete Helmet Headset with Voice Acvated Microphone (VAM)
Coiled Cable
Connects headset to
MotoChello system
Earphone Adapter
To switch between headsets
and earphones
4-pole Sleeve
Secure connection for 4-pole
earphone plugs
Gold Wing GL1800 Headset with VAM

Voice Acvated Microphone (VAM) Installaon Instrucons
©2015 MotoChello, Inc.
Driver VAM Controller Installation
1. Remove le hand glove box.
2. Follow old headset wire to where it is plugged
in and unplug headset pigtail.
3. Plug in the VAM controller (white connector)
where you unplugged the headset Pigtail
(usually a red connector on the GL1800) and
white connector on the MotoChello VAM
controller.
4. Using the red wire and the Posi Tap connector
to +12v accessory wire.
5. Place the VOM controller as shown in picture
and route wires as suggested in the Picture. Fix
it place with the included Velcro.
6. Test installaon if it passes then replace the
glove box and you are finished.
Install Notes:
This is a suggested placement for the
VAM unit. You may place it and the
connecon point for your headset
cable wherever you choose.
If you have an aermarket volume
control already mounted on your
bike you do not need to remove it. It
will connue to operate with the
MotoChello headset installed.
VAM Control Box Placement, Driver
Gold Wing GL1800 Headset with VAM

Voice Acvated Microphone (VAM) Installaon Instrucons
©2015 MotoChello, Inc.
1418-C Industrial Way, Gardnerville, NV 89410
775 / 782-2203 • 855 / 326-3953 • www.motochello.com
Passenger VAM Controller Installation
1. Remove Backrest (3 Screws inside of trunk).
1. Remove Seat by removing the 4 Allen Head bolts
through the seat grab bars
2. Follow the GL-1800 headset cable to where it is
plugged in and disconnect connector
3. Plug the VAM controller where you removed the
headset Pigtail. (usually a red connector on the
GL-1800) and white connector on the MotoChello
VAM controller.
4. Connect Red wire to +12 V accessory wire using
the Posi-Tap (usually the green/black striped wire
* see Picture for details).
5. Be sure the +12v is accessory power. Use a mul-
meter or test lamp to verify it. If in doubt, please
contact MotoChello for technical support.
VAM Control Box Placement, Passenger
Install Notes:
This is a suggested placement for the
VAM unit. You may place it and the
connecon point for your headset
cable wherever you choose.
If you have an aermarket volume
control already mounted on your
bike you do not need to remove it. It
will connue to operate with the
MotoChello headset installed.
Gold Wing GL1800 Headset with VAM

Posi-Connector Installation
Instrucons for installing the Posi-Tap® Connector
Posi-Twist:
1. Strip all wires to be inserted 3/4” (19mm).
2. Twist all wires together.
3. Completely unscrew the top from the Posi-Twist.
4. Feed the twisted wires through the boom poron
of the Posi-Twist.
5. While ensuring the wires do not slip out of the
boom of the Posi-Twist, aach the top and ghten.
Posi-Tap:
1. Strip the wire to be connected 3/8” (10mm).
2. Unscrew the cap of the Posi-Tap (gray or large end).
3. Slide the wire you wish to tap into through the slot
in the cap.
4. Re-aach the body of the Posi-Tap and ghten.
5. Aach the other wire to the boom using the same
method as a Posi-Twist.
Posi-Lock:
1. Strip all wires to be inserted 3/8” (10mm).
2. Aach the wires to the screw-in connectors using
the same method as Posi-Twist.
Instrucons provided by RocketMoto - www.rocketmoto.com
775-782-2203
www.motochello.com

With the vast variety of helmets available, it is impossible to cover detailed installaon for all of them.
Should you need help installing your headset, please contact MotoChello support for assistance.
Helmet Headset Installation
General Guide for MotoChello Headset Installation
MotoChello uses 40mm speakers with foam covers and industrial strength Velcro® for placement. The loop
side adheres Speakers to the inside of your helmets outer shell. You may adjust them as needed to fine tune
their placement. For best results and comfort, the headset speakers should be placed towards the lower front
of the ear (in front of the ear canal) and not against the top or back of the earlobe. Pressure in these areas can
become uncomfortable over me. Having the speakers properly placed will also reduce wind, a bonus.
WARNING: Do not cut, drill or modify your helmet in any way for safety reasons.
Doing so may also void your helmet warranty and reduce its effectiveness.
The flat sides match up on the headset connectors
so you can find them by feel. Avoid forcing them
together to prevent possible bending of the pins.
Black/Blue wires -
LEFT ear
Connects to appropriate wires
listed at left
Green/Red wires -
Microphone Adhesive backed for
easy helmet install
Yellow/White wires - RIGHT ear
Speakers fit inside
the foam lining.
Adjust placement to
find your most
comfortable spot
Boom Mic
Boom Mic
Button Mic
XXX
Correctly placed speakers are low and forward 775-782-2203
www.motochello.com
Point the white dot on the
microphone to face you
If there is a flat side on the mic -
point it AWAY from you
“Hook” side of Velcro is pre-
installed on the back of
microphones. Place “Loop”
side at Mic location to adhere
to helmet.
**Boom Mic extension arm
should not lay on outside of
helmet to avoid picking up
external noise vibrations.
A.
B.