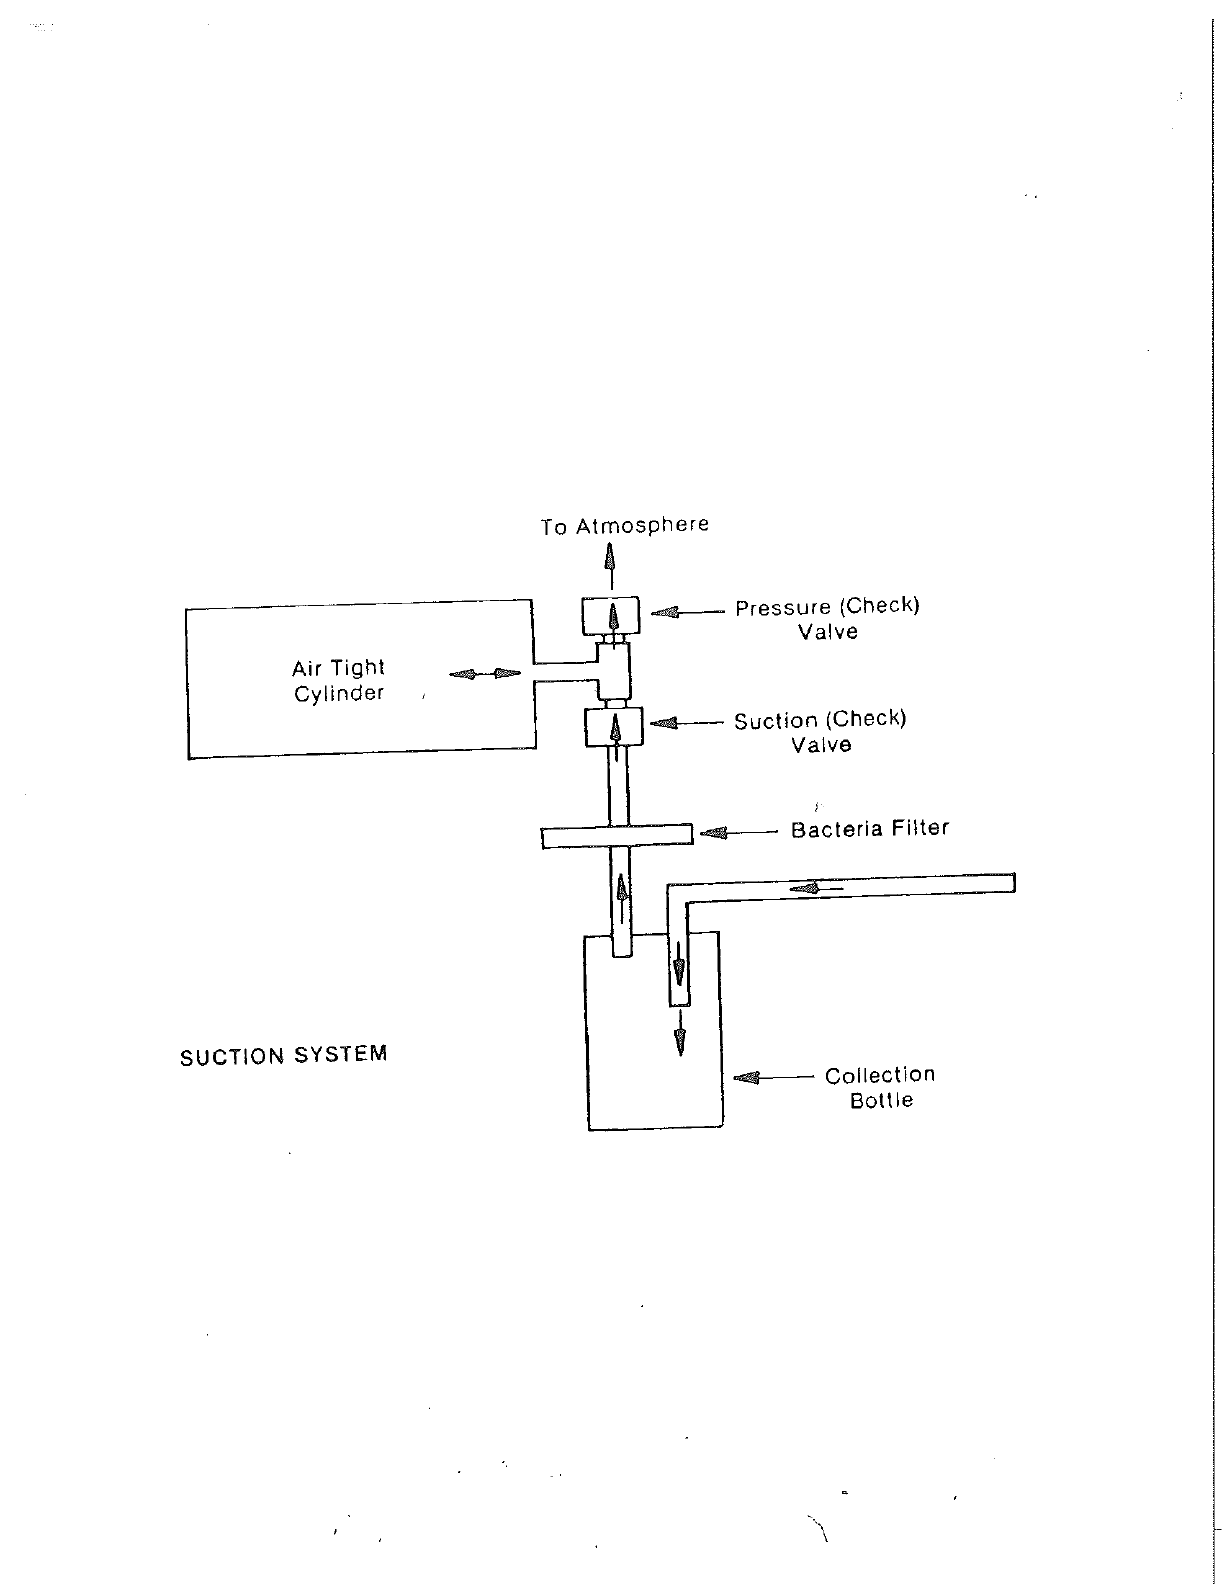
Gomco 270 Manual


INDEX
to
GENERALINFORMATiON
2.0SPECIFICATIONS
3.0SET-UP
4.0OPERATINGPROCEDURE
5.0OPERATINGPRINCIPLE
6.0MAINTENANCEANDSERVICE
7.0ILLUSTRATIONS
8.0
TROUBLESHOOTING
9.0REPLACEMENTPARTS
LIST

1.0GENERAL
INFORMATION:
1.1Purpose:
Gomco
Models270and2701areportabledrainagepumpsdesignedtoassuregentle
suctionforspecialized
uses
asgastriclavage,abdominaldecompression,doudenal
andfistuladrainagefollowingprostatectomy.Thesuctionsystemincludestwopreset
drainagelevelsof90mmand120mmofmercuryvacuum.
1.2
Features
—
Model
270:
Supplied
with
model270asstandardequipmentare:
1.One(1)1200mlglasscollectioncontainer
with
overflowprotectioncap
assembly.
2.
One(1)wireformed
bottle
holder.
3.
Bacteria
filter
topreventfluidandaerosolcontamination.
4.
Onedisposabletubing
pacltage
containing2-six
foot
iengthsofclearflexible
PVC
tubing.
5.
Compact
case
with
lightedselectorswitch,pumpcycle
light
andhospitalgrade
plug.
1.2.1
Overflow
Protection:
The1200mlcoiiection
bottle
assemblysupplied
with
thispumpincludesa cap
and
float
assembly(See
Illustration
No.4).Whencollectedpatientfluidsreacha
predetermined
level,
thevacuumsupplytothecollection
bottle
isshutoffbythe
cap
andfloat.
1.2.2
Bacteria
Fiiter:
Thehighefficiencybacteria
filter
iscustomengineeredtopreventfluidand
aerosoi
contaminationofportablesuction
units.
This
filter
featuresa
hydrophobic,microporousmembranewhichfiltersair
with
maximumefficiency
(0.3micronparticlesinair),while
blocl^ing
the
floW
ofaqueousfluidsand
aerosoi
contaminants.TheGomcohighefficiency
fiiter
protectsagainstsuction
pumpcontaminationinthe
case
ofcanisteroverflowasithelpspreventthe
overflowfromreachingthepump.
1.3
Features
—
iViodel
2701:
Supplied
with
modei2701asstandardequipmentare:
1.One1100mldisposablecollectioncontainer
with
overflowprotectioncap.
2.
Onewireformedcontainerholder.
3.
Bacteria
filter.
4.
Onedisposabletubing
paci<age
containing2-six
foot
lengthsofclearflexible
PVC
tubing.
5.
Compact
case
with
lightedselectorswitch,pumpcycle
light
andhospita!grade
plug.
1.3.1
Overfiow
protection:
The1100mldisposablecollectioncontainersupplied
with
thispumpincludesa
multi-stage
filter
(1)hydrophobicmembranestopsflowofaqueoussolutions
(actsasoverflowprotection),(2)giassprefilterallows
filter
tohandlemost
laser/electrocautery
applications.
1.3.2
Bacteria
Fiiter:
Thehighefficiencybacteria
filter
iscustomengineeredtopreventfluidand
aerosol
contaminationofportablesuctionunits.This
filter
featuresa
hydrophobic,microporousmembranewhichfiltersair
with
maximumefficiency
(0.3micronparticlesinair),while
bloci^ing
theflowofaqueous
flujds
and
aerosol
contaminants.TheGomcohighefficiency
filter
protectsagainstsuction
pumpcontaminationinthe
case
ofcanisteroverflowasithelpspreventthe
overfiov\(
fromreachingthepump.
'"\

2.0SPECIFICATIONS:
2.1Vacuum:
*At90mmsetting:90mmto99mmHg.
at120mmsetting:120mmto132mmHg.
2.2
Flow
Rate
(Air):
At90mmsetting:.25iiters/minute
At120mmsetting:.30liters/minute
2.3Electrical
Requirements:
115
volts50/60Hz.(1.5ampsmax.)
230volts50/60Hz.(1.3ampsmax.)
2.4PumpCylinder:
155
to160
OHMS
resistance
2.5Dimensions:
Case
Only
-
(D)8"x (w)8"x (H)7"
Overall
-(D)8"x
(V\/)
11"x (H)7"
2.6
Weight:
Shipping
-15
pounds
Net- 10pounds
2.7
Duty:
Continuous
*
NOTE;
Vacuumshouldbemeasuredafterthepumphasbeenrunningfor15minutestonormalizethe
pumpcylindertemperature.
3.0SET-UP:
3.1Collection
Bottle
Assembly
—
Glass
Bottle:
(See
IllustrationNo.4)
1.Checkthebottietopedgesfornicks.Ifthebottletopisnicked,itwillnot
seal.
2.
Check
that
thecapgasketIsproperlypositionedinsidethecover.
3.
Check
that
thefloatmovesfreely.
4.
Screwthecoverassemblysecurelyontothebottle,makingsure
that
thegasket
seals.
5.
Place
thebottleassemblyintothewireformbottleholder.
6.Connectonelengthoftubing,enclosedinthetubingpackage,tothebacteria
filter
andtothevertical
fitting
onthebottlecapandfloatassembiymarked"to
pump".
7.Connecttheotherlengthoftubingtothelongbentmetaltubeofthecap
assembly.
3.2Collection
Bottle
Assembly— DCU:
1.
Makesure
filter
shut-offisinplaceinundersideoflid.
2.
Place
bottleona
flat
surfaceandlaycapassemblyonbottle.
Push
downoncap
tosnaplidtobottle.
3.
Place
bottleintowireformbottleholder.
4.
Connectonelengthof
tubing.-enclosed
inthetubingpackage,tothebacteria
filter
andtothevertical
fitting
ofthecapmarkedvacuum.
5.
Connect't'he
otherlengthoftubingtotheelbow
marked
"patient".

4.0OPERATINGPROCEDURE:
{SeeIllustrationNo.3)
1.
Tiie
selectorswitclistiouidbeinthecenter"off"position.
2.
Plug
thelinecordintoa groundedelectricaloutlet,makingsure
that
itisthesame
voltageasindicatedonthe
unit
nameplate.
3.
Besurethecollectionbottleisassembledproperly,see
3,0,
and
that
thelengthoftub-
ingfromthebottletothebacteria
filter
isdry.
4.
Push
theselectorswitchonthe
front
controlpaneltothedesiredvacuumrange,upfor
120mmHganddownfor90mmHg.Theredlightwithintheswitchwillremainlitin-
dicatingthe
unit
ison.
5.
Duringoperation,theamber"pump
cycle"
lampwillblinkintermittentlytoindicatethe
intermittent
pumpingaction.Afterfourorfiveminutesofoperation,theselected
vacuum
leveiwillbereached.
6.Priortousingyourpumpona patient,insurethevacuumbysubmergingtheendofthe
patienttubeintoa containerofwater.Aspirationofwaterintothecollectionbottle
should
benoticed.
7.Thepumpisnowreadyforuse.
8.Duringpatientuse,thelevelofthecollectedcontentswithinthecollectionbottle
should
befrequentlycheckedandemptied.
5.0OPERATING
PRINCIPLE:
The
mildnegativepressureofthis
unit
isinducedbytheexpansionandcontractionofair
withinanairtightcylinder.Theexpansionandcontractionoftheairinthecylinderis
con-
trolledbypressureandsuctionvalvesanda solidstatetimingdevicetoproducea mild
suc-
tion.Containedwithintheair
tight
pumpcylinderisa heatingelementwound
with
a
resistance
wire.Duringthe"on"time120voltsisappliedtotheheatingelementfora period
of2 to3.5
seconds,
dependingupontheselectedvacuumrange,controlledbythesolidstate
timer.Theresistancewireheatstheairwithinthecylinderandexpandedairisexpelledinto
atmospherethroughthepressure(check)valve.Theamberpumpcyclelampinthe
front
con-
trol
panel(SeeIllustrationNo.3)islitduringthistime.Duringthe"off"time,voltagetothe
heatingelementisinterruptedbythesolidstatetimerfora periodof19to22
seconds.
The
pressure
valve
closes
duringthisperiodandtheremainingair.withinthecylindercoolsand
contractscausinga partialvacuumwhichopensthesuction(check)valve.Airfromwithinthe
collectionbottleisdrawnintothecylinderto
fill
thevacuum.Duringthis"off"time,theamber
pumpcyclelampinthe
front
controlpanelremainsoffandthisiswhensuctionactuallyoccurs.
6.0
IVIAINTENANCE
ANDSERVICE
6.1Pump:
The
pumpofthis
unit
hasnomovingpartsandthereforerequiresnomaintenance.Inthe
eventfloodingofthepumpoccurs,theelementinthepumpcylinderandthevalveswill
need
replacing.Attemptingtocontinuetoruna floodedpumpmaycausedamagetothe
controlcircuit.
6.2PumpCylinder
Replacement:
1.Disconnectthe
unit
fromItspowersource.
2.
Removethe
case
topcoverbyremovingthefourselftappingscrews.
3.
Disconnectthevalveandmanifoldassemblyfromthecylindertubingconnector.
4.
Removethepowercordgroundwirefromthe
case
groundscrew.
5.
Removethecylindergroundwirefromthegroundscrew.
6.Removethe
two
cylindermountingscrewsfromthebottomsideofthe
case.
7.Unsolderthetwocylmderwiresatthecylindercoverterminals
anjd
remove.
8.
Installthenewcylinderinreverseorder.

ToAtmosphere
Air
Tight
Cylinder
Pressure(Check)
Valve
Suction(Check)
Valve
BacteriaFilter
SUCTION
SYSTEM Collection
Bottle

6.2.1
Element
Replacement
(SeeIllustrationNo.6)
1.Removepumpcylinderasdescribed
In
6.2.
2.
Removethesixslottedheadmachinescrewsfasteningthecylindercovertothe
cylinder.
3.
Taptheedgeofthepumpcover
with
a piasticmallettobreakitfree.
4.
Liftthecoveroff
with
heatingelementattached.
5.
Removethetwoeiementleadsrunning
thru
thecoverterminalsbyunsoldering
themfromthetopsideofthecover.Pry-upthetwosmalltabssecuringthewire
totheterminals.Thecenterterminalholesshouldbeclearofsolder.
6.Loosenthehexnutlockingtheelementrodtothecoverandunscrewtheelement
fromthecover.
7.Screwthenewelementintocovercenterholeapproximatelyflush
with
thetop
surface
ofthecover.Tightentheelementlocknutagainstcover.
8.
Pass
thetwoelementleads
thru
thecoverterminalsandwindeachleadaround
thesmallterminaltabsandbendbothtabsdowntosecurethewires.Solderthe
twoleadsandsolderclosedthecenterterminalholes.
9.
Checkresistancetomakesureofpropercontact
—
155to160
OHMS.
10.
Piace
gaskettothesealsurfaceofthecylinder.Applya smalldropofRTV
sealant
ontopsideofthecylindercoveratthecenterelementrodholeto
preventanyleaks.
11.
Inserttheelementintothecylinderandplacethecoverontothecylinderwhile
aligningscrewholes.Replacethesixcovermountingscrewsandtighten.Note—
care
mustbetakenwhenhandlingtheelementandcoverassemblytoprevent
damage
tothefragileelement.
12.
Installcylinderasdescribedinpumpcylinder
replacement—6.2.
6.3SuctionandPressureValves:
The
checkvalvesusedinthis
unit
arefactory
sealed,
thereforerequirenomaintenance
(See
IllustrationNo.8)
6.3.1SuctionandPressure
Valve
Replacement:
1.Disconnectthe
unit
fromitspowersource.
2.
Removethe
case
topcoverbyremovingthefourselftappingscrews.
3.
Disconnectthewhitesiliconerubbertubingfromthepumpcylindertubing
connector.
4.
Disconnecttherubbertubingfromthesuctionvalve.
5.
Unscrewbothvalvesfromthevalvemanifold.
6.Lightlylubricatethethreadsofthenewvalves
with
petroleumjellyor
equivalentandscrewthevalvesintothemanifold.
Note:
Care
mustbetaken
whenreplacingvalvestopreventthreaddamageduetocrossthreadingand
overtightening.Valvesshouldonlybeinstalledfinger
tight.
7.Installthevalveandmanifoldassemblyinreverseorder.
6.4
Bacteria
Filter:
The
bacteria
filter
shouldbereplacedafteronemonthofpatientuseorwhena reduction
oftheairflowrateisnoticed.Itmustbereplacedintheeventfluidshaveenteredit,such
as
incollectionbottleoverflow.

6.4.1
Bacteria
Filler
Repiacement:
1.Unscrewthe
filter
fromthevacuumand
filter
connection(See
Illustration
No.
1 orNo.2)byhandturningina
counter-cloci<wise
direction.
2.
Screwa new
filter
into
thevacuumand
filter
connectionbyturningina
clockwise
directionfinger
tight.
Note:
Care
mustbetakenwhenreplacingthe
filter
topreventthread
damageduetocrossthreadingandovertightening.
6,5GlassCollection
Bottle
andCapAssembly
Steriiization:
1.Removethecapassemblyfromthebottle.
2.
Disposeofdrainagefluidsandmaterialsinthebottle.
3.
Soak
the
bottle
andcapassemblyina warmdetergentsolution.Washallthe
parts
with
a nylonbristlebrush,rinsethoroughly
with
waterandaerate.
4.
Autoclaveat250°F for15minutesfollowingtheautoclavemanufacturer'srecom-
mendedprocedure.
Caution:
Donotflashautoclavetheglasscollectionbottle.Ifdesired,sterilize
with
ethyleneoxidegas.Followmanufacturer'sdirectionforrecommendedprocedure.
6.6
Control
Circuit:
Thepumpcyclesarecontrolledbya solidstateprintedcircuitboard(See
Illustration
No.7)
Shts.
1
thru
5 forschematicandparts
list)
orTimer(See
Illustration
No,7A).
Thetimingisfactorysetandneedsnoadjustment.
Control
Circuit
Description
(PN-2311)
Illustration
No.7
TheSF120A-774isanOn/Offrecyclingtimerwhichprovidesa fixed"Off"timeof19to22
seconds
anda selectable"On"timeofeither3.4to3.75secondsor2.1to2.25
seconds.
The2.1to2.25second"On"timecanbeselectedbyshortingterminals4 and5 together.
Whenpowerisapplied,the"On"timeoccurs
first.
A
9Vpowersupplyissuppliedby
Dl,
Rl,
C6,C7,
08,
and
Zl.
07
and
08
areusedforhigh
frequencynoisefiltering.C6isthe
filter
capacitorfortheVz wavevoltagesupplied
throughD1,and
Rl.
Zl
istheregulatingzenerdiode.
Thecircuittimingisaccomplishedbyusinga MC14541programmabletimer,IC1.ThisIC
has
a
built
inoscillatorchipwhosetimingcomponentsareconnectedbetweenpins1,2,
and3.Thepin3 connectionusedisdeterminedby
102,
a
MC4016
bilateralswitch.The
sec-
tionsofthisswitch
that
areturnedon,determinethetimingcomponentswhichare
used.
Duringthe"Off"timeinterval,P3,R7,
Rll,
and
02
comprisethetimingcomponents.
These
areselectedbya highsignalonpin6 of
102.
Thelonger"On"timetimingcomponentsareP2,R6,
R12,
andC3.Theseareselectedbya
highsignalonpin12of
102,
Whena shorter"On"timeisdesired,P2,andR6areparallel
byP1andR5byapplyinga highsignalonpin13of
102.
Since
"On"timeisrelativelyshort,
resistorR14,a zeroOHMresistor,isconnectedbetweenpin5 ofIC2andcommonduring
test.Thispreventsthetimerfromgoing
into
the"Off"time
until
both"On"timeshave
been
calibrated.Thisresistoristhenremoved.
The
output
ofthetimer
Is
connectedthrougha
full
wavebridge,BR1,andSCR.
01.
The
gatedivetotheSCRiscontrolledby
R2.
Q2,R4,andpin8 of
ICI.
Whenpin8 islow,tran-
sistorQ2isoff.andgatecurrentto
Ql
issuppliedto
01
viaR2.ThetimeristhenInthe
"On"
state.Whenpin8 of
101
ishigh,transistor
Q2
Is
"On",shortingthegatecurrentof
Ql
tocommon.Thisprovidesthe"Off"
time.
IC1isprogrammedbytheconnectionofpin12and13eithera highorlowstate.Forthis
circuittheICisprogrammedtodividetheoscillatorfrequencyby1024.
Since
theQ
output
of1C1willchangestateinonehalfof
that
numberofcounts,thenumberof512isusedto
calculatetheoscillatorfrequency.Therefore,theoscillatorfrequencymeasuredatpin1 of
ICI
shouldbe24.98Hzforthe"Off"time,143.22Hzforthelong"On"
time,
and227.56Hz
for
theshort"On"time.

6.6.1ControlCircuitSpecifications:
1.Modeofoperation— continuousOn-Offrecyciing
witti
powerappiiedtothe
inputterminals.Theloadisenergizedduringthe"On"timeperiod(SeeIl-
lustrationNo.7).
2.
Input
voltage— 120Volts± 15%,50/60Hz.
3.
TimeDelays—
4.
Load160
OHMS
resistive.
AT120
MM
SETTING
AT
90MM
SETTING
ON
TIME 3.4to3.75sec. 2.1to2.25sec.
OFF
TIME
19
to
22sec.
19
to22sec.
6,6.2
ControlCircuit
Replacement:
1.Disconnectthe
unit
fromitspowersource.
2.
Removethe
case
topcoverbyremovingthefourselftappingscrews.
3.
DisconnectallthewiresfromtheP.C.boardbypullingoffthe
quicl<
connect
terminals(Donot
pull
onwires.
Mal^e
sureyouhavea
firm
holdontheter-
minal).
4.
RemovethetwoP.C.boardmountingscrewsfromthebottomsideofthe
case.
5.
InstallthenewP.C.boardinreverseorder.(SeeIllustrationNo.1 forwiring
detail.)
6.NOTE:On10/18/04theP.C.boardwasreplaced
with
a encapsulatedcircuit
pacl<age.
To
installtheencapsulatedcircuitpackage,installonemountingscrewintoanexisting
mountingholeInthebottom
side
ofthe
case,
connectallwirestothepropercircuit
package
terminals(SeeIllustrationsNo.2 forwiringdetail).
7.0ILLUSTRATIONS
No.
1
-
FinalAssembly& WiringDetail
w/RC.
BD.
No.
2 - FinalAssembly& WiringDetail
w/Tlmer
No.
3 - Front
Panel
Assembly
No.
4 - CollectionBottleAssembly
No.
5 - DCU
No.
6
-
PumpCylinderAssembly
No.
7
-
ControlCircuit(P.C.BD.)
No.
7A- ControlCircuit(Timer)
No.
8 - ValveandManifoldAssembly


ILLUSTRATION
NO.2


I
Pi"
\
\
\ \ \
'0
4^
a
I
\
\
Vi
Vj
\
V5
K

ILLUSTRATIONNO.
7
SHEET
NO.
1
nEVI8<ON$
APP.
BV
S>rs
ft
.
pi
c
AT'o
S
1.
X^ooa
OF
OpHRATiOKJ
1
COMTi'-O^JS
0>0
-
OFF
IMpJT
TEBM
MALS.
Th£
LOAC
z.
ivipoT
Voi.TA<:ie,
2.2.
SF250A-'>74
=
23o
AC
.-^
i^-^C
.5<i/(-o
fli,
3.
Ti-ie.
Osi-Art
J
1
OFT
Ti»«e.
rXLAiS
•-
sFizsA-774.
:
1^
T.
zz
atna-iDs
3.2OJ
-r-fl&
r;c.i-A-<i
5F'2*
A-77-4-
M'^H
I
<*5
ie<:-.*io%
-O
J-i
T.
z.zS
Sec
i.liec.,*'0%,-0
OWNBY
cpS
OATE-
'?.lC-ao
CMK.
9Y
DATE:
APP
BY
DATE:
/a
SCALE
fJt-U
00
MOT
SCALE
DtUENStONS:
IN
- UW
I.OK)
IN.
=
H«0
MM.
TOlERANCES
FftACTlONS
=
-A
2PLACE
D£C.
=
.01
-
.25
3
PLAC^
DEC.
I
.005
-
,13
AMGLES
S
T
TITLE:
SOL
STATE
T...ieC5
PART
PdO:
DWQ-
I
C?
?>
4.,

W
J
o
O
'
UJ
^
O
i(
K
H H
3
U
O
S. .
Ul
UJ
UJ
In
Q
•
OO
UJUJ
M
U.
[M
f)
<
o o
ff-
•J
lij
UJ
< <
•
o
l/l
'3
U
>
>•'
m
to
If
0.
r
fl.
u
<
N.
CO

PAHT
KO:
REVISIONS
•
APP,
BV
01
R
I
V
TC
/
DWN.
BY:
SfT.
DATEi'l'l-^-S-'
TOLEPIANCES
FE5ACT10NS
=
t
TtTLE:e\t;CUiT
CMK.
BY:
J-'if'*.
DATE:
<}
2
PLACE
oec.
=
.01
3
PLACE
DEC.
=
.CBK
ANGLES
=
T
PAHT
NO
Zi-
APP.
BY:
i{.^4
DATE.
•^•If-fx^
2
PLACE
oec.
=
.01
3
PLACE
DEC.
=
.CBK
ANGLES
=
T
PAHT
NO
—
APP.
BY:
i{.^4
DATE.
•^•If-fx^
2
PLACE
oec.
=
.01
3
PLACE
DEC.
=
.CBK
ANGLES
=
T
DWG.
I
OF
1
SCALE;
r\y
1
DO
»0T
SCALE
DWG-
DWG.
I
OF
1
B
^
ILLUSTRATION
NO,7
SHEET
NO.3

BILL
OF
MATERIALS
REF NO QTY,
DESCRIPTION
BRl
1
BRIDGE
W04MA
Cl
1
CAPACITOR
.lufd
250
VDC
C2
1
CAPACITOR
.lufd
250
VDC
C5
1
CAPACITOR
.Oluf'd
250
VDC
C4
1
CAPACITOR
.Olufd
250
VDC
C5
1
CAPACITOR
.Olufd
250
VDC
C6
1
CAPACITOR
^^uf-d
25
VDCMSR
C7,C8
2
CAPACITOR
.00lufd
500
VDC
Dl
1
RECTIFIER
DIODE
1N4001|
ICI
•
1
INTEGRATEDCIRCUT
MC
l45Hl
B
IC2
1
INTEGRATEDCIRCUT
MC
l40l6
B
Pl
1
TRIMPOT
1 MEG.OHM
'
P2
1
TRIMPOT
lOOK
OHM
P3
1
TRIMPOT
lOOK
OHM
Ql
1
SCR
C 106D
Q2
1
TRANSISTOR
2^15172
Rl
1
RESISTOR
22K
OHM
1^2
WATT
R2
1
RESISTOR
lOK
OHM
i
WATT
R5
1
RESISTOR
4.7K
OHM
^
V7ATT
r4
1
RESISTOR
27IC
OHM
h
WATT
R5
1
RESISTOR
47K
OHM
^
WATT
r6
1
RESISTOR270K
OHM
^
WATT
R7
1
RESISTOR120K
OHM
^
WATT
r8
1
RESISTOR
27K
OHM
i
WATT
R9
1
RESISTOR
lOKOHM
i
WATT
iL|„USTRATiON
NO.
7
SHEET
4

BILL
OF
MATERIALS
REF
NO
QTY. DESCRIPTION
RIO
1
RESISTOR
33K
OHM
i
WATT
Rll
1
RESISTOR
390K
OHM
i
WATT
R12
1
RESISTOR
390K
OHM
i
WATT
R13
1
RESISTOR
27K
OHM
J
WATT
Rll|
I
RESISTOR
0 OHM
i
WATT
R15,16,17
RESISTOR
0 OHM
f
WATT
1 ZENER
9V
1N5239B
1 PRINTEDCIRCUT
BOARD
5
i
IN.TERMINAL
1
COVER
1
LABEL
3
SPACER
ILLUSTRATION
NO.
7
SHEET
5
This manual suits for next models
1
Table of contents
Popular Water Pump manuals by other brands

JEC Pumps
JEC Pumps JRZS Series operating & maintenance manual

Ingersoll-Rand
Ingersoll-Rand 6661HX-XXX-C Operator's manual

Parmco
Parmco GD-2 Installation and operating instructions

T.I.P.
T.I.P. WPF 1500 S operating instructions

Lincoln
Lincoln A 4417 manual

Angelo Decor
Angelo Decor Pond Building AD41500 quick start guide

Lincoln
Lincoln J Series Owner's/operator's manual

FAG
FAG PUMP1000-4L-CONTROL user manual

Grundfos
Grundfos DP 10.50 Original installation and operating instructions

ProMinent
ProMinent Sigma Series Supplementary instructions

umbra pompe
umbra pompe ACUAFLUSS 4 Addendum

Aqua
Aqua HC 100 Operating and maintenance instructions