Goodmans GDVD100R User manual

GDVD100R
OPERATING INSTRUCTIONS
Before operating this unit,
please read this owners manual carefully

IMPORTANT SAFEGUARDS
This wires in this mains lead are coloured
in accordance with the following wiring
codes:
Blue.............................................Neutral
Brown.......................................... ...Live
This wires in this mains lead must be con-
nected to the terminals in the plug as fol-
lows:
Blue Wire.................................N or Black
Brown Wire................................L or Red
Only a 3 Amp fuse should be fitted in the
plug or a 5 Amp fuse at the distribution
board.
This symbol means that this unit is double insulated.
An earth connection is not required.
PRE FITTED MAINS PLUGS
For your convenience a mains plug has been fitted to this appliance. For your safety
please observe the following information.
1. Should the fuse in the plug fail remove the plug from the wall socket and replace the
fuse with a 3 Amp ASTA approved to BS 1362 fuse.
2. Never use the plug without the fuse cover fitted. Replacement fuse covers are avail-
able from your dealer or most electrical retail outlets.
3. If the mains plug is cut off the cable, rewire the replacement plug in accordance with
instruction give in this manual.
4. CAUTION: Under no circumstances should the discarded plug be inserted into the
mains socket. To prevent a shock hazard carefully dispose of the discarded plug.
Do not leave the plug lying around where children might see it.
WARNING: To prevent fire or shock hazard do not expose this unit to rain or moisture.
CAUTION : DANGEROUS VOLTAGES EXIST INSIDE THIS UNIT. DO NOT REMOVE
COVER (OR BACK).
NO USER SERVICEABLE PARTS INSIDE REFER SERVICING TO QUALI
FIED SERVICE PERSONNEL. DISCONNECT FROM MAINS SUPPLY
WHENNOT IN USE.
WARNING: UNDER NO CIRCUMSTANCES MUST THE LIVE OR NEUTRAL
WIRES BE CONNECTED TO THE EARTH TERMINAL INA 3- PIN
MAINS PLUG.
BLUE
POWER
CORD
FUSE
BROWN
CORD GRIP

3
•This appliance is classified as a CLASS 1 LASER product.
•The CLASS 1 LASER PRODUCT MARKING is located on the rear
panel.
•This product contains a low power laser device. To ensure con-
tinued safety do not remove any cover or attempt to gain access
to the inside of the product. Refer all servicing to qualified per-
sonnel only.
CAUTION
The use of optical instrument with this product will increse
eyes hazard. As the laser beam used in this CD/DVD player is
harmful to eyes, do not attempt to disassemble the cabinet.
Refer servicing to qualified personnel only.
The following marking is printed on the rear panel.
WARNING
This symbol is intended to alert the user of the
presence of uninsulated “dangerous voltage ”within
the product’s encasement that may be of sufficient
magnitude to constitute a risk of electric shock to
persons.
This symbol is intended to alert the user of the
presence of important operating and maintenance
(servicing) instructions in the literature accompa-
nying the applicance.
To prevent fire or shock hazard, do not ex-
pose the unit to rain or moisture.
To avoid electrical shock, do not open the
cabinet.
Refer serving to qualified personnel only.
Mains cord must only be changed at quali-
fied service shop.
CLASS 1 LASER PRODUCT
LUOKAN 1 LASERLAITE
CLASS1LASERAPPARAT

4
Important Safeguards and Precautions
If There is Noise Interference on the TV While a Broadcast is
being Received
Depending on the reception condition of the TV, interference may
appear on the TV screen while you watch a TV broadcast and the
unit is left on. This is not a malfunction of the unit or the TV.Towatch
a TV broadcast, turn off the unit.
Service
•Do not attempt to service the unit yourself.
•Please refer any service to the nearest service centre.
Copyright
Audio-visual material may consist of copyrighted works which must
not be recorded without the authority of the owner of the copyright.
Please refer to relevant laws in your country.
Copy protection
This DVD player supports Macrovision copy protection.
On DVD discs that include a copy protection code, if the contents of
the DVD disc are copied using a VCR, the copy protection code
prevents the videotape copy from playing normally.
Recommended Measures for Optimum Picture Excellence
This unit is a precision device that is constructed using extremely
accurate technology.
Soiling or friction affecting the pickup lens or disc drive can impair the
image quality. At the worst, neither video nor audio will be played
back. To obtain optimum picture quality, the player should be checked
(cleaning and replacement of some parts) every 1,000 hours. Note
that this period varies depending on the environment (temperature,
humidity, dust, ect.) in which the player is used.
Do not attempt to clean the pickup lens yourself.
Power Cord Protection
To avoid any malfunctions of the unit, and to protect against electric
shock, fire or personal injury, please observe the following:
•Hold the plug firmly when connecting or disconnecting the AC
power cord.
•Keep the AC power cord away from the heating appliances.
•Never put any heavy object on the AC power cord.
•Do not attempt to repair or reconstruct the AC power cord in any
way.
Location and Handing
•Air vents are provided in the cabinet to prevent excessive tem-
peratures inside the unit. Do not place this unit in closed spaces,
cover it, or otherwise block the vents.
•Do not place this unit in direct sunlight, or near heat sources.
•Keep this unit away from strong magnetic objects.
•Do not insert or drop anything into this unit through the air vents
as this could cause serious damage, possibly resulting in fire.
•Do not place any object containing water or other liquids on this
unit. In the event that liquid should enter the cabinet, unplug this
unit immediately and contact the retailer or service centre immedi-
ately.
•Do not remove the cabinet. Touching parts inside the cabinet
could result in electric shock and / or damage to the unit.
•Do not use the unit in a car. The operation can not guaranteed.
Nonuse Periods
•When the unit is not being used, turn the unit off.
•When left unused for a long period of time, the unit should be
unplugged from the household AC outlet.
No Fingers or Other Objects Inside
•Do not put any foreign object on the disc tray.
Stacking
•Place the unit in a horizontal position, and do not place anything
heavy on it.
Condensation
Moisture may form on the pickup lens in the following conditions:
•Immediately after a heater has been turned on.
•In a steamy or very humid room.
•When the unit is suddenly moved from a cold environment to a
warm one.
If moisture forms inside this unit, it may not operate properly. In this
case, turn on the power and wait about one hour for the moisture to
evaporate.
On adjusting volume
•Do not turn up the volume while listening to a portion with very
low level inputs or no audio signals. If you do, the speakers may
be damaged when a load section is played.

5
General Information
Features ........................................................................... 6
DVD region codes ............................................................. 6
Disc that can be played .......................................................... 6
Glossary of disc terms .................................................... 6
Conventions about this manual ....................................... 6
Notes on disc ................................................................... 7
Accessory ....................................................................... 7
Inserting batteries into the remote control ....................... 7
Function Overview
Front panel ....................................................................... 8
Back panel ........................................................................ 8
Remote control ................................................................. 9
Connections
Connecting speakers ................................................... 10
Connecting AM / FM aerial .......................................... 11
Connecting to TV and additional components............... 12
Basic Setup
Setting up the surround sound system ........................... 13
Selecting the listening mode ........................................... 13
General setup .................................................................. 14
Speaker setup .................................................................. 14
Audio setup ...................................................................... 15
Parental control ............................................................... 15
Change the password ..................................................... 15
Playing Discs
General operation ............................................................ 16
Basic playback ................................................................. 16
Playing video CDs with PBC ............................................ 17
Using the menu for each DVD .......................................... 17
Checking the information ................................................. 18
Selecting the start time .................................................... 19
Program play .................................................................... 19
Selecting the audio channel and language ..................... 19
Special Function
Angle selection ................................................................ 20
Picture Zooming ............................................................... 20
Selecting subtitle language .............................................. 20
Other Function
Tuning to radio stations ................................................... 21
Preseting radio stations ................................................... 21
Listening to preset radio stations .................................... 21
Listening to an external source ....................................... 21
Sleep timer setting............................................................ 21
Troubleshooting ...................................................... 22
Specifications............................................................ 23
Table of Contents

6
Features
•DVD player built-in DTS*1 and Dolby Digital*2 decorder, supporting
Dolby Pro Logic I by 6-channel amplifier.
•Tuner (AM/FM) receiver.
•Conforming DVD, SVCD, VCD2.0, VCD1.1, MP3, CD-R, CD-RW,
Picture CD, and JPEG discs.
•DVD navigation and SVCD, VCD 2.0 PBC controlling functions.
•VFD front panel display and OSD menu display.
•Full function remote control.
*1 Manufactured under license from Digital Theater System,
Inc. US Pat. No. 5,451,942, 5,956,674, 5,974,380, 5,978,762 and
other world-wide patents issued and pending. “DTS”and
“DTS Digital Surround”are trademarks of Digital Theater
Systems, Inc. Copyright 1996,2000 Digital Theater Systems,
Inc. All rights reserved.
*2 Manufactured under license from Dolby Laboratories.
“Dolby”, “AC-3”, “Pro Logic”and the double-D symbol
are trademarks of Dolby Laboratories. Confidential Unpub-
lished Works. 1992-1999 Dolby Laboratories, Inc. All rights
reserved.
DVD region code
DVD players and discs are designed with region numbers which
dictate the region (printed on the rear panel). If the region number
does not match the region number in your DVD player, you will not be
able to play the disc. If you try to play the DVD, the message “WRONG
REGION”will appear on OSD.
The region number for this DVD player is 2.
Disc can be playbacked
•DVDs
Disc are general recorded with
multi-titles. Titles may be subdivided
into chapters.
•Video CDs
Disc are general divided
into tracks.
•Audio CDs and MP3
Disc are divided into tracks.
Note
•You cannot play CD-G, CD-EXTRA, CD-ROM and DVD-ROM discs.
•You cannot play illegally produced discs.
•You cannot play scratched discs.
•You cannot play disc that are dusty, soiled or marked with finger-
prints.
Glossary of disc terms
•Title (DVD)
The longest sections of a picture or a music piece on a DVD; a
movie, ect., for a picture piece on a video software; or an album,
etc., for a music piece on a audio software. Each title is assigned
a title number enabling you to locate the title you want.
•Chapter (DVD)
Sections of a picture or a music piece that are smaller than titles.
A title is composed of several chapters. Each chapter is assigned
a chapter number enabling you to locate the chapter you want.
Depending on the disc, no chapters may be recorded.
•Track (Video or audio CD)
Sections of a picture or a music piece on a VIDEO or a CD. Each
track is assigned a track number enabling you to locate the track
you want.
Conventions about this manual
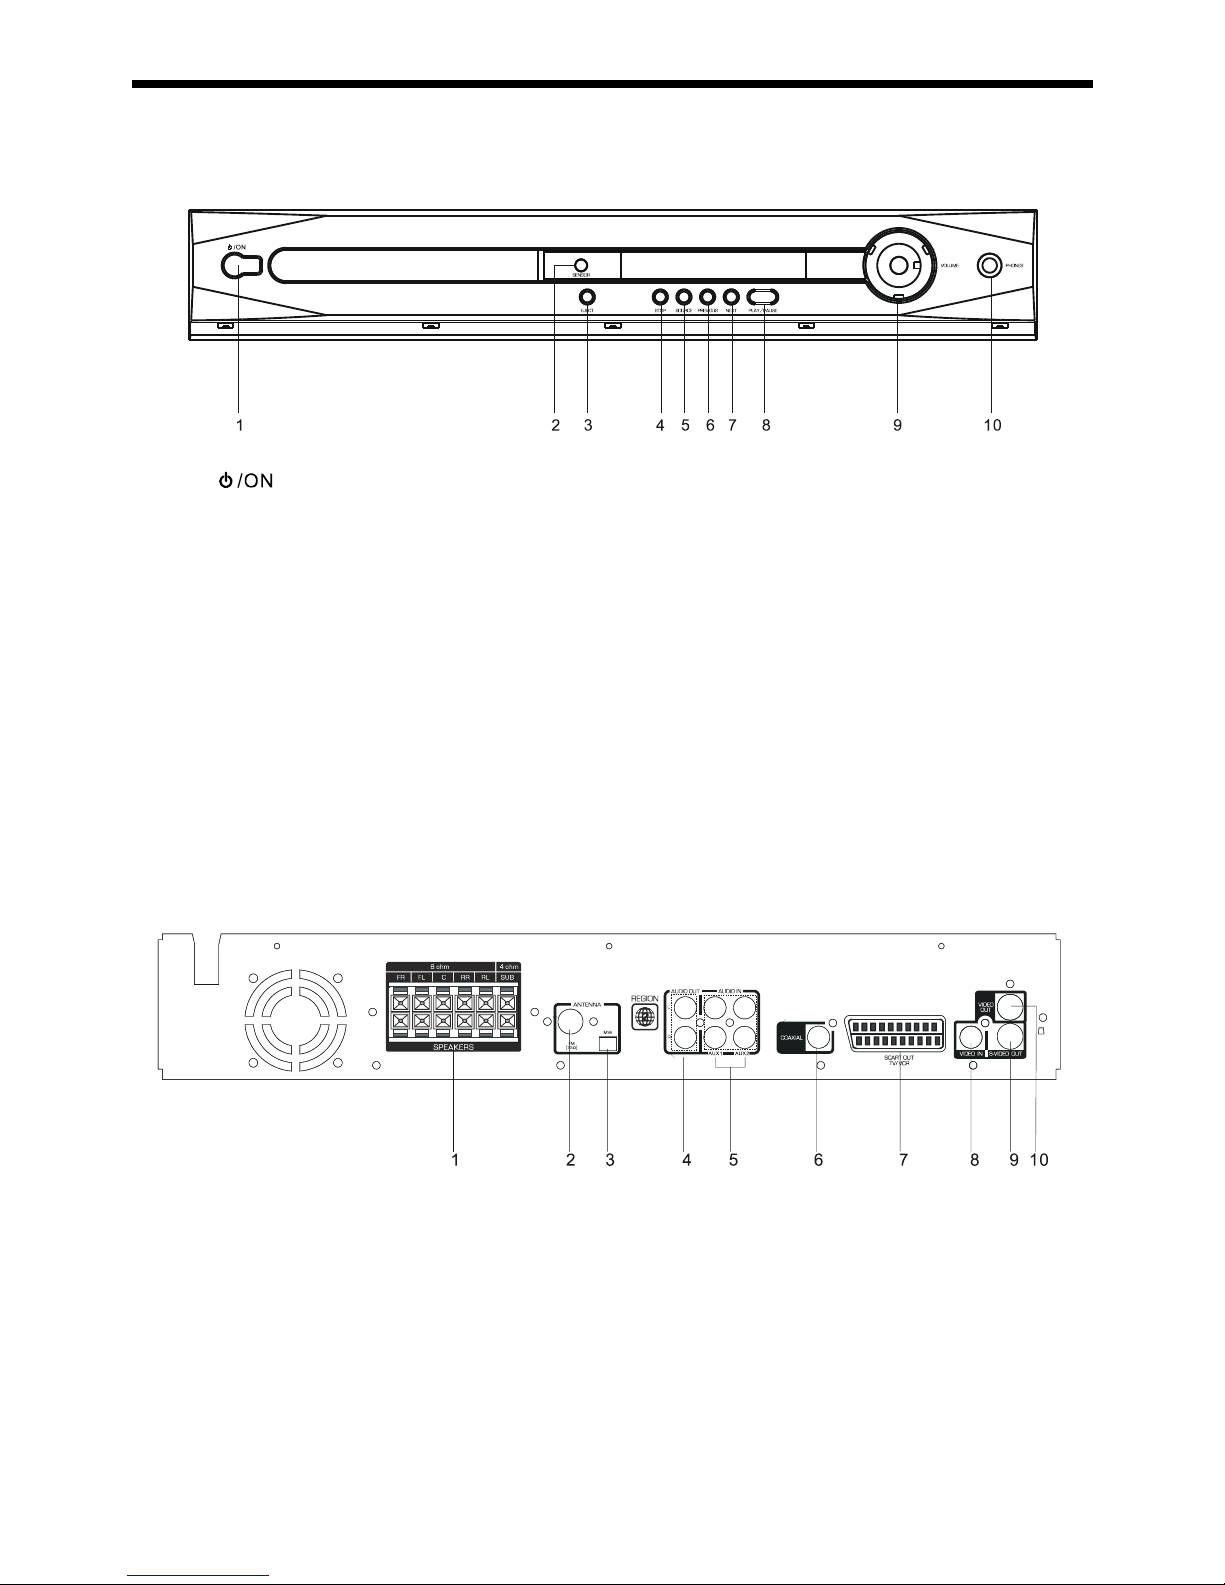
•Instructions in this manual describe the controls on the system.
You can also use the controls on the remote control if they have
the same or similar names as those on the system.
•The types of functions and operations that can be used for a
particular disc vary depending on the features of that disc. In
some cases, these functions and operations may differ from the
descriptions given in this Operations Manual. In this event, follow
the instructions given on the screen. This Operations Manual only
covers basic disc operations.
•For some operations, the icon may appear on the the screen.
This indicates that the operation described in this Operations
Manual is not permitted for the current disc.
•The drawings about the TV screen and front panel display used
in this Operations Manual are purely for the purposes of explana-
tion. The actual displays may differ slightly from what are shown
here.
General Infor
orma
mation
tion

7
Notes on disc
Disc handling precautions
•To keep the disc clean, handle the disc by its edge. Do not touch
the surface.
•Do not stick paper or tape on the disc.
If there is glue (or a similar substance) on the disc, remove the glue
completely before using the disc.
•Do not expose the disc to direct sunlight or sources such as hot
air ducts, or leave it in a car parked in direct sunlight as there can
be considerable rise in temperature inside the car.
•After playing, store the disc in its case.
•Do not write on the label side with a ball-point pen or other writing
utensils.
•Be careful not to drop or bend the disc.
Disc cleaning precautions
•Before playing, clean the disc with a cleaning cloth. Wipe the disc
from the center out.
•Do not use solvents such as benzine, thinner, commerically
avaiable cleaners or anti-static spray intended for vinyl LPs.
Disc installing precautions
•Do not install more than 1 disc on disc tray.
•Do not place the disc on the tray up-side down.
•Do not try to close the disc tray when the disc is not installed
properly.
Accessory
Check that you have the following items:
•Main unit (1)
•Subwoofer (1)
•Speakers (5)
•Remote control (1)
•AAA batteries (2)
•Video cable (1)
•Audio cable (1)
•Speaker Wire 5 pcs(22AMG)
•MW loop antenna (1)
•FM pigtail antenna (1)
•Operations Manual (1)
Inserting Batteries into the Remote Control
Insert two batteries by matching the + and - on the batteries. When
using the remote, point it at the remote sensor on the front panel of
this system.
Note
•Do not leave the remote in an extermely hot or humid place.
•Do not use a new battery with an old one.
•Do not drop any foreign object into the remote casing. particularly
when replacing the batteries.
•Do not expose the remote sensor to direct sunlight or lighting
apparatuses. Doing so many cause a malfunction.
•If you will not use the remote for an extended period of time,
remove the batteries to avoid possible damage from battery leak-
age and corrosion.
General Information

8
Back panel
1. SPEAKERS Terminal
Connect to the supplied speakers.
2. FM AERIAL Terminal
Connect to the supplied FM pigtail aerial.
3. MW AERIAL Terminal
Connect to the supplied AM loop aerial.
4. AUDIO OUT SOCKET
Connect to the audio input of an external recording device
or amplifier.
5. AUDIO IN SOCKET
Connect to audio output of AUX1 or AUX2.
6. COAXAL DIGITAL / OUT SOCKET
Connect to an optional receiver.
7. SCART OUT
Connect to the TV with Scart input.
8. VIDEO IN
Connect to VCR with video output.
9. S-VIDEO OUT SOCKET
Connect to TV with S-video input connector.
10. VIDEO OUT
Connect to TV video input connector.
Function Overview
Front panel
6. PREVIOUS
In DISC mode, press to skip to previous track.
In TUNER mode, press to select radio preset.
7. NEXT
In DISC mode, press to skip to next track.
In TUNER mode, press to tuning the higher frequency.
8. PLAY / PAUSE
Press to start or stop temporarily playback.
9. VOLUME CONTROL
Increase or decrease the master volume level.
10.PHONES
Connect the headphone to this jack.
1.
Press to switch the power ON or OFF.
2.SENSOR
Received the remote control.
3. EJECT
Press to open/close disc tray.
4. STOP
Press to stop playback.
5. SOURCE
Press to select source: DVD, TUNER, TV/VCR, AUX.

9
Function Overview
Turn the system STANDBY or POWER ON .
2. OPEN/CLOSE
Open or close the disc tray.
3. MENU/PBC
In disc mode, switch to set the MENU/PBC function on or off.
In tuner mode, switch between FM MONO and FM STEREO.
4. AUX 2
Press to select AUX 2 mode.
5. /// ENTER Buttons
Select and move the screen cursor to a desired option.
6. BACKWARD and FORWARD ( / )
In disc mode, press to skip to next or previous track.
In tuner mode, press to select scan - or scan + .
7. STOP
Press to stop playing a disc and clear the stored program.
8. PLAY / PAUSE ( /ll)
Press to start or pause playback.
9. MASTER VOLUME +/-
Select to adjust the master volume level.
10. DISPLAY
Display the information about the playing disc.
11. STEP
Press to see the picture slowly.
12. SLEEP
Press to active the sleep timer.
13. PROGRAM
Press to set a program play.
14. REPEAT
1/ALL: Press to select repeat one tilte or all.
A-B: Press to select repeat A-B.
15. ANGLE
Press to change the angle viewed(where available).
16. SUBTITLE
Press to select a desired subtitle language.
17. RETURN
Press to return back the menu for VCD and DVD with title.
18. SEARCH
Press to set search function.
19. SURROUND
Press to select set the surround function.
20 . AUDIO
Press to select audio language and audio channel for sound.
21. TITLE
Press to playback the title menu.
22. RESET
Press to reset all the items in the setup menu as defaults.
23. NUMBER KEYS (0~9/+10)
Select the items or setting directly.
24. ZOOM
Press to zoom in the playing picture.
25. SETUP
Press to display or exit SETUP menu.
26. SELECT
Select the audio channel to view or adjust its level.
27. EQ
Press to select the preset equalizer mode.
28. SLOW / MEMORY (l )
In Disc mode, press to do slow-motion.
In tuner mode, press to store the current frenquency in memory.
29. PREV& NEXT ( / )
Press to select the previous/next title, chapter or track/radio
preset.
30. AUX1
Press to select AUX 1 mode.
31. TV/VCR
Press to select TV/VCR mode.
32. DVD
Press to select DVD mode.
33. TUNER
Press to select TUNER mode.
34. MUTE
Press to mute all of the sound.

10
Connect the supplied speakers Using the supplied speaker wires
matching the colors of the jacks and speaker wires.
•Connect the supplied speaker wire to the FR, FL, C, SR, SL
terminal jacks.
•Connect the supplied speaker wire to the SUB terminal jacks.
To avoid short-circuiting the speakers
•Short-circuiting of the speakers may damage the system. To pre-
vent this, make sure to take the following precautions when con-
necting the speakers.
•Make sure the stripped end of each speaker cord does not touch
another speaker terminal or the stripped end of another speaker
cord.
Connections
Connecting to Speakers
Examples of poor conditions of the speaker cord
•Stripped speaker cord is touching another speaker terminal.
•Stripped cords are touching each other due to excessive removal
of insulation.
Note
•Be sure to match the speaker cord correctly.
•For optimal sound performance, use the supplied speakers.
•Do not connect speakers with an impendance lower than the
speakers supplied.

11
Connecting MW / FM aerial
•Connect the supplied MW loop aerial to the MW socket . Position
the loop aerial to receive the clearest sound.
•Connect the supplied FM aerial to the FM socket . Move the aerial
in various direction until the clearest signal is received.
Note
•Keep the aerial as far away as possible from the TV, AUX or any
radiation source to prevent unwanted noise.
If you have poor FM reception
For better FM reception, use a 75 ohm coaxial cable (not supplied) to
connect the system to an outdoor FM aerial.
Connections

12
•Use the supplied audio cables to connect AUDIO IN sockets to
the corresponding AUDIO OUT sockets on the TV, VCR or other
audio/visual components.
•Use the supplied SCART cable to connect SCART socket to a TV
with the corresponding SCART input socket. the Scart terminal
contains separate video signals and stereo audio signals.
•Use the supplied audio cables to connect AUDIO OUT sockets to
the corresponding AUDIO IN sockets on the TV, CD or TAPE
recorder.
•Connect to an amplifier with DTS, Dolby Digital decoder or CD
recorder.
If your TV have no SCART input socket, you can select one of the
following connections as below.
Option
•Connect the S-VIDEO OUT socket to the S-Video input socket on
the TV using a S-Video cable.
•Connect the VIDEO OUTsocket to the Video input sockets on the
TV using a video cable.
•Connect the VIDEO IN socket to the Video output sockets on the
video camera using a video cable.
Connecting to TV and additional components
Connections

13
45o
20o
90o
AA
B
CC
. But they can be placed in the area
C
.
30
o
60
o
C
D
C
D
You can vary the level of each speaker as follows.
1Press the SELECT button to select a channel. The level of the
channel will appear on the front panel display and TV screen.
FL (Front-left level), CNT (Center level), FR (Front-right level), SR
(Surround-right level), SL (Surround-left level) and SUB
(Subwoofer level) adjustable range: -15 dB to +10 dB, 1 dB/step.
2Use the MASTER VOLUME + / - buttons to adjust the selected
channel’s level.
If you do not press the SELECT or MASTER VOLUME +/- button
for a few seconds, the value turns off and is stored in the system.
Note
•The optional items vary with the changing of listening mode.
To adjust the volume of all the speakers (Master Volume) at
one time.
Use the MASTER VOLUME +/- buttons in normal mode.
Selecting the listening mode
•Press SURROUND to select the listening mode as following:
Dolby Digital, Dolby Pro Logic, DTS, Stereo.
Please note these optoins vary depending on the disc or source
selected.
Setting up the surround sound system
You must connect all the speakers and setup the system properly in
order to enjoy the Digital Cinema experience at home.
Position
For the best possible surround sound all the speakers other than the
subwoofer should be the same distance from the listening position
().
However, this system allows you to place the center speaker up to 1.
6 meters closer (
B
) and the rear speakers up to 4.6 meters closer
(
C
) to the listening position.
The front speakers can be placed from 1.0 to 15.0 meters (
A
) from
the listening position.
•You can place the subwoofer at any position. If possible, place
the subwoofer near a corner to maximize the bass response.
45
o
20
o
90
o
A A
B
CC
•You can place the rear speakers either behind you or to the side,
depending on the shape of your room, etc.
A
Basic Setup
Height
•The best height for the front speakers is when the high fre-
quency speakers (tweeters) are at ear height (while seated).
•The best height for the center speaker is at the height of your
ears (while seated).
•The height of the rear speakers is not lower than the height of
your ears (while seated).
See the following diagram.The best position to place the rear
speakers is area D

14
General setup
1Press SETUP to enter SETUP MENU.
2Use///to select your preferred option.
3Press ENTER to confirm a highlighted selection.
4To exit setup menu, press SETUP.
Note:
To access all options in the setup menu press stop twice.
Setting the TV display
You can select the aspect ratio of the TV to be connected.
•4:3 PS
If you have a conventional TV set and your DVD is not formatted
for widescreen viewing, use this setting. A wide picture is dis-
played on the whole TV screen with a portion automatically cut
off.
•4:3 LB
If you have a conventional TV set and your DVD is formatted for
widescreen viewing, use this setting. Wide bands will be dis-
played on the upper and lower portions of the TV screen.
•16:9
If you have a widescreen TV set, use this setting (you must also
set your widescreen TV to “full size”)
Selecting the language for OSD
This function allows you to select the desired language. The default
setting is ENGLISH.
VIDEO output setting
Selects the video output terminals.
The default setting is SCART.
Speaker setting
Center delay setting
If the listening position is closer to the center speaker than the front
speaker, you can set the center delay time to impove the sound field
effect.
Options: off, 1ms, 2ms, 3ms, 4ms or 5ms.
Default setting is: 5ms.
Rear delay setting
If the listening position is closer to the rear speaker than to the front
speaker, you can set the rear delay time to improve the sound field
effect.
Options: off, 3ms, 6ms, 9ms, 12ms or 15ms.
Defaulty setting is: 15ms.
Test tone
If you set to ON, the system will test the speaker settings. The test
signal is generated through the left, center, right, and surround speak-
ers. The default setting is OFF.
Basic Setup
- -GENERAL PAGE- -
TV DISPLAY
OSD LANG
VIDEO OUTPUT
4:3 PS
4:3 LB
16:9
MAIN PAGE
SET TO DISPLAY MODE
- -SPEAKER SETUP PAGE- -
CNTR DELAY
REAR DELAY
TEST TONE
MAIN PAGE
SET CENTER DELAY
5ms
3ms
1ms
OFF

15
Audio Setup
Digital out
Dynamic range setting
In many listening situations, it is objectionable to allow the sound to
become very loud, and thus the loudest sounds must be compressed
downwards in level. Likewise, the very quiet sounds would be inau-
dible and must be brought upwards in level to be heard. Dolby Digital
satisfies these needs through the dynamic range controlling.
Selects the dynamic range compression to fit the individual listening
situation of the audience. The variable range is from FULL, 7/8 to 1/8,
or OFF.
•FULL: Audio with fully compressed dynamic range.
•7/8~1/8: Audio with partially compressed dynamic range.
•OFF: Audio with uncompressed dynamic range.
Parental Control
This function allows to set playback limitation level. Playing some DVD
discs can be limited depending on the age of the user.
Note:
This functin only works with disc that are recorded with paren-
tal control, if the disc does not contain this feature, it will be
played anyway.
PREFERENCES SETUP
Change the Password
To set a new password for the parental control or to change the
password. The default password is 9999.
a
b
Basic Setup
DYNAMIC
MAIN PAGE
FULL
6/8
4/8
2/8
OFF
AUDIO RELATED
- - AUDIO SETUP - -
Note
•The Dynamic Range settings only support disc recorded using
Dolby Digital .
PARENTAL
PASSWORD
DEFAULTS
CHANGE PASSWORD
MAIN PAGE
CHANGE
- - PREFERENCES PAGE - -
PAREN TAL
PASSWORD
DEFAULTS
MAIN PAGE
SETTO G
1 KID SAF E
2 G
3 PG
4 PG13
5 PG-R
6 R
7 NC-17
8 ADULT
PARENTAL
PASSWORD
DEFAULTS
MAIN PAGE
SETTO NO_PARENTAL
2 G
3 PG
4 PG13
5 PG-R
6 R
7 NC-17
8 ADULT
NO_PARENTAL
- - PREFERENCES PAGE - -
Enter password, then press ENTER to select the parental level.
PARENTAL
PASSWORD
DEFAULTS
MAIN PAGE
LOAD FACTORY SETTINGS
RESET
- - PREFERENCES PAGE - -

16
General operation
1When you complete all the connections, plug the AC power cord
of the player and subwoofer.
2Press POWER to switch ON the main power.
3Press the DVD, TUNER, TV/VCR or AUX1,AUX2 on the remote
control or press the SOURCE key on the front panel to select the
input source.
4Press OPEN/CLOSE to open the disc tray, press again to close
the disc tray.
5Press MASTER VOLUME UP / DOWN (+/-) to increase or de-
crease the volume level.
6Press MUTE to turn off the sound. To restore the volume, press
it again.
Basic playback
Start playback
•Press PLAY/PAUSE /ll . To interrupt playback, press /ll again.
Note
•Some discs will start playing automatically, and others will dis-
play the menu on the TV screen. use the ///to select the
track, or press the number keys (0 ~ 9/+10) to go to the desired
track/chapter.
Stop playback
•Press STOP .
Skip to another track/chapter
•Press l/ l repeatedly during playback to skip to next or
previous track/chapter.
Fast search
1Press and hold / more than 1 second to fast reverse or
fast forward.
•For DVD / MP3 discs
FF(fast forward) : F.FWDX2, F.FWDX4, F.FWDX6,
F.FWDX8.
FR(fast reverse) : F.BWDX2, F.BWDX4, F.BWDX6,
F.BWDX8.
•For VCD / CD discs
FF(fast forward) : F.FWDX1, F.FWDX2, F.FWDX3,
F.FWDX4.
FR(fast reverse) : F.BWDX1, F.BWDX2, F.BWDX3,
F.BWDX4.
2To resume normal play, press PLAY/PAUSE /ll.
Playing Discs
Repeat
•For DVD discs
Press REPEAT repeatedly to select the following on the display:
REPEAT 1 : repeat chapter
REPEAT : repeat title/disc
•For VCD discs
Press REPEAT repeatedly to select the following on the display:
REPEAT 1 : repeat the current track
REPEAT : repeat the entire disc
Note
For VCD discs, this function can only be used when PBC is turned
off.
Repeat A - B
This function can play a specific section in a chapter/track repeatedly.
1Press A - B at the statring portion you want.
2Press A - B again at the end portion you want. The specific
section will now repeat continuously.
3Press A - B the third time to resume normal playback.
Note
•Points A and B can be set only within the same chapter/track.
Slow motion play
Press SLOW/MEMORY l to play in slow motion.
•For DVD discs
Press it repeatedly to select the slow motion speed:
SF (forward) : lSLOW 1/2, lSLOW 1/4, lSLOW 1/8.
SR (reverse) : lSLOW 1/2, lSLOW 1/4, lSLOW 1/8.
•For VCD discs
Press it repeatedly to select the slow motion speed:
SF (forward) : lSLOW 1/1, lSLOW 1/2, lSLOW 1/3.
EQSELECT
1. Press EQ button repeatedly on the remote control to select the
following: EQUALIZE ON, EQUALIZE OFF, TYPE.
2. When in TYPE page, press SELECT button repeatedly to select the
following cyclically: STANDARD ÆÆ
ÆÆ
ÆCLASSIC ÆÆ
ÆÆ
ÆJAZZ ÆÆ
ÆÆ
ÆROCK
ÆÆ
ÆÆ
ÆPOPSÆÆ
ÆÆ
ÆBALLAD ÆÆ
ÆÆ
ÆDANCE
Note
•If not in TYPE page, press SELECT button can select FL, C, FR,
SURROUD, SUBWOOFER cyclically.
•When you select one speaker, press VOLUME +/- can adjust the
volume level.

17
Using the menu for each DVD
Using the title menu
1Press the TITLE while playing a DVD disc.
The “TITLE MENU”will be shown on TV screen for a moment, and
then the title menu appears. The contents of the menu vary from
disc to disc.
2Use the ///to select the title (or chapter) you want to
play. Depending on the disc, you can use the number buttons
(0~9 /+10) to select the title (or chapter).
Note
•Depending on the DVD disc, you may not be able to select the title
or chapter.
•Depending on the DVD disc, a “title menu”may simply be called a
“menu”or “title”in the instructions supplied with the disc.
•For some DVD disc, when you press the TITLE, the playback will
restart from the beginning of the disc.
Using the root menu
1Press the RETURN while playing a DVD disc.
The “ROOT MENU”will be shown on TV screen for a moment,
and then the root menu appears. The contents of the menu vary
from disc to disc.
2Use the ///buttons to select the title (or chapter) you
want to play. Depending on the disc, you can use the number
buttons (0~9 / +10) to select the title (or chapter).
Note
•Depending on the DVD disc, you may not be able to enter the root
menu.
•For some DVD disc, when you press the RETURN , the playback
will restart from the beginning of the disc.
Playing Video CDs with PBC
When playing Video CDs (Version 2.0) with PBC functions, you can
enjoy simple interactive operations, operations with search functions,
etc.
PBC playback allows you to play Video CDs interactively, following
the menu on the TV screen.
1Start playing a Video CD without PBC functions, Press MENU/
PBC to set PBC function ON.
2The menu appears on the TV screen.
3Use the number keys buttons to select the item you want.
For some discs, you can only select the items using the number
buttons.
4Follow the instructions on the menu screen for interactive opera-
tions.
Refer to the instructions supplied with the disc, as the operating
procedure may differ according to the Video CD.
Note
• While playing a disc with PBC ON mode, the REPEAT function will
not work.
• While playing a disc with PBC ON mode, use number keys to select
the item you want is not availabe.
To go back to the menu screen
Press the RETURN when playing a disc with PBC. The “BACK TO
MAIN PAGE”is shown on the TV screen, and then the menu appears.
Note
•If the PBC function of this system is set to off, pressing the
RETURN button will not work.
To cancel PBC playback function and play a Video CD without
PBC menu.
•Press the MENU/PBC . “PBC OFF”will appear on the TV screen.
If a disc is playing, the playback will stop.
•Press the to start (or restart) playing the disc from the begin-
ning or use number key to select track you like.
Playing Discs

Checking the information
You can check information about the disc, such as the total number of
the titles or chapters or tracks or time, using the Display function. The
information you want appears on the TV screen or/and on the front
panel display.
When playing back a DVD
1Press the DISPLAY repeatedly to show on TV screen as the fol-
lowing:
TITLE 02 / 05 CHAPTER 001 / 006
00 : 34 : 56
TITLE REMAIN
00 : 34 : 56
CHAPTER ELAPSED
00 : 01 : 23
CHAPTER REMAIN
00 : 03 : 21
2Press the DISPLAY again, to turn the information display off.
Note
•Depending on the DVD, the title number or chapter number or time
may not appear or you may not be able to change the display.
When playing back a Video CD or CD
1Press the DISPLAY repeatedly to show on TV screen as the fol-
lowing:
(PBC OFF) VCD/CD
SINGLE ELAPSED
00 : 01 : 23 T: 01/16
SINGLE REMAIN
00 : 03 : 21 T: 01/16
TOTAL ELAPSED
00 : 12 : 34 T: 01/16
TOTALREMAIN
00 : 54 : 32 T: 01/16
OFF
Playing Discs
Note
zFor CD, the information about track and time appears simply on
the front panel display.
zDepending on the VCD, the time information may not appear on
the TV screen or you may not be able to change the display.
zThis function only effective for VCD or CD in PBC OFF mode.
When playing back a MP3
1Press the DISPLAY repeatedly to show on TV screen as the fol-
lowing:
SINGLE ELAPSED 00:02:25
SINGLE REMAIN 00:10:35
OFF
2Press the DISPLAY again, to turn the information display off.
(PBC ON) VCD
SINGLE ELAPSED
00 : 01 : 23 T: 01/16
SINGLE REMAIN
00 : 03 : 21 T: 01/16
2Press the DISPLAY again, to turn the information display off.
OFF
18

19
Program play
You can play the contents of the disc in the order you want by
programming the order of the tracks to be played. UP to 99 tracks can
be stored.
1While playback is stopped, select or press PROGRAM to enter
program mode.
2Use the number buttons (0 ~ 9, +10) to input the track number in
the order you want.
If you attempt to program more than 99 tracks, the FULL will be
displayed.
3Repeat step 2 to store other tracks.
4To start program play, press PLAY/PAUSE /ll.
5To stop playback, press once.
6To cancel the program, press again.
Selecting the audio channel and language
Note:
Depending on the discs, you can select the different audio channels.
zFor Video CD discs
Press AUDIO repeatedly to select the following : LEFT VOCAL,
RIGHT VOCAL, MONO LEFT, MONO RIGHT, STEREO.
zFor DVD discs
Press AUDIO repeatedly to change the audio format (including
audio coding type, number of channels recorded and audio
language) The relevant message appears on the TV display as
shown below.
zFor CD discs
Press AUDIO repeatedly to select the following: MONO
LEFT, MONO RIGHT,STEREO.
Selecting the start time
This function allows you to start playing at any chosen time on the
disc.
When playing DVD disc
1Press the SEARCH repeatedly, the following menu appears on
the TV screen.
TITLE 02 / 05 CHAPTER 001 / 006
TITLE 02 / 05 TIME - - : - - : - -
2Use the number buttons (0~9 / +10) to input the title or chapter
number you want.
3Then it will play directly.
4Press SEARCH again to exit.
5Use the or to select title number or chapter number and use
ENTER or PLAY button to confirm and play it.
TITLE 02 / 05 CHAPTER 001 / 006
When playing Video CD disc
1Press the SEARCH, the following menu appears on the TV screen.
SEARCH: - - : - -
2Use the number buttons (0~9 / +10) to input the time you want.
3Press SEARCH again to exit.
Note:
zWhen playing a VCD disc, only in PBC OFF mode, the function is
available.
Playing Discs
AUDIO 2/8: AC-3 5.1CH ENGLISH

20
Angle selection
Some DVD discs contain scenes which have been shot simulta-
neously from a number of different angles. For these discs, the same
scenes can viewed from each of the different angles. (The recorded
angles differ from disc to disc.)
1While playing a title shot from different angles, the angle mark
:
appears on the TV screen. Of course, you can turn it on by
changing angle mark to off in preferences..
2Press the ANGLE button to change the scenes from one angle to
other angle(s).
For example: 1/4, 2/4, 3/4, 4/4.
Picture Zooming
This function allows you to enlarge the picture on the TV screen and
to pan through the enlarged image.
1Press ZOOM repeatedly to select a zoom factor as below:
ZOOM x 1.5
ZOOM x 2
ZOOM x 3
ZOOM OFF
2To pan through the enlarged image, press ///
buttons to move the zoomed picture left, right, up or down.
Selecting subtilte language
This function can only be used for DVD disc recorded with multi-
subtitle language. You can set a preferred language for subtitle in the
SETUP menu.
1Press SUBTITLE repeatedly to select a desired language.
Note
•The first press shows the current selection. Subsequent press
toggles to the next subtitle setting.
•Some DVDs display subtitles automatically, and cannot be turned
off even if you set the subtitle function to off.
•During some scenes, the subtitles may not appear immediately
after you turn them on.
•Some DVDs allow you to make subtitle selections and turn sub-
titles on or off only via the disc menu. Use ///and ENTER
buttons.
Special Function
Table of contents
Other Goodmans Home Theater System manuals