Goodmans MICRO1980DVD Instruction Manual

MICRO1980DVD
Goodmans Helpline Phone Number 08708730080
DVD HOME THEATRE SYSTEM

Frequency Response:
Main Speakers 200Hz-20kHz +/- 3dB
Surround Speakers 200Hz-20kHz +/- 3dB
Center Speaker 200Hz-20kHz +/- 3dB
Subwoofer 20Hz-200Hz +/- 3dB
S/N Ratio > 76dB
Input Sensitivity 350mv, 47k
Channel Resolution > 30dB (Normal)
Remote Control
Transmitter Infrared Ray
Signal Range Approximately 15'
Power Source 2 AAA Batteries
General
Power Supply AC 230V~50Hz
Consumed Power 135W
Size (WxHxD) 410 mm x 60 mm x 398 mm
DVD Player: 16.3 x2.8 x15.7
Speakers 4 x4.5 x5.3
Subwoofer: 8
Weight
DVD Player: 16.2 lbs.
Speakers: 0.75lbs.
Subwoofer: 11 lbs.
Because its products are subject to continuous
improvement, We reserves the right to modify
product design and/or specifications without
notice and without incurring any obligations.
""
"" "
"""
"x14.5"x17.2"
TECHNICAL SPECIFICATIONS
DVD Player
TV System NTSC/PAL
Compatible Discs DVD, CD, MP3,
CD-R, CD-RW
Resolution Ratio Greater Than 500 lines
Video S/N Ratio 65dB
Frequency Response fs (96KHz/24bit)
4Hz - 44KHz:+/-2dB
Audio S/N Ratio 95dB
Degree of Distortion <0.01%
D/A Converter 192KHz/24bit
Video Out 1Vp-p
S-Video Out Y: 1Vp-p(75 )
C: 0.3Vp-p(75 );
Audio Out 2.0V+0/-1V
5.1 Channel,
Digital Audio Output Optical,Coaxial
Connections YUV, CVBS
SCART, S-Video, 2 Channel
Output
FM Tuner
Tuning Range 87.5-108MHz
(100kHz Space)
S/N Ratio >46dB
Monophonic >46dB
Stereo >50dB (DIN)
Selectance 50dB
THD
Monophonic 2%
Stereo 3%
Frequency Response 30Hz-10kHz +/- 1dB
Stereo Resolution 35dB (1kHz)
30dB (100Hz-10kHz)
AM Tuner
Tuning Range 522-1620kHz
S/N Ratio 35dB
THD 3%
Amplifier
Output Power:
Main Speakers 20W+20W (4 )
Surround Speakers 20W+20W (4 )
Center Speaker 20W (4 )
Subwoofer 35W (8 )
28 1

TROUBLE SHOOTING
This handy trouble-shooting guide is
provided to save you time in case you experience
any inconvenience with this DVD player. If the
problem is not listed or if the provided solution
does not correct the problem, please return to
point of sales within 12 months of purchase.
Problem Possible Solution
No power
1. Check to ensure that the power plug is
securely in the wall outlet.
No sound
1. Check the connection between the DVD
player and the TV set, amplifier, or any
other unit it is connected to.
2.Check to ensure the TV and amplifier are
in the correct mode.
No picture
1. Check the connection between the DVD
player and the TV set or any other unit it
is connected to.
2.Check to make sure TV is turned on.
Disc does not play
1.Check to make sure the disc is loaded
correctly label side facing up on disc tray.
2.Check that disc is clean from dirt, dust,
fingerprints, and smudges.
3.Check to ensure disc is with in the guides
on the tray.
4.Check if parental lock function is on.
5.Make sure disc is for use in region
Remote does not work.
1. Check batteries; possibly replace.
2. Check to ensure there isn't any obstacles
between the remote sensor on the unit's
front panel and the remote control.
3.Be sure the remote is aimed at the remote
sensor.
Divided picture
1.Check that disc is clean and has no
scratches.
2. The unit is controlled by a micro computer,
which may need to be reset. Turn off the
unit's power, wait several seconds, then
turn back on.
No color picture
1. Check to see if the S connector is damag-
ed (bent pin).
MP3 discs don't play
1. Use another software edition to re burn
disc, as the edition used may not be com-
patible with the player.
2. Use new editions of software such as Audio
station 4, asy CD Creator , To ast
Titanium, etc.
3. Make sure MP3 file is not encoded with a
variable bit rate, such as provided by Real
Networks.
"E "
JPEG adoptting the most efficient compression is
widely used as picture storage type flattened and
stored format.
Even if pictures are compressed 15-20 times. they
still have good effect. Supported by most picture
processing software, fit for picture storage, it has small
data and easy use .This machine can read. JPEG-
fomat-made picture CD disc.
Press revelant number key to select picture display.
1. Put in disc correctly, the machine begins to
search disc information.
2. Press number key to select picture.
3. It s efficient only in present picture when press
number key.
Select to play by menu
1. Put in disc, machinesearches disc information and
main menu displays on screen. press number key
from 1 to select picture. press play key to make sure.
2. Press direction key to select picture then press
play key.
3. In condition of stop. Press direction key to select
other pictures.
4. In condition of stop. Select the first line file item
on the right. Then press play key, to return to upper
menu.
JPEG FILES
227

Reset
TV type
Audio
Subtitle
Disc menu
Parental
Default
.. Prefrence page ..
Load factory setting
PAL
ENG
ENG
ENG
8 ADULT
RESET
Password Mode
Off
Password Mode
Password
On
Off
.. Password setup page ..
Change Password
Off
Password Mode
Password Chang
.. Password setup page ..
MP3 FUNCTION
For a film to be restricted for children, the
film class may be set according to label marking
on the disc. High light " PARENTAL" in the
preference setup menu need confirm the pass-
word mode is off.
DEFAULTS
This option will resume the original settings
of this machine.
Follow the operating instructions stated in
"DVD MENU SETUP" in combination with the
desired option in the following figure.
PASSWORD SETUP
Follow the operation instructions stated in
DVD menu setup in combination with desired
option in the following figure.
PASSWORD MODE SETUP
""
PASSWORD
The default is The user may change
it using this option
Follow the operating instructions stated
in DVD menu setup in combination with the
desired option in the following figure.
"0000"
""
SYSTEM SETUP
Mp3 is an audio compression mode using Level
3 of the international standard MPEG, whereby
sound signal is compressed in a rate of 12:1. A Mp3
disc can record music for play of over 600 minutes
or record over 170 songs, rivaling CDs in sound
quality.
To play a MP3 disc
Files Menu of Mp3 play
When playing a Mp3 disc, 2 files menus can be
selected by pressing PROG key: File list, Folder.
1. FILE LIST
It may select the files to be played by pressing
UP DOWN, arrow key combining with ENTER
key, or using number keys and ENTER key to
select directly. If the number input is out of the
music number,
will display on screen.
2. Folder
Display menu first then press up down, left right
arrow and ENTER key to select subdirectory
and music.
"CURRENT TRACK NUMBER"
OPERATION OF MP3 FUNCTION
26 3
TABLE OF CONTENTS
Important Safeguards................................. 1
Safety Information .................................... .2
Table of Contents .......................................3
Important Notes
About Your DVD Play................................. 5
Best Location..........................................................5
To Obtain a Clear Picture......................................... 5
Playable Discs........................................................5
Digital AudioOutput ................................................5
Laser-Head Over-Current Protection System ............5
Use of Disc ...............................................5
Handling.................................................................5
Cleaning.................................................................5
Storing...................................................................5
Front and Back panels .. .............................6
Front Panel.............................................................6
Back Panel.............................................................7
Remote Control..........................................8
Operating the remote control.......................9
Connectings.............................................10
Speakers..................................................11
Arrangement of speakers...........................11
Connecting the londspeakers.....................12
........................................ 4
Connecting antenna..................................13
Connecting power supply...........................14
Playing the radio.......................................15
Basic DVD operation.................................16
Functions.................................................17
System Setup............................................19
DVD Menu Setup ...................................... 19
General Setup .......................................... 20
Audio Setup ............................................. 21
Speaker Setup ........................................................21
Spdif Setup ............................................................22
Dolby Digital Setup.................................................23
3D Processing ....................................................... 24
Video Setup ..............................................24
Preference Setup ....................................25
Pass Word Setup ..................................... 26
Mp3 function............................................. 26
JPEG files.................................................27
Trouble shooting........................................27
Technical specifications .............................28
Save the carton and packing material; they will be useful if you ever have to transport the unit.
Pack contents:
1 X TUN ER
1 X DVD Player
1 X 4 Channel Power Amplifier
Loudspeaker connection wires
1 x Multi pin unit interconnection cable
1 X FM AERIAL
1 X MW AERIAL
1 X REMOTE CONTROL with batteries
1 X Scart cable.
Please retain all packaging material for future transportation of the unit or in the unlikely event that
the unit needs to be returned for service.

Set TV standard
TV type
Audio
Subtitle
Disc menu
Parental
Default
PAL
ENG
ENG
ENG
8 ADULT
RESET
PAL
MULTI
NTSC
.. Prefrence page ..
Preferred audio language
TV type
Audio
Subtitle
Disc menu
Parental
Default
PAL
ENG
ENG
ENG
8 ADULT
RESET
.. Prefrence page ..
English
French
Spanish
Swedish
Danish
Portuguese
Russian
Greek
Preferred subtitle language
TV type
Audio
Subtitle
Disc menu
Parental
Default
PAL
ENG
ENG
ENG
8 ADULT
RESET
.. Prefrence page ..
English
French
Spanish
Swedish
Danish
Portuguese
Russian
Greek
Preferred menu language
TV type
Audio
Subtitle
Disc menu
Parental
Default
PAL
ENG
ENG
ENG
8 ADULT
RESET
.. Prefrence page ..
English
French
Spanish
Swedish
Danish
Portuguese
Russian
Greek
Set Parental Control
TV type
Audio
Subtitle
Disc menu
Parental
Default
PAL
ENG
ENG
ENG
8 ADULT
RESET
.. Prefrence page ..
1 KID SAF
2 G
3 PG
4 PG 13
5 PGR
6 R
7 NC17
8 ADULTO
SYSTEM SETUP
DISC MENU LANGUAGE
This machine provides English, French,
Spanish,Swedish,Danish,Portuguese,Russian,
Greek and others as the film's menu language
options.
Follow the operating instructions stated in
"DVD MENU SETUP" in combination with the
desired option in the following figure.
PARENTAL
Follow the operating instructions stated in
"DVD MENU SETUP" in combination with the
desired option in the following figure.
SUBTITLE
This machine provides English, French,
Spanish,Swedish,Danish,Portuguese,Russian,
Greek and others as the built-in subtitle
languages. When a DVD is played, the user
may hide the subtitle or choose any of them
as the preset subtitle language.
Follow the operating instructions stated in
"DVD MENU SETUP" in combination with the
desired option in the following figure.
PREFERENCE SETUP
During stop mode, press the SETUP button
to access the INITIAL SETUP menu, which
includes items of dubbing language, subtitle,
disc menu language, age control, default
values and main menu.
Preset values are essential to a DVD player.
The user may change these items as desired.
This product supports output of various
system, including MULTI NTSC PAL.
1)If your TV set has only NTSC or PALsystem,
the screen will blink and become colourless
when a wrong system is selected. In this case,
press the N/P button on the R.C to return to
normal, screen always remember to select the
correct system.
2)For more information of output format,refer
to the instructions or your TV set.
AUDIO LANGUAGE
Follow the operating instructions stated in
DVD MENU SETUP in combination with the
desired option in the following figure.
""
This machine provides English, French,
Spanish,Swedish,Danish,Portuguese,Russian,
Greek and others as the built-in disc dubbing
language options.
TV TYPE
Follow the operation instructions stated in
DVD menu setup in combination with the
desired option in the following figure.
""
425

The following will help you get the most enjoyment from your DVD receiver system.
BEST LOCATION
The unit should be placed on a firm, flat surface, away from VCRs, stereos, radios, or large
speakers, as the magnetic flux from these devices may cause distortion in the sound and a poor
picture. If placed in a cabinet, be sure there is at least 1 of free space completely around the unit
for proper ventilation.
TO OBTAIN A CLEAR PICTURE
ADVD receiver is a precision device. If the optical pick-up lens and disc drive parts become dirty
or worn down, picture quality will become poor. To obtain a clear picture, regular inspection and
maintenance are recommended every 1,000 hours of use, depending on the operating environment.
Contact dealer for details.
PLAYABLE DISCS
This DVD receiver system will play the following types of discs: DVD, MP3, CD, CD-R, and CD-R
W with super-error correction ability. It is also capable of displaying picture CDs and digital photo
albums. It supports eight languages, up to 32 subtitles, and multi-angle viewing. It features easy
setup and operation with on-screen menus. It has full function CPU up grade able capability.
DIGITALAUDIO OUTPUT
The unit's coaxial output capability enables you to connect an external six-channel AV amplifier
and processor with built-in Dolby Digital codec with just one cord. This enables you to conveniently
enjoy different DVD, CD, and MP3 discs.
ANALOG AUDIOOUTPUT
Speaker system plug-and-play convenience through the built-in six-channel power amplifier
eliminates the use of an external power amplifier.
LASER-HEAD OVER-CURRENT PROTECTION SYSTEM
To extend the service life of the laser head, the unit includes a unique laser-head over-current
protection system, ensuring a constant laser current.
""
This page contains valuable information regarding the handling, cleaning, and storage of discs
played in this unit.
Handling
Do not touch the playback side of the disc.
Do not attach paper or tape to discs.
Do not stick or write anything on the surface. Protect against fingerprints.
Always hold a disc by the center and edge portions.
Cleaning
Fingerprints and dirt on the disc may cause picture and/or sound deterioration. Wipe the disc from
the center outward with a soft cloth. Always keep the disc clean.
If you cannot wipe the dirt off, lightly use a slightly moistened soft cloth and finish with a dry cloth..
Do not use any type of solvent such as: Paint thinner, benzene, commercially available cleaners
or anti-static spray for vinyl LPs.
Storing
Do not store discs in places subject to direct sunlight or near heat sources.
Do not store discs in places subject to moisture and dust.
Store discs vertically in a case. Stacking or placing objects on discs outside of their case may
cause warping.
NOTE: GOODMANS is not responsible for damage that may occur to any disc that is operated in
this unit or not handled, cleaned, or stored as suggested above.
USE OF DISCS
ABOUT YOUR DVD PLAYER
.. 3D Processing page .. ..
Go To PROLogic II config Page
Off
PRO Logic II
Reverb Mode
PRO Logic II
On
Off
Auto
.. PRO LogicII Config ..
On
MUS
PRO Logic II
Mode
Select PRO LogicII Mode
Music
Movie
PRO Logic
AUTO
.. PRO Logic II Config ..
On
MUS
PRO Logic II
Mode
Reverb Mode
Off
Concert
Living room
Hall
Bathroom
Cave
Arena
Church
.. 3D Processing page ..
Off
PRO Logic II
Reverb Mode
SYSTEM SETUP
VIDEO SETUP
Includes component and TV mode setup.
COMPONENT SETUP
Follow the operation instructions stated in DVD
menu setup in combination with desired option in
the following figure.
"
"
MODE SETUP
Follow the operation instructions stated in
DVD menu setup in combination with desired
option in the following figure.
""
REVERB SETUP
Follow the operation instructions stated in
DVD menu setup in combination with desired
option in the following figure.
""
3D PROCESS SETUP
Includes PRO LOGIC II, reverb mode setup.
PRO LOGIC is set to ON , OFF or AUTO.
PRO-LOGIC II CONFIG
Includes prologic II , mode setup.
PRO-LOGIC SETUP
Follow the operation instructions stated in
DVD menu setup in combination with desired
option in the following figure.
""
.. Video setup page ..
Component
Component
TV mode
S-VIDEO
RGB
Interface
P-SCAN
Set P-SCAN On/Off
Composant
TV mode
.. VIDEO setup page ..
TV MODE SETUP
Follow the operation instructions stated in
DVD menu setup in combination with desired
option in the following figure.
""
24 5

DVD / CD component
POWER
REMOTE
SENSOR
Power Amplifier component
Tuner component
INPUT DOWN UP PRE/TUNE OPEN/CLOSE
X-PRO
X-PRO
X-PRO
FRONT AND BACK PANELS
7
16 5 2
3
4
1
1. POWER
Before plugging the power cord into the AC
outlet, check to make sure all of the connections
have been properly completed. When they have
been, carefully plug power cord into outlet.
Press the POWER button on the front panel
to power the unit.
When the unit is initially powered, a brief
surge of electricity may cause interference with
other electronic equipment on the same circuit.
If this occurs, connect the unit to an outlet on a
different circuit.
2. /OPEN/CLOSE
Use this button to open and close the disc tray
while in DVD mode. It is disabled when another
signal source is used.
3. /PRE/TUN
Use this button to begin play function while in
DVD mode.
When in the Tuner mode, this button is used
to select preseting or tuning mode.
4. /UP
While in the DVD status, you may press this
button for next track. .
While in the tuner mode, you may press this
button for radio up search.
5. /DOWN
Use this button to stop play function while in
DVD mode.
While in the tuner mode, you may press this
button for radio down search.
6. INPUT SIGNAL SOURCE
Use this button to select theproper input signal
source. (Note: The selected input will correspond
to the selected input terminal on the rear panel.)
7. VOLUME
Use this knob to control the unit's volume.
It controls all six channels simultaneously.
Dynamic Range Compression
FULL
3/4
2/4
1/4
OFF
Daul Mono
Dynamic
.. Dolby Digital Setup ..
Select Equalizer Type
.. Equalizer Page ..
EQ Type
Bass Boost
Super Bass
Treble Boost
Off
Off
Off
None
Rock
Pop
Live
Dance
Techno
Classic
Soft
Super bass
.. Equalizer Page ..
EQ Type
Bass Boost
Super Bass
Treble Boost
Off
Off
Off
On
Off
Trebie Boost
.. Equalizer Page ..
EQ Type
Bass Boost
Super Bass
Treble Boost
Off
Off
Off On
Off
Bas boost
On
Off
.. Equalizer Page ..
EQ Type
Bass Boost
Super Bass
Treble Boost
Off
Off
Off
Dual Mono (1+ 1) Setup
Daul Mono
Dynamic
Stereo
L-Mono
R-Mono
Mix-Mono
.. Dolby Digital Setup ..
SYSTEM SETUP
BASS BOOST SETUP
Follow the operation instructions stated in
DVD menu setup in combination with desired
option in the following figure.
""
SUPER BASS SETUP
Follow the operation instructions stated in
DVD menu setup in combination with desired
option in the following figure.
""
TREBLE BASS SETUP
Follow the operation instructions stated in
DVD menu setup in combination with desired
option in the following figure.
""
DOLBY DIGITAL SETUP
DUAL MONO
Dolby digital setup includes Dual MONO
and dynamic range compress.
Follow the operation instructions stated in
DVD menu setup in combination with desired
option in the following figure.
""
If you have Dolby digital output in your
amplifier/decoder, you may select stereo. Left,
right and mixed sound accordingly.
DYNAMIC
Follow the operation instructions stated in
DVD menu setup in combination with desired
option in the following figure.
""
EQUALIZER SETUP
Include EQ Type, Bass Boost, Super Bass,
Treble Boost setup.
Follow the operation instructions stated in DVD
menu setup in combination with desired option in
the following figure.
"
"
6 23

DVD-CABLE(OUTPUT)
SVIDEO
OPTICAL
5.1CH AUDIO OUTPUT
COMPONENT VIDEO OUT
FR FL SR SL
CENT SWPr Y Pb
COAXIAL
VIDEO
SCART
SPEAKERS
S.WOOFER
(8 )
CENTER
(4 )
R LREAR
(4 )
AUDIO INPUT
L SW SL
R CENT SR
AC 230V ~ 50Hz
(4 )
FRONT
R L
SPEAKERS
R
FR
L
FL
DVD-CABLE(INPUT)
AUDIO INPUT
AC 230V ~ 50Hz
124
56
7
8 9 10 11
12
13 14
15 16 17 18 19 20 21 22
1. DVD cable
2. FM/AM antenna
4. Coaxial out
5. AUX1 & AUX2 in
6. S-video out
7. Composite video out
8. Pre out
9. 5.1 Front in
10. 5.1 Front out
11. 5.1 surround out
12.Front main speakers terminal
13.5.1 subwoofer out
14.5.1 center out
15.Pre in
16.5.1 subwoofer in
17.5.1 center in
18.5.1 surround in
19.Subwoofer speaker terminal
20.Center speaker terminal
21.Component video out
22.Surround speakers terminal
23.Optical out
24.Scart out
FRONT AND BACK PANELS
2324
On
Off
Downmix
Front speaker
Center Speakre
Rear Speaker
Test Tone
.. Speaker Setup Page ..
Test Tone
5.1 CH
Large
Small
Small
Off
48K
96K
.. SPDIF Setup Page ..
SPDIF Output
LPCM out
Set LPCM SPDIF Output RATE
.. SPDIF Setup Page ..
SPDIF OFF
SPDIF/RAW
SPDIF/PCM
SPDIF Output
LPCM out
Setup SPDIF
Setup Rear Speaker
Large
Small
Off
Downmix
Front speaker
Center Speakre
Rear Speaker
Test Tone
.. Speaker Setup Page ..
5.1 CH
Large
Small
Small
Off
Setup Center Speakre
Large
Small
Off
Downmix
Front speaker
Center Speakre
Rear Speaker
Test Tone
.. Speaker Setup Page ..
5.1 CH
Large
Small
Small
Off
SYSTEM SETUP
SPDIF SETUP
SPDIF SETUP includes SPDIF output and
LPCM out setup.
Dolby digital signals can be output through
COAXIAL in rear panel.
SPDIF OUTPUT
Follow the operation instructions stated in
“DVD menu setup” in combination with desired
option in the following figure.
The center speaker is set to LARGE, SMALL or OFF.
REAR SPEAKER
The rear speaker is set to LARGE, SMALL or OFF.
Follow the operating instructions stated in "DVD
MENU SETUP" in combination with the desired
option in the following figure.
CENTER SPEAKER
Follow the operating instructions stated in "DVD
MENU SETUP" in combination with the desired
option in the following figure.
TEST TONE is set to ON or OFF
While no disc in the DVD receiver, this function
can test LEFT , CENTER , RIGHT , RIGHT
SURROUND, LEFT SURROUND in squence.
""" "
LPCM OUTPUT
To avoid disturbing neighbours at night, use
this function to low down the volume without
changing the original tone.
TEST TONE
"
"
Follow the operation instructions stated in DVD
menu setup in combination with desired option
in the following figure.
22 7

RDS
REMOTE CONTROLLER
2
4
5
6
22
7
38
13
19
14
15
37
36
12
10
11
9
21
20
8
24
27
25
26
OPEN/CLOSE
MUTE
DVD SELECTOR
AM/FM TUNER
AUX1 SELECTOR
AUX2 SELECTOR
RESET
0-9 NUMBER KEYS
+10
VOL INCREASE
VOLUME DECREASE
PROG
SCREEN DISPLAY / RDS
SLOW MOTION
MENU
CHANNEL LEVEL SELECTOR
SUBTITLE
LANGUAGE
ANGLE
SETUP
ZOOM
RESUME PLAY
REPEAT
FM STEREO / MONO MODE
PRESET/TUNING
SCROLL UP
SCROLL RIGHT
SCROLL DOWN
SCROLL LEFT
ENTER
DOWN (search down for radio stations/rewind skip)
UP (search up for radio stations/forward skip)
TITLE
MEMO (memory/previous track)
AUTO (automatic search/next track)
STOP
PAUSE
PLAY
A-B REPEAT
TIME
OSD LANGUAGE SELECTOR
STEP
1
28
29
32
31
30
33
35
34
17
18
39
16
23
42
40
41
3
Setup Front speaker
Large
Small
Downmix
Front speaker
Center Speakre
Rear Speaker
Test Tone
.. Speaker Setup Page ..
5.1 CH
Large
Small
Small
Off
Set Downmix Mode
LT/RT
Stereo
5.1CH
5.1 CH
Large
Small
Small
Off
Downmix
Front speaker
Center Speakre
Rear Speaker
Test Tone
.. Speaker Setup Page ..
Speaker Setup
SPDIF Setup
Dolby Digital Setup
Equalizer
3D Processing
.. Audio Setup Page ..
Go To Audio Setup Page
On
Off
TV Display
Angle Mark
OSD Lang
Captions
.. General Setup Page ..
PS
On
ENG
On
Closed Caption
English
French
Spanish
German
Portuguese
Europe
TV Display
Angle Mark
OSD Lang
Captions
.. General Setup Page ..
PS
On
ENG
On
Set OSD Language
SYSTEM SETUP
CAPTIONS
Follow the operating instructions stated in
"DVD MENU SETUP" in combination with the
desired option in the following figure.
Note: This function doesn't work if the DVD
doesn't show it.
AUDIO SETUP
Includes speaker setup, SPDIF setup.
Dolby digital setup, 3D processing setup.
OSD LANGUAGE
The user may use this item to set the language
of the setup menu and screen display to English
French,Spanish,German,Portuguese and Europe.
Follow the operating instructions stated in
"DVD MENU SETUP" in combination with the
desired option in the following figure.
SPEAKER SETUP
This submenu options include DOWNMIX MODE,
FRONT CENTER, REAR, TEST TONE setup.
DOWNMIX MODE
Follow the operating instructions stated in "DVD
MENU SETUP " in combination with the desired
option in the following figure.
This setting is suitable for films. If you only need
two channels to enjoy music, it's recommended to
nd
select the 2 option. Where 5.1 theater sound is
rd
available, the 3 option is recommended.
FRONT SPEAKER
When set center, rear and subwoofer to off
and front to LARGE , then front audio signal can be
mixed from center, rear and sub woofer speakers,
Usually it is set to SMALL .
""
""
""
821

Notes:
Do not direct the remote sensor toward
any light source, such as direct sunlight or
a strong fluorescent light, as it may cause
the unit to not operate correctly.
When other remote controls are used
nearby or when the remote is used near
equipment using infrared rays, interference
may occur.
Placing an object on the remote control
may cause it to inadvertently depress a
button, changing a function and shortening
battery life.
Do not glaze the front of the DVD receiver
with colored glass, as it may cause
interference with normal operation of the
controller.
Make sure there is no barrier between the
remote control and remote sensor, as it
could prevent the unit from receiving the
signal.
Do not spill water or put wet items on the
remote control.
Never disassemble remote control.
BATTERIES
INCORRECT USE OF BATTERIES MAY
CAUSE THEM TO LEAK,CORRODE OR EXP
LODE.
Battery Installation
1. Push down and out on the battery Compart-
ment cover to remove it.
2. Insert the two AAA batteries into the battery
compartment of the remote control, making
sure the + and - signs on the batteries and
inside the battery compartment match up.
3. Replace the battery compartment cover.
Notes:
Do not mix batteries from different manu-
facturers, nor old ones with new.
If the remote control will not be used for an
extended period of time, remove the
batteries to prevent damage-causing
corrosion.
Remove dead batteries immediately to
prevent damage-causing corrosion.
If battery leakage occurs, wipe the battery
liquid from the battery compartment, then
replace both batteries.
Always replace both batteries at the same
time, using new, fully charged batteries.
Life expectancy of batteries may vary
depending on amount of use.
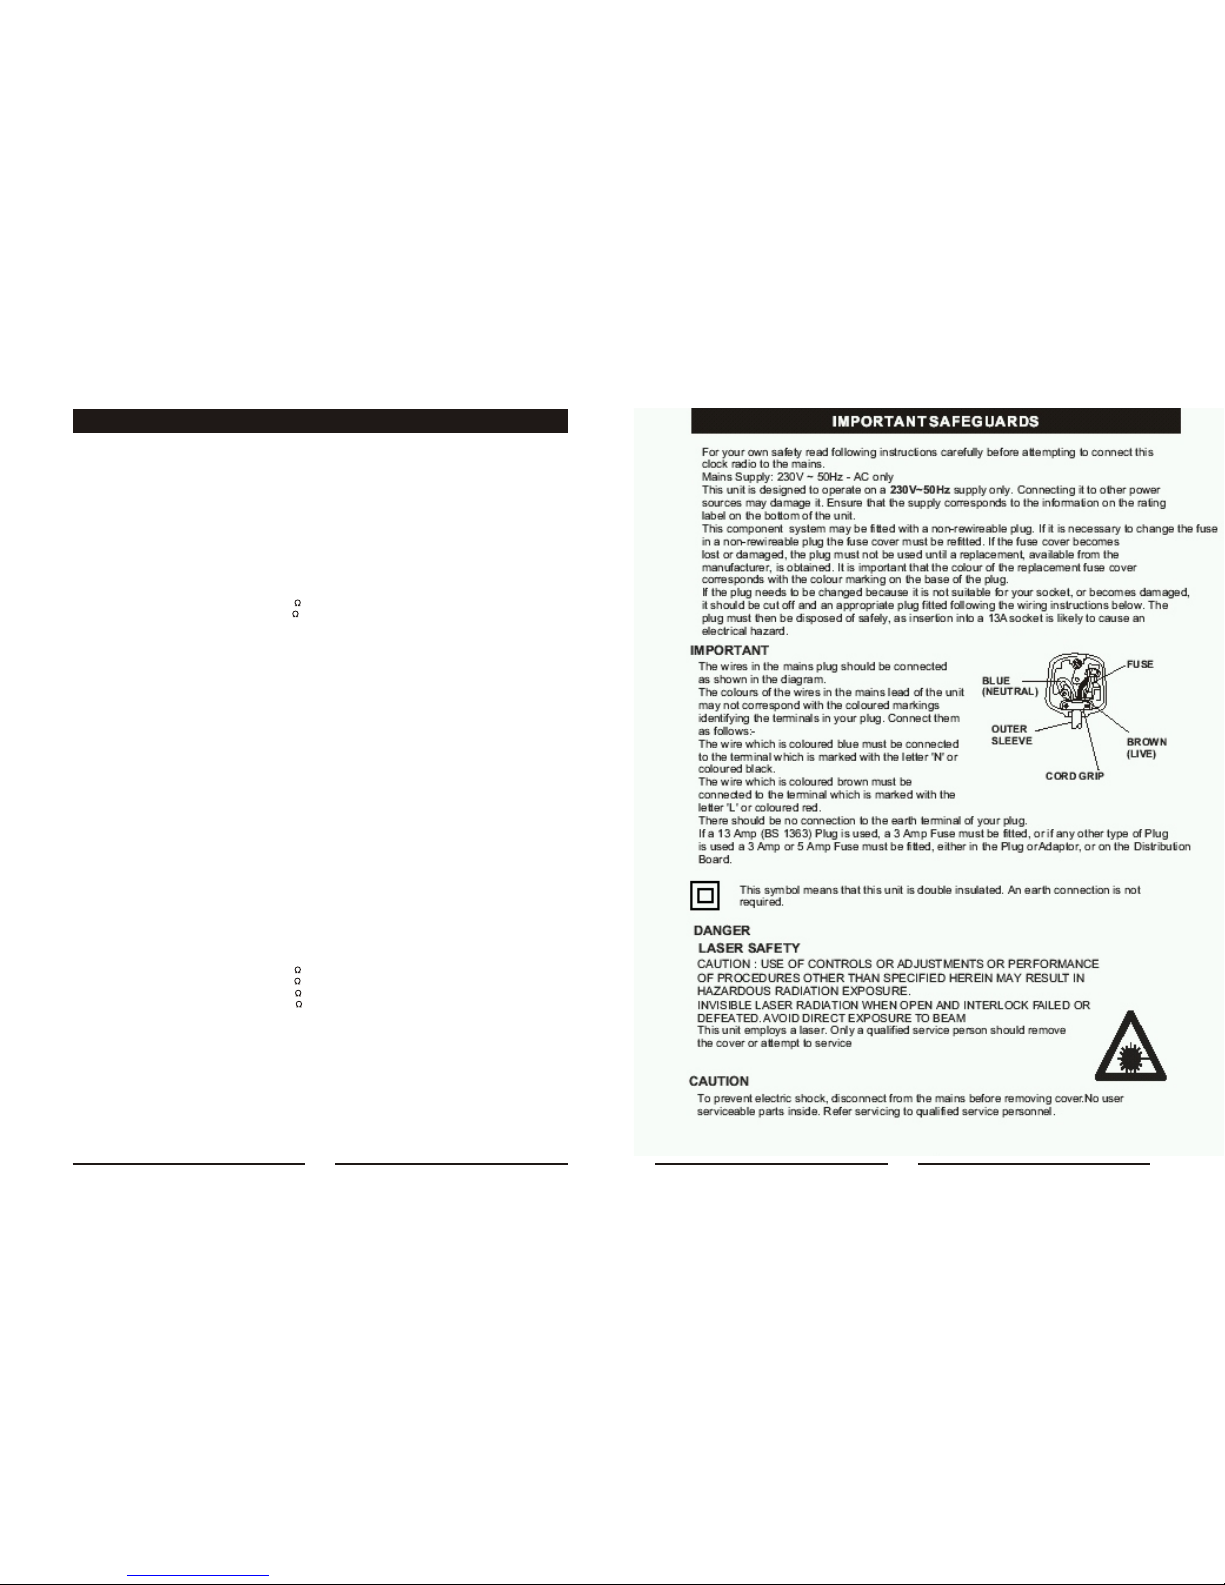
Using the Remote Control
Point the remote control at the remote sensor
on the DVD receiver. When the signal is
received from the remote, the unit will function
accordingly. The remote will operate to
approximately 16' from the remote sensor at an
0
angle of around 30 each direction.
""
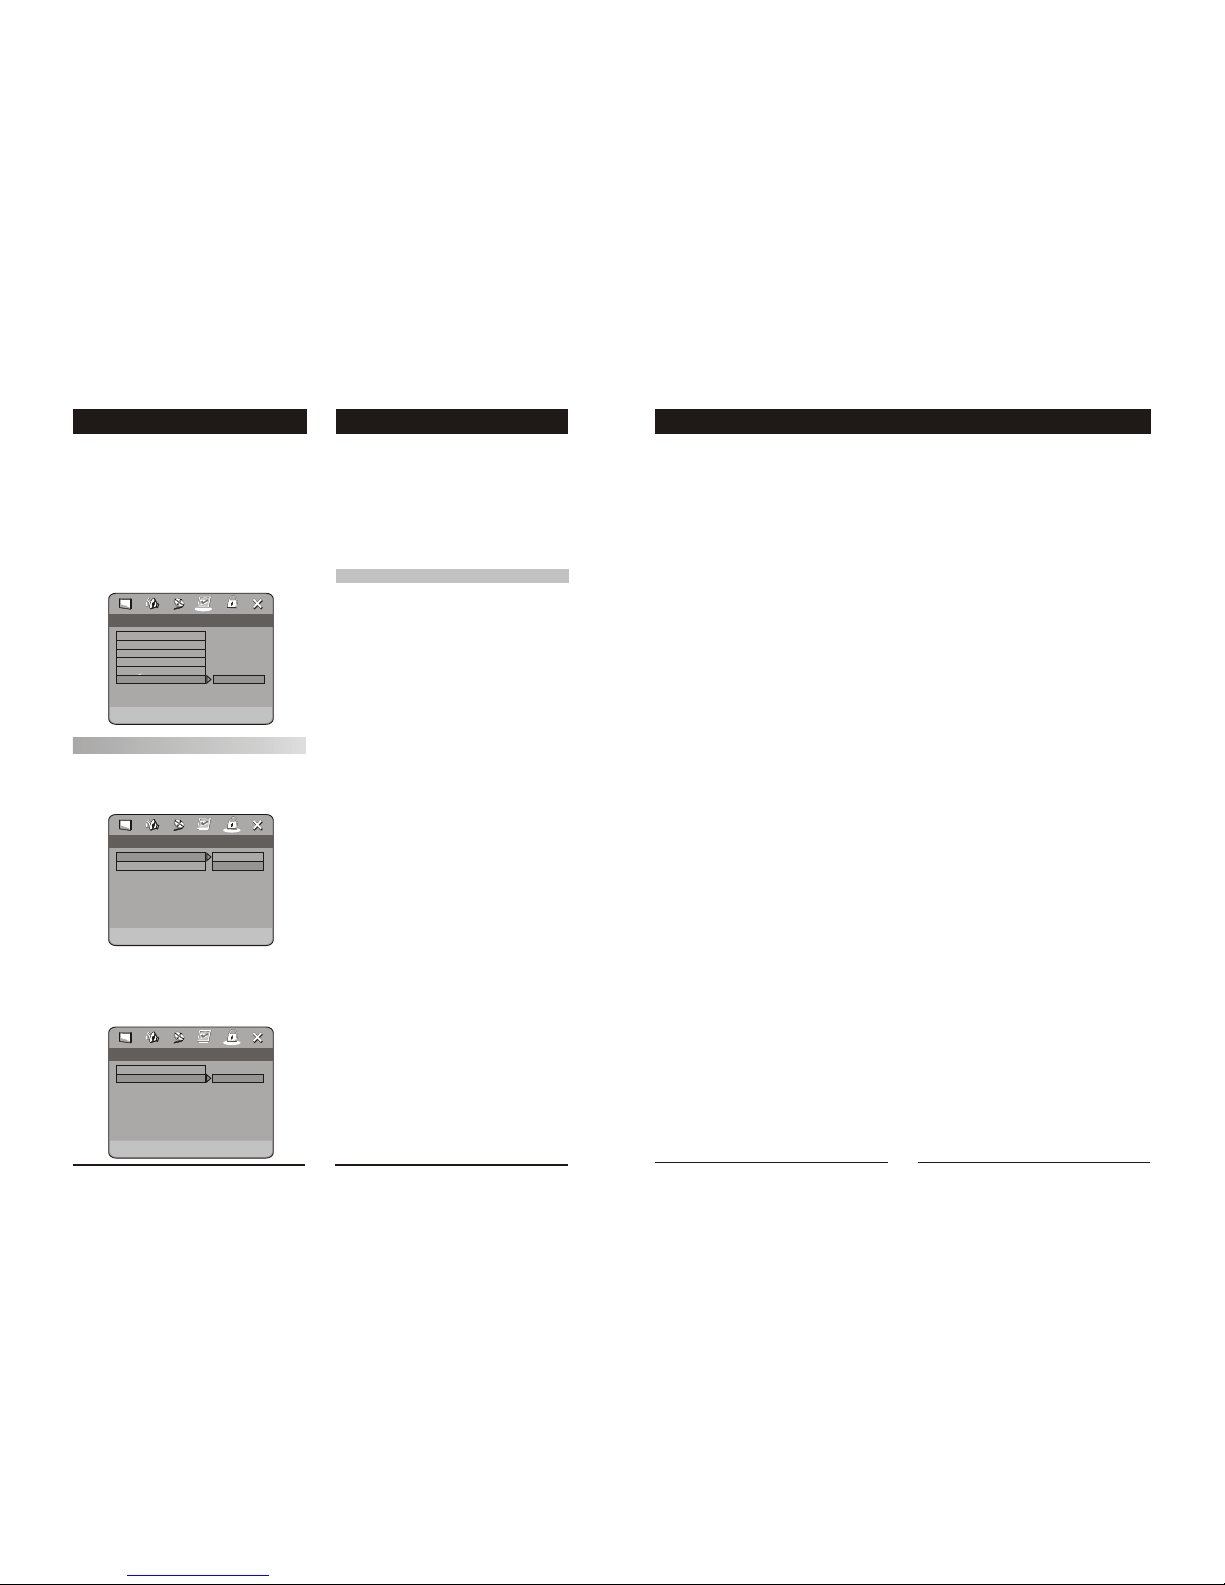
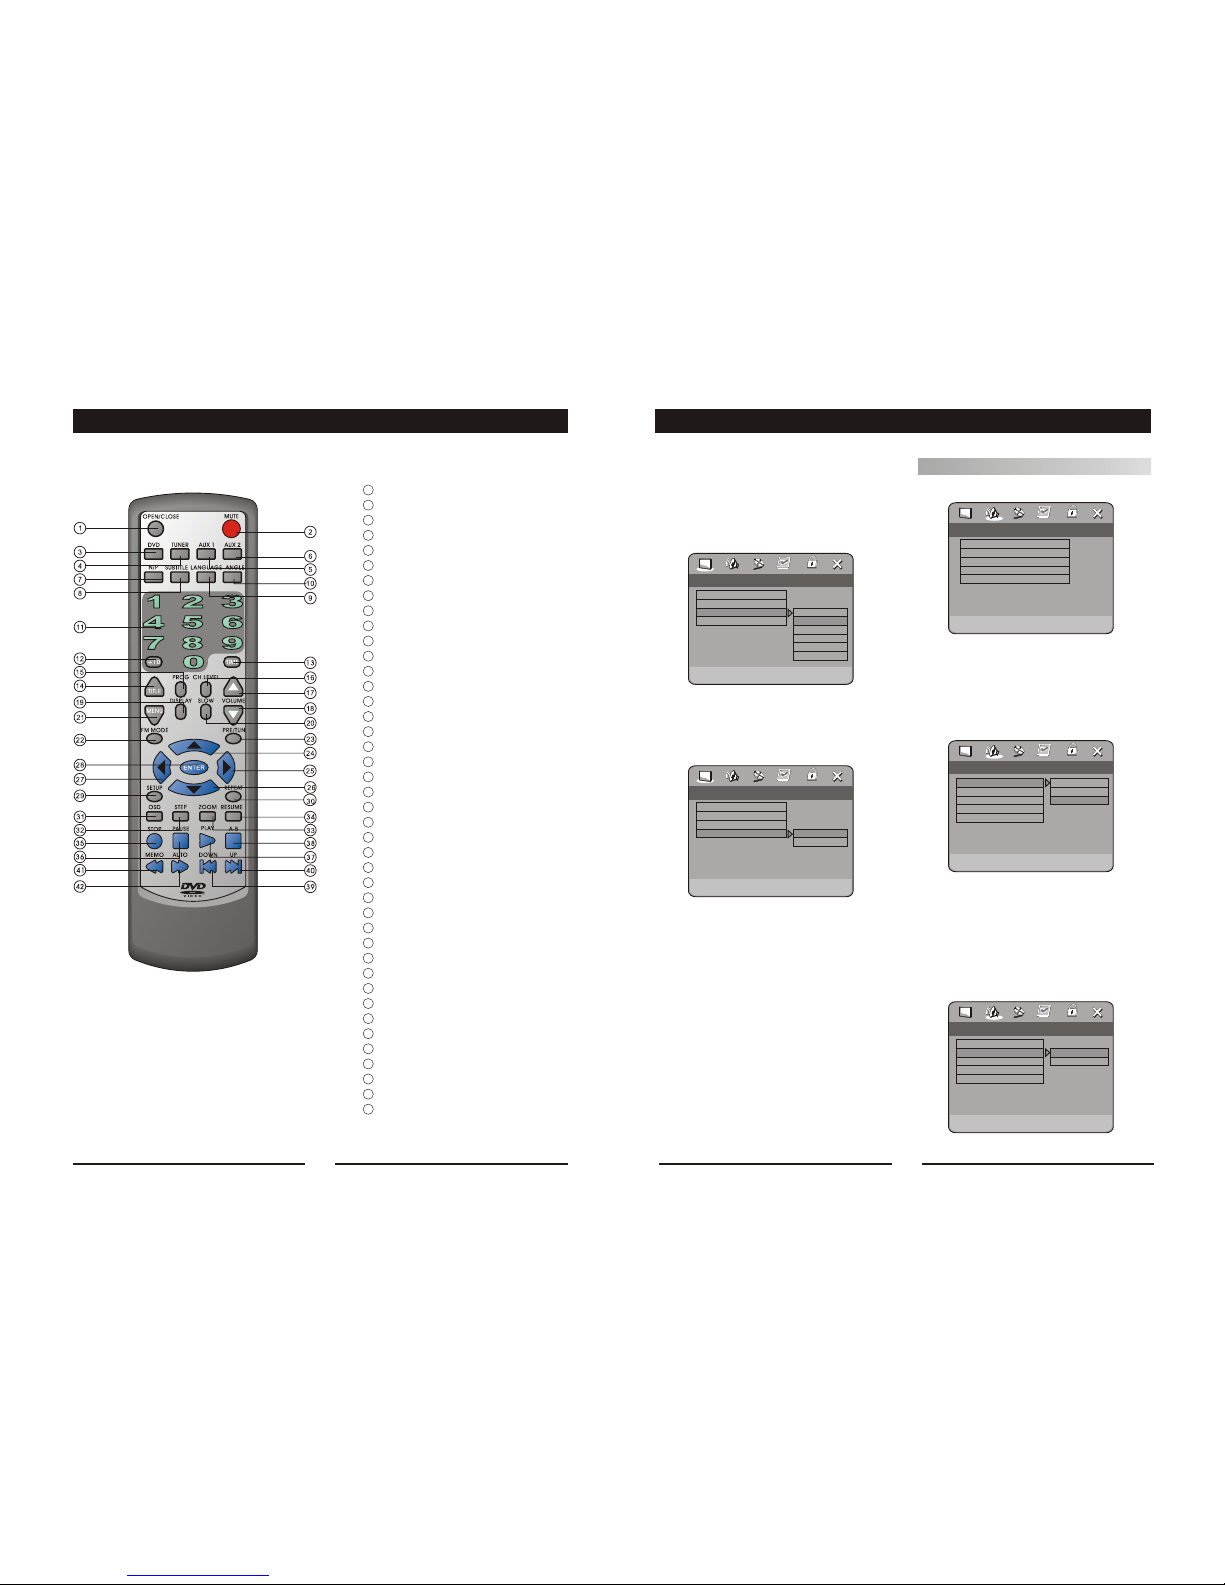
OPERATING THE REMOTE CONTROL
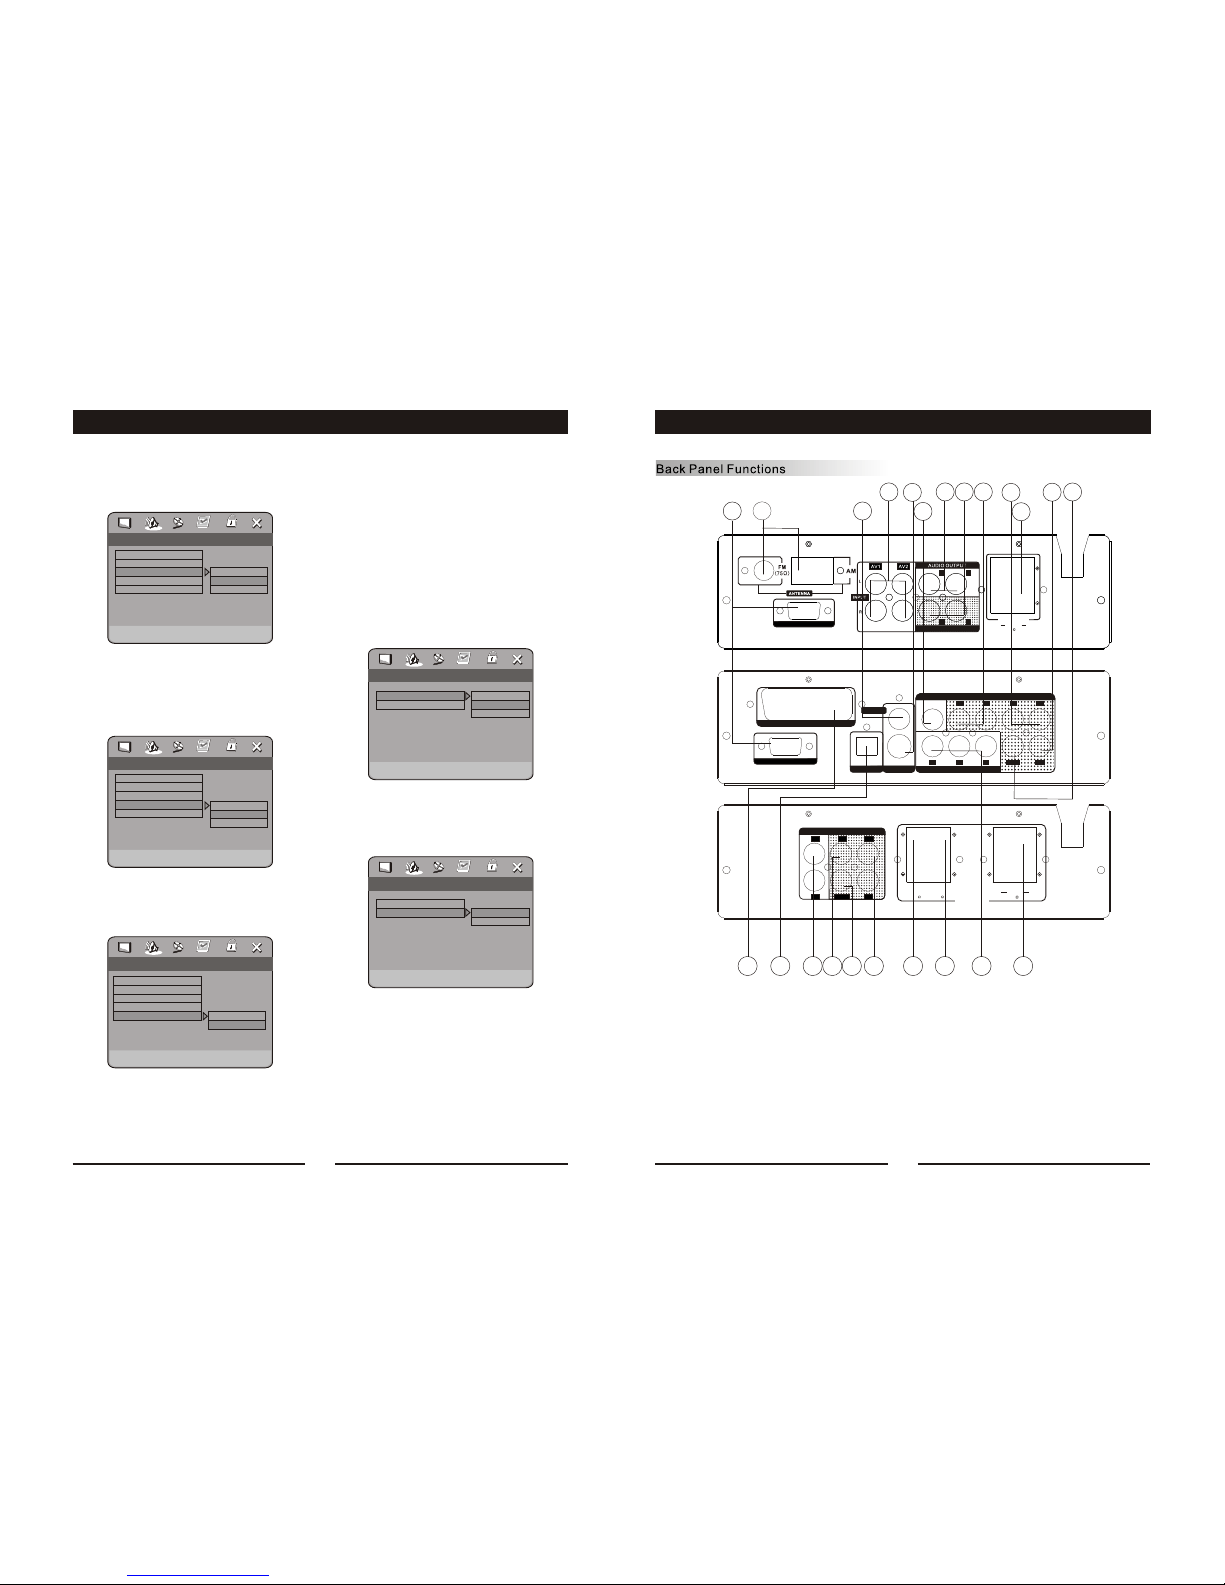
Set Angle Mark
On
Off
TV Display
Angle Mark
OSD Lang
Captions
.. General Setup Page ..
PS
On
ENG
On
Normal/PS
Normal/LB
Wide
TV Display
Angle Mark
OSD Lang
Captions
.. General Setup Page ..
PS
On
ENG
On
Set TV Display Mode
SYSTEM SETUPFUNCTIONS
Note: Regardless of what screen format is
chosen, if the screen displays in 4:3 format, the
picture can only be shown in that format. With
DVDs, the screen format is convertible. If the
screen displays only in 4:3 format, when a DVD
with 16:9 display format is used, the picture will
be flattened.
TV
screen
Film
format Normal
4:3
4:3
16:9
16:9
Full view Mailbox Wide screen
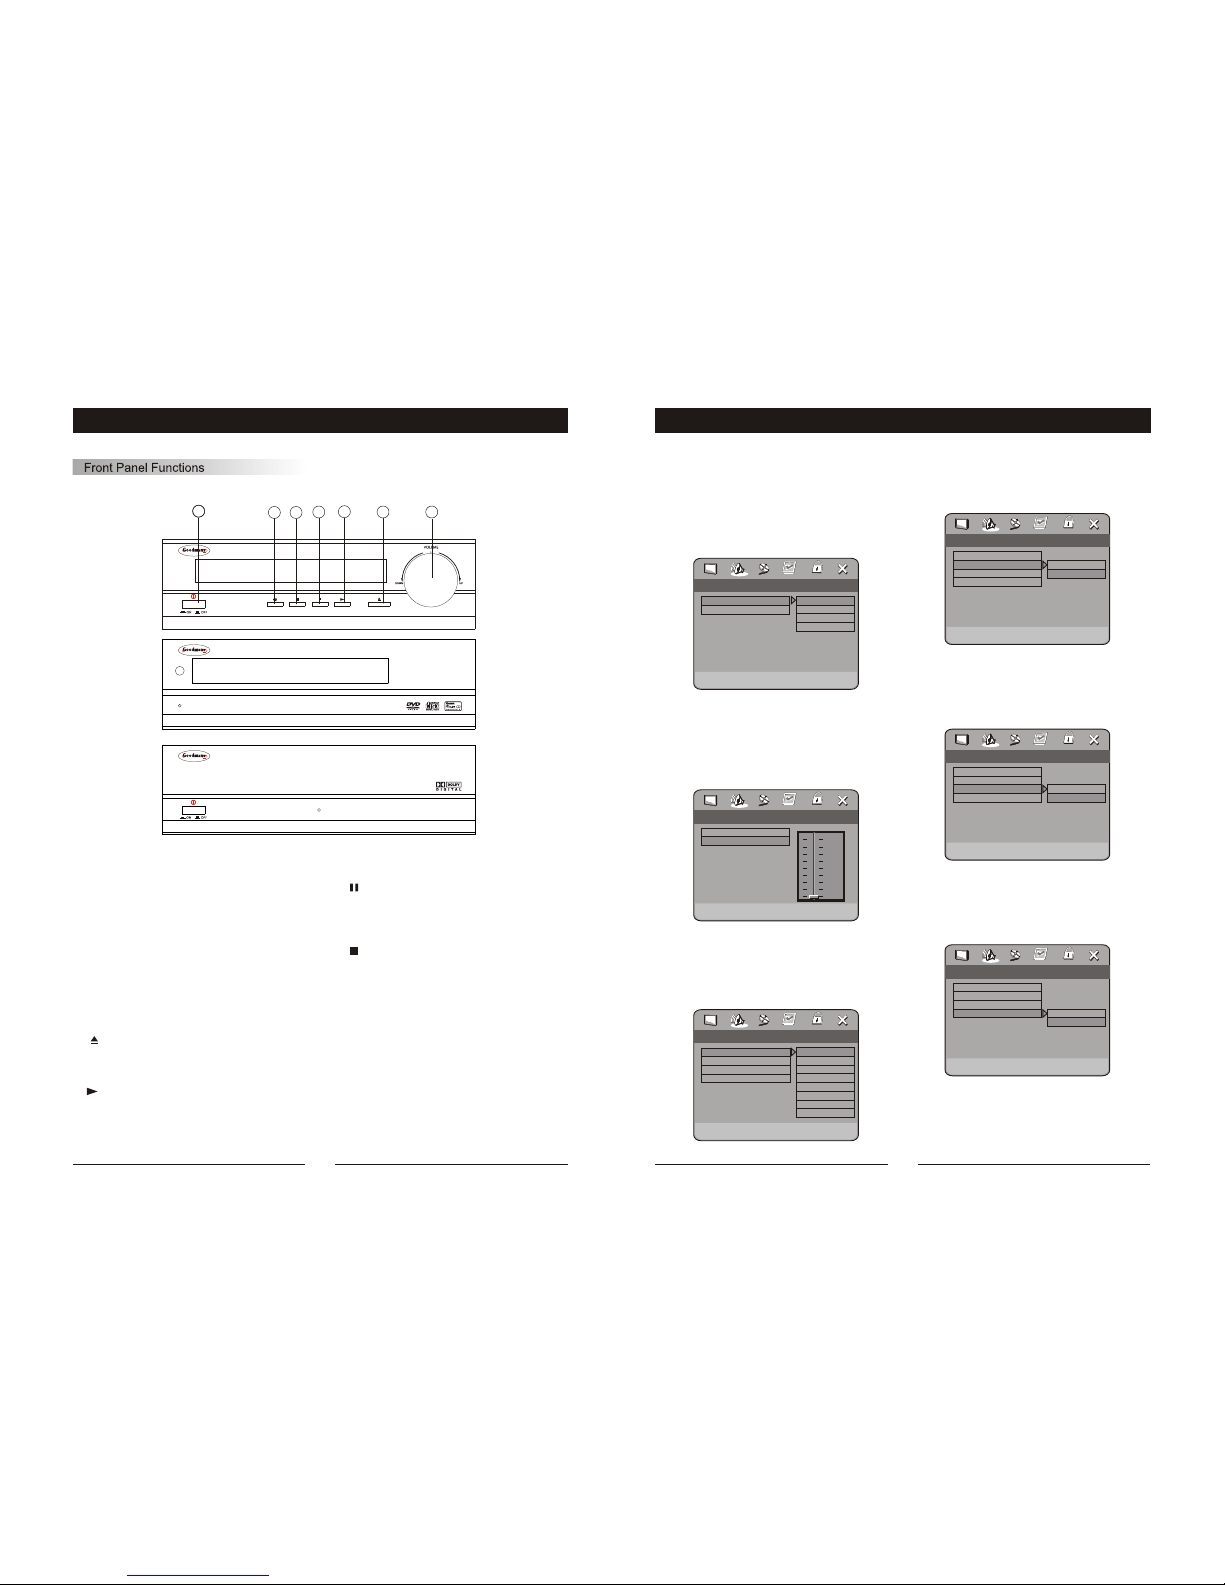
ANGLE MARK
When a DVD providing multiple angles is used,
the user may select a particular shooting angle.
Follow the operating instructions stated in "DVD
MENU SETUP" in combination with the Desired
option in the following figure.
GENERAL SETUP
This option is used to set up TV screen
format, video functions and DVD functions,
with options of "TV DISPLAY", "ANGLE MARK",
"OSD LANGUAGE", "CAPTIONS".
TV DISPLAY
Follow the operating instructions stated in
"DVD MENU SETUP" in combination with the
desired option in the following figure.
Zoom
Apicture may be enlarged up to four times
during either playback or slow motion through
the unit's zoom function. Press the ZOOM key
once and it enlarges the image 2x; press a
second time and the image enlarges 3x; A
third pressing enlarges the image 4x. A forth
pressing the image 1/2x, a five pressing the
image 1/3x, a sixth pressing the image 1/4x . To
return to normal-size playback, press the ZOOM
key a seventh time. Enlargement takes place
in the center of the picture.
CH.LEVEL
When a DVD disc is played, press this key
and Vol Vol key to adjust channel level.
Volume and Mute
The volume on this DVD receiver is easily
controlled with the remote control by pressing
either the VOL key to raise the volume or the
VOL key to lower it. By pressing the MUTE
key, no audio will be heard. To rein state the audio,
press the MUTE key again.
Program
Allows you to program specific tracks in a
desired order of play. Press PROG key program
menu well appear on the screen, set up the
program play in number key. The scroll to the
START, Press ENTER key to program play. To
exit the Programmed play mode, press the
PROG button again.
DVD Menu Setup
By pressing the SETUP key on the remote
control, the main setup menu appears. You will
be asked to enter the Personal Identification
Number (PIN), which is "0000" .
1. After accessing the setup menu, press the
scroll key for up or down movement to select a
desired Item. Once an item is selected, press
the PLAY key to confirm your entry and to move
to the Sub-entry.
2. Use the left or right scroll key to move the
pointer and the up or down scroll key to select
the Desired option. Once an item is selected,
press the ENTER key to confirm your selection.
This Completes the setup of the selected
function.
20 9

CONNECTINGS
MUSIC SOURCE INPUT
CD
ACTIVC
SUBWOOFER(OPTIONAL)
VIDEO INPUT
S-VIDEO INPUT
INTERCONNECT
SCART
YUV
DVD-CABLE(OUTPUT)
SVIDEO
OPTICAL
5.1CH AUDIO OUTPUT
COMPONENT VIDEO OUT
FR FL SR SL
CENT SWPr Y Pb
COAXIAL
VIDEO
SCART
SPEAKERS
S.WOOFER
(8 )
CENTER
(4 )
R LREAR
(4 )
AUDIO INPUT
L SW SL
R CENT SR
AC 230V ~ 50Hz
(4 )
FRONT
R L
SPEAKERS
R
FR
L
FL
DVD-CABLE(INPUT)
AUDIO INPUT
AC 230V ~ 50Hz
FUNCTIONS
Time
This DVD receiver can display various data
regarding the disc being played.
Press Time button the number of title and
chapter, Audio, Subtitle language, Angle, Title time,
Chapter time, repeat mode, display time.
TIME
MENU: MENU/PBC
With the PBC function on, choosing a song
on a CD can only be done when at the main
menu. With the PBC function off, song selections
can be made by entering the relevant number
keys. The menu content of the disc will appear
when the MENU button is pressed while a DVD
disc is playing.
MENU AUDIO
SUBTITLES
PLAY
2. Press the A-B button again while the disc
is playing to set point B, the ending spot. The
section between Aand B will replay.
3. Press the A-B button a third time to cancel.
Repeat Play
This DVD receiver allows repeated playback
of specific titles, chapters/tracks, or segment.
It even allows switching between two items that
are being repeated.
1. Select the item to repeat.
2. Press the REPEAT key.
REPEAT
REPEAT
REPEAT
A-B Repeat
The A-B repeat function allows you to
re-show sections between two specific points
(A and B) on a disc.
1. Press the A-B button while the disc is
playing to set point A, the beginning spot.
A-B
A
CHAPTER
TITLE
ALL
AB
Bitrate Title Elapsed
01/10
01/14
5.1 CH
Menu
Title
Chapter
Audio
Subtitle
The repeat mode changes each time the
REPEAT key is pressed (i.e., from title repeat to
chapter repeat, all repeat , to repeat off.)
When playing CD, press the REPEAT button to
get the following display. TRACK ALL, and
Repeat off.
When playing Mp3, press REPEAT button to get
the following player mode: Single, Repeat one,
Repeat Folder, Folder.
AMP Volume up/down Adjustment
Press the CH.SEL button on the remote control,
TV OSD appears:
VOL_L+00db
Press CH.SEL twice,OSD Appears:
VOL_R+00db
Press CH.SEL thirce to seven times the OSD
converts in turn of RF,LS,FS and CN;
VOL_RS+00db
VOL_LS+00db
VOL_C+00db
Press CH.SEL continually it goes in cycle.
Press the VOL+ or VOL- button on the remote
control to change the Volume value of ALL,LF,
RF,LS,RS or CN separately.
10 19

N/P
This DVD receiver supports video output of
various systems, including auto, NTSC, and PAL.
The picture will blink and become colourless
when the wrong system is selected. If this
occurs, press the N/P key on the remote control,
then select the correct system (NTSC for North
America, PAL for Europe). For more information
on output format, refer to the TV set's manu-
facturer's instructions.
Subtitles
The unit has the capability to display subtitles
in any of 32 different languages.
1. Press the SUBTITLE key. The subtitle
menu will appear. Select the desired language
by pressing the SUBTITLE key.
2. To remove the subtitles from view, press
the SUBTITLE key until they disappear.
Note: The disc being played must be multi-
subtitle encoded.
SUBTITLE OFF
SUBTITLE 02/08 ENGLISH
SUBTITLE
Camera Angle
The ability to change the camera angle allows
viewer to play director and watch a movie from
different perspectives.
1. Press the ANGLE key on the remote control.
With each press, the camera angle changes.
2. The key may be pressed only when the
flashing angle icon appears in the unit's display
panel.
Note: Camera angle may be changed only in
discs with multi-angle capability encoded
into them.
Language
The unit has the capability to show movies in
one of eight languages.
1. Press the LANGUAGE key. The language
menu will appear. Select the desired language
by pressing the LANGUAGE key.
Note: The disc being played must be multi-lan-
guage encoded.
1/4
ANGLE
AUDIO 1/8 AC-3 2CH ENGLISH
LANGUAGE
LOCATING A TITLE
DVD discs are normally divided into titles,
which are then sub-divided into chapters. A
specific title can be easily found with this unit.
Specific titles can be found using either the title
menu function, if the DVD disc contains a title
menu, or through its unique title number.
Title Menu Function
1. Press the TITLE key. The title menu will
appear on the TV screen.
2. Press the appropriate scroll key to select
the desired title. A title may also be located by
pressing its assigned number with the number
buttons.
3. Press the ENTER key . This will start
playback from chapter 1 of the selected title.
Note:
Some discs do not respond to this function. If
different instructions appear on the TV screen,
follow those instructions. The Instructions given
here describe the basic procedure. Procedures
may vary depending on the content of the DVD
disc. When playing a VCD2.0 disc, TITLE key
can be used to return to menu.
FUNCTIONS
1
2
34
5
67
The configuration and arrangement of a
surround sound system's speakers is critical.
For maximum listening enjoyment, refer to the
Arrangement of Speakers section in this manual
prior to connecting speakers.
Surround Sound Speakers
Front or main right and left speakers;
center speaker
These three speakers provide extensive
sound imaging and augment the dynamic effect
of the audio. A movie's principal dialogue comes
through these speakers.
Rear or surround sound speakers
These two speakers provide 3-D dynamic
sound effects, and create an enveloping
atmosphere, as they add background sounds.
.
Subwoofer speaker
Provides rich and powerful bass, adding a
powerful dimension of realism.
Note: Audio recorded for the center speaker and
subwoofer will be assigned to the front and 3-D
rear speakers to obtain the optimum 3-D
surround sound effect.
The ideal surround sound speaker configur-
ation may vary according to room size and wall
material. The figure below illustrates a typical
arrangement.
Hints:
Front or main speakers and central speaker
should be placed at the same level and in a way
that sound is oriented toward the listener's ears.
3D surround sound or rear speakers should
be placed 3' higher than the height of listener's
ears.
Subwoofer speaker may be placed anywhere
within the room, as its location produces little
effect on a listener's sensation to sound. To
obtain the optimum bass effect, a subwoofer is
recommended in home theater systems.
1.TV set or screen
2. Front or main left speaker
3.Subwoofer
4.Center speaker
5.Front or main right speaker
6.3-D surround sound left speaker
7.3-D surround sound right speaker
8.Viewer's location
SPEAKERS ARRANGEMENT OF SPEAKERS
18 11

INTERCONNECT
Front speaker
Center speaker
Surround speaker Surround speaker
Subwoofer speaker
Front speaker
DVD-CABLE(OUTPUT)
SVIDEO
OPTICAL
5.1CH AUDIO OUTPUT
COMPONENT VIDEO OUT
FR FL SR SL
CENT SWPr Y Pb
COAXIAL
VIDEO
SCART
SPEAKERS
S.WOOFER
(8 )
CENTER
(4 )
R LREAR
(4 )
AUDIO INPUT
L SW SL
R CENT SR
AC 230V ~ 50Hz
(4 )
FRONT
R L
SPEAKERS
R
FR
L
FL
DVD-CABLE(INPUT)
AUDIO INPUT
AC 230V ~ 50Hz
BASIC DVD OPERATION FUNCTIONS
Memory Playback
This unit allows the viewer to stop playback,
then later continue playback from that exact disc
location. Press the STOP key to halt playback.
The unit then will memorize the location where
playback was stopped. To resume watching,
press the RESUME or PLAY key and the unit will
resume playback from the exact location where
playback was stopped. (Exclude Mp3 DISC)
When you play DVD discs, press MENU or
TITLE key return menu and title, the unit then
will memorize the location, To resume watching
press the RESUME key and the unit will resume
playback from the exact location.
Slow Motion
This DVD receiver has the ability to play
discs in slow motion in either forward or reverse
direction. Each time the SLOW key is pressed,
the speed will slow from forward slow speed1/ 2,
to 1/ 4, to 1/ 8, to 1/ 16 to reverse slow speed 1/ 2,
to 1/ 4, to 1/ 8, to 1/ 16, to normal speed. To
resume normal playback, press the PLAY key.
PLAY
RESUME
SLOW
Screen Display
While a disc is playing, the status of various
functions may be checked, such as the tile, track
number, and several time categories.
1. Press the DISPLAY key once and the title
appears along with the chapter and how much
time has played.
2. Press the DISPLAY key again and the
remaining time for that particular title appears.
3. Press the DISPLAY key again and the total
elapsed time for that particular chapter appears.
4. Press the DISPLAY key again and the
total remaining time for that particular chapter
appears.
5. Press the DISPLAY key again and the
display turns off.
DISPLAY TT 01/02 CH 02/ 28
00:21:05
TITLE REMAIN
01 44 34
CHAPTER ELAPSED
CHAPTER REMAIN
2X
2X
To activate either function, simply press the
key or key on the remote control. The
speed changes each time the key is pressed.
To resume normal playback, press the PLAY key.
CONNECTING THE LOUNDSPEAKERS
12
Connect the loudspeakers as shown. Make sure that the correct +/- polarity is observed when
connecting at the speakers and also at the speaker terminals on the amplifiers. To connect the wires to
the terminals lift the tab as shown in fig 1 and insert the bared wire (ensuring correct polarity) then press
back the tab to secure the wire in the holder.
12 17

BASIC DVD OPERATION
NO DISC
LOADING
POWER
If there is no disc, NO DISC shown on screen:
OPEN
OPEN/CLOSE
OPEN/CLOSE
Once the unit is connected to a television
set and any other accessory equipment, you
are ready to enjoy the excitement of DVD videos
or your favorite CDs and MP3 files.
To play a DVD video disc:
Turn on the TV and select the A/V mode. If
the set features an SCART connection, be sure
the SCART mode is selected from the TV menu.
Turn on amplifier, if connected. Select AC-3 or
DVD mode.
To play an audio disc:
Turn on the audio system and choose the
input source that is connected to the DVD player.
Set the SPDIF OUTPUT to SPDIF OFF from the
SETUP MENU display if you don't have the
proper equipment for Dolby Digital surround
sound.
1. Press the POWER key on front panel.
DISC LOADING appears on screen.
2. Press the OPEN/CLOSE key. The disc
tray will open.
3. Place the disc on the disc tray. Be sure
play side is face down on the tray.
4. Press OPEN/CLOSE key to close tray.
The disc tray will close. The disc type will
appear in the upper-left-hand corner of the
screen.
Once it has read the disc, the unit automati-
cally will begin playback. When playing a DVD,
the DVD title or menu will appear. CD tracks are
played in sequence.
Note:
It is possible to damage a disc if it is not
placed correctly on the guides in the disc tray.
This may also cause the DVD player to
malfunction. Do not force or place anything
other than a 5 DVD or CD onto the disc tray.
Never move the DVD player during playback,
as this may cause damage to the disc as well as
the player. To open and close the disc tray, only
use the OPEN/CLOSE key found on both the
remote control and on the unit's front panel.
"
6.Fast Forward/Reverse Playback
The unit features both fast forward and fast
reverse playback. Either mode will speed up:
2x,4x,8x,16x,32x.
Press PAUSE key:
Press PREV key:
Press NEXT key:
FRONT PANEL
PLAY
PAUSE
FRONT PANEL
REMOTE CONTROL
REMOTE CONTROL
FRONT PANEL
REMOTE CONTROL
REMOTE CONTROL
5. PREV/NEXT playback
Press key or key , play previous or next
track. To resume normal playback, press PLAY key.
REMOTE CONTROL
PLAY
PAUSE
AM
FM
FM
Outdoor AM antenna
Coaxial cable(75 ohm)
Coaxial cable (75 ohm)
Outdoor FM antenna
Radio signals may be difficult to receive in
some buildings and under certain conditions.
The provided antennas will help in their reception.
They are intended for indoor use only.
AM Loop Antenna
The placement of the AM loop antenna should
be in a direction that provides the clearest
reception. Keep as far as possible from DVD
receiver, TV set, and speaker and power cords.
If reception remains poor, an outdoor antenna
may be necessary.
To connect the AM loopantenna:
1.Hold down handle
2.Insert wire end into hole
3.Release handle
Position for best reception
FM Indoor Antenna
The FM antenna should be fully extended
and in a direction that provides the clearest
signal. Secure the antenna ends in a location
where distortion is a minimum. If reception
remains poor, an outdoor antenna may be
necessary.
To connect the FM antenna:
1.Open cable terminal by pressing back on tab
2.Insert wire end
3.Release tab; make sure wire is in terminal
securely
2
3
1
CONNECTING ANTENNA
16 13

DVD / CD component
POWER
REMOTE
SENSOR
Power Amplifier component
Tuner component
INPUT DOWN UP PRE/TUNE OPEN/CLOSE
X-PRO
X-PRO
X-PRO
BASIC OPERATION
Before plugging the power cord into the AC outlet, check to make sure all of the connections
have been properly completed. When they have been, carefully plug power cord into outlet.
Press the POWER button on the front panel to power the unit. The display panel will light.
When the unit is initially powered, a brief surge of electricity may cause interference with other
electronic equipment on the same circuit. If this occurs, connect the unit to an outlet on a different
circuit.
Selecting Sound Source
1. Press any function button (DVD, AM/FM,
AUX1, AUX2) to select the desired sound source.
The appropriate symbol will appear in the display.
2. When the AM/FM tuner button is pressed,
the last station listened to will play.
Note: The desired program source will not play
unless it and the selected signal button coincide
with the active program source signal input.
Volume Control
The volume may be adjusted by either turning
the large volume knob on the front panel or
using the appropriate volume button on the
remote control.
Mute
Pressing the MUTE button temporarily mutes
every speaker. To resume audio, press MUTE
button again.
CONNECTING POWER SUPPLY
POWER
DVD / CD component
POWER
REMOTE
SENSOR
Power Amplifier component
Tuner component
INPUT DOWN UP PRE/TUNE OPEN/CLOSE
X-PRO
X-PRO
X-PRO
PRE/TUN
SETUP REPEAT
VOLUME
+10
OPEN/CLOSE
UPDOWNMEMO AUTO
DVD TUNER
FM MODE
STOP PAUSE PLAY A-B
OSD STEP ZOOM RESUME
ENTER
PROG CH.LEVEL
SLOW
DISPLAY
RDS
TIME
N/P SUBTITLE LANGUAGE ANGLE
MENU
TITLE
STANDBY
AUX 1/ 2 MUTE
Memory number
Wave band Station frequency
To Play Preset Stations
1.Press the TUNER button to select the
desired wave band.
2.Press the PRE/TUN button.
3.Press any of the numbered buttons to
select the desired station's memory number.
For example, to play the station at memory
#5, simply press the 5 button; for memory
#17, press the 1 button followed by the 7
button.
4.Stations in the memory function may also
be accessed by pressing the UP or DOWN
button.
PLAYING THE RADIO
Automatic Tuning
This unit will store up to 50 individual AM or
50 individual FM radio stations in its memory.
1.Press the AUTO button. The word AUTO
will appear in the display and the automatic
tuning mode is activated.
2.Stations will be stored in ascending order
until 50 stations of that particular wave band
have been saved. When a station is stored, the
memory storage number, as well as the station's
frequency, will flash for four seconds in the
display.
3.When the total number of stations reaches
50, in a particular wave's (AM or FM) memory,
no further station in that wave band will be saved.
Basic function of RDS(radio data system)
1.Identify the broadcasting-station
2.Identify the program
3.Display the complex information
4.Time display
Operation:
RDS button can be applied while the signal
with RDS received from broadcasting station
and the station will be identified automatically.
You can check the time, complex information,
the program and frequency of the station by
pressing RDS button. Once the RDS signal
disappears the function should not be available.
14 15
Table of contents
Other Goodmans Home Theater System manuals