Gorenje HEC50EP User manual

Instructions for use and connection
32
Your new cooker GB
Dear Buyer,
You have become the owner of our new cooker,
which will assist you in rapid and effective
preparation of your favorite dishes.
The appliance is intended for household use.
It consists of the multipurpose oven with multiple
heating alternatives, and the glass ceramic hob.
Our appliances are packed in the environmentally
friendly materials which may be recycled,
deposited or destroyed without any hazard to the
environment. Such packaging materials are also
labeled accordingly.
Once the life cycle your appliance is over, make
sure not to pollute the environment, and deliver it
to the authorized collectors of old household
appliances.
Instructions for Use
Instructions for use have been prepared for the
user and describe the cooker and how to use it
Instructions for Connection
This appliance should be connected to the power
supply according to instructions for connection of
the appliance in compliance with current standards
and local regulations. The connection should be
done by a qualified technician only.
Rating Plate
The rating plate of the cooker containing general
data is at the edge of the oven and is visible when
the door is open.
Installation mode
On one side the appliance may be built-in or
placed adjacent to the high kitchen cabinet,
higher than the appliance itself. On the other side
it is allowed to place only the kitchen cabinet of a
height equal to that of the appliance.
Cooling fan
The cooling fan is mounted into the cooker and
its function is to cool the housing and the control
panel of the cooker.
Before Use ...................................................... 33
Important Warnings..................................... 33
Energy Saving Tips
Technical Data............................................... 34
Ceramic Hob.................................................. 34
Dishes ............................................................. 35
Control panel................................................. 36
Sensors and displays
Remaining heat display
Control
Switching the hotplate off
Safety switch off
Double ring hotplate
Blocking particular hotplate
Automatic cooking mode
Start timer
Safety functions and error display
Accessories
Control panel description............................. 45
General settings............................................. 46
Use of oven ..................................................... 46
Alternatives with the oven off:
Selection and setting of oven temperature
Alarm timer
Safety sensor block
Programmed roasting with the meat probe
The oven may be controlled in two ways..... 49
Switching between the two control modes
Food selection mode
Operation mode selection ............................. 50
Modes of Operation....................................... 50
Heating with bottom heater and hot air
Fan Assisted Heating
Cooking with the Upper and Lower Heaters
Cooking with the Infrared Grill and Fan
(Fan-assisted grilling)
Cooking with Infrared Grill (Grilling)
Heating with bottom heating element assisted with
fan operation
Heating with bottom heating element
Heating with Upper Heater
Fan forced heating
Preserving Foods with Hot Air
Cleaning and Maintenance........................... 54
Cleaning and maintenance of ceramic-glass
hob .................................................................. 55
Oven
Drawer
Instructions for Connection.......................... 57
Important Warning
Connection Terminal

Instructions for use and connection 33
Before Use
Heat the empty oven at the temperature 250°C
for 30 minutes while set at fan operation mode to
eliminate offensive smell of insulation coating
pull-out slides. Smell occurring when heating up
is not harmful, however, it is recommended to air
the kitchen during the first use.
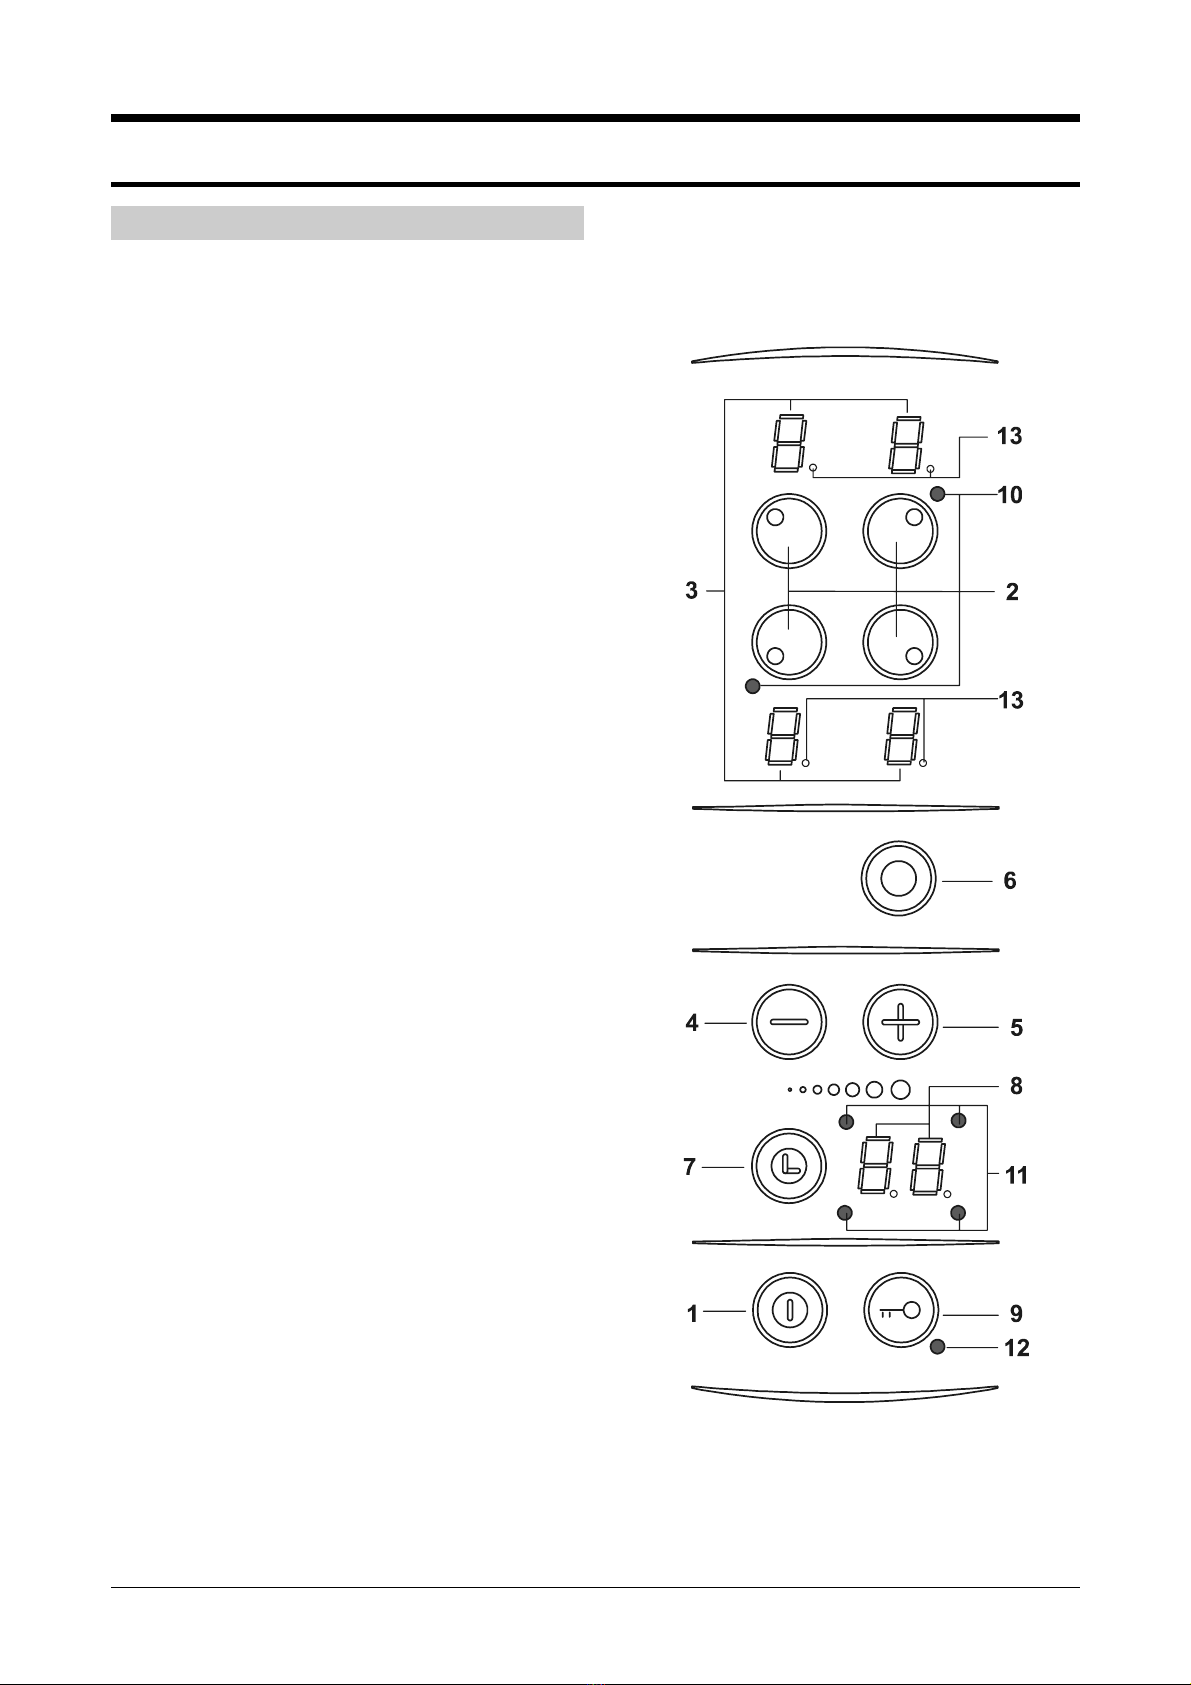
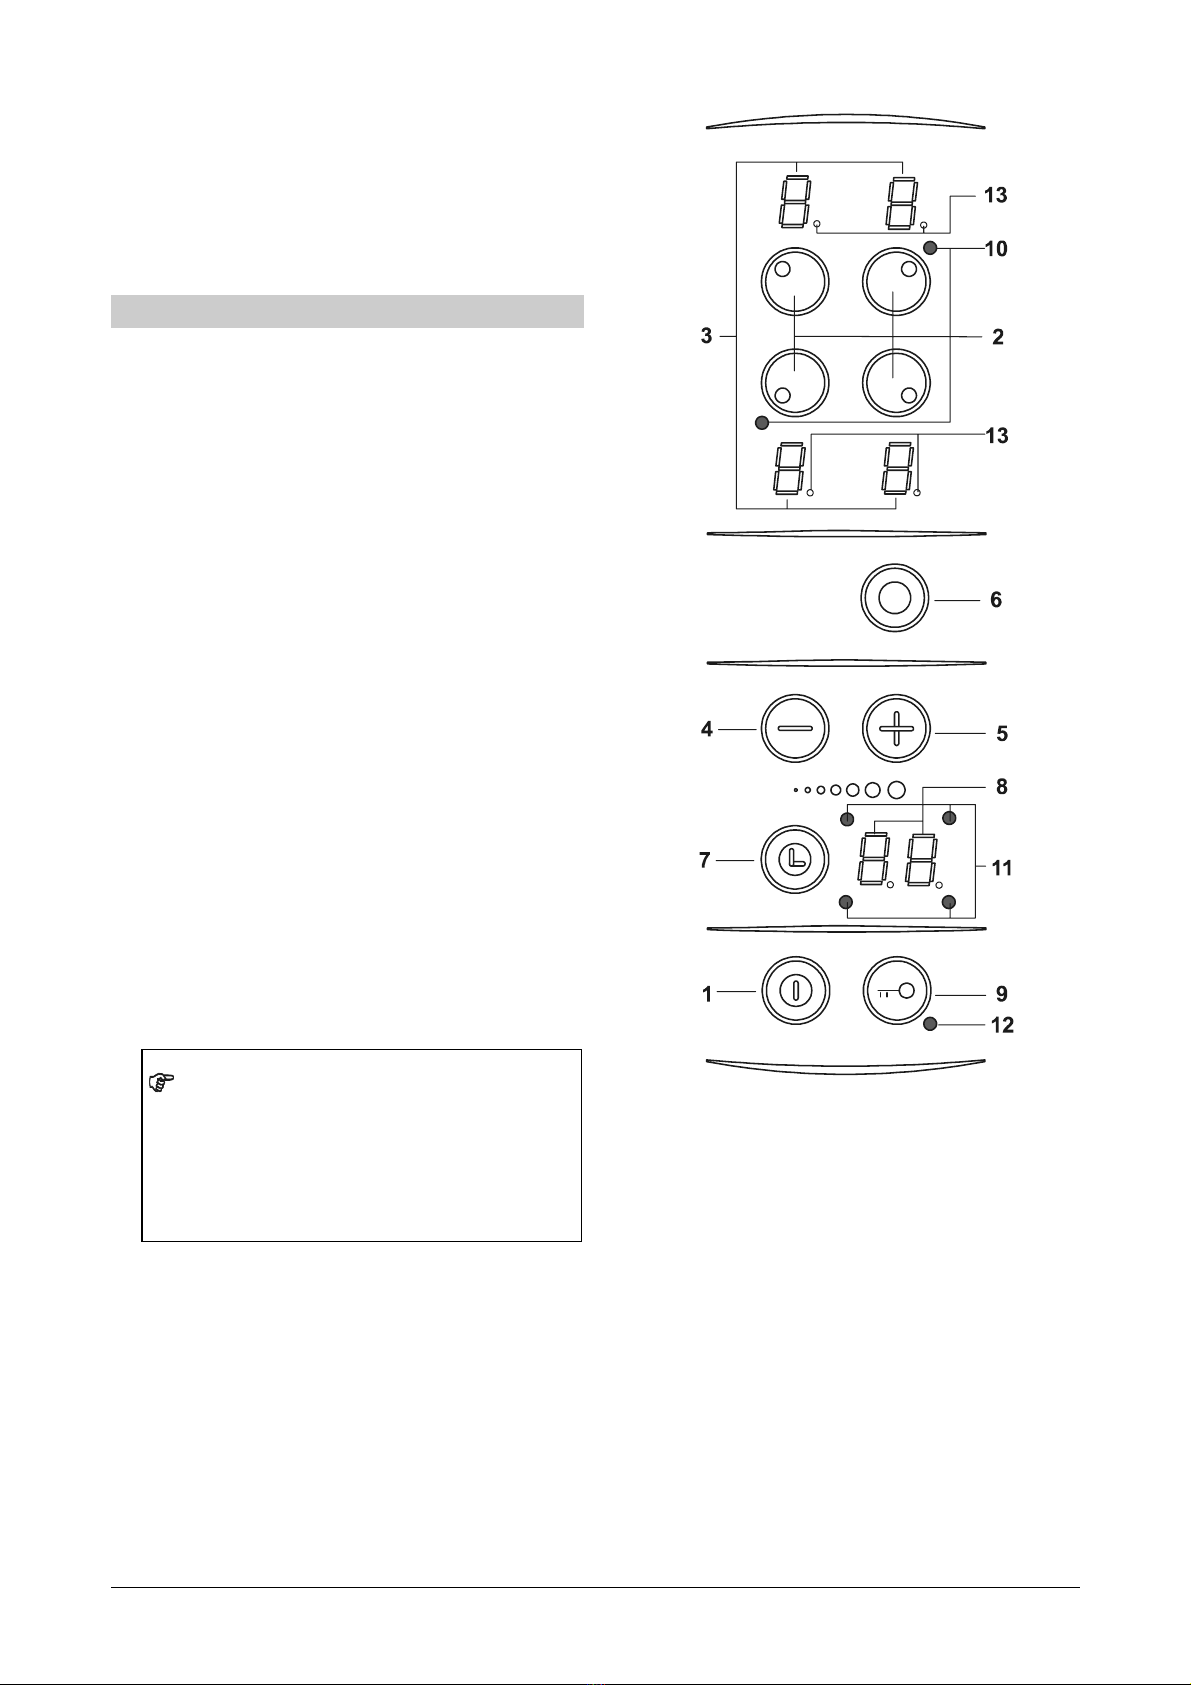
Important Warnings
• The appliance should be connected to the power
supply by a qualified technician.
• The oven is ventilated through the opening on the
back side of the cooktop frame.
• Individual parts of the cooker get very hot during
operation (door glass, the area around the
cooking zones, etc.). Don't let children play near
the cooker and warn them of the danger of burns.
• Hot grease is highly flammable, so you have to be
very careful when you prepare food with grease or
oil (for example fried potato chips).
• Cooking zones should never be left empty when
switched on.
• Never cover the oven with aluminum foil and don't
place the baking sheet or any other pan on the
bottom of the oven. Foil prevents air circulation in
the oven, slows down the baking process and
damages the enamel.
• If you have an electric appliance connected to a
socket close to the cooker, take care that the
supply cord does not come in contact with hot
areas or get jammed between the oven and the
hot oven door.
• Never use the cooker as a room heater.
• Never store inflammable, explosive or heat
sensitive material in the drawer.
• The ceramic hob should never be used as a
working top as you may scratch it with sharp
objects.
• Never put food wrapped with aluminum foil or
stored in plastic dishes directly on the hot cooking
zone, as the ceramic surface is very likely to get
damaged.
• Do not use glass-ceramic hob when it is cracked
or broken. If a visible crack appears, immediately
disconnect the appliance from the mains.
• In the event of any disturbance disconnect the
power supply immediately and call your service.
ATTENTION!
Do not clean the oven with high-pressure
cleaners.
Oven door gets extremely hot during operation of
the appliance. For that reason there is additional
protection, the third oven door glass, which
reduces the surface temperature on the oven
door during operation of the appliance.
The symbol on the product or on its
packaging indicates that this product
may not be treated as household waste.
Instead it shall be handed over to the
applicable collection point for the recycling of
electrical and electronic equipment. By
ensuring this product is disposed of
correctly, you will help prevent potential
negative consequences for the environment
and human health, which could otherwise be
caused by inappropriate waste handling of
thisproduct. For more detailed information
about recycling of this product, please
contact your local city office, your household
waste disposal service or the shop where you
purchased the product.
Energy Saving Tips
• The bottom of the pot should be slightly concave
for optimum heat transfer from the cooking zone.
• The bottom of the pot should always suit the size
of the cooking zone. If the pot is smaller, it can
cause energy loss and if larger, the cooking zone
may become damaged.
• Use a pot lid whenever possible.
• The pot size should suit the quantity of food.
Cooking smaller quantities of food in a large pot
results in energy loss.
• Food which needs longer cooking may also be
prepared in the pressure cooker.
• Various vegetables, potatoes, etc. can be cooked
with a smaller quantity of water. This way the food
is cooked much sooner, but do not forget to cover
the pan properly. When the water starts boiling,
turn the knob to the position for slow boiling.
• Some 5-10 minutes before the food is cooked,
switch off the hot plate or the oven, whichever you
are using.
• Smaller pieces of meat should be cooked on the
cooker top and larger pieces should be prepared
in the oven.
• Open the door of the oven only when necessary,
as frequent opening causes energy loss and
prolongs the time required for cooking.
• With conventional heating of the oven, the food is
cooked on one level, but the oven may be loaded
with two narrow tins or it is possible to bake one
after another.

Instructions for use and connection
34
Technical Data
Type E65YY5-T12T
Dimensions H/W/D (cm) 85/60/60
Mains voltage 3N AC 400 V, 50 Hz
Heating elements voltage AC 230 V, 50 Hz
Total power (kW) 10,1
Oven power (kW) 3,4
Upper heater (kW) 0,95
Lower heater (kW) 1,1
Grill (kW) 2,2
Fan heater (kW) 2,2
Fan motor (W) 35
Cooling fan (W) 17
Oven light (W) 25
Ceramic hob (mm ø/kW) HL=HI-Light ceramic heating zone
front left
back left
rear right
front right
180/120/1,7/HL
145/1,2/HL
250x140/2,0/HL
145/1,2/HL
Total power
(
kW
)
6,1
Ceramic Hob
Ceramic-glass cooktop is equipped with four
hotplates designed as cooking zones. The
surface of the hob is flat, without any edges for
eventual gathering of dirt.
• Hotplates quickly reach the selected heating
power while the adjacent area around the
hotplates remains cool.
• The cooktop is resistant to temperature
changes.
• The cooktop is also impact resistant. Cookware
may be placed upon the surface rather firmly
without any consequences.
• Avoid using the hob as a working surface.
Sharp objects may produce scratches.
• Never attempt to prepare food in aluminum or
plastic cookware. Never place any plastic
objects or aluminum foil upon the hot cooking
hob.
• Avoid making coffee in traditional Turkish
coffee kettle since the diameter of the bottom is
too small and the hotplate may be damaged.
IMPORTANT!
• Never use cracked or broken ceramic-glass
cooking hob. Sharp edged objects, falling upon
the surface of the hob may cause cracking. The
consequences may be visible immediately or
only after a while. In case any visible cracks are
observed cut the power supply immediately.
• In case sugar or other heavily sweetened
substance is spilled on the hotplate, wipe it
immediately and remove the sugar residues
with a scraper although the cooking zone is still
hot, otherwise the hotplate may be damaged.
• Avoid cleaning the cooktop while the cooking
zones are still hot, as you may damage the hob.

Instructions for use and connection 35
Dishes
Use only high quality cookware with flat and firm
bottom.
• Position the pot at the center of the hotplate
during cooking.
• When using the fireproof and temperature
resistant glass cookware observe the
instructions of the producer.
• If the pressure cooker is used to prepare food,
have it under constant control throughout the
cooking until proper pressure has been
obtained. In such cases start the cooking at
maximum power of the hotplate, and reduce the
power subsequently according to the
instructions of the producer.
• When using high radiation (bright metal
surface) crockery, or thick bottom dishes for
preparing food on the glass ceramic hob, the
period of reaching the boiling point may be
prolonged for certain time (up to 10 minutes).
Consequently, if you need to boil considerable
amount of liquid, it is recommended to use the
dark, flat bottom pot.
The cooking zone may be damaged:
• if it is left in operation without any cookware
being placed on top, or if covered with empty
cookware;
• if improper cookware is used: unevenly flat
bottom or small diameter (traditional Turkish
coffee kettle).
• the use of terra-cotta (clay) cookware is likely to
produce scratches upon the ceramic-glass
surface.
• Before placing any cookware upon the cooktop
thoroughly wipe the bottom dry, thereby
improving the heat conduction and protecting
the hotplate from damage.

Instructions for use and connection
36
Control panel
Sensors and displays
1Ceramic hob ON/OFF sensor
2Hotplate ON/OFF sensor
3Heating power setting and remaining heat
display
4Sensor (-)
5Sensor (+)
6Additional hotplate ring ON/OFF sensor
7Timer clock ON/OFF sensor
8Timer clock display
9Blocked operation sensor
10 Additional hotplate signal lamp
11 Timer controlled hotplate signal lamp
12 Blocked operation control lamp
13 Heating power display decimal dot:
ON: operation control is enabled
OFF: operation control is blocked

Instructions for use and connection 37
Remaining heat display
In case the hotplate surface is still hot (danger of
burns), the heating power display indicates »H«.
The relevant signal lamp goes off when there is
no more danger of burns (below 60°C), and the
display consequently indicates »0«.
In case of mains interruption for more than 3
seconds, the warning signal »H« is not displayed,
although the temperature exceeds 60°C.
Control
Once the glass ceramic hob is connected to the
mains, the sound signal confirms the appliance is
ready for use.
The hob is equipped with electronic sensors
which are switched on by touching or pressing the
sensor surface for at least one second.
Each sensor reaction is confirmed by the beep.
Do not place any objects upon the sensor surface
(otherwise you may provoke error mode). Keep
the sensor surface clean at all times.
Switching the hob on
Touch the ON/OFF sensor (1) for at least one
second. The hob is activated and all power
displays (3) indicate »0« while the decimal dot
flashes (13).
Next setting should be adjusted within ten
seconds, otherwise the hob will automatically
be switched off.
Switching the hotplates on
Once the hob is switched on with the ON/OFF
sensor (1), within the next ten seconds you have
to select and switch on a particular hotplate.
• Touch the sensor for the selected hotplate (2).
The relevant heat power display indicates »0«
and the decimal dot (13) stops flashing.
• By touching the sensor »-» (4) or »+« (5) set
the desired heating power from 1-9.

Instructions for use and connection
38
Keeping the »-» (4) or »+« (5) sensor
pressed, the power automatically increases
or decreases. This may also be performed
by consecutive separate touches of the
sensor, thereby changing the power one
step at a time.
The setting is always possible only with one
selected hotplate, the one with the decimal
dot illuminated (13).
The power display indicates »0« if the
temperature of the hotplate is below 60°C,
or »H«, if the temperature exceeds
60°C (see chapter "Remaining heat"
If the hotplate is switched off prior the end of
cooking you may use the remaining heat
and save electric energy.
Switching the hotplate off
• The selected hotplate must be activated.
Decimal dot is illuminated (13).
• By touching the ON/OFF hotplate sensor “-” (4)
bring the heating power to »0«. After 3 second
lapse the hotplate is switched off.
Fast switch off
• The selected hotplate must be activated.
Decimal dot is illuminated (13).
• Switch the hotplate off by simultaneously
touching both sensors (-) and (+) (4 and 5).
Switching the hob off
The glass ceramic hob may be switched off at
any time by touching the relevant ON/OFF
sensor (1).
Safety switch off
In case you have forgotten to switch off one or
more hotplates, they will be switched off
automatically after some time (see chart).
Power Limited activation
time (in hrs)
1-2 6
3-4 5
54
6-8 1,5
9 1,5

Instructions for use and connection 39
In such cases the display indicates »0« if the
temperature is below 60°C or »H« if the
temperature is above 60°C (see chapter
"Remaining heat")
To unblock the safety stop, first switch the hob off
by touching the ON/OFF sensor, then reactivate
the hob by touching the same sensor again.
Double ring hotplate
Front left and rear right hotplates are designed as
double hotplate rings, providing the possibility of
to activate such hotplate surface as to suit the
diameter of the dish used, by switching on either
the inner hotplate ring or also the extended
exterior ring.
Switching the extended exterior
hotplate ring on and off
• Select the desired hotplate by touching the
relevant ON/OFF sensor (2) (the decimal dot
(13) is on).
• Adjust the heating range by the sensor »-» or
»+« (4 or 5).
• By touching the extended hotplate sensor (6)
switch on the complete hotplate (signal lamp is
on (10).
• Next touch of the extended hotplate sensor (6)
will switch the extended ring off (signal lamp
(10) goes off).
Blocking the hob operation
After the hob had been switched on by the
ON/OFF sensor (1) you may block the functioning
of the complete hob (9). This prevents the
accidental activation (children safety). The
blocked mode is signaled by the hob blockage
control lamp (12).
The hob remains blocked also after the
repeated activation of the hob by the
ON/OFF sensor (1) until the blockage is
removed by repeated touching of the
blockage sensor (9) and the blockage signal
lamp (12) goes off.

Instructions for use and connection
40
Blocking particular hotplate
This mode prevents accidental change of the
original hotplate setting during its operation.
• Select the hotplate (2). Decimal dot is on (13).
• Set the desired heating power and any optional
functions (additional heating ring, timer).
• Next touch of the ON/OFF sensor (2) activates
the blockage.
• Decimal dot (13) is off and the hotplate may not
be controlled.
• Subsequent touch of the ON/OFF sensor (2)
removes the blockage and reactivates the
control. Decimal dot (13) is back on.
Automatic cooking mode
Each hotplate is equipped with the automatic
cooking control. When it is activated the hotplate
will operate at maximum power for a limited
period of time (depending upon the power level
required for continuation) and then automatically
switch to the reduced power level to resume
cooking.
Switching the automatic mode on
• By touching the ON/OFF sensor (2) select the
hotplate. Display indicates »0« and the decimal
dot (13) is flashing.
• Pressing the »-» sensor (4) set the heating
power to 9. Then touch the sensor »+« (5). The
display alternatively indicates »A« and »9«.
• By touching the sensor »-» (4) set the desired
heating level to be switched on after the
automatic time had expired (see chart).
Power setting Automatic mode
setting
(in minutes)
11
23
3 4,8
4 6,5
5 8,5
6 2,5
7 3,5
8 4,5
9-

Instructions for use and connection 41
Selected power setting display
In case you might wish to see the momentary
power level setting, touch briefly (for half a
second) the ON/OFF sensor of the particular
hotplate (2).
Altering the power setting in the
automatic mod
The power level setting to be activated once the
automatic mode is off may be changed by
pressing the sensors »-» or »+« (4 or 5) while the
hotplate is in automatic mode. The length of the
automatic mode period is defined automatically in
regard to the new power setting (see chart).
Example: Power setting is 1 (automatic mode
period is 1 minute). After 0,5 minute the setting is
changed to 4 (automatic mode period will be 6,5
minutes) so the automatic mode will be prolonged
for further 6 minutes (6,5 minutes minus 0,5
minute).
Switching the automatic mode off
By pressing the sensor »-» (4) set the power level
to »0«. The display indicates »0« or »H«.
Start timer
The start timer facilitates cooking by setting the
length of the hotplate operation.
Timer switch on
• Select the hotplate by touching the ON/OFF
sensor (2). Decimal dot is on (13).
• Select the power setting 1- 9 by pressing the
sensor »-» or »+« (4 or 5).
• Switch the timer on by touching the ON/OFF
timer sensor (7). The timer display (8) indicates
»00«.
• By touching the sensor »-» or »+« (4 or 5) set
the desired cooking time (01 do 99 minutes).
The timer starts the countdown automatically
after a few seconds. The signal lamp of the
relevant timer controlled hotplate is on (11).

Instructions for use and connection
42
The cooking period with timer countdown
may be set only for one hotplate at the time.
To accelerate the time entry the sensors »-»
or »+« (4 or 5) must be kept depressed.
Altering the set cooking time
Cooking time may be changed at any time during
the hotplate operation.
• Select the hotplate by touching the ON/OFF
sensor (2). Decimal dot is on (13).
• Switch the timer on by touching the ON/OFF
timer sensor (7).
• Select the new cooking period setting by
pressing the sensor »-» or »+« (4 or 5).
To accelerate the time entry the sensors »-»
or »+« (4 or 5) must be kept depressed.
Remaining cooking time
Remaining cooking time may be recalled by
pressing briefly the hotplate ON/OFF sensor (2).
Timer switch off
The intermittent beep signals that the set period
had elapsed. The sound may be turned off by
touching any of the sensors, otherwise it stops
automatically after two minutes.
In case you wish to switch the timer off prior
the set time has elapsed, do the following:
• Select the hotplate by touching the ON/OFF
sensor (2). Decimal dot is on (13).
• Touch the ON/OFF timer sensor (7).
• By touching the »-» sensor (4) set the cooking
time to »00«. The timer function is off and the
hotplate functions normally until it is turned off
manually.
Fast switch off
Select the hotplate by touching the ON/OFF
sensor (2). Decimal dot is on (13).
By simultaneous pressing of both sensors »-»
and »+« (4 and 5) the hotplate is switched off.
The timer display (8) indicates »00«, and the
hotplate display indicates the heating power
setting.

Instructions for use and connection 43
Start timer as alarm function
Start timer may also be used merely as an alarm,
when it is not in the start timer function mode for
one of the hotplates.
Setting the alarm timer
If the hob is off:
• Switch the hob on by touching the ON/OFF
sensor (1).
• Switch the timer on by touching the ON/OFF
timer sensor (7).
• Set the desired time by pressing the sensor »-»
or »+« (4 or 5).
If the hob is on and the hotplates are
activated:
• After touching the sensor of the hotplate
marked with the decimal dot (13), the hotplate
is deactivated. The decimal dot (13) goes off.
• Switch the timer on by touching the ON/OFF
timer sensor (7).
• Set the desired time by pressing the sensor »-»
or »+« (4 or 5).
• If you wish to change the heating power
setting, touch the sensor (2) and reactivate the
selected hotplate. The decimal dot (13) of the
start timer display goes off.
Switching the timer alarm off
The intermittent beep signals that the set period
had elapsed. The sound may be turned off by
touching any of the sensors, otherwise it stops
automatically after two minutes.
In case you wish to switch the clock timer off
prior the set time has elapsed, do the
following:
• Touch the ON/OFF timer sensor (7).
• By touching the »-» sensor (4) set the cooking
time to »00«.
The alarm timer function is off.
By simultaneous touch of the sensors »-» and
»+« (4 and 5) the start timer function is off.

Instructions for use and connection
44
Safety functions and error display
The hob is equipped with the overheat safety
sensors. When they are activated they turn off the
hotplates nearest to the control board.
Error, possible cause, remedy
• Constant sound signal or Err 33
− Water is spilled over sensor surface
(Wipe the sensor surface)
• Flashing »H«
− Hot pan is placed above the sensor surface.
(Wait until normal sensor temperature is
regained.).
− Gaskets on heating elements are damaged.
(Wait until normal sensor temperature is
regained.).
In case any other error signal is displayed,
switch the hob off immediately, disconnect it
from the mains and contact your nearest
service center.
Accessories
Deep frying pan is used for baking pastry and for
roasting meat.
Do not insert the deep frying pan into the bottom
guide.
Enameled tray is used only for baking pastry.
Put the food in a pan and place it on the shelf.
Food can be placed directly on the wire shelf as
well, but don't forget to insert the drip tray under it
to collect the drippings.
Protective shield is used when you cook in the
oven with the door open (infra red grilling).
The pull-out slides enable you to choose 3
different shelf positions for baking.
Put the grid or baking pan carefully on the
selected pair of pull-out slides between the
elements restricting the baking pan. This can be
done when the pull-out slides are pushed into the
oven or their relevant pair is drawn from the oven.
When these slides are drawn out, check whether
the baking pan or the grid is correctly placed on
the pull-out slides and then push them slowly into
the oven. Close the door ONLY when the slides
will be entirely inserted in the oven.
WARNING: be careful not to get burnt as during
preheating and baking process the pull-out slides,
grids and baking pan can heat up strongly.
If baking pan or grid is pulled out when baking by
the pull-out slides, please, use the baking handle
or protection glove provided.
Before closing the oven door check if the pull-out
slides are pushed well into the oven.
Warning: make sure the appliance is installed in
a perfectly horizontal position, otherwise the
telescopic guides may run out of the oven when
the door is open.
Place the grease filter always in position when
the oven is in the heating mode with the fan on,
since the possibility to stain the oven walls is the
biggest (spurting of fat during roasting). This way
the fan is also protected from staining.
When removing the tray from the oven, use the
handle. Hook the handle to the edge of the tray
and pull it out slightly lifted. Use the handle for
removing the wire shelf as well.
The rear wall of the oven is coated with catalytic
coating which can be installed or removed by a
qualified technician only.

Instructions for use and connection 45
Table for cooking selected food
Symbol Food Temperature
(°C)
Time
(in min.)
Weight
(in kg)
Level of
baking
(from the
bottom)
Warning
chop in
one piece
195 1:50 1 2 Roasting on a smaller baking tin on the
baking grill
chops, fish 250 20:25 4x0,2 3 Preheating - 8 minutes at door closed.
Cooking on the grid (under it the a drip tray
is placed for gathering dripping grease) at
door open (shield made of sheet metal!).
Meat must be turned in the middle of
cooking time.
chicken 170 1:00 1 2 Roasting meat on the baking grill on the
middle level, a baking pan for collecting
grease and juice drippings on the bottom
level
pizza 200 0:10 1x0,4 2 Preheating - 8 minutes, cooking in shallow
frying pan.
small
cakes -
biscuits
160 0:25 3x0,3 1, 2, 3 Preheat for 8 minutes; baking on all three
levels simultaneously
rising of
dough
40 - - 1 Preheating - 3 minutes.
Dough rises in the bowl placed on the grid.
leavened 150 1:00 1,1 1 Cooking in the dark model for gugelhupt
placed on the grid
breat 200 1:15 1 2 Cooking in shallow frying pan.
roast beef 220 1:50 1 1 Cooking or stewing meat in covered vessel
put on the grid.
defrosting - - - 2 Put the food on the grid, drip tray is inserted
in the bottom guide.
cleaning of
the oven
50 0:30 0,4l water 1 Pour water into a deep baking pan
(1)
(1a)
(2a)
(2)
(3a) (4a)
(5a)
(3b) (4b) (5)
(d4-3)
(d3-1)
(4)
(d6)
(d1) (d2)
(d4-6)
(d4-6a) (d4-6b)
(d4-5)
(d4-1)
(d4-4)(d4-2)
(d3-2)
Control panel description
1 Food selection sensor; food selection display
(d1); signal lamp (green) (1a)
2Mode selection sensor; mode selection display
(d2); signal lamp (red) (2a)
3Oven temperature selection (3a, 3b);
temperature selection display (d3-1); oven
thermostat signal lamp (d3-2)
4Selection sensor for symbols:
− oven operation period (d4-1);
− end of oven operation (d4-2);
− meat probe (d4-3);
− alarm timer (d4-4);
− current time (d4-5);
− selection sensor display 4(d4-6):

Instructions for use and connection
46
− meat probe temperature display (d4-6a);
− meat probe temperature setting display (end
of oven operation) (d4-6b);
− selection sensor value setting 4 (4a, 4b)
5ON/OFF sensor; signal lamp (red) (5a);
blockage of operation display – activation by
simultaneous pressing of 1 and 2 for
approximately 5 seconds (d6).
General settings
• Sound signal volume
− When no other function is active it is possible
to set the sound signal volume by touching
the sensor (4b). The display (d4-6) indicates
symbols of 4 volume levels.
• Sound signal duration:
− oven operation period sound signal (d4-1),
end of oven operation (d4-2) and meat probe
(d4-3) last 7 minutes;
− alarm timer sound signal (d4-4) lasts 3
minutes
− After the expiry of indicated time the sound
signal goes off automatically.
• Each proper touch of sensor is
accompanied by a beep.
• Changing the value setting speed
The value setting speed is doubled after 5
seconds of continuous sensor pressing.
• Simultaneous pressing of (-) and (+)
sensors (3a/3b) ali (4a/4b)
Resets the settings to “0”, except for the
temperature setting display (d3-1) which is
changed to 30°C, and the end of operation
sensor (d4-2) which changes to indicate the
time of day.
In case the ON/OFF sensor (5) is not pressed
within 5 seconds, all settings are reset
automatically, except for the time of day and the
alarm timer.
In case of eventual power failure which is less
that 1 minute long, all settings remain
unchanged and the oven resumes normal
operation (if activated).
(1)
(1a)
(2a)
(2)
(3a) (4a)
(5a)
(3b) (4b) (5)
(d4-3)
(d3-1)
(4)
(d6)
(d1) (d2)
(d4-6)
(d4-6a) (d4-6b)
(d4-5)
(d4-1)
(d4-4)(d4-2)
(d3-2)
Use of oven
Alternatives with the oven on:
Changing or setting the oven temperature (d3-1)
• Changing or setting oven operation time (d4-1)
Changing or setting end of oven operation (d4-2)
• Changing or setting meat probe temperature (d4-3)
if the meat probe is connected
Alternatives with the oven off:
• By using the food selection sensor (1) or mode
selection sensor (2) you may select the type of
food (1) or function mode (2), and you may
change or set the oven temperature (d3-1),
oven operation time (d4-1), end of oven
operation (d4-2), meat probe (if the type of food
or function mode had been selected before)
(d4-3) alarm timer (d4-4) and the time of day
(d4-5).
• changing or setting the alarm timer and the
current daily time (d4-4).
Setting the time of day
• After the appliance is connected to the mains
the display (d4-6) flashes »12.00« and the
symbol (d4-5).
• By touching the sensors (4a/4b) you may set
the exact daily time (approximately 5 seconds
after the setting is finished the symbol (d4-5)

Instructions for use and connection 47
goes off and the display (d4-6) indicates the
correct daily time.
Changing the current daily time
The time of day may be changed at any time
(except in case of activated end of operation
mode (d4-2) is on) by doing the following:
• Touch the selection sensor (4) and select the
current time selection mode ((d4-5) is flashing).
• by means of sensors 4a/4b set the current time
(symbol (d4-5) and the time displayed are
flashing (d4-6))
• after 5 seconds the display indicates (d4-5)
correct current time (symbol (d4-5) goes off).
• in case of power failure shorter than 1 minute,
the current daily time remains unchanged.
Oven illumination
• When the oven is on, the lamp is also on,
regardless of the operation mode.
• If the oven is off, touch the sensor (1) and
select the symbol "Light" (1), then touch the
light ON/OFF sensor (5) turn the lamp on. Next
touch of the ON/OFF sensor turns the lamp off.
Selection and setting of oven
temperature
After selecting the type of food and oven function
mode, by pressing the sensors (3a/3b) you may
select the desired oven temperature in the range
from 30 – 250°C (depending upon the selected
operation mode) in 5°C intervals.
During the operation, oven temperature may
be randomly increased or decreased within
the permitted temperature range (see chart)
by pressing the sensors (3a/3b).
Table of data for operation mode (with a sensor 2)
Operation mode
Preset
temperature (°C)
200 160 200 170 250 160 160 150 -
Preset time
(h/min)
---------
Possibillity of max.
set temperature (°C)
250 250 250 250 250 220 220 200 -
Oven thermostat signal lamp (d3-2)
• Signal lamp is on; oven temparture is below the
setting and the oven is heating.
• Signal lamp is off; the temperature in the oven has
reached the set temperature.
• Signal lamp is flashing regularly; the oven is set to
the end of operation mode with the adequate
sensor (d4-2); the preparation of food has not
started as yet (the appliance automatically
computes the relevant moment of starting the
oven operation).
Setting the operation time
• The time of oven operation may be selected in the
range from 0 to 6 hours, in 1 minute intervals.
• After selecting the function mode and the
temperature, by pressing the sensor 4 you may now
select the operation time from 0 to 6 hours, in 1
minute intervals.
• Touch the selection sensor (4), the display
(d4-1) starts flashing. By touching sensors (4a/4b)
set the desired operation time.
• Turn the oven on with the ON/OFF sensor (5).
• When the set time has elapsed, the oven is
switched off (signalled by the beep, oven operation
time symbol (d4-1) and the relevant signal lamp
(5a) are flashing).
• By touching any sensor (except the ON/OFF sensor
(5), which turns the sound signal off and switches
the oven on) you may switch the sound signal off,
otherwise it is turned off automatically after 7
minutes.
Oven operation time may be changed during
the operation.
Setting the end of operation time
• This function is used when you wish to select
the end of operation (cooked food) at exactly
the pre-selected time.
• The function may be used only with previously
set time of operation ((d4-1) is on).
• By touching the selection sensor (4) symbol
(d4-2) flashes, and the display (d4-6) flashes
the sum of daily current time and the oven
operation time. Use the sensor (4a) to set the
desired end of oven operation.
• Switch the oven on with the ON/OFF sensor
(5). The appliance awaits the start of operation
(oven thermostat signal lamp symbol flashes
regularly (d3-2), oven operation time symbol is
on (d4-1) and end of operation time symbol
(d4-2) is also on.
• The starting time is now defined automatically.
At the moment the oven starts the operation,
the end of operation symbol (d4-2) goes off,
oven illumination is on, and the oven thermostat
signal lamp (d3-2) is on until the set
temperature is reached.

Instructions for use and connection
48
• Eventual immediate start of operation may be
provoked by simultaneous pressing of sensors
(4a/4b) (for approximately 5 seconds).
(1)
(1a)
(2a)
(2)
(3a) (4a)
(5a)
(3b) (4b) (5)
(d4-3)
(d3-1)
(4)
(d6)
(d1) (d2)
(d4-6)
(d4-6a) (d4-6b)
(d4-5)
(d4-1)
(d4-4)(d4-2)
(d3-2)
Alarm timer
This function may be applied separately, and is not in
connection with the oven operation. It is use whenever
you wish to be warned at a pre-selected time.
• By touching the selection sensor (4) provoke
flashing of the alarm timer symbol (d4-4) (the
display (d4-6) flashes "»00:00«). Set the desired
time with sensors (4a/4b) in the range from 0 to 99
minutes in 1 minute intervals. The countdown starts
after approximately 5 seconds, the alarm timer
symbol (d4-4) is on, the display (d4-6) indicates the
current time.
• By touching the selection sensor (4) you may check
and correct the remaining time, indicated on the
display (d4-6).
• By simultaneous pressing of sensors (4a/4b)
(approximately 5 seconds) the remaining time may
also be set to »00:00«.
Safety sensor block
This function is activated in case you may wish to
block the oven operation control (safety of
children).
• It is activated by simultaneous pressing of food
selection sensor (1) and the function mode
sensor (2) for approximately 5 seconds.
• The blocked operation symbol is on (d6).
• Blockage may be removed by consequent
pressing of both sensors (the blocked operation
symbol (d6) goes off).
• By pressing the ON/OFF (5) sensor the oven
may be switched off at any time, despite the
activated blockage of operation.
Programmed roasting with the meat
probe
This function mode requires the setting of the
temperature to be developed within the center of
meat chunk. The setting range is between 30 and
99 °C. The temperature is controlled by the meat
probe.
Connection of the probe
Insert the meat probe plug into the socket and
stick the probe into the meat. The socket is
located in the upper front left side of the oven. It
has a metal plug which must be pulled out and
reinserted after roasting.
WARNING
Be careful not to touch the heating element with the
probe during roasting!
This mode of roasting is suitable for appropriately
large chunks of meat, preferably boneless, since the
bones impede the temperature control and yield
incorrect temperature readings. Chicken and rabbits
are not appropriate for meat probe roasting.
Recommended temperatures of meat core
pork roast 85°C
roast beef 80°C
veal roast 75°C
beef fillet 40-50°C
Procedure
• Connect the probe and stick it into the meat.
• Select the appropriate roasting mode by the food
selection sensor (1) or by the function mode sensor
(2). The display (d4-6a) indicates the actual meat
temperature, while the display (d4-6b) indicates the
preset temperature of 80°C. This value may be
changed at any moment by pressing sensors
(4a/4b) in the temperature range between 30 and
99°C in 1°C intervals.
• Switch the oven on with the ON/OFF sensor (5) and
the meat probe starts measuring the core
temperature, which is increasing.
• Once the set temperature of the meat core is
obtained, the oven stops operating, and the sound
signal indicates the end of operation. The beep may
be turned off by touching any of the sensors (except
for the ON/OFF sensor (5), which turns the sound
signal off but switches the oven back on).
• If the oven is not switched off it will switch back
on after some time (when the actual

Instructions for use and connection 49
temperature falls below the preset value). This
way the actual temperature of the food is
maintained.
• Pull the probe from meat and pull the plug from the
socket. The display (d4-6) indicates the actual
current time of day.
Use of meat probe in combination
with the timer functions (for
experienced users)
When using the meat probe you may also set the
operation time or the end of operation, as described
in previous paragraphs. But always remember:
• If you use the preset time operation mode
(d4-1) and set the desired period, the oven will
stop operating when the time elapses, irrelevant of
whether the actual temperature of the food has
reached the preset temperature. Therefore the
preset operation time must always be somewhat
longer that the time necessary for food to reach
the appropriate temperature.
• The same procedure is identical for the end of
operation function mode (d4-2).
• This combination is suggested once the user has
gained certain experience regarding the time
required for particular sort and quantity of food to
be roasted appropriately roasted at a preset
temperature.
• According to these information gained with
experienced use, you may set the oven operation
time (d4-1) somewhat longer than required,
thereby successfully using also the end of
operation mode (d4-2).
Note
With the meat probe connected the display always
indicates the actual and the selected temperature
(except with the oven off, when no function mode is
selected). In case you had already selected the
particular type of food with the food selection sensor
(1) and the preset operation time, the time setting
will be rendered void at the moment of connecting
the probe. This happens also with all other cases.
The time may of course be preset again.
If the oven is off and the meat probe is connected,
the meat probe symbol starts flashing (d4-3) as an
alert that the probe is active.
CAUTION
Use only the meat probe designed for this
particular oven.
(1)
(1a)
(2a)
(2)
(3a) (4a)
(5a)
(3b) (4b) (5)
(d4-3)
(d3-1)
(4)
(d6)
(d1) (d2)
(d4-6)
(d4-6a) (d4-6b)
(d4-5)
(d4-1)
(d4-4)(d4-2)
(d3-2)
The oven may be controlled in two ways
1 By selecting the type of food
2 By selecting the function mode
Switching between the two control
modes
• The oven is off:
− If mode (1) is selected, you may switch to
mode (2) by pressing the sensor (2) twice (if
oven selector is on illumination only, one
touch of the sensor is enough). All settings
relevant to mode 1 are erased.
− Similarly you may switch from mode (2) to
mode (1) (in such cases touch sensor (1)
twice).
• The oven is on:
− Switching is not possible.
− If you still wish to change the function mode,
first switch the oven off by touching the
ON/OFF sensor (5) (signal lamp (5a) is
flashing) and then select the desired function
mode.

Instructions for use and connection
50
Food selection mode
This mode is appropriate for the preparation of
chosen food with automatic setting of mode,
temperature and operation time.
• Touch the food selection sensor and select the
type of food (appropriate symbol and relevant
function mode are lit, as well as the
temperature and operation time)
• Touch the ON/OFF sensor (5) to start the
operation. After the expiry of the set time the
oven is switched off automatically.
• In case of different quantity of food, you may
still use this mode, but you must change the
operation time and the temperature accordingly.
• You may however use the end of operation
function (see »End of oven operation« section).
While the signal lamp (5a) is flashing, you
may change settings at random. If the oven is
not switched on in approximately 15 seconds
after the last touch of any sensor, it will switch
off automatically.
After the oven is switched on (signal lamp 5a
is lit) you may revoke the setting by
consequent touch of the ON/OFF sensor (5)
(signal lamp 5a is flashing) and the oven will
switch off automatically after approximately 5
seconds.
Table of data for selected food (with a sensor 1)
Food type
Pork
chops
whole
Pork
chops
fish
Chicken Pizza Biscuits
and
muffins
Rising of
dough
Raisin
cake
Bread Roast
beef
Defrosting Cleaning
Function mode
Preset
temperature (°C)
195 250 170 200 160 40 160 200 220 - 50
Preset time
(h/min)
1:50 0:25 1:00 0:10 0:25 - 1:00 1:15 1:50 - 0:30
Possibillity of max.
set temperature (°C)
250 250 250 250 250 220 250 250 250 - 220
Weight (in kg) 1 4x0,2 1 1x0,4 3x0,3 - 1,1 1 1 - -
Operation mode selection
This mode is used when you wish to prepare any
unspecific type and quantity of food. You may
select the function mode, oven temperature,
operation time, time when you wish the food to be
ready, or roasting with the meat probe and alarm
timer.
Once the desired function mode is selected,
and other settings regulated, the oven must
be switched on by pressing the ON/OFF
sensor (5) within 15 seconds, otherwise all
settings are rendered void.
The appropriate function mode is selected by
pressing the mode selection sensor (2) (the
display indicates the selected function mode).
Modes of Operation
Heating with bottom heater and hot
air
Using the bottom, round heating elements
and fan is particularly useful for pizzas,
leavened dough fruit cakes,
cheese soufflé and potatoes au gratin.
Use the attached baking dish, a small-size baking
dish or a cake tin.

Instructions for use and connection 51
Fan Assisted Heating
The fan heater and the fan are switched on.
The fan assures uniform circulation of the
hot air in the oven.
• This heating system is useful for baking
biscuits, many small pieces of
meat, the accelerated thawing of frozen foods
and preserving fruits and vegetables (including
drying).
• The oven heats quickly so there is no need to
preheat it. An exception is made for some
cakes, as seen from the table. Food can be
cooked simultaneously on one, two or three
levels.
• If you have to put food in a preheated oven,
wait until the light goes off for the first time.
• You can, of course, use your own cake tins and
smaller tins.
• You can insert two or even three trays in the
oven at the same time (when baking biscuits for
example). This will help you save time and
money.
• Baking temperatures are lower, the loss of
nutritious value of food is reduced, and so is
energy consumption.
Cooking with the Upper and Lower
Heaters
This heating mode can be used for preparing
various foods: meat, bread, cakes, pies or
even preparing whole meals.
• With this heating system you can use only one
level at the same time.
• If you have to put food in the preheated oven,
wait until the red light goes off for the first time.
• You can, of course, use your own cake tins and
smaller tins than the enclosed ones. We
recommend darker pans for baking cakes (for
example, a black enameled tin). Light material
(like white sheet metal) reflects the heat and the
cake may not be baked enough on the lower
side.
• When roasting meat please remember: larger
and thicker pieces of meat should be roasted on
the lower guide at a lower temperature and
smaller and thinner pieces, on the middle guide
at a higher temperature setting.
• Some 5-10 minutes before the baking is finished,
switch the oven off. This will help you save
energy.
• After the roasting is finished, wait for some 5-10
minutes to allow the meat juice to remain in the
meat; then cut it.
• You can prepare frozen meat without thawing it
first. You just have to bear in mind that the
roasting time is longer, depending on the size of
the meat joint.
Cooking with the Infrared Grill and
Fan (Fan-assisted grilling)
The grill and fan are on, thus producing
uniform air circulation which makes this
system perfect for roasting larger joints of
meat (1 kg and more).
• Preheating is not necessary.
• Put the meat (oiled and salted) on an oiled wire
shelf. Place the shelf on level 2 and put the
enameled tray in the lower shelf position to
collect the drippings.
• You can roast more joints at the same time but
only on one level.
• When roasting poultry, turn it over in the middle
of roasting. There is no need to turn over other
kinds of meat.
• After the roasting is finished, wait for some 10
minutes and then cut the meat.
• We recommend at least a partial thawing of
frozen meat before roasting.
Cooking with Infrared Grill (Grilling)
The infrared heater radiates the heat and
grills the food. The heater is situated under
the oven top.
• In case the infrared heater operates in the
temperature range, indicated on the
temperature selector (between 150 – 220°C)
the oven door must be closed..
• At operating temperatures above 220°C the
door must be opened or half opened.
Front panel shield should be inserted between
teh front panel and teh oven in order to protect
teh panel against high temperatures.
Table of contents
Other Gorenje Range manuals
Popular Range manuals by other brands

Plamen
Plamen 850 Glas Technical Instruction

Whirlpool
Whirlpool FGS395Y Use and care

Frigidaire
Frigidaire FFEF4015LWB installation instructions

GE
GE PD900DPBB - Profile 30 in. Drop-In Electric... Dimensions and installation information

GE
GE JB250 owner's manual

Whirlpool
Whirlpool WEG750H0H Installation instructions & manual for maintenance