Gorilla Gym Family Doorway Gym User manual

1
Family Doorway Gym
Owner’s Manual
To ensure safe operation, please review this Owner’s Manual before using
your Gorilla Gym. Save this instruction manual for as long as you own this
product. Include this instruction manual when loading or reselling this
product to others. Use this instruction manual if you need to contact the
manufacturer for any reason.

2
Contents
Important Safety Information
Equipment Warning Label
Parts List
Assembly Instructions
Installation
Distributed by Velex Corporation, 1151 Massachusetts Avenue, Cambridge, MA. 02138 USA.
Gorilla Gym Family Doorway Gym. Copyright 2013.

3
Important Safety Information
Check with your physician before beginning any fitness training, including Gorilla Gym. Serious
injury or death can result from improper use of fitness devices. Follow all warnings and
instructions, including those in the instruction manual.
To minimize risk of death or serious injury, observe the following precautions for all modes of
Gorilla Gym use:
• Follow all instructions given in this manual, and insist that others follow them as well. Do not
alter Gorilla Gym, substitute parts, or use Gorilla Gym for any purpose or in any matter other than
as described in this manual.
• Do not use more than one accessory at a time. Use only Gorilla Gym accessories. Gorilla Gym
is not tested to work with third-party accessories.
• Gorilla Gym is intended for home use only. Do not use Gorilla Gym in public gymnasiums, health
clubs, hotels, or any other non-residential environment.
• Gorilla Gym is intended for indoor use only. Avoid extreme temperatures or conditions that could
weaken or compromise Gorilla Gym’s installation or usage.
• Consult your physician before beginning any exercise program.
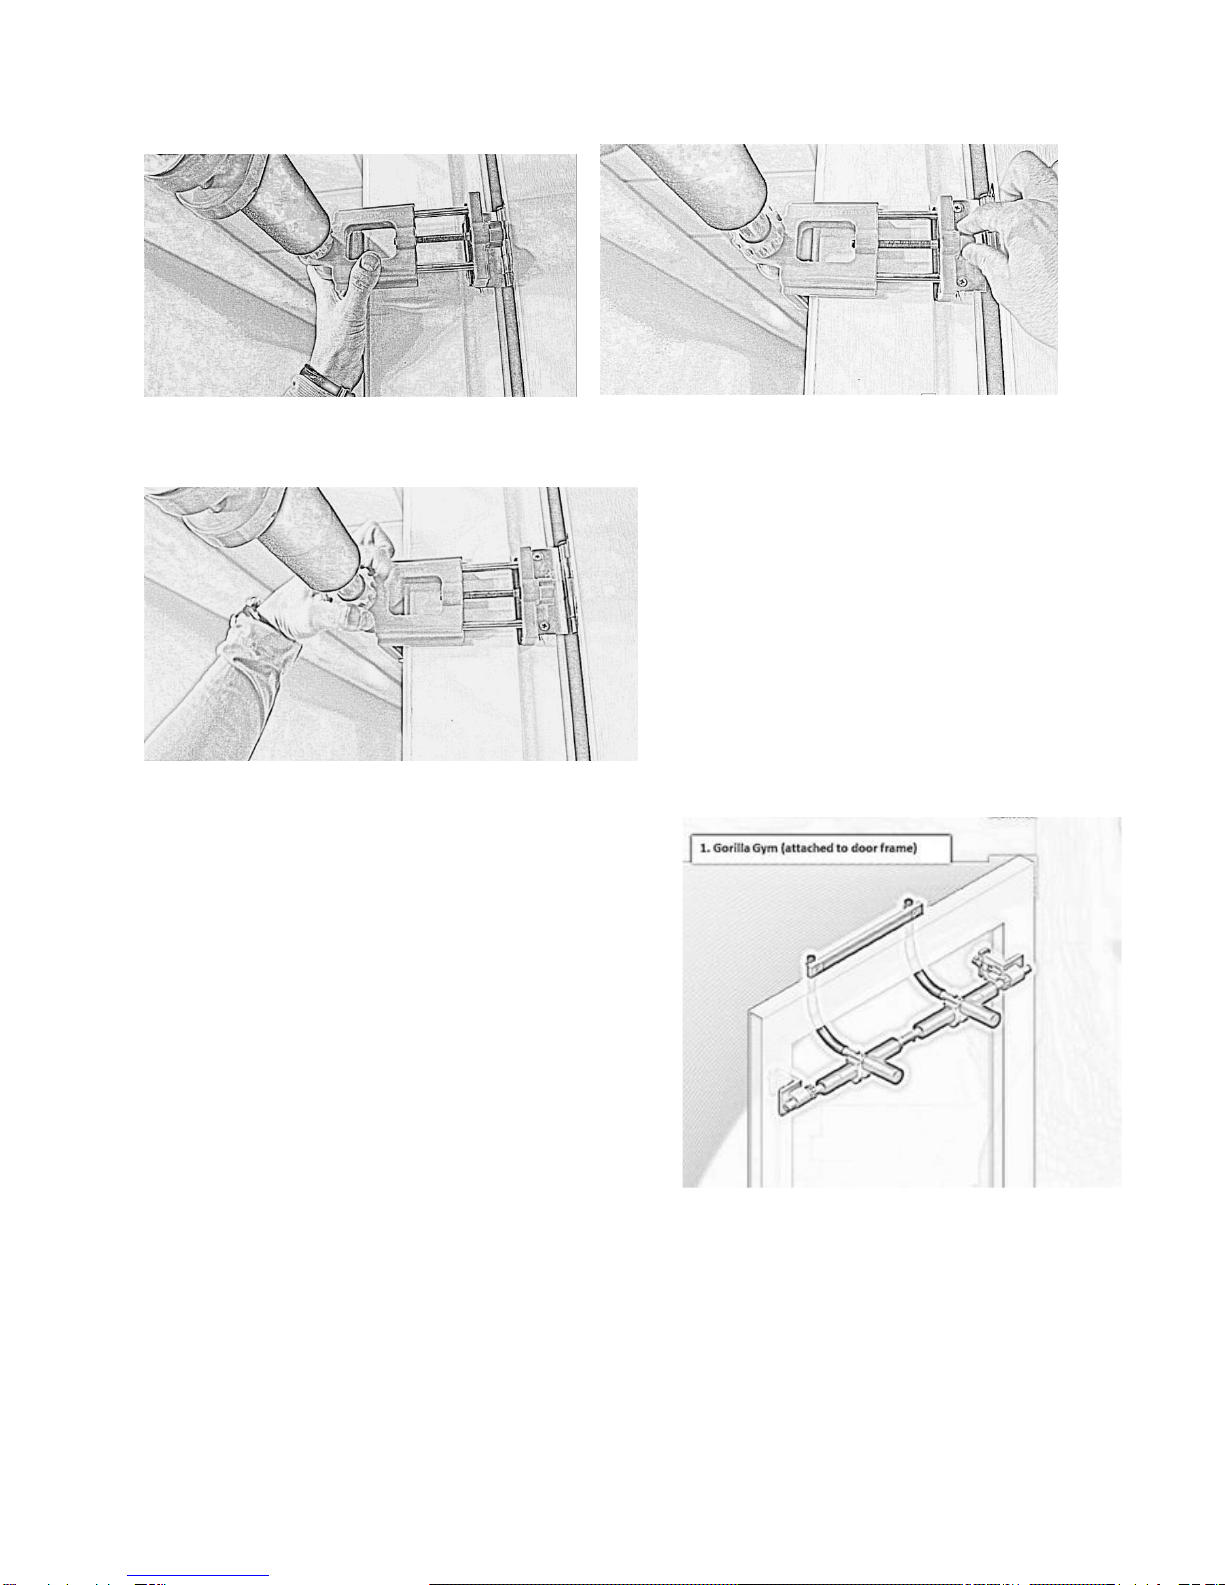
• Do not install or use Gorilla Gym without the safety shim installed and wedged between your
door frame and the fitness plastic bar.
• Do not allow more than one person to use Gorilla Gym, or any of its accessories, at the same
time.
• Every time before starting your exercise or swinging program, have an adult check the Gorilla
Gym platform and mounted door frame for parts that might be loose, damaged, or worn.
Specifically examine the door frame. If any such problems are found, do not use this equipment.
• Reduce your risk of injury by exercising safely with attention to proper techniques and practices
• Observe the weight limits provided in this manual for Gorilla Gym and each accessory. Different
accessories have different weight limits. Do not overload Gorilla Gym or its accessories with
weight beyond the specified amount.
• To avoid property damage, do not over-tighten the vice grip attachments on Gorilla Gym.
• Ask your physician about performing stretching exercises before and after each workout to
prevent muscle injury.
• Before use, review warning labels placed on Gorilla Gym vice grip and its components.
Go to www.gorilla-gym.com or e-mail us at service@gorilla-gym.com should you have questions
about the safety information or if you need a replacement user manual.

4
Parts List
1. Curved Handle Bars (qty 2)
2. Horizontal Plastic Bar (qty 1)
3. Main Support Bar (Left Half)
4. Main Support Bar (Right Half)
5. Gorilla Gym Vice-Grip (qty 2)
6. Vice-Grip Adjuster (qty 2)
7. Vice-Grip Tightener (qty 2)
8. Stabilizer (qty 2)
9. Removable Short Padded Grips (qty 4)
10. Long Bolts (qty 2)
11. Medium Bolts (qty 2)
12. Short bolts (qty 2)
13. Washers (qty 6)
14. Locking Nut (qty 6)
15. End Caps (qty 2)
16. Safety Shim
17. Assembly Tool
18. Medium Thick Bolt (qty 2)
19. Nut with Rubberized Threading (qty 2)

5
Specifications
Fits standard door frames: 24” to 36” wide
Door trim width (see picture): 2 ¾ - 4 ¾ inch
Maximum supported weight (Gorilla Gym): 300 lbs
Maximum supported weight for attachments:
oPullup extender: 240lbs
oAb straps: 200lbs
oFight station: 50lbs
oSwing: 200lbs
oToddler swing: 30lbs
oSwing deluxe: 30lbs

6
Assembly Instructions
CAUTION: Carefully read and understand all of the following directions for proper installation
before you begin.
Tighten nuts and bolts with the enclosed assembly wrench
1) Attach the two Main Support Bar halves (3 and 4)
together with the two Short Bolts (12), washers
(18), and nuts (19).
Match the head square base of the bolt with the
square opening.
2) Attach the two curved bars to the horizontal
plastic bar using the medium bolts (11), washers
(13), nuts (14).
The head square base of each bolt is on the
padded side of the plastic bar.

7
3) Connect the two curved bars (1) to the Main
Support Bar using the Long Bolts (12). The plastic
stabilizers (8) go between the curved bars and the
horizontal support bar. Use the Long Bolts (12) to
connect all three of these surfaces together with the
head square base of the bolt threaded through
underneath so the square hole matches with the
square base of the bolt. Then use the washers (13)
and nuts (14) to finish the attachment connection at
the top. When finished, all the nuts/washer end
points should be facing upward.
4) Connect the two pieces of each Vice-Grip (5) with
the shallower end of the tightener (7) turning onto the
threads of each Vice-Grip. The deeper end of the
tightener should be on the outside.
5) Now you are ready to slide the patented Gorilla
Gym Vise-Grips (5) onto each end of the long
horizontal bar (3 + 4) so that the bar tightener (7)
faces the inside. You can place the removable
padded grips (9) either inside or outside the Vice-
Grips depending on your door frame width.
6) Put the thick bolts (20) through the stabilizers (8)
with the big nut (21) on the inside part. Hand-
tightening the nut is enough and a little extra space
on the thick bolt is okay. Since the nut features
rubberized thread, there is no need to use a wrench
to over-tighten.
5) Once you have assembled your Gorilla Gym,
make sure all the nuts and bolts have been securely
fastened with the enclosed assembly wrench, tighten
wherever necessary.

8
Installation
Gorilla Gym attaches and removes from most standard door frames in seconds but make sure
your door frame and the moldings around it are safe, secure, and solid. If you see any breaks or
weakness in the frame or surrounding moldings, your Gorilla Gym should not be used as serious
injury may result. Once you are sure that the doorway you chose has the correct door moldings
around it, you are ready to install.
1) Place the ‘Safety Shim’ (16) with the sharp
end behind the middle door frame molding on
the same side as the door hinge. Make sure it
is inserted and secure behind the molding. The
Safety Shim helps keep the Gorilla Gym in
place while you secure the Vice-Grips on the
sides of the doorway moldings. (See figure A)
2) Place the bottom of the Gorilla Gym’s plastic
bar (2) into the grasp of the Safety Shim while
moving the Gorilla Gym to rest onto the top of
the door frame. (See fig. B). This allows the
long horizontal bar (3 + 4) to rest momentarily
on the outside of the doorway trim with the
Vice-Grips (5) hanging in between.
3) make sure Vice-grips (5) are open enough. Next guide the open Vice-Grips on both sides to
fully slide flush against the interior door molding trim (See figure C). First on one side, make sure
the Vice grips align with the interior doorway trim. Tighten the Vice-Grips with the Adjuster (6) until
contact is tight with the interior doorway trim. Repeat with the other Vise-Grip on the other side of
doorway. (See Figure D). DO NOT OVERTIGHTEN with the Adjusters (6) as this might damage
your interior doorway trim. After both vise-grips are secured on each side, tighten each vise grip
with the Tightener (7) very well to secure their position on the long horizontal bar. ( See figure E).
IT IS IMPORTANT that you tighten each Vise-Grip so no side-to-side movement by the Vice-Grips
is possible.
Figure A
Figure B

9
Figure C Figure D
Figure E
CHECK: Hold and move around the Gorilla
Gym for any evidence of loose movement and
to make sure the unit is securely installed into
the door frame. If it is loose, recheck your
steps and make sure Vise-grips are correctly
aligned and tighten with the adjustor and
tightener.
Figure F shows how Gorilla Gym should be
mounted properly
There, you are done! It takes less than 5 minutes to assemble the Gorilla Gym and seconds to
install.
Figure F

10
Congratulations on purchasing the Gorilla Gym! Get fit and have fun in the comfort and
convenience of your own home. Install the Gorilla Gym Family Fitness Hub in your own doorway
in seconds without tools or drilling. Our patented Vice-Grips add stability to allow you to perform a
wider variety of exercises with a larger range of motions such as pull-ups, chin-ups, swinging arm,
ab, and shoulder exercises. Add multiple attachments for additional exercises and activities for
men, women, and children such as boxing, yoga, and swinging. Gorilla Gym is an affordable,
compact multi-function home gym designed for busy people who don’t want to fill up their home
with expensive single-function exercise equipment. Compact, lightweight, professional quality
steel frame supports up to 300 pounds (weight limits vary for optional attachments). Gorilla Gym
provides something for everyone in the family.
Gorilla Gym Attachments (sold separately)
Pullup Extender
The pullup extender allows additional space
away from the door plane for taller people
and allows for a wider variety of pull-ups and
positions.
Assembly
Connect each half of the extender bars with
the 2 sets of nuts, bolts, and washers. (See
Figure G)
Installation
Remove the pipe end caps of the Gorilla
Gym’s curved pipes. Align and attach the
two connector pipes into the ends of the
curved Gorilla Gym pipes until the locking
metal buttons snap into place (see figure H).
Figure G
Figure H

11
Check to see that all connections are solid and that nuts, bolts, washers etc. have been tightened
properly. Check to see that the connections are solid by holding, pulling, and swaying the
connected pipes back and forth.
Ab Straps
The Ab Straps allow hang and swing for a complete core workout
Assembly and use
The Ab Straps are hung over the curved handle bars (figure P). To use, insert your arms in the ab
straps with your upper arm (just above the elbow) resting on the ab straps while you hold tightly
the curved bars handles (see figure Q).
Figure P Figure Q
Air Straps
Air Straps allows for an anti-gravity workout
that engages all 11 of your muscle groups.
They attach right onto the stabilizers with a
simple snap of the carbineer. Just adjust to
your desired arm and foot lengths, put your
hands and feet through our patented straps.
You will be airborne and able to perform
multiple non-impact exercises that engage
all muscle groups. Use extreme caution
when doing these cardio intensive exercises
and make sure your doctor has approved
such cardio exercises.

12
Fight Station Attachment
Designed to hold a 50 pound (20 kg) boxing
heavy bag as well as a speed bag
assembly.
Installation
Remove the pipe end caps of the Gorilla
Gym’s curved pipes. Align and attach the
Fight Station Attachment pipes into the ends
of the curved Gorilla Gym pipes until the
locking metal buttons snap into place. (See
Figure J)
Check to see that the connections are solid
by holding, pulling, and swaying the
connected pipes back and forth.
Attach the heavy bag with a carabiner to the
hook at the tip of the fight station (see figure
K).
NOTE: Ensure that the vise grips tighteners
(7) are tightened all the way (see figure E)
Figure I: Fight Station attachment
Figure J
Figure K

13
Swing
Gorilla Gym offers 3 swing attachments (swing, toddler swing, and swing deluxe). See figures M,
N, O.
Figure M: Swing Figure N: Deluxe Swing Figure O: Toddler Swing
Assembly
The swing is attached to the stability blocks (8) and is secured with the tightening pin/bolt (13,14).
See figure L.
Figure L

14
Swings are attached by passing the swing rope through the stability blocks and securing with the
tightening pins/bolts. Some swing attachment may include metal or plastic hooks. These hooks do
not need to go into the stabilizers. They could be left hanging freely.
Trapeze
The trapeze attaches right onto the
stabilizers by taking out the thick bolt and
putting in the rope in place then putting the
thick bolt & nut back in place. Kids can
practice gymnastics or just hang and swing
with their arms.
Rope
Simply swing the rope with the carbineer
side over the main horizontal bar and then
use the carbineer to grab the rope
underneath thus securing the rope. Test the
connection and your child is ready to
practice climbing, swinging, and playing
jungle indoors.
Rings
The rings attach right onto the stabilizers by
taking out the thick bolt and putting in the
rope in place then putting the thick bolt &
nut back in place. Your kids are ready to
start with some fun gymnastics.
Ladder
The ladder attaches right onto the
stabilizers by taking out the thick bolt and
putting in the rope in place then putting the
thick bolt & nut back in place. Now your kids
are ready to climb around and have fun
indoors.

15
Yoga Swing
The Yoga Swing attaches right onto the stabilizers by taking out the thick bolt and putting in the
metal hooks in place then putting the thick bolt & nut back in place. Now you have support and
motion to enable you to deepen your poses.
Other Gorilla Gym Attachments
Refer to the specific installation instructions enclosed with attachment.

16
Distributed by Velex Corporation, 1151 Massachusetts Avenue, Cambridge, MA. 02138 USA.
Gorilla Gym Family Doorway Gym. Copyright 2013.
Tel. 617-600-7615 www.Gorilla-Gym.com Service@Gorilla-Gym.com
Table of contents
Other Gorilla Gym Home Gym manuals