manuals.online logo
Brands
  1. Home
  2. •
  3. Brands
  4. •
  5. Gotharman
  6. •
  7. Music Equipment
  8. •
  9. Gotharman Anamono X Technical manual

Gotharman Anamono X Technical manual

Gotharman’s anAmoNo X
Modular Synthesizer
Update Manual v6.16
Compability with VCF8 Dual Band SSI Filter
Import Multiple Samplings From Directory As one sampling with Chop
points function
Sample slot select via keyboard splits
Sample playback and chop engine has been optimized
Filter Boost parameter
Controller tracks outputs MIDI CC 1 to 127
Text made more light on some pages
Delete samples/presets progress shown on LED’s
Bug Fixes
Compability with the new VCF8 –Dual Band SSI Filter
After installing this update, it is possible to select the VCF8, Dual Band SSI Filter, in
the filter settings menu, and the parameters of this filter will be shown on the
analog filter pages.
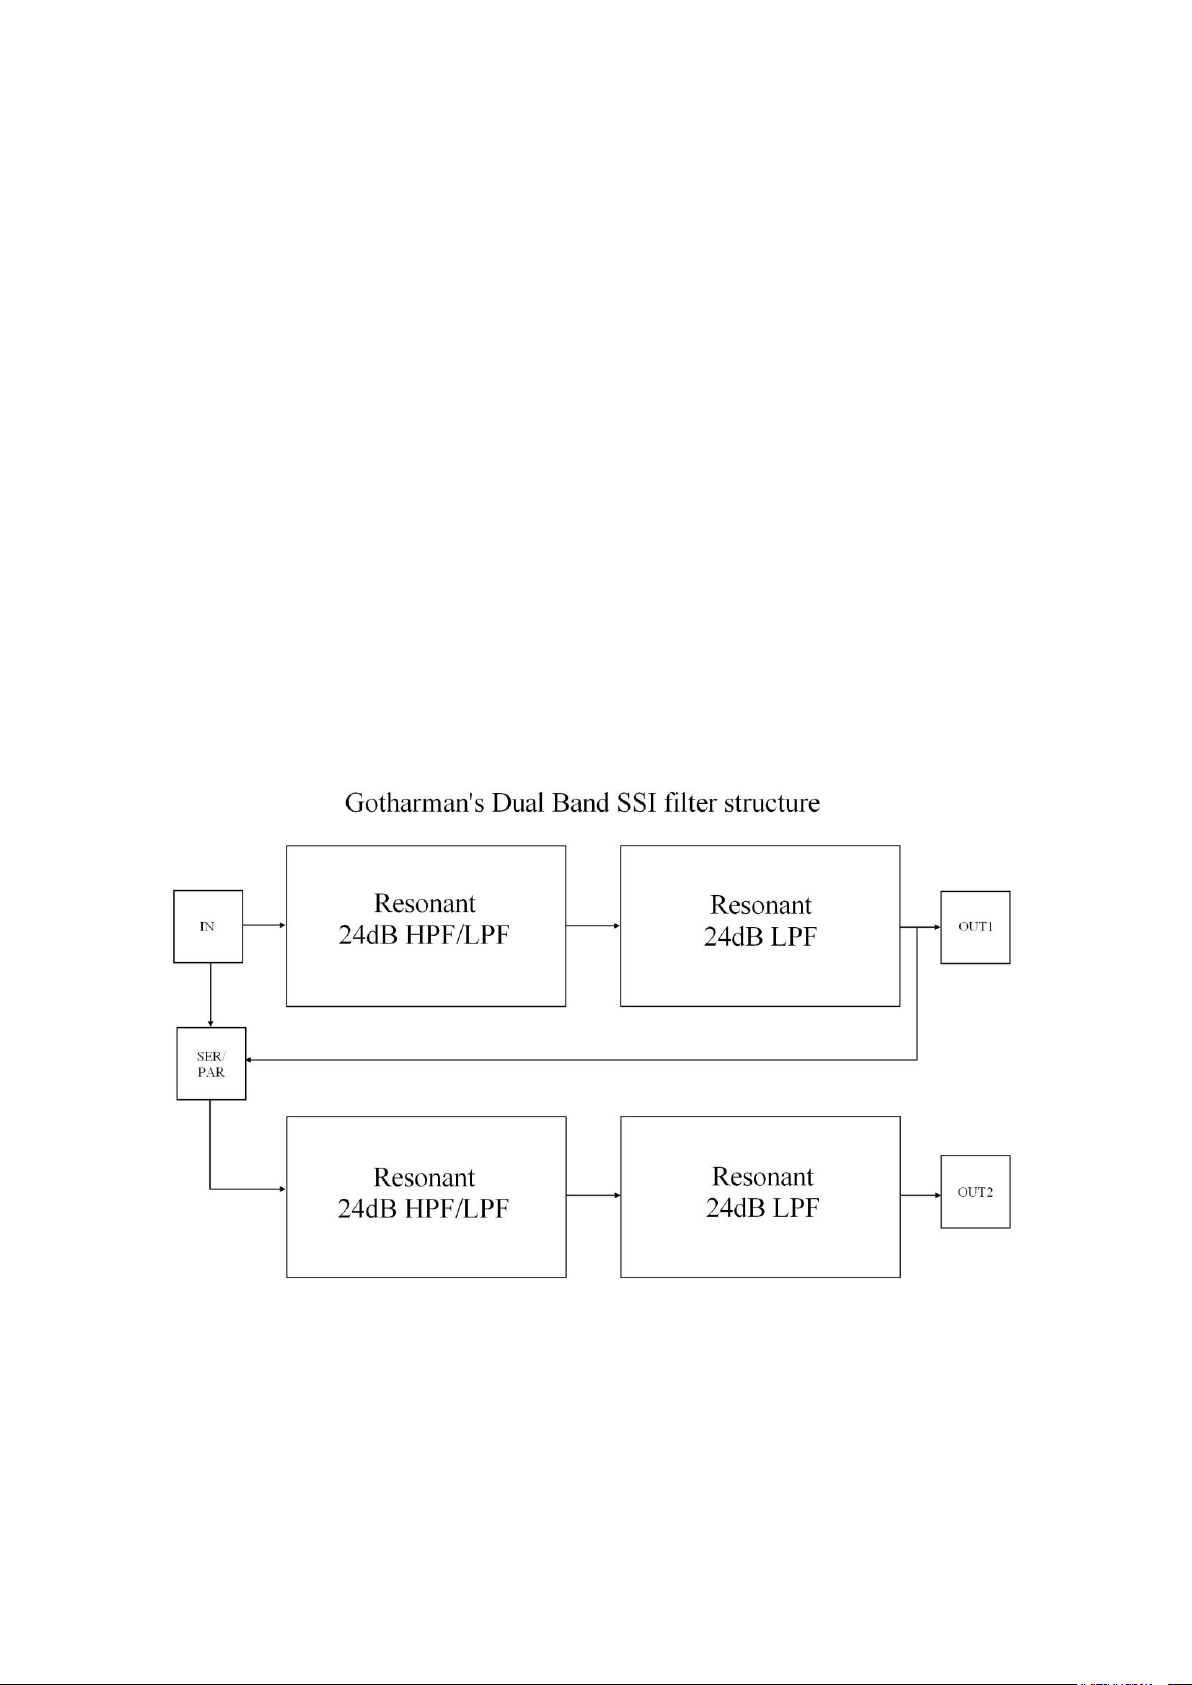
This filter has four analog 24dB resonant filters, two that are switchable between HPF
and LPF modes and two that are always in LPF mode. This gives four resonant peaks
in total, and makes this filter ideal for formant sounds. It is also great for bass sounds
and a lot of other sounds. It is based on a bunch of the new great SSI2144 filter chip.
It is organized as two chains of HPF/LPF + LPF in series. The two chains can be
connected in parallel or serial to each other, and they output to each of their filter
output.
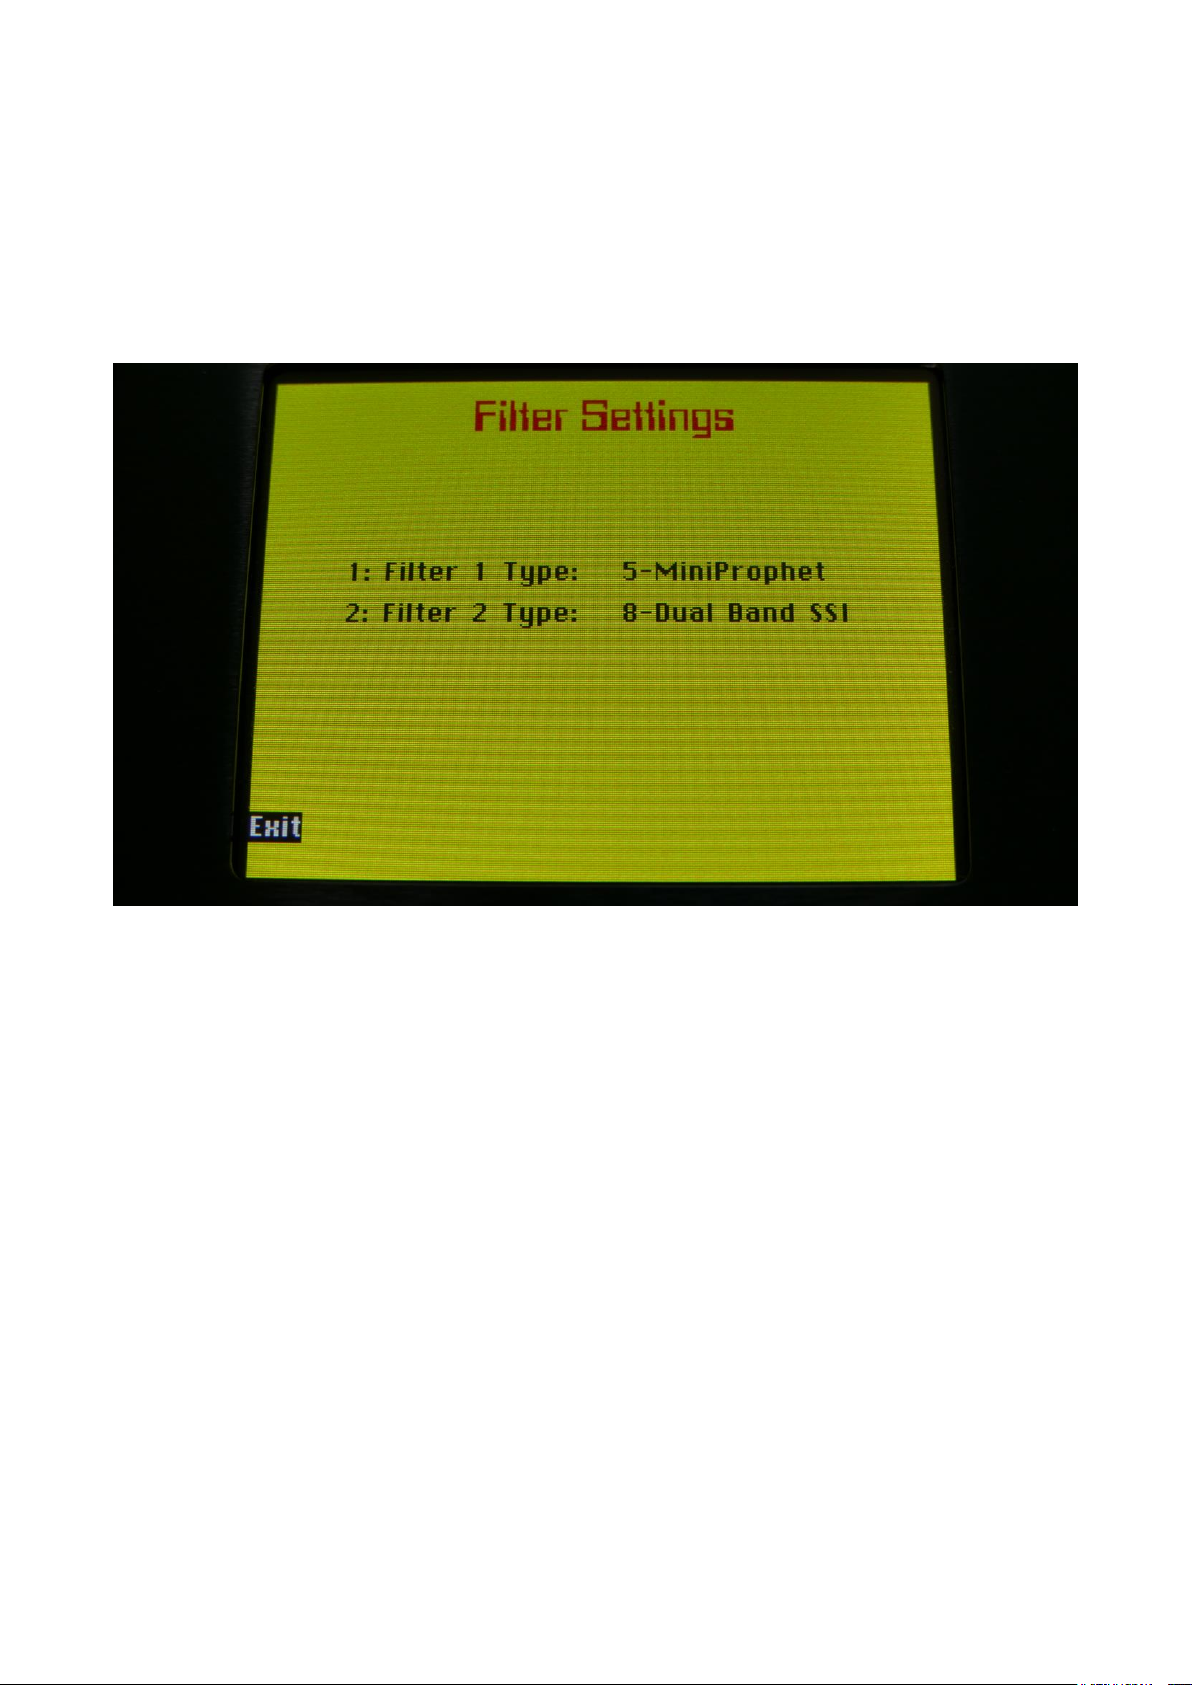
After you have installed this filter, you must set it up in the menu's, in order to make
it work properly.
Go to "More..>Common>Filter Settings", and set either filter 1 or 2 to: 8-Dual Band
SSI, depending on in which filter slot you installed it:
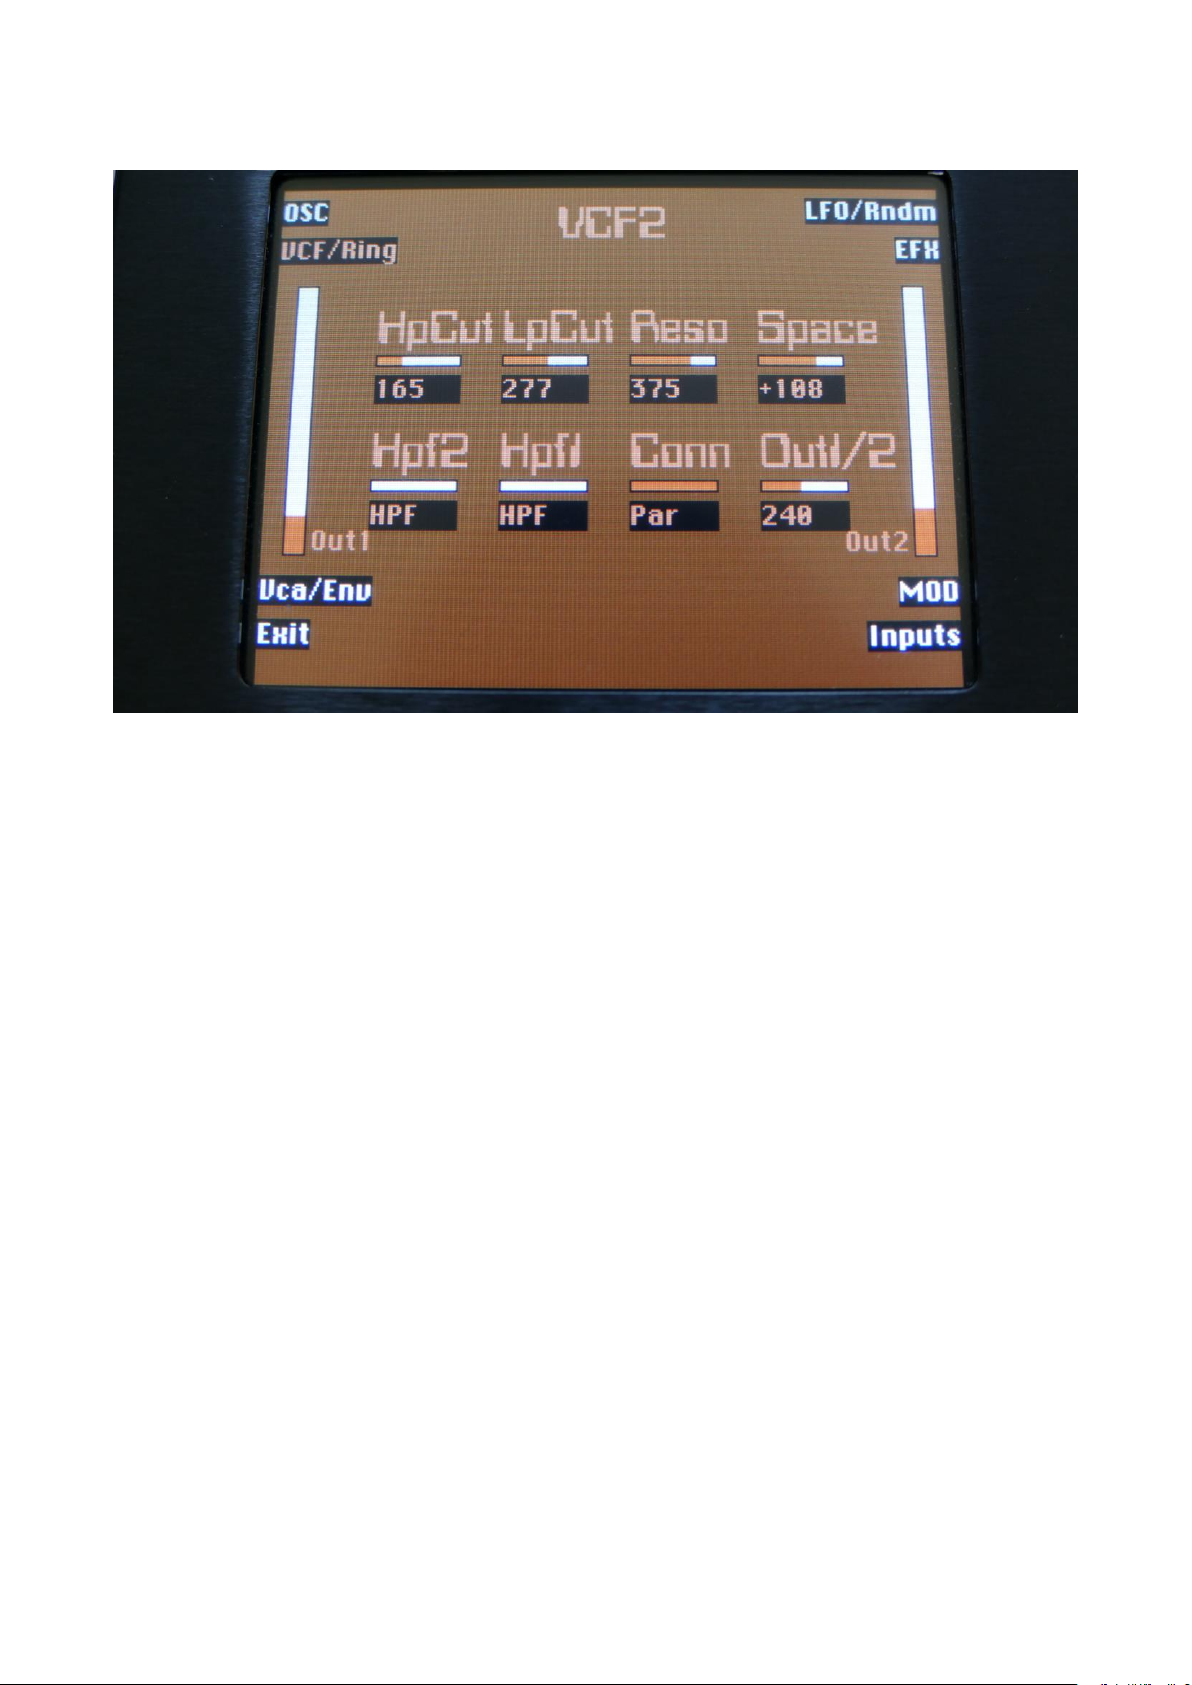
Parameters:
HpCut: HPF/LPF 1 and 2 filter cutoff frequency. Space between the 2 filters can be
adjusted with Space.
LpCut: LPF 1 and 2 filter cutoff frequency. Space between the 2 filters can be
adjusted with Space.
Reso: Filter resonance of all 4 filters.
Space: Space between the cutoff frequencies of the two filter chains.
HPF2: HPF2 filter mode HPF or LPF.
HPF1: HPF1 filter mode HPF or LPF.
Conn: Connection of the 2 filter chains. Ser (serial) or Par (parallel).
Out1/2: Mix between filter output 1 (HPF/LPF + LPF chain 1) and filter output 2
(HPF/LPF + LPF chain 2).
Import Multiple Samplings From Directory As one sampling with Chop
points function
This new function will make it easier than ever, to get more than 476 samplings into
your Anamono X! Without splicing samples on a computer!
On your computer:
Make a directory (or folder) on an Anamono X compatible USB drive. Name the
directory with the name, that you want the sampling to have. Copy any single
samplings you would like this sampling to contain, into the directory. Max 64
samplings.
Create multiple such directories, if desired.
Unmount the USB drive from your computer, and insert it in the Anamono X USB
port.
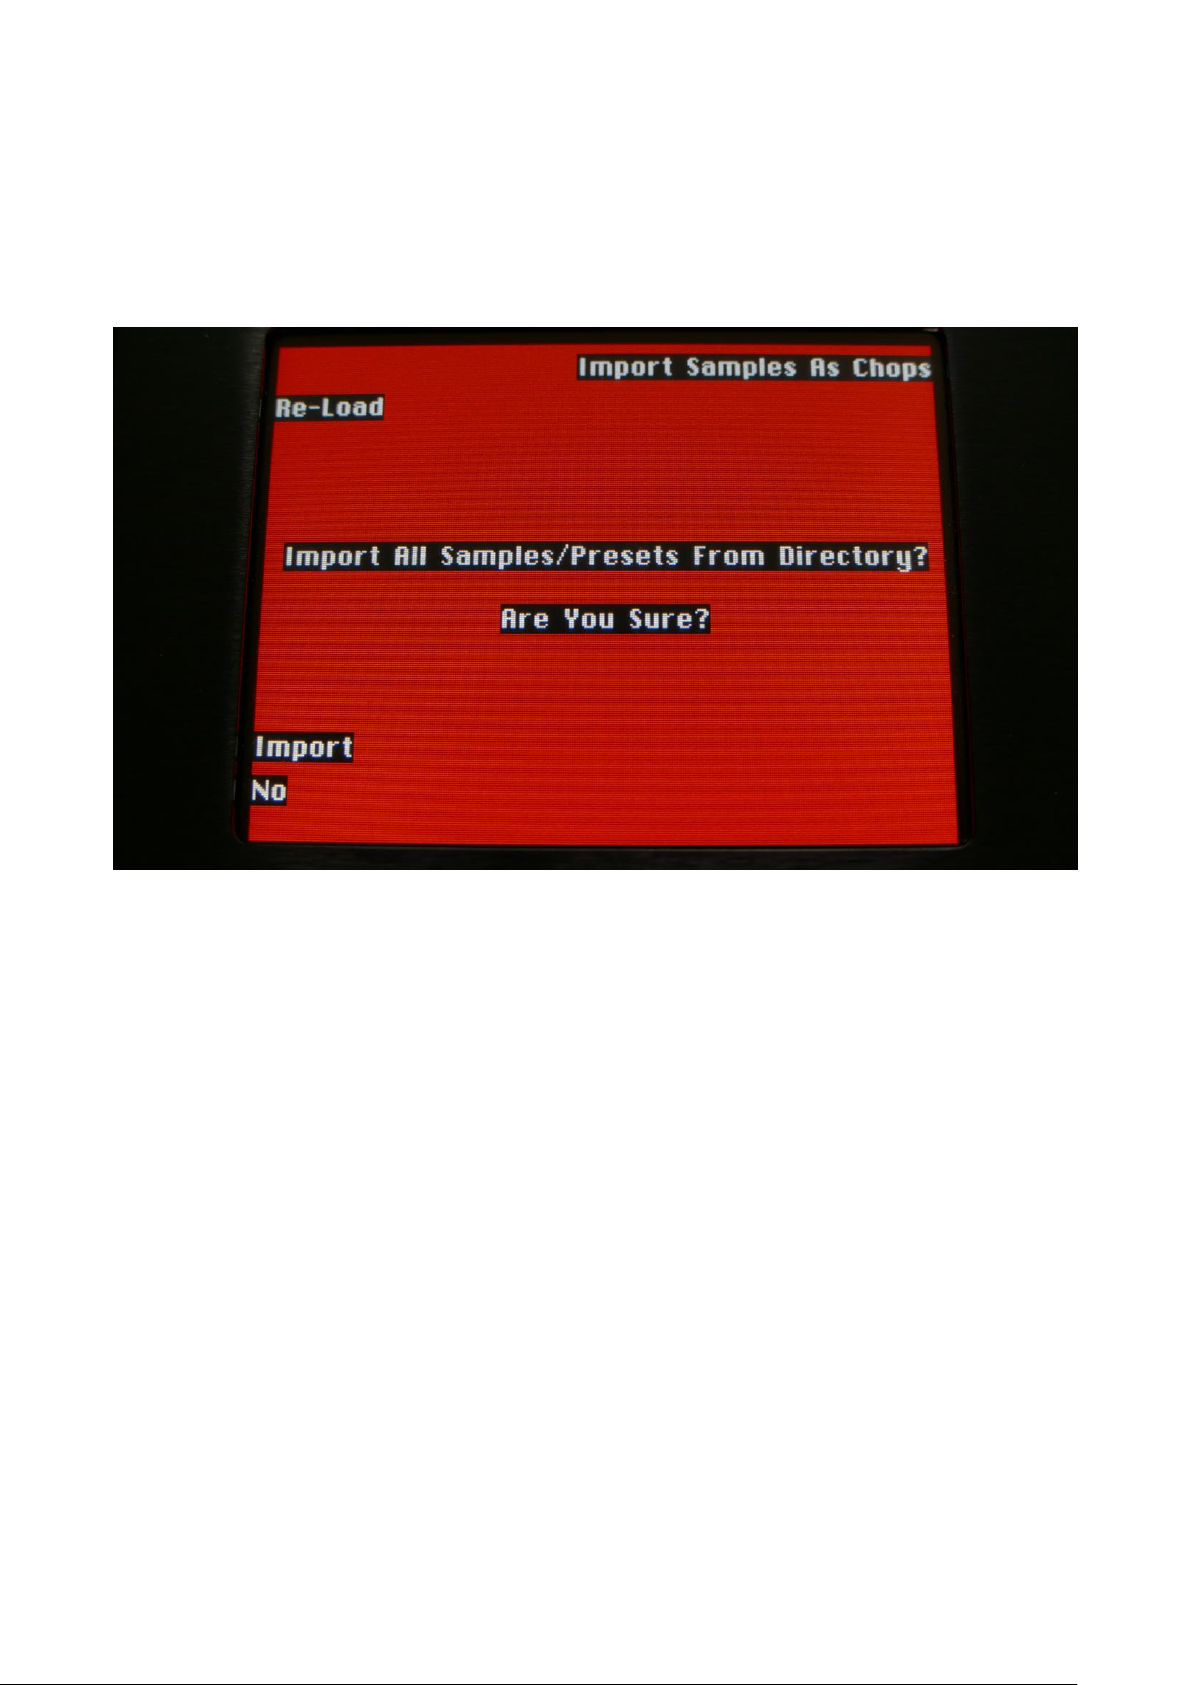
Enter the USB menu, select the directory you just created, and push “Import”.
This screen will now show:
Push “Import Samples As Chops”.
Anamono X will now create one sampling from all of the samplings in the selected
directory, and insert a chop point at the start point of each sampling.
After the import is done, go to the sample rec page, select the sampling you just
imported (named from the directory name), and enter the Chop edit page. You will
now be able to hear each of the samplings, by selecting chops.
On the synth sampler pages, the procedure is the same. Select the sampling, and
select the chop point. Modulate the chop point selection, to create great variation.
I have found this function especially useful, when working with acoustic drum
samplings. There are many acoustic drum sample packs on the net, that has
different variations of the same drum sound. Put all the variations of a sound in one
directory, import as chops, and modulate the chop selection with velocity, random
or any other modulation source, to make some great dynamic acoustic drum beats.
Sample slot select via keyboard splits
Each synth sampler has 4 sample slots, that can each play back their own sampling,
and that has their own settings for Tune, Start, Length and Chop point.
To select which slot should play back, is possible by manual selection, by making a
trigger select a specific slot, and by any modulation source.
Now it is also possible, using keyboard splits!
Set up some triggers, to trig each of their synth sampler, for instance trigger 1 to
sampler 1, trigger 2 to sampler 2 and so on…
In the Trigger>MIDI setup, set up a key range of at least 4 keys for each trigger.
IMPORTANT: The trigger MIDI transpose parameter MUST be set to +0. If not, the
key range of the trigger will be transposed, and it can be a bit hard to figure out
which keys selects what sample slots.
On the synth sampler pages, select different samplings for each of the 4 slots, of
each of the 5 samplers.
On the Sample Select page of each sampler, turn Edit Knob 2 fully up, to select
“Kybd Split”as the Slot Select source:
By playing a connected MIDI keyboard, you will now be able to make Anamono X
play back the different samplings selected in the slots, by hitting different keys.
The logic of the key splits:
-If the trigger you are using has a keyrange that is dividable by 4, each sample slot
will have an equal number of keys. I.e. if the keyrange is one octave (12 keys), each
slot will have 3 keys.
-If the trigger you are using has a key range, that is NOT dividable by 4, most keys
will be assigned to slot 4. I.e. if the key range is 7 keys, slot 1, 2 and 3 will have each
1 key, and slot 4 will have 3 keys.
If you need to adjust the tuning of the samplings, please use the “Tune”and “Fine”
parameters on the synth sampler pages. DO NOT use the trigger MIDI transpose
setting, since this will just transpose the key range, and not the samplings.
Sample playback and chop engine has been optimized
Sometimes, especially when working with shorter samplings, the sample playback
and the chop system became unstable. This could sometimes lead to interesting
results, but most of the time it was just plain annoying.
Therefore the sample playback and chop system has now been completely
redesigned for maximum performance and precision.
Because of this, you might have to redo your chop points.
Filter Boost parameter
A Filter Boost parameter has now been added to the analog filter pages. The range
of this is -128 to +383, with +0 being the neutral and initialized setting.
The new analog filter boards, SP Filter, Tubaz and SSI Filter, has a rather big variation
in the output level, according to the setting of the Reso parameter. With the Boost
parameter, it is possible to compensate for this. It is, of course, also possible to use
this, just for adding a slight overdrive to the filter sound.
Controller tracks outputs MIDI CC 1 to 127
For some odd reason, I got the maximum CC number that a controller track could
transmit, set to 63, when designing Anamono X. This has now been changed, so
each of the 16 controller tracks can be set to output MIDI CC 1 to 127.
Text made more light on some pages
On the Oscillator and LFO pages, the text of the parameter values was pretty dark,
which made it hard to read. This has now been changed to lighter colours, so it is
easier to read.
Delete samples/presets progress shown on LED’s
When deleting one sampling, all samples in a bank or all presets, a LED just turned
on in the previous firmware versions.
Now the progress is shown on the push button LED’s.
LED 1 to 4 shows the progress of the erasing of the data. These will turn on and off
in a loop, until all the selected data has been erased.
LED 5 to 8 shows the progress of the finishing of the process, and will only light one
time each.
Bug fixes:
With sample memory full, erasing or exporting the last sampling in a bank, would
under certain conditions, make Anamono X freeze. This has now been fixed.
Sample loop does now work with sample chops.
Sometimes when exporting multiple samplings, the USB drive would issue a “Bad
Command”, and the system would halt. Anamono X can now handle this, and will
continue the export after such a fault.
By:
Flemming Christensen
Gotharman
August 2017

Other Gotharman Music Equipment manuals

Gotharman MiniProphet User manual

Gotharman

Gotharman MiniProphet User manual

Gotharman Little deFormer 3 Technical manual

Gotharman

Gotharman Little deFormer 3 Technical manual

Gotharman zaTurn Technical manual

Gotharman

Gotharman zaTurn Technical manual

Gotharman Note Randomizer mkII User manual

Gotharman

Gotharman Note Randomizer mkII User manual

Gotharman TubaZ User manual

Gotharman

Gotharman TubaZ User manual

Gotharman Little deFormer 3 Technical manual

Gotharman

Gotharman Little deFormer 3 Technical manual

Popular Music Equipment manuals by other brands

Schatten Design HFN Artist installation instructions

Schatten Design

Schatten Design HFN Artist installation instructions

API Select T25 Operator's manual

API Select

API Select T25 Operator's manual

Millennia HV-32P user guide

Millennia

Millennia HV-32P user guide

Mooer SynthDrum owner's manual

Mooer

Mooer SynthDrum owner's manual

EMG 35-TW Installation information

EMG

EMG 35-TW Installation information

Velleman K4401 Illustrated assembly manual

Velleman

Velleman K4401 Illustrated assembly manual

Subdecay StarLight DLX user guide

Subdecay

Subdecay StarLight DLX user guide

JK Audio Universal Host user guide

JK Audio

JK Audio Universal Host user guide

Behringer Virtualizer Pro DSP2024P user manual

Behringer

Behringer Virtualizer Pro DSP2024P user manual

Radial Engineering CLASSIC TRIMODE TONEBONE owner's manual

Radial Engineering

Radial Engineering CLASSIC TRIMODE TONEBONE owner's manual

Mesa/Boogie SUBWAY D-350 owner's manual

Mesa/Boogie

Mesa/Boogie SUBWAY D-350 owner's manual

KAM ZP10 instruction manual

KAM

KAM ZP10 instruction manual

Radial Engineering JD7 Injector owner's manual

Radial Engineering

Radial Engineering JD7 Injector owner's manual

Medeli PTED05 How to use

Medeli

Medeli PTED05 How to use

Peavey 800 Booster Specifications

Peavey

Peavey 800 Booster Specifications

Robaux Lil Eight II user manual

Robaux

Robaux Lil Eight II user manual

Cammino H 3.1 instruction manual

Cammino

Cammino H 3.1 instruction manual

RMI Acouswitch IQ DI user manual

RMI

RMI Acouswitch IQ DI user manual

manuals.online logo
manuals.online logoBrands
  • About & Mission
  • Contact us
  • Privacy Policy
  • Terms and Conditions

Copyright 2025 Manuals.Online. All Rights Reserved.