Gram IOP 20686-94 X User manual

(EN) INSTRUCTION MANUAL
Type
IOP 20686-94 X

2
DEAR CUSTOMER,
The oven is exceptionally easy to use and extremely ecient. After reading the instruction
manual, operating the oven will be easy.
Before being packaged and leaving the manufacturer, the oven was thoroughly checked with
regard to safety and functionality.
Before using the appliance, please read the instruction manual carefully.
By following these instructions carefully you will be able to avoid any problems in using the
appliance.
It is important to keep the instruction manual and store it in a safe place so that it can be
consulted at any time.
It is necessary to follow the instructions in the manual carefully in order to avoid possible
accidents.
Caution!
Do not use the oven until you have read this instruction manual.
The oven is intended for household use only.
The manufacturer reserves the right to introduce changes which do not aect the
operation of the appliance.

3
TABLE OF CONTENTS
Safety instructions ............................................................................................................. 4
Description of the appliance ............................................................................................. 8
Installation......................................................................................................................... 10
Operation........................................................................................................................... 12
Baking in the oven – practical hints ............................................................................... 31
Test dishes...........................................................................................................................33
Cleaning and maintenance.............................................................................................. 35
Technical data................................................................................................................... 41

4
SAFETY INSTRUCTIONS
Warning: The appliance and its accessible parts become hot
during use. Care should be taken to avoid touching heating
elements. Children less than 8 years of age shall be kept
away unless continuously supervised.
This appliance can be used by children aged from 8 years
and above and persons with reduced physical, sensory or
mental capabilities or lack of experience and knowledge if
they have been given supervision or instruction concerning
use of the appliance in a safe way and understand the ha-
zards involved. Children shall not play with the appliance.
Cleaning and user maintenance shall not be made by chil-
dren without supervision.
During use the appliance becomes hot. Care should be taken
to avoid touching heating elements inside the oven.
Accessible parts may become hot during use. Young children
should be kept away.
Warning: Do not use harsh abrasive cleaners or sharp metal
scrapers to clean the oven door glass since they can scratch
the surface, which may result in shattering of the glass.
Warning: Ensure that the appliance is switched o before re-
placing the lamp to avoid the possibillity of electric shock.
You should not use steam cleaning devices to clean the
appliance.

5
SAFETY INSTRUCTIONS
● Ensure that small items of household equipment, including connection leads, do
not touch the hot oven as the insulation material of this equipment is usually not
resistant to high temperatures.
● Do not leave the oven unattended when frying. Oils and fats may catch re due
to overheating or boiling over.
● Do not put pans weighing over 15 kg on the opened door of the oven.
● Do not use harsh cleaning agents or sharp metal objects to clean the door as they
can scratch the surface, which could then result in the glass cracking.
● Do not use the oven in the event of a technical fault. Any faults must be xed by
an appropriately qualied and authorised person.
● In the event of any incident caused by a technical fault, disconnect the power and
report the fault to the service centre to be repaired.
● The rules and provisions contained in this instruction manual should be strictly
observed. Do not allow anybody who is not familiar with the contents of this instruc-
tion manual to operate the oven.
● The appliance has been designed only for cooking. Any other use (for example
for heating) does not comply with its operating prole and may cause danger.
Danger of burns! Hot steam may escape when you open the
oven door. Be careful when you open the oven door during
or after cooking. Do NOT lean over the door when you open
it. Please note that depending on the temperature the steam
can be invisible.

6
Using energy in a respon-
sible way not only saves
money but also helps the
environment. So let’s save
energy! And this is how you
can do it:
Do not uncover the pan too often
(a watched pot never boils!).
Do not open the oven door unnecessarily
often.
Only use the oven when cooking larger
dishes.
Meat of up to 1 kg can be prepared more
economically in a pan on the cooker hob.
Make use of residual heat from the
oven.
If the cooking time is greater than 40 minutes
switch o the oven 10 minutes before the
end time.
Important! When using the timer,
set appropriately shorter cooking
times according to the dish being
prepared.
Make sure the oven door is properly
closed.
Heat can leak through spillages on the door
seals. Clean up any spillages immediately.
Do not install the cooker in the direct
vicinity of refrigerators/freezers.
Otherwise energy consumption increases
unnecessarily.
HOW TO SAVE ENERGY

7
During transportation, protec-
tive packaging was used to
protect the appliance against
any damage. After unpack-
ing, please dispose of all
elements of packaging in a
way that will not cause dam-
age to the environment.
All materials used for packaging the appli-
ance are environmentally friendly; they are
100% recyclable and are marked with the
appropriate symbol.
Caution! During unpacking, the packag-
ing materials (polythene bags, polystyrene
pieces, etc.) should be kept out of reach of
children.
UNPACKING DISPOSAL OF THE APPLIANCE
Old appliances should not sim-
ply be disposed of with normal
household waste, but should
be delivered to a collection and
recycling centre for electric and
electronic equipment. A symbol
shown on the product, the in-
struction manual or the packag-
ing shows that it is suitable for recycling.
Materials used inside the appliance are
recyclable and are labelled with information
concerning this. By recycling materials or
other parts from used devices you are making
a signicant contribution to the protection of
our environment.
Information on appropriate disposal centres
for used devices can be provided by your
local authority.

8
DESCRIPTION OF THE APPLIANCE
Door Handle oven
Control panel
Oven functions
Touch controls
Temperature
Active functions
On/O switch
Time display
Text messages
Touch controls

9
SPECIFICATIONS OF THE APPLIANCE
Cooker ttings:
Sideracks
Grill grate
(drying rack)
Roasting tray
Baking tray
Meat probe

10
Installing the oven
The kitchen area should be dry and aired
and equipped with ecient ventillation.
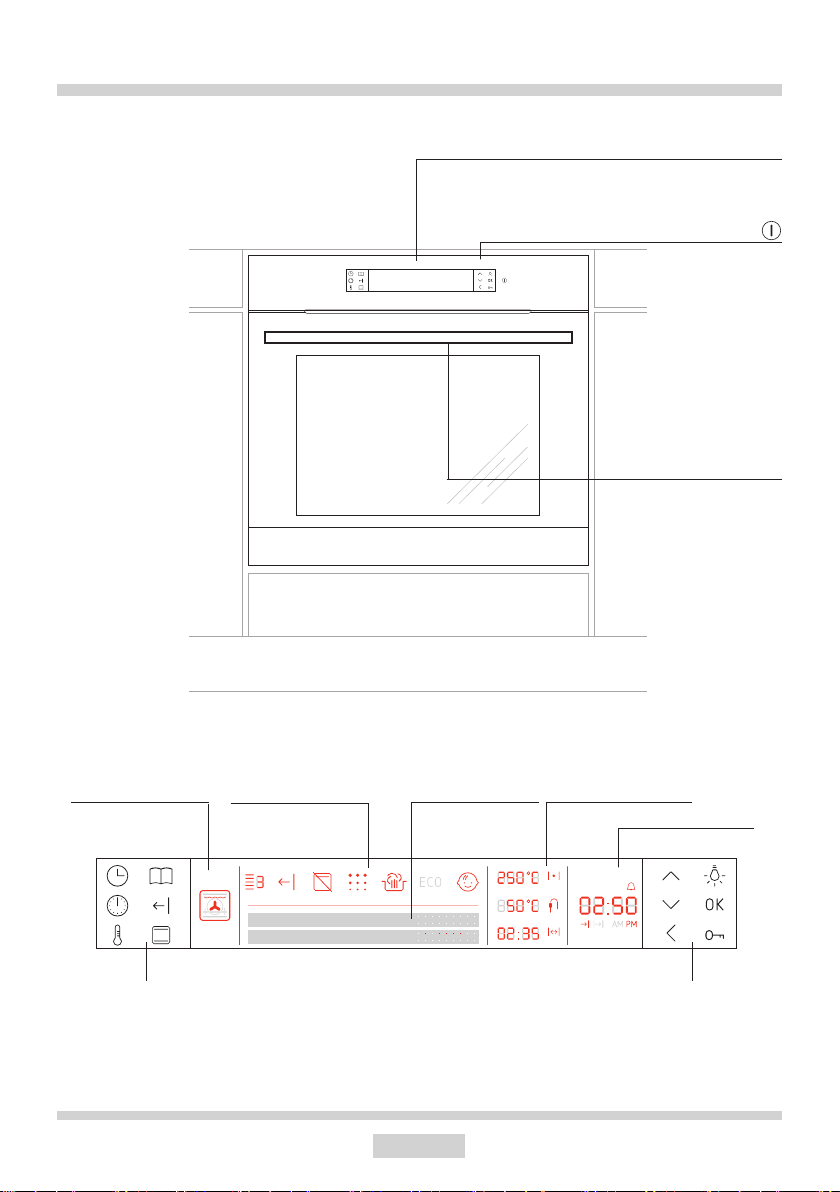
When installing the oven, easy access to
all control elements should be ensured.
This is a Y–type design built–in oven,
which means that its back wall and one
side wall can be placed next to a high
piece of furniture or a wall. Coating or
veneer used on tted furniture must be
applied with a heat–resistant adhesive
(100°C). This prevents surface deforma-
tion or detachment of the coating.
Hoods should be installed according to
the manufacturer’s instructions.
Make an opening with the dimensions
given in the diagram for the oven to be
tted.
Make sure the mains plug is disconnected
and then connect the oven to the mains
supply.
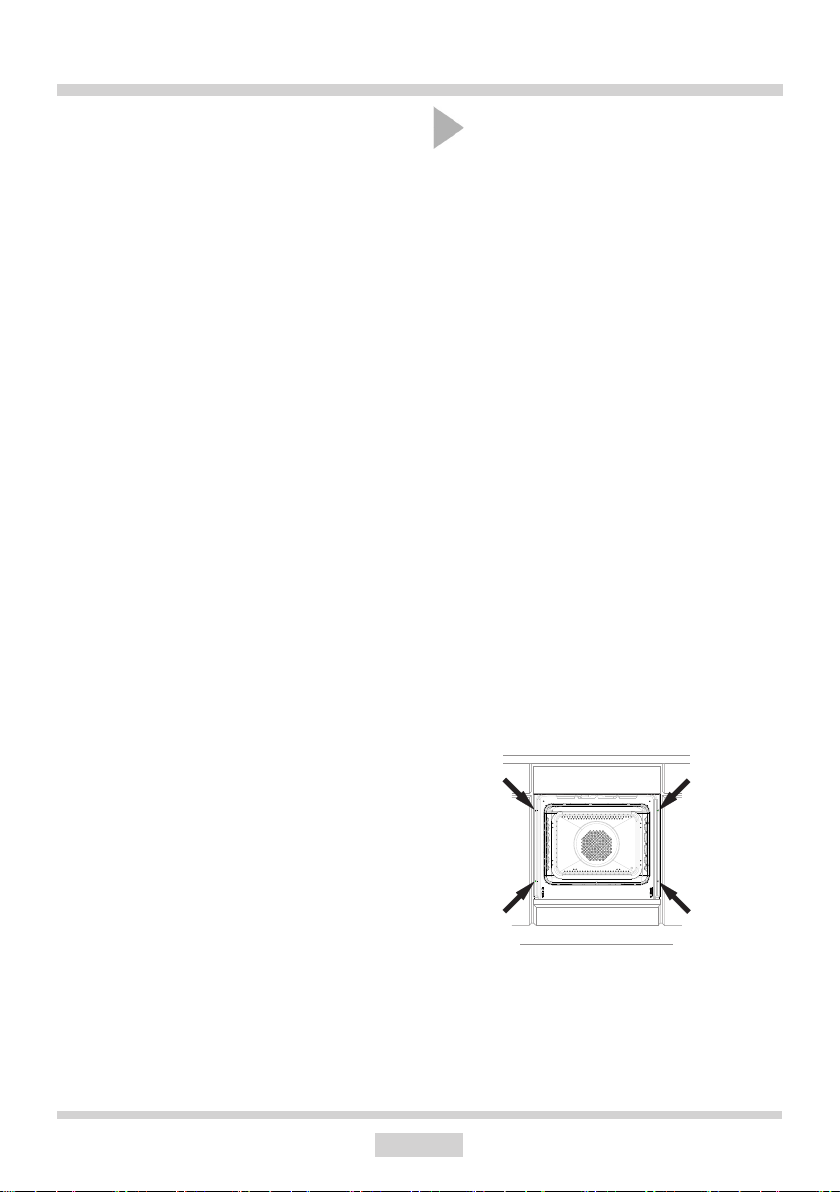
Insert the oven completely into the open-
ing without allowing the four screws in the
places shown in the diagram to fall out.
INSTALLATION
The oven is manufactured to work with
a one-phase alternating current (230V
1N~50 Hz) and is equipped with a 3 x 1,5
mm2connection lead of 1.5 mm length
with a plug including a protection contact.
A connection socket for electricity supply
should be equipped with a protection
pin and may not be located above the
cooker. After the cooker is positioned, it is
necessary to make the connection socket
accessible to the user.
Before connecting the oven to the socket,
check if:
- the fuse and electricity supply are able to
withstand the cooker load,
- the electricity supply is equipped with an
ecacious ground system which meets
the requirements of current standards
and provisions,
- the plug is within easy reach.
Electrical connection
Important!
If the xed power supply cable is damaged,
it should be replaced at the manufacturer
or at an authorized servicing outlet, or by a
qualied person to avoid danger.

11
56
523
544
429
1034
595
595
570
max50
16
25
116
595
600
595
40
40
560
40
560
560
560
7
600
5,5
584,5
INSTALLATION
Mounting scheme with dimensions

12
OPERATION
Before using the appliance for
the rst time
• Remove packaging, clean the interior
of the oven,
• Take out and wash the oven accessories
with warm water and a little washing-up
liquid,
• Turn on the ventilation in the room or
open a window,
• Heat up the oven (to a temperature of
250°C for approximately 30 minutes),
remove any stains and wipe the interior
carefully. (see section: Using the control
panel),
Important!
To clean the oven chamber use only
warm water and a small amount of
washing-up liquid.
Important!
The oven features touch control panel
and display. To activate each touch
sensor, touch the glass above the
sensor (indicated by a pictogram). An
acoustic signal will be heard.
On/o switch is on the right side
of the display. To activate each touch
sensor, touch the glass above the
sensor (indicated by a pictogram). An
acoustic signal will be heard, which
was selected in the menu. (See sec-
tion: Using the control panel),
Touch sensor surfaces must be
kept clean.

13
OPERATION
Touch controls
The control panel features 12 touch sensors (no backlight), marked as shown above. Each
time you touch a sensor a beep is emitted (except as indicated in detailed operating instruc-
tions). On/o switch is on the right side of the display. When touch an activated sensor a
beep is emitted [conrmation]. When you touch an inactive sensor and [error] beep is heard.
When you touch and hold a sensor for 3 seconds a [conrmation 2] beep is emitted.
The appliance generates the following beeps:
[on] beep
[o] beep
[conrmation] — sensor touched
[conrmation 2] — sensor touched and held
[error] beep when you touch an inactive touch sensor
[kitchen timer alarm] — the maximum duration of 5 minutes.
[fast heat-up end alarm] – the maximum duration of 5 minutes.
[end time] – the maximum duration of 5 minutes.
[Open door alert]
Using the control panel
- clock settings
- kitchen timer, duration,
end time settings
- set temperature
- preset programmes
- fast heat-up on/o
- oven functions
- plus / up [+]
- minus / down [-]
- back [<]
- oven cavity lighting on/o
- conrm
- Child Lock

14
OPERATION
Oven functions
Oven functions are indicated as follows:
Display backlight brightness. Backlight brightness changes throughout the day. Backlight
brightness is set to high during 05:00—22:00 and low during 22:00—05:00. Backlight bright-
ness is also determined by the oven operating mode:
• Low backlight brightness — you can read current time in standby mode
• High backlight brightness when you use the appliance.
Active functions
Baking level symbol
Fast heat-up
Door lock (oven with pyrolytic cleaning)
Pyrolytic cleaning (oven with pyrolytic cleaning)
ECO mode
Child lock

15
OPERATION
Temperature
Oven cavity temperature and heating indicator
Meat probe and activation indicator
Start Time/ End Time and activation indicator
Text messages
Text information area includes 2 lines x 34 characters for displaying text information in the
following languages:
English, German, Polish, Russian, Czech, Serbian, Lithuanian, Estonian, Latvian, French,
Spanish, Turkish, Swedish, Norwegian, Finnish, Danish, Italian, Dutch.
Time display
HH:MM time display and symbols: AM/PM,
kitchen timer, duration, end time

16
OPERATION
Turn on the appliance and set the time.
When you plug in the appliance for the rst
time you need to select the language. The
display is o except the text messaging area.
The default language is English. "Select lan-
guage" is displayed on the left and language
selection option on the right. You can use
, sensors and [OK]. Use and sen-
sor to select language. Touch OK sensor to
select your preferred language (The "Select
language" message will be displayed in your
preferred language). Touch OK again to begin
setting the time. For details on how to select
language please refer to the settings section.
When you plug in the appliance (or after a
power outage) you will need to set current
time. Current time is ashing on the display.
You can use , sensors and [OK].
Touch OK to initiate standby mode.
Important! In the event of a power outage
all automatic programmes, set temperatures
and kitchen timer are cleared. If you interrupt
the pyrolytic cleaning (or the door is locked
for any other reason), the oven will start the
cooling and door opening procedure before
you can set the time.
Standby mode
In this mode, the power consumption of the
appliance is limited to 800mW (except when
cooling down or using the light). Switch the
appliance to standby mode to reset all func-
tion settings, times, temperature, kitchen
timer and automatic programmes. All heating
elements are disconnected. The display is
dimmed except for the clock. You can use ,
and child lock combination (touched
together, individually they are inactive). Dis-
play backlight brightness is reduced.
If meat probe is plugged in the oven cavity,
is displayed. The symbol goes out when you
unplug the meat probe.
If the temperature in the oven chamber ex-
ceeds 50°C, the oven chamber temperature
is displayed (to indicate the residual heat)
and the cooling fan operates. When the tem-
perature drops below 50°C, the cooling fan is
turned o and the oven chamber temperature
display goes out.
If the oven door is opened, the oven light
comes on. Oven light turns o when you close
the door or automatically after 10 minutes if
the door is still open.
The is displayed when Child Lock is on.
Touch and together to deactivate Child
Lock.
When you activate the appliance from the
standby mode you will hear an acoustic
signal [on]. When you turn o the appliance
into standby mode you will hear an acoustic
signal [o].
If you touch inactive sensors in a standby
mode, there will be no conrmation [error].
During 22:00 – 06:00 in standby the display
backlight is reduced as set for night-time
mode.

17
OPERATION
Operation.
In this mode you can select the desired
functions, programmes and adjust settings.
You can use , , and sensors that
activate the Child Lock. Other touch sensors
are enabled when necessary. When all pro-
grammes complete and you do nothing for
60 seconds, the appliance turns o (auto-
o).
When you use the appliance display back-
light brightness is normal. Oven chamber
outline symbol is displayed in oven function
area. The display shows the current oven
temperature or "--- °C" when the tempera-
ture is lower than 30°C. If meat probe is
unplugged, no information relating to meat
probe is displayed. Otherwise, the sym-
bol is displayed and meatprobe temperature
is shown of "-- °C" when the temperature is
below 30°C. The text display (left) shows
the message "Select function >" and ">" is
blinking.
Clock
Touch and hold for a few seconds to
change the current time. In turn you can
set time display mode (12h/24h), hours and
minutes.
- touch or to adjust settings;
- touch OK to conrm the setting and begin
to adjust the next setting;
- touch to go back;
- when selecting time display mode
(12h/24h), touch or or do nothing for 10
seconds to abort.
Touch OK to conrm and store the settings.
In 12h mode the "AM" is displayed for 1-12
hours and "PM" for 13-24 hours.
You can only set the time when the appli-
ance is in standby or operating mode an no
automatic programme or timer is enabled.
Otherwise, when you touch and hold the
sensor, you will hear an [error] beep and you
will not be able to change the current time.

18
Light
The sensor operates independently and
using it does not aect other functions and
settings. sensor is inactive in a standby
mode.
The light in the oven turns on:
- when you touch — for 30 seconds;
- when you touch and hold for 3s – until
the appliance enters standby mode,
when you use any heating function or a pre-
set programme — for 30s;
when "fast heat-up" completes — for 30s;
when you open the door — until the door is
closed, but no longer than for 10 minutes.
Touch to turn o the light at any time.
Cooling fan.
Cooling fan operates independently of the
set functions and the appliance status.
Cooling fan turns on when the oven cham-
ber temperature exceeds 50°C and turns o
when it is below this temperature.
Thermostat
Thermostat symbol (next to the oven tem-
perature) indicates the operating status of
heaters. If any of the heating elements oper-
ates, the symbol lights up. The symbol
goes out, if none of the heating elements
operates (e.g. when the oven reaches the
desired temperature and the heating ele-
ments are disconnected until the tempera-
ture drops).
OPERATION
Heating functions
Touch to select heating functions. You
can use the following controls:
– open pre-set programmes menu (clear
unconrmed settings);
– open timer menu (clear unconrmed
settings);
– go back. If you are on the main screen
– clear settings and enter operating mode.
, – navigate the menu;
OK – conrm.
[do nothing for 20s] - if you do nothing for 20
seconds, settings are cleared and the appli-
ance enters operating mode.
The text display (left) shows the message
"Select heating function >" and ">" is blink-
ing. Heating functions are displayed se-
quentially. The default function is Fan cook-
ing. Note: Rotisserie functions only appear
on appliances that feature rotisserie. Out of
the three cleaning function available only
the active function is displayed, depending
on the pyrolysis settings.
In addition to accompanying functions, dif-
ferent oven chamber outline symbols are
displayed reecting the selected heating
function. Touch or to select and then
OK to conrm.
Once your selection is made, it is displayed
on the left side while the right side is blank.
The default oven temperature ashes.
Touch or to adjust temperature and
then OK to conrm.
If meat probe is detected, the appliance will
ask you to select its temperature. Touch
or to adjust default meat probe tempera-
ture of 80°C and then OK to conrm.
This step is omitted if no meat probe is de-
tected.

19
OPERATION
Oven light is on switches, and you can use
and sensors. Other functions start af-
ter 5 seconds of conrming.
[Duration ] symbol is displayed and time
display shows time that has elapsed.
You can cancel a heating programme at any
time. Touch:
– you can select pre-set programmes;
– standby mode.
Set the timer to control if the oven is on/o.
The timer does not aect, which heating
function is selected.
Touch to select a new heating function
(already active heating function is not inter-
rupted). By default currently selected func-
tion and temperature are displayed. New
function and temperature selection must be
conrmed.

20
OPERATION
Overview of oven functions, oven elements, possible temperature and default settings.
Function De-
scription Oven elements
Temperature
[OC] Default
tempera-
ture [°C]
Level
from the
bottom
min. max
Conventional bottom heater + top heater 30 280 180 3
Cake bottom heater + top heater +
fan 30 280 170 3
Grill Roaster + rotisserie drive 30 280 280 4
Turbo grill roaster + top heater + fan +
rotisserie drive 30 280 200 2
Super grill roaster + top heater + rotisserie
drive 30 280 280 4
Fan assisted
heating fan heater + fan 30 280 170 3
ECO Fan
Heater fan heater + fan 30 280 170 3
Pizza fan heater + bottom heater +
fan 30 280 220 2
Browning top heater 30 240 180 -
Roasting bottom heater 30 240 200 -
Cleaning
Aqualytic func-
tion*
bottom heater + top heater 30 280 90 -
Steam Clean-
ing* bottom heater 30 240 50 -
Pyrolytic
cleaning* Roaster + bottom heater - - 480 -
*available cleaning function depends on the model
Table of contents
Other Gram Oven manuals

Gram
Gram 16OI 642 B User manual

Gram
Gram IOP 20663-92 X User manual

Gram
Gram OI 5006 V B User manual

Gram
Gram CI 55050 V User manual

Gram
Gram KI 6016-60 N User manual

Gram
Gram CM 55050 User manual

Gram
Gram IO 20642-92 User manual

Gram
Gram BIH 56350 B User manual

Gram
Gram IOP 16663-92 B User manual

Gram
Gram IOP 18643-90 X User manual

Gram
Gram IOP 20662-92 W User manual

Gram
Gram IO 18610-90 B User manual

Gram
Gram IO 16642-92 B User manual

Gram
Gram KEP 6246-60 N User manual

Gram
Gram IOS 20644-92 X User manual

Gram
Gram 16KP 663 User manual

Gram
Gram IO 20674-94 X User manual

Gram
Gram OIP 16636 B User manual

Gram
Gram IO 9600-90 X User manual

Gram
Gram OIP 5436 B User manual