GRE VARADERO Series User manual

ALVORENS OVER TE GAAN TOT DE MONTAGE, DIENT U DE VOLGENDE INSTRUCTIESAANDACHTIG DOOR
TE LEZEN EN VAN ALLE COMPONENTEN.
BEWAAR DEZE INSTRUCTIES VOOR TOEKOMSTIGE RAADPLEGINGEN.
ANTES DE PROCEDER À MONTAGEM LEIAATENTAMENTE TODAS AS FOLHAS DE INSTRUÇOES DE TODOS
OS MANUAIS DO KIT.
GUARDAR ESTAS INSTRUÇÕES PARA FUTURAS CONSULTAS
INTERNET
www.gre.es
i
TM
á la norme
CONFORME
P
R
O
D
U
I
T
N
F
P
9
0
-
3
1
6
HIMPR.11
FABRICADO POR:
MANUFACTURAS GRE, S.A.
ARITZ BIDEA 57 - TROBIKAAUZOTEGIA
APARTADO 69
48100 MUNGUIA (VIZCAYA) ESPAÑA
Nº REG. IND.: 48-06762
MADE IN SPAIN - FABRIQUE EN ESPAGNE
PHOTOS ET IMAGES NON CONTRACTUELLES
FOTOS E IMÁGENES NO CONTRACTUALES
NON-CONTRACTUAL PHOTOS AND PICTURES
FOTO’S EN AFBEELDINGEN HEBBEN GEEN CONTRACTUELE WAARDE
FOTOS E IMAGENS NAO CONTRATADA
PHOTOS UND BILDER SIND NICHT VERTRAGLICH
LA FOTOGRAFIA O IL DISEGNO È SOLO A SCOPO ILLUSTRATIVO ED INFORMATIVO
AVANT DE PROCEDER AU MONTAGE, VEUILLEZ LIRE ATTENTIVEMENT LES PAGES D’INSTRUCTIONS
RELATIVES A TOUS LES COMPOSANTS DU KIT.
CONSERVER POUR CONSULTATIONS ULTERIEURE.
BEFORE STARTING ASSEMBLY, READ CAREFULLY THE INSTRUCTION MANUALS OF EVERY COMPONENTS
OF THE KIT.
KEEP THIS INSTRUCTIONS FOR FUTURE REFERENCE.
ANTES DE PROCEDER AL MONTAJE, LEA DETENIDAMENTE LAS HOJAS DE INSTRUCCIONES DE TODOS LOS
COMPONENTES DEL KIT.
GUARDE ESTAS INSTRUCCIONES PARA FUTURAS CONSULTAS.
PRIMA DI PROCEDERE AL MONTAGGIO LEGGERE ATTENTAMENTE I FOGLI DELLE ISTRUZIONI DI TUTTI
I COMPONENTI DEL KIT.
CONSERVARE QUESTE ISTRUZIONI PER FUTURE CONSULTAZIONI.
BEVOR SIE MIT DER MONTAGE ANFANGEN LESEN SIE MIT AUFMERKSAMKEIT DIE GEBRAUCHSANWEISUNGEN
VON ALLEN KITTEILEN.
BEWAHREN SIE BITTE DIESE WICHTIGEN HINWEISE ZUR SPÄTEREN EINSICHTSNAHME AUF.

Pag. 40 - 43
Pag. 44
Pag. 1 - 3
SAFETY PRECAUTIONS
CONSEJOS DE SEGURIDAD
CONSEILS DE SECURITE
SICHERHEITSHINWEIS
CONSIGLI DI SICUREZZA
RAADGEVINGEN VOOR DE VEILIGHEID
CONSELHOS DE SEGURANÇA
Pag. 4 - 8
PREPARATION OF THE SITE
PREPARACION DEL TERRENO
PRÈPARATION DU TERRAIN
VORBEREITUNG DES BODENS
PREPARAZIONE DEL TERRENO
BEREIDING VAN HET TERREIN
PREPARAÇÃO DO TERRENO
Pag. 9 - 15
COMPONENTS
COMPONENTES
ELEMENTS
BESTANDTEILE
COMPONENTI
ONDERDELEN
COMPONENTES
Pag. 16 - 31
INSTALLATION
INSTALACIÓN
INSTALLATION
INSTALLATION
INSTALLAZIONE
INSTALLATIE
INSTALAÇÃO
Pag. 32 - 39
MAINTENANCE AND USE
MANTENIMIENTO Y USO
ENTRETIEN ET UTILISATION
WARTUNG UND GEBRAUCH
MANUTENZIONE E USO
ONDERHOUD EN GEBRUIK
MANUTENÇÃO E UTILIZAÇÃO
ACCESSORIES
ACCESORIOS
ACCESSOIRES
ZUBEHÖR
ACCESSORI
ACCESSOIRES
ACESSÓRIOS
SERVICIOS TÉCNICOS
- Instalación de piscinas
- Venta de repuestos y accesorios
- Mantenimiento de depuradoras.

SAFETY PRECAUTIONS
CONSEJOS DE SEGURIDAD
CONSEILS DE SECURITE
SICHERHEITSHINWEIS
CONSIGLI DI SICUREZZA
RAADGEVINGEN VOOR DE VEILIGHEID
CONSELHOS DE SEGURANÇA
INSTRUCTIONS
1
PARTE 1

2
SAFETY ADVICES
The safety of your children depends on you! Risks are
at their highest when children are under five years old.
Accidents do not just happen to other people! Prevent
possible accidents!
- Watch over children and:
· keep a close eye on them at all times;
· choose a responsible person to ensure their safety;
· be especially careful when there are many bathers in
the pool;
· teach your children to swim as early as possible;
· make sure you wet their necks, arms and legs before
they go into the water:
· learn first aid in case of emergencies involving children;
· do not allow diving or jumping when children are present;
· do not allow races and rough games close to the pool;
· do not let any child who cannot swim or who is not
accompanied by an adult enter the pool without a safety
jacket or water wings;
· do not leave toys around or inside the pool area if they
are unattended;
· always keep the water clean and disinfected;
· keep water treatment products out of the reach of
children.
- Have:
· an accessible telephone close to the pool area so that
you do not leave children unattended while you speak
on the phone;
· a buoy and a pole close to the pool area.
- Other equipment can also contribute to safety:
· a protective fence or enclosure with an entrance that
can always be kept closed (a hedge cannot be considered
an enclosure for example);
· a manual or automatic protective cover that is correctly
positioned and fixed;
· an electronic detector that detects movement or falls
into the pool, in good working order;
However, these can never replace the care of an adult.
- In the event of an accident:
· get the child out of the water as quickly as possible;
· ask for help immediately and follow any advice given;
· replace wet clothes with dry ones.
- Place a sign close to the pool showing emergency
services telephone numbers and memorise them:
· The Fire Service;
· Emergency Medical Services;
· Poison Treatment Centre.
- Prevent the use of the pool in case of damage the
filtration system(s).
Do not:
· Dive;
· Walk around the edges of the pool;
SAFETY ADVICE
Before starting assembly, read the instructions below
carefully.
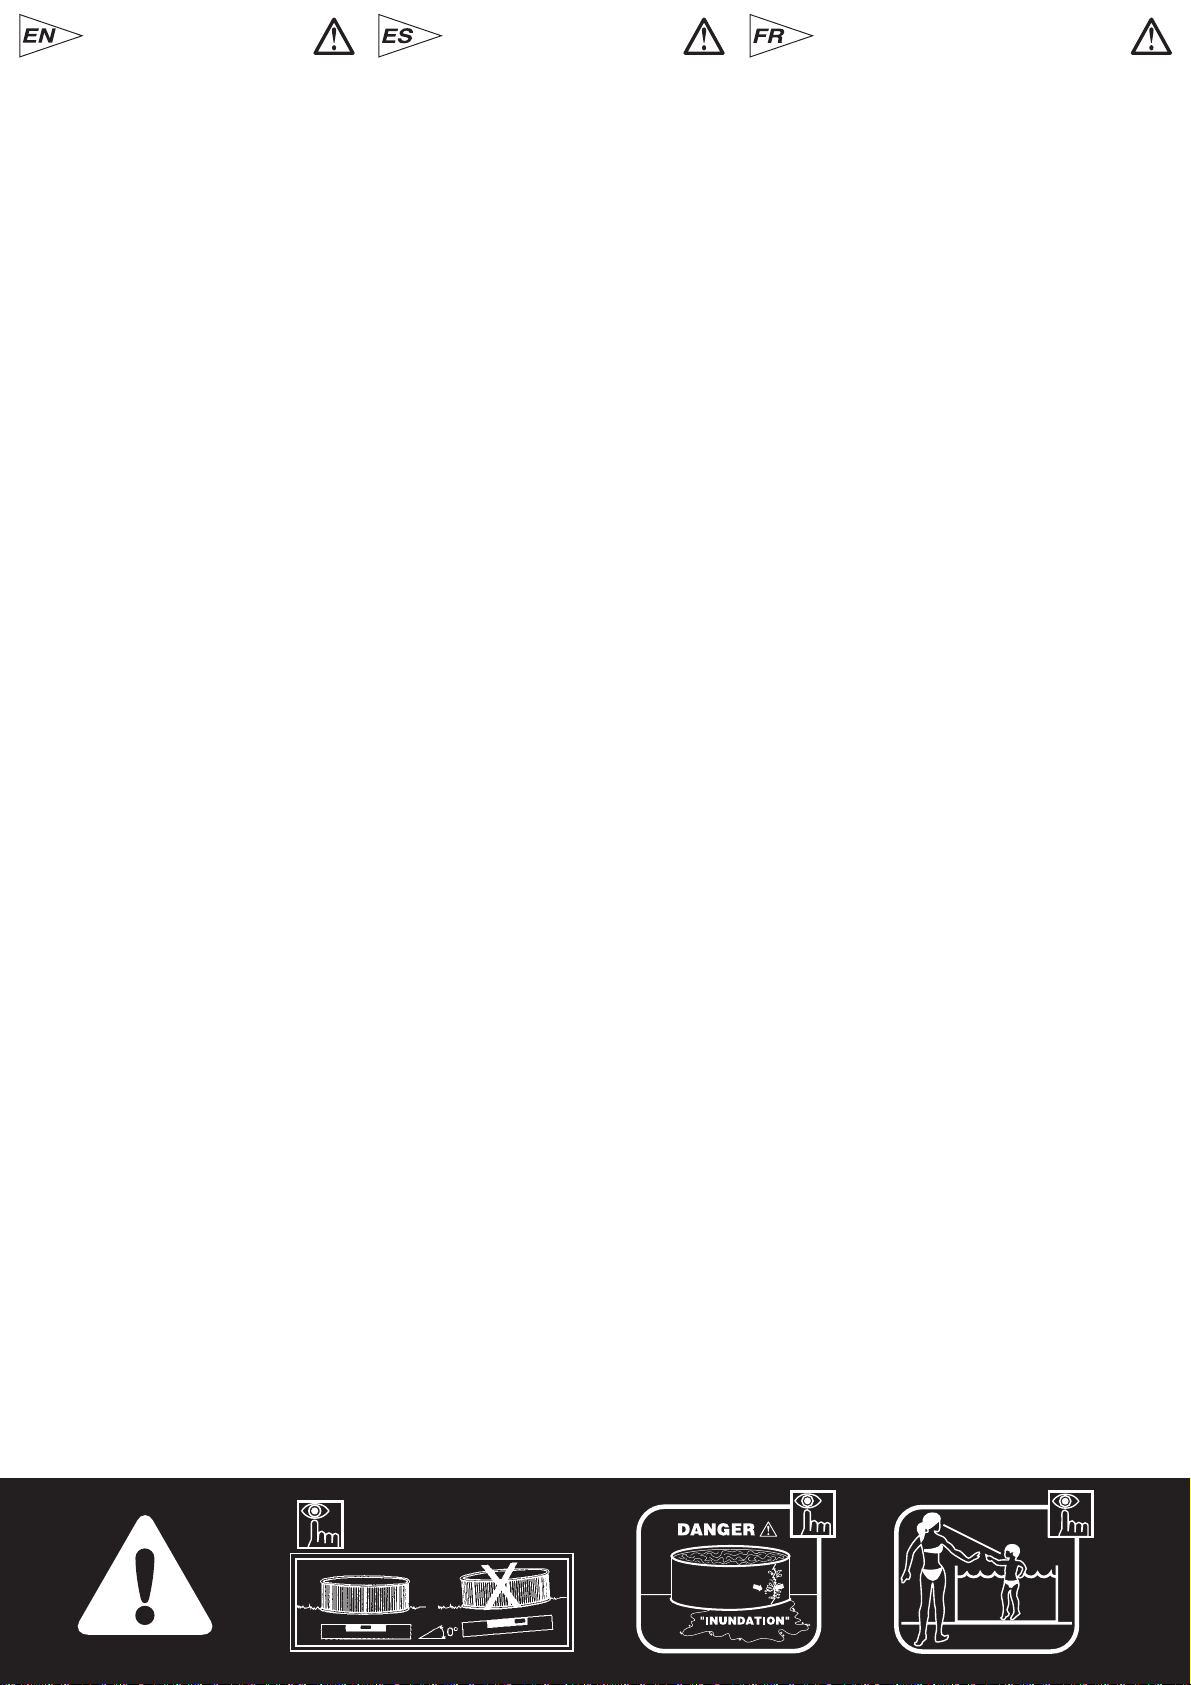
• For safety, do not install the pool on a balcony or
terrace.
• Keep the pool full of water.
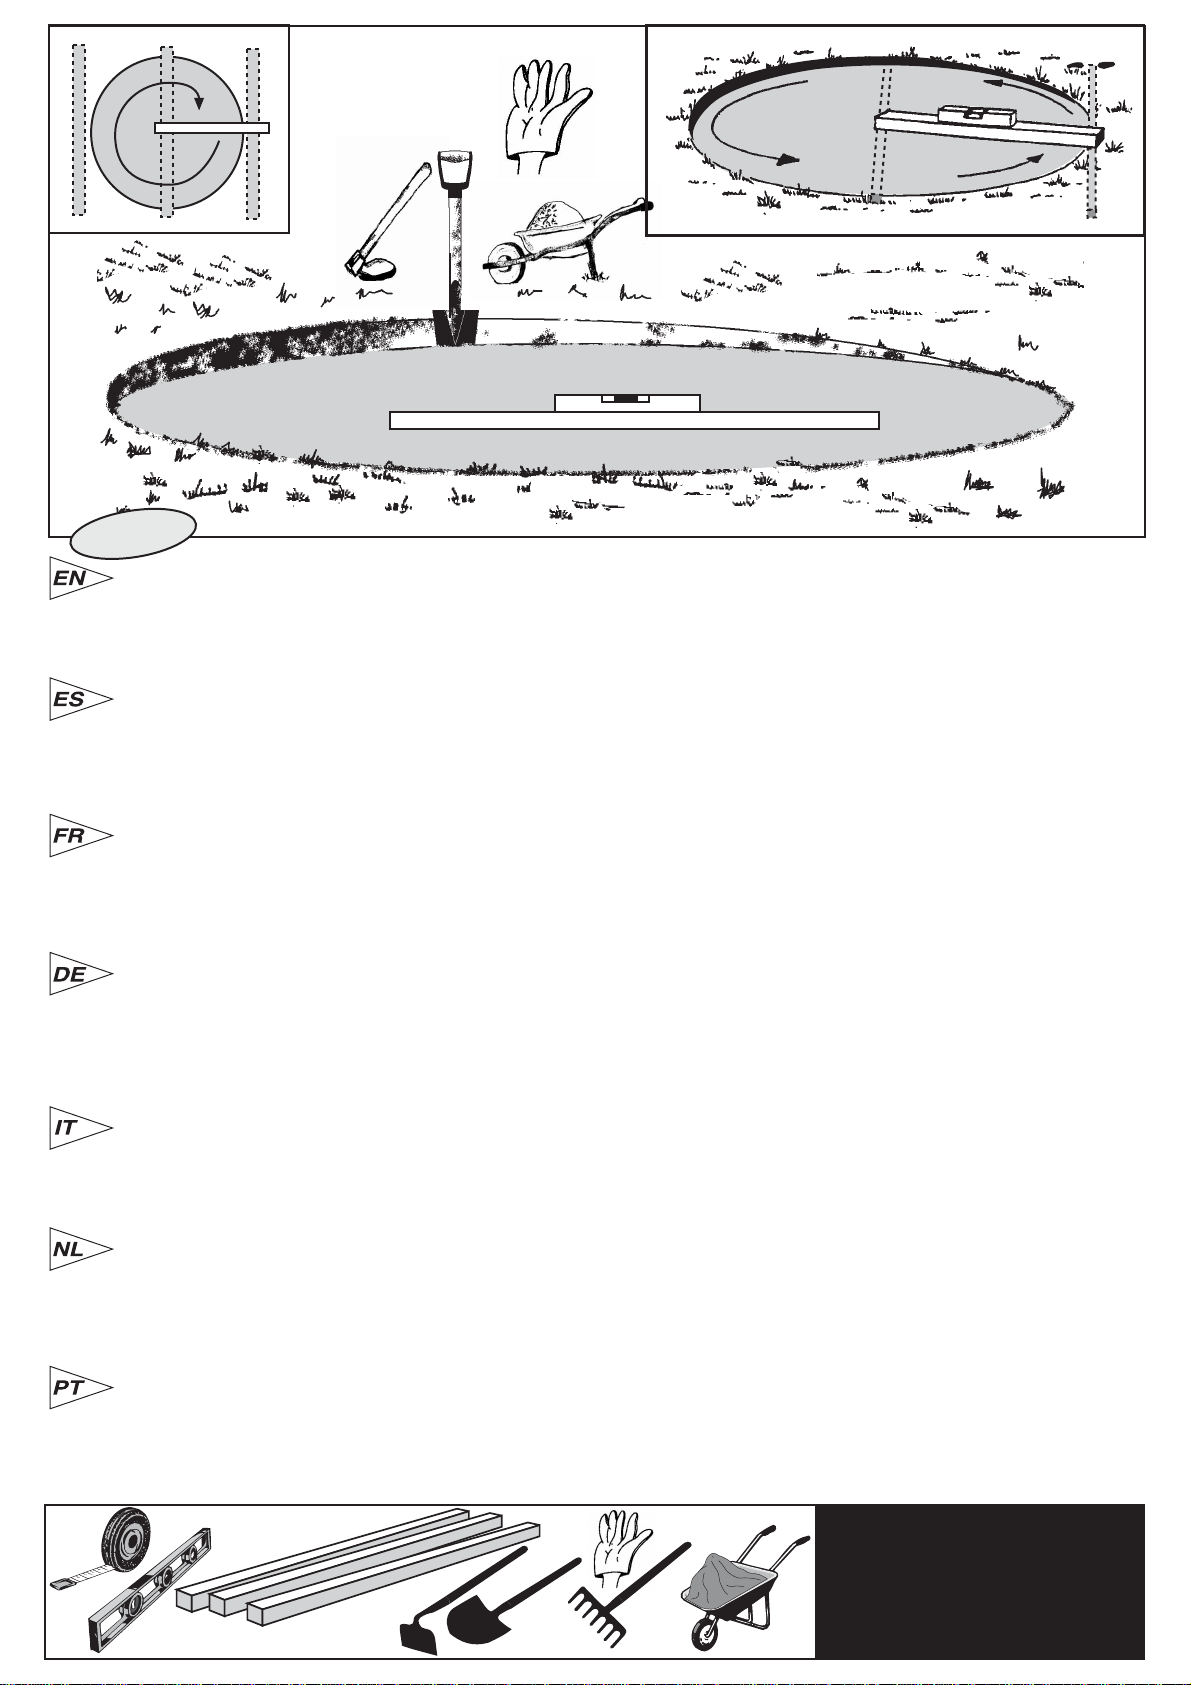
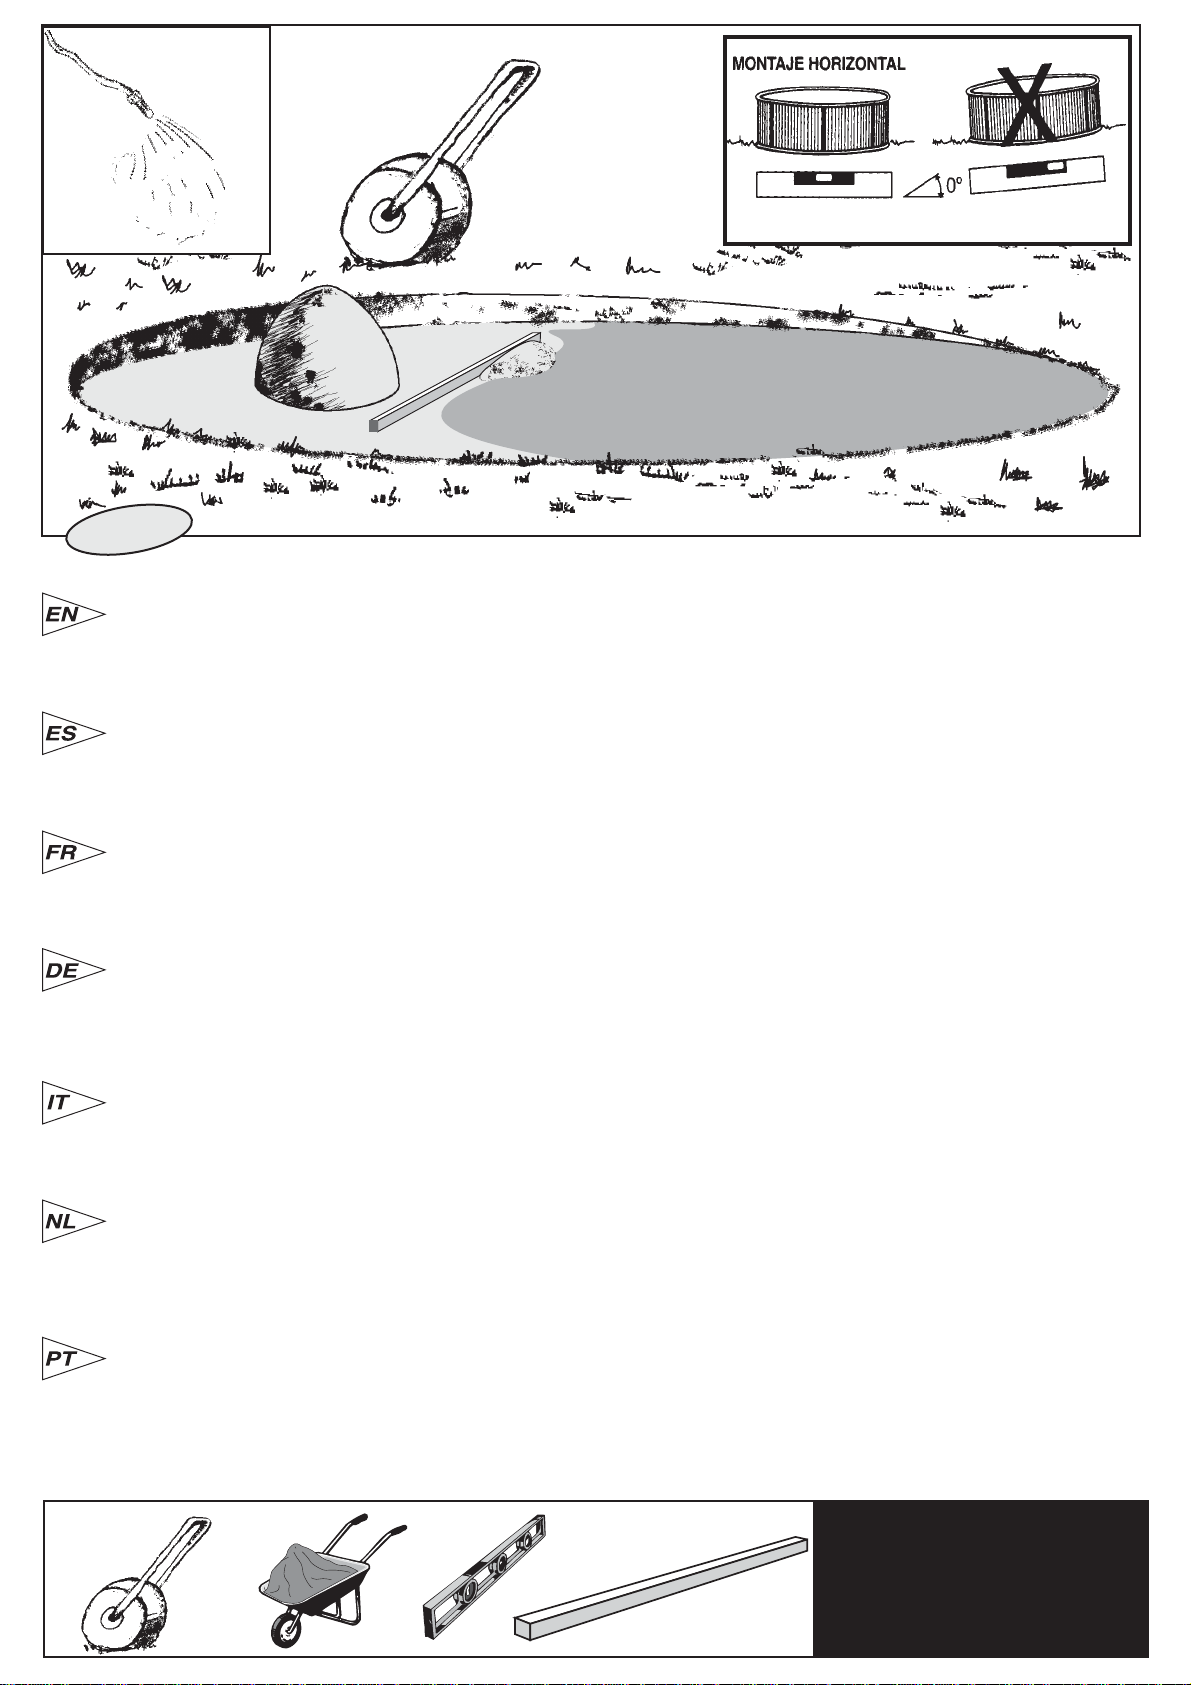
•Important: Place the pool where there is a drain nearby
so that it will not produce flooding if the wall should
rupture. Think of your pool as though it were a large
dam. If the pool is not properly levelled, the pressure
inside could tear the wall and all the water would pour
out. Such a large volume of water could cause significant
damage to the surroundings and even to individuals who
are close by.
• This pool is designed for children.
• Do not use the pool at night or in poor visibility.
• Do not use the pool when under the influence of alcohol,
medicaments or drugs.
•
Place the prevention of risks sticker, contained
in this manual, on the swimming pool, next to
the ladder.
•
The ladder must be used to get in and out of the
swimming pool.
• Do not swim between the pool wall and the ladder (risk
to be stuck).
• Do not allow a pet (dog, cat, ....) to have a swim in the
swimming-pool.
• Do not touch the filter when your body or ground are
wet (electrocution).
WARNING: Every electrical appliance fed in 220 V,
has to be located at least at 3,50 m from the edge
of the pool.
The equipment should be connected to a voltage,
with earth connection, protected by a residual current
device (RCD) having a rated residual operating
current not exceeding 30 mA.
Read the instructions carefully and keep for future
reference.
IF YOU HAVE ANY PROBLEM, ..¡CONTACT US!
TELEFONO CONTACT:
Great Britain: Green number: 0800 91 76 778
Tel.: 00 (33) 4 92 28 32 78
Fax.: 00 (33) 4 92 28 03 33
e-mail: [email protected] web: www.gre.es
CONSEILS DE SECURITÉ
La sécurité de vos enfants ne dépend que de vous! Le risque est
maximum lorsque les enfants ont moins de 5 ans. L’accident n’arrive
pas qu’aux autres! Soyez prêt à y faire face!
- Surveillez et agissez:
· la surveillance des enfants doit être rapprochée et constante;
· désignez un seul responsable de la sécurité;
· renforcez la surveillance lorsqu’il y a plusieurs utilisateurs dans la
piscine;
· apprenez à nager à vos enfants dès que possible;
· mouillez nuque, bras et jambes avant d’entrer dans l’eau;
· apprenez les gestes qui sauvent et surtout ceux spécifiques aux
enfants;
· interdisez le plongeon ou les sauts en présence de jeunes enfants;
· interdisez la course et les jeux vifs aux abords de la piscine;
· n’autorisez pas l’accès à la piscine sans gilet ou brassière pour un
enfant ne sachant pas bien nager et non accompagné dans l’eau;
· ne laissez pas de jouets à proximité et dans le bassin qui n’est pas
surveillé;
· maintenez en permanence une eau limpide et saine;
· stockez les produits de traitement d’eau hors de la portée des enfants.
- Prévoyez:
· téléphone accessible près du bassin pour ne pas laisser vos enfants
sans surveillance quand vous téléphonez;
· bouée et perche à proximité du bassin.
- Par ailleurs, certains équipements peuvent contribuer à la sécurité:
· barrière de protection dont le portail sera constamment maintenu
fermé (par exemple une haie ne peut être considérée comme une
barrière);
· couverture de protection manuelle ou automatique correctement mise
en place et fixée;
· détecteur électronique de passage ou de chute, en service et
opérationnel.
Mais ils ne remplacent en aucun cas une surveillance rapprochée.
- En cas d’accident:
· sortez l’enfant de l’eau le plus rapidement possible;
· appelez immédiatement du secours et suivez les conseils qui vous
seront donnés;
· remplacez les habits mouillés par des couvertures chaudes.
- Mémoriser et afficher près de la piscine les numéros de premiers
secours:
· Pompiers : (18 pour la France);
· SAMU : (15 pour la France);
· Centre antipoison.
- Interdire l’accès au bassin en cas de détérioration du ou des système(s)
de filtration.
Le cas échéant :
· Ne pas plonger;
·Ne pas marcher sur la margelle.
CONSEILS PRATIQUES DE SECURITÉ
Avant de procéder au montage de la piscine, lire attentivement
les instructions suivantes.
• Par sécurité,ne pas installer la piscine sur un balcon ou une terrasse.
• Laisser la piscine remplie d´eau.
•Important: Installer la piscine près d'un lieu d'écoulement afin d'éviter
les inondations en cas de débordement. La piscine est un peu comme
un barrage. Si elle n'est pas de niveau, la pression peut entraîner la
rupture de la paroi, et par conséquent, l'écoulement de l'eau. Ce grand
volume d'eau peut provoquer des dommages importants sur le terrain
et blesser les enfants ou les personnes se trouvant à proximité.
• Cette piscine est conçue pour les enfants
• Eviter d'utiliser la piscine de nuit ou par manque d'éclairage.
• Ne pas se baigner sous l'emprise de boissons alcoolisées, de
médicaments ou d’une quelconque autre drogue.
• Placer l'autocollant de prévention contenu dans ce manuel, sur la
piscine, près de l’échelle.
• Il est obligatoire d'utiliser l'échelle pour entrer et sortir de la piscine.
• Ne jamais nager entre la paroi de la piscine et l’échelle (risque de
rester coincé).
• Ne jamais permettre à un animal (chien, chat, etc) de se baigner
dans la piscine.
• Ne manipulez jamais l’ épurateur quand votre corps ou le sol sont
mouillés (électrocution).
ATTENTION: Tout appareil électrique alimenté en 220 V doit être
situé au moins à 3,50 m du bord du bassin.
L’appareil doit être branché sur une prise de courant avec prise
de terre, protégé par un interrupteur différentiel (RCD) avec un
courant de fonctionnement résiduel assigné qui n’excède pas 30
mA.
À lire attentivement et à conserver pour consultation ultérieure.
EN CAS DE PROBLEME... NOUS CONSULTER!
SERVICE APRES VENTE:
France Tel.: (33) 0892 707 720 (0,34¤/min)
Belgique Tel.: 0800 10 211
Suisse numéro verde: 0 800/563 820
e-mail: sav@pools
CONSEJOS DE SEGURIDAD
¡La seguridad de sus niños depende de usted! El riesgo
es máximo cuando son menores de 5 años. ¡Un accidente
no solo ocurre a los demás! ¡Prevenga posibles accidentes!
- Vigilar y actuar:
· vigile los niños de cerca y constantemente;
· designe un solo responsable de la seguridad;
· aumente la vigilancia cuando son muchos bañistas en la
piscina;
· enseñe a sus hijos a nadar lo antes posible;
· mójese la nuca, brazos y piernas antes de entrar al agua;
· aprenda primeros auxilios para atender urgentemente a
los niños;
· prohíba la zambullida y saltos en presencia de niños;
· prohíba las carreras y juegos bruscos alrededor de la
piscina;
· no autorice el acceso a la piscina sin chaleco o brazaletes
a los niños que no saben nadar y que no están
acompañados por un adulto en el agua;
· no deje juguetes alrededor y dentro de la piscina si no
está vigilado;
· mantener permanentemente el agua limpia y desinfectada;
· guarde los productos de tratamiento del agua fuera del
alcance de los niños.
- Prever :
· teléfono accesible cerca de la piscina para no dejar de
vigilar a sus niños mientras habla por teléfono;
· boya y pértiga cerca de la piscina.
- Por otro lado, algunos equipos pueden contribuir a la
seguridad:
· barreras de protección cuyo acceso se pueda mantener
constantemente cerrado (por ejemplo, un seto no se puede
considerar como una barrera);
· cubierta de protección manual o automática correctamente
colocada y fijada;
· detector electrónico de paso o caída a la piscina, en
funcionamiento y operativo.
Pero no sustituye, en ningún caso, a la vigilancia de un
adulto.
- En caso de accidente:
· sacar al niño del agua lo más rápido posible;
· pedir socorro inmediatamente y seguir los consejos que
les comuniquen;
· sustituir las ropas mojadas por secas.
- Memorizar y fijar un cartel cerca de la piscina con los
teléfonos de primeros auxilios:
· Bomberos: (112 Emergencias);
· Servicios Médicos de Urgencia: (112 Emergencias);
· Centro antitóxico.
- Impedir el uso de la piscina en caso de deterioro del
sistema o sistemas de filtración.
Llegado el caso:
· No zambullirse;
· No caminar por los bordes de la piscina.
CONSEJOS PRÁCTICOS DE SEGURIDAD
Antes de proceder al montaje, lea detenidamente las
siguientes instrucciones.
• Por seguridad, no instale la piscina en balcones o terrazas.
• Mantenga la piscina siempre llena de agua.
•Importante: Coloque la piscina en un lugar cercano a un
punto de desagüe para evitar inundaciones en caso de
rotura. Piensa en tu piscina como si fuera una gran presa,
si la piscina no está perfectamente nivelada, la presión del
agua puede llegar a romper la pared y el agua se saldría
fuera. Un volumen de agua tan grande, puede causar
daños en el terreno e incluso a las personas que se
encuentren cerca de la piscina.
• Esta piscina está diseñada para niños.
• No utilizar la piscina de noche o con falta de visibilidad.
• No utilice la piscina bajo los efectos de bebidas alcohólicas,
medicamentos o drogas.
•
Colocar el autoadhesivo de prevención de riesgos
contenido en este manual en la piscina, al lado de la
escalera.
•
Es obligatorio utilizar la escalera de la piscina para entrar
y salir.
• Nunca nadar entre la pared de la piscina y la escalera
(riesgo de quedar atrapado).
• Nunca permitir a un animal (perro, gato, etc) bañarse en
la piscina.
• Nunca manipule la depuradora cuando su cuerpo o el
suelo están mojados (electrocución).
ATENCIÓN: Todo aparato alimentado en 220 V, debe
situarse por lo menos a 3,50 m del borde de la piscina.
El equipo se debe conectar a una toma de corriente,
con conexión a tierra, protegida con un interruptor
diferencial (RCD) con una corriente de funcionamiento
residual asignada que no exceda de 30 mA.
Lea atentamente las instrucciones y guárdelas para
futuras consultas.
SI TIENE ALGÚN PROBLEMA, ..¡CONSÚLTENOS!
TELÉFONO CONSULTAS: Tel.: (34) 946 741 844
web: www.gre.es

4
NO
NO NO NO
PREPARATION OF THE SITE
PREPARACION DEL TERRENO
PRÈPARATION DU TERRAIN
VORBEREITUNG DES BODENS
PREPARAZIONE DEL TERRENO
BEREIDING VAN HET TERREIN
PREPARAÇÃO DO TERRENO
INSTRUCTIONS
PARTE 2

5
OK
3,5 m
Tool necessary (not included)
Herramienta necesaria (no incluida)
Outil nécessaire (non compris)
Erforderliches werkzeug (nicht eingeschlossen)
Utensile necessario (non compreso)
Benodigd gereedschap (niet inbegrepen).
Ferramenta necessária (não éstá incluída)
Lugar de colocaçao: As nossas piscinas estão concebidas para serem instaladas na superfície do chãoe para o uso familiar ao ar livre.
O chão deve estar firme, liso e perfeitamente horizontal. Nota: 1000 l. = 1 m3= 1000 Kg.
Recomendações para eleger a melhor situçao para a sua piscina:
• Escolha um lugar onde as escavaçoes para nivelar o terreno sejam mínimas.• Uma zona que não se inunde em caso de chuva.• Onde não passem
canais nem fios subterrãneos, ( água, gás, electricidade,....). • Não instalar por baixo de linhas eléctricas. • Protegida do vento e sem árvores, já
que o pólen e as folhas sujam a piscina. • Zona com sol, onde dê mais o sol de manhã.• Perto de uma tomada elévtrica, de uma tomada de água
e de um escoamiento.
Punt voor plaatsing: Onze zwembaden zijn ontworpen voor hun installatie op de begane grond en bestemd voor familiegebruik in de open lucht.
De grond dient vast, vlak en perfect horizontaal te zijn.Onthoud: 1000 liter water = 1 m3= 1000 Kg.
Aanbevelingen voor het uitzoeken van de beste ligging voor uw zwembad:
• Zoek een plek uit waarop zo min mogelijk moet worden afgegraven voor de nivellering van het terrein. • Zorg voor een stuk grond, dat in geval
van regen niet onder water komt te staan. • Vermijd iedere aanwezigheid van ondergrondse aansluitingen ( water, gas, elektriciteit,....). • Niet
intallaren onder elektriciteitsdraden. • Beschermen tegen wind en bomen vermijden, aangezien de pollen en bladeren het zwembad kunnen
vervuilen. • Zoek een zonnige plek met vooral ochtendzon. • Plaatsen in de nabijheid van een elektriciteits-, water- en afvoeraansluiting.
Luogo di posa: Le nostre piscine sono progettate per essere installate sul piano del terreno e per uso familiare all'aria aperta. Il terreno deve essere
stabile, liscio e perfettamente orizzontale.Ricordare: 1000 lts. d'acqua = 1 m3= 1000 Kg.
Raccomandazioni per scegliere la migliore posizione per la piscina:
• Scegliere un luogo in cui si debba eseguire il minor scavo possibile per livellare il terreno.• Scegliere una zona che, in caso di pioggia, non si inondi.
• Scegliere una zona in cui non passi nessun allacciamento sotterraneo. (acqua, gas, elettricitá,....). • Non installaresotto linee eletriche. • Scegliere
una zona protetta dal vento e senza alberi, poiché il polline e le foglie sporcheranno la piscina. • Scegliere una zona soleggiata, con maggiore
esposizione ai raggi mattutini.• Scegliere una zona nelle vicinanze di una presa elettrica, presa d;acqua e uno scolo.
Austellort: Unsere Schwimmbäder sind zur Aufstellung im Freien auf dem Boden und zur Benutzung durch die Familie ausgelegt. Der Boden muss
fest und vollkommen waagerecht sein.Beachten Sie: 1000 l.wasser = 1 m3= 1000 Kg.
Hier einige Empfehlungen zur Wahl des optimalen Standortes Ihres Schwimmbades:
• Wählen Sie für die Aufstellung ein Gelände, wo Sie möglichst wenig Erde auszuheben brauchen, um den Boden zu planieren. • Der Bereich darf
bei Regen nicht überschwemmt werden. • Durch den Untergrund darf keine unterirdische Leitung führen ( Wasser, Gas, Strom,....). • Installieren
Sie das Pool nicht unter Stromleitungen. • Der Aufstellort solite windgeschützt sein und keinen Baumbestand aufweisen, denn Pollen und Laub
verschmutzen das Schwimmbad. • Wählen Sie einen sonnenbeschienenen Bereich, vor allerm mit Morgensonne. • Wählen Sie Ihren Standort in
der Nähe eines Strom- und Wasseranschlusses und eines Abflusses.
Lieu d'installation: Nos piscines sont conçues pour être installés sur la surface du sol et pour un usage familial de plein air. Le sol doit etre ferme,
plat et parfaitement horizontal. Pour mémoire: 1000 lts.d'eau = 1 m3= 1000 Kgs.
Recommandations pour choisir le meilleur emplacement pour votre piscine:
• Choisissez un lieu où vous devez réaliser le moins d'escavation possible pour niveler le terrain. • Zone non inondable en cas de pluie. • Où il ne
passe aucun branchement souterrain.( eau, gaz, électricité,....). • Ne pas installer en dessous de lignes électriques. • Protégée du vent et sans arbres
étant donné que le pollen et les feuilles salissent la piscine. • Zone ensoleillée, où il y a le plus de soleil le matin. • Près d'une prise électrique, prise
d'eau et d'un lieu d'écoulement.
Lugar de colocación: Nuestras piscinas están diseñadas para ser instaladas sobre la superficie del suelo y para uso familiar al aire libre.
El suelo debe estar firme, liso y perfectamente horizontal. Recuerde: 1000 lts. = 1 m3= 1000 Kgs.
Recomendaciones para elegir la mejor ubicación para su piscina:
• Escoja un lugar donde deba realizar la menor excavación posible para nivelar el terreno. • Zona donde en caso de lluvias no se inunde. • Que no
pase ninguna conexión subterranea ( agua, gas, electricidad,....). • No instalar debajo de tendidos eléctricos. • Protegida del viento y sin árboles ya
que el polen y las hojas ensucian la piscina. • Zona soleada, donde de más el sol por la mañana. • Cerca de una toma eléctrica, toma de agua y
un desagüe.
Installation place: Our pols are designed to be erected above ground an for an outdoor family use.The ground has to be firm, flat and perfectly
horizontal. Remenber: 1000 lts of water = 1 m3= 1000 Kgs.
Advices to chose the best location for your pool:
• Select a place where you'll have to realize the least excavation to levelled the ground.• Non easily inundated area in case of rain.• Where there is
not any underground conection (water, gaz, electricity,…). • Do not install it underneath electric line. • Protected from wind and without any trees
because the pollen and the leaves make the pool dirty. • Sunny area, where the most sun is during the morning. • Close to a water and power supply
and drainage system.
Nº 8

6
1
FLOUR
HARINA
FARINE
MEHL
Tool necessary (not included)
Herramienta necesaria (no incluida)
Outil nécessaire (non compris)
Erforderliches werkzeug (nicht eingeschlossen)
Utensile necessario (non compreso)
Benodigd gereedschap (niet inbegrepen).
Ferramenta necessária (não éstá incluída)
Marcar zona de instalación:
Una vez escogida la zona de ubicación de la piscina (que debe estar perfectamente nivelada) procederemos al marcaje.
Para ello tiene Ud. dos opciones:
- Preparar una plataforma de hormigón (cemento,etc.) de la medida necesaria según dimensiones de su piscina.
- Directamente sobre el terreno previa preparación que detallamos a continuación:
Para marcar el terreno ayúdese de estacas de madera, destornillador, embudo (ó botella de plástico), harina ó cal y una cuerda.
Mark the installation area:
Once the location area is chosen (which have to be perfectly levelled), we’ll proceed at the marking.
You‘ve got 2 options for that :
1°To prepare a concrete platform (cement,…) with the necessary measure according to your swimming-pool size.
2°Directly on the ground :
To mark the ground using wood pickets, screwdriver, funnel (or plastic bottle), flour or lime and a rope.
Marquer la zone d'installation:
Une fois choisie la zone d'emplacement de la piscine (qui doit être parfaitement nivelée) nous procéderons au marquage.
Pour cela, vous avez deux options:
- Préparer une plateforme en béton (ciment,etc.) de la mesure nécessaire selon les dimensions de votre piscine.
- Directement sur le terrain:
Marquer le terrain en s'aidant de pieux en bois, tournevis, entonnoir (ou bouteille en plastique), farine ou chaux et une corde.
Standort markieren:
Der für die Aufstellung des Pools gew|ahlte (gut planierte) Ort wird anschließend markiert.
Dafür bieten sich Ihnen zwei Optionen:
- Die Vorbereitung einer Betonplatte (aus Zement usw.) in den notwendigen Abmessungen für das Schwimmbad.
- Aufstellung direkt auf dem Boden:
Boden mit Hilfe von Holzpflocks, Schraubenzieher, Trichter (oder Kunststofflasche), Mehl oder Kalk und einer Kordel abstecken.
Tracciare zona di installazione:
Una volta scelta la zona di sistemazione della piscina (che deve essere perfettamente nivelata), si provvederà alla relativa tracciatura.
A tale scopo, si hanno due opzioni:
- Predisporre una piattaforma di calcestruzzo (cemento,ecc.) con le misure necessarie, a seconda delle dimenzioni della propia piscina.
- Direttamente sul terreno:
Tracciare il terreno servendosi di picchetti di legno, di un cacciavite, un imbuto (o una bottiglia di plastica), gesso o calce e una corda.
Her markeren van de plaats voor installatie:
Wanneer we de plaats (die volkomen genivelleerd dient te zijn) voor de ligging van het zwembad eenmaal hebben uitgezocht gaan we over tot het
markeren daarvan.
Dit kunt u op twe manieren doen:
- Een platform van beton bereiden (cement, enz.) met nodige afmeting, al naar gelang de grootte van uw zwembad.
- Direct op het terrein:
Het terrein markeren met behulp van houten palen, schroevedraaier, trechter (of een plastic fles), meel of kalk en een touw.
Marcar zona de instalação:
Depois de escolher a zona de colocação da piscina (que tem de estar perfeitamente nivelada), é preciso marcar.
Para isso, existem duas opções:
- Preparar uma plataforma de formigão (cimento,etc.) com a medida necessária segundo as dimensiões da piscina.
- Directamente sobre o terreno:
Marcar o terreno com a ajuda de estacas de madeira, uma chave de parafusos, um funil (ou uma garrafa de plástico), farinha ou cal, e uma corda.
REQUIERED AREA
AREA NECESARIA
SURFACE NECESSAIRE
ENFORDERLICHE FLÄCHE
SUPERFICIE RICHIESTA
VEREISTE OPPERVLAKTE
SUPERFICIE NECESARIA

7
2
Tool necessary (not included)
Herramienta necesaria (no incluida)
Outils nécessaire (non compris)
Erforderliches werkzeug (nicht eingeschlossen)
Utensile necessario (non compreso)
Benodigd gereedschap (niet inbegrepen).
Ferramenta necessária (não éstá incluída)
Nivelar: En caso de nivelar el terreno nunca añadiremos tierra donde falta, siempre cavaremos donde sobra. De ésta forma garantizaremos la
estabilidad del terreno, su firmeza. En cualquier caso eliminaremos todas las hierbas, raíces, piedras, etc...El proceso de nivelado del terreno es
muy importante, dedíquele el tiempo y atención necesarios para que su piscina se asiente perfectamente en el terreno elegido y evitará problemas.
Como nivelar: Con reglas ó “ listones “ de madera largos, sitúelos enterrándolos en la zona elegida y limpia, formando rectángulos (ó cuadrados)
nivelados entre sí, por medio de una regla de albañil (aluminio) y un nivel.Cuando estén todos los “ listones “ a nivel y retirada la tierra donde sobre,
podrá rellenar,las pequeñas zonas que falten de nivelar (con tierra limpia ó arena) pero siempre compactando y nivelando a continuación. Es
importante que quede bien firme para que no se hunda el terreno cuando tenga la piscina llena de agua. Consulte con un profesional: Constructor,
jardinero, etc.
Levelling: When levelling the ground, always remove material from the top of the slope rather than filling in the bottom: this will ensure greater
ground stability and firmness. Always remove all grass, roots, stones, etc. Levelling is extremely important: devoting the necessary time and effort to
ensuring that your pool sits properly on the ground will avoid problems later. How to level: thanks to a large mason rule (aluminium or wood) and a
level, level out the ground forming rectangles (or squares), locating this rule in the selected and cleaned area. When all the areas are on level and
when the excess of ground is removed, you may fill in the small areas which are left to level out (with clean ground or sand) but always compacting
and levelling again afterwards.It is very important the installation area is well compressed and firm in order the ground do not subside when the pool
will be full of water. Please ask a professional : builder, gardener,…
Nivellierung: Zum Planieren des Boden darf niemals Erde aufgeschüttet werden, wo diese fehlt, sodern es darf nur uberschüssige Erde ausgehoben
werden.Nur so wird die Stabilität und Festigkeit des Boden gesichert. Laub, wurzeln, Steine usw. müssen natürlich entfernt werden.Wir weisen besonders
darauf hin, dass die Bondennivellierung außerordentlich wichtig ist. Nehmen Sie sich daher Zeit und achten Sie darauf, dass das Pool einwandfrei auf
dem gewählten Boden aufliegt.Sie sparen sich dadurch Probleme.Wie wird nivelliert: Mit Linealen oder Holzleisten.Graben Sie diese im ausgewählten,
sauberen Bereich ein, indem Rechtecke (oder Quadrate) gebildet werden, die untereinander mit Hilfe eines Maurerlineals (aus Aluminium) und einer
Wasserwaage niveliert werden müssen. Wenn alle “Leisten” auf gleicher Höhe liegen und überflüssiges Erdreich entfernt ist, können die noch nicht
nivellierten kleinen Zonen aufgefüllt werden (mit sauberem Erdreich oder Kiessand). Dabei muss jedoch immer verdichtet und anschließend nivelliert
werden.Achten Sie darauf, dass der Untergrund fest ist un nicht absinkt, wenn das mitWasser gefüllte Pool darauf steht.Wir empfehlen, einen Fachmann
zu Rate zu ziehen: Bauunternehner, Gärtner usw.
Niveler: Dans le cas de nivellement du terrain, ne jamais rajouter de terre aux endroits où il en manque, toujours creuser aux endroits où il y en a
en trop. Ainsi, nous garantirons la stabilité du terrain, sa fermeté. Dans tous les cas, éliminez toutes les herbes, racines, pierres, etc… Le procédé de
nivellement du terrain est très important, accordez lui le temps et l'attention nécessaires pour que votre piscine soit parfaitement installée sur le terrain
choisi et cela évitera des problèmes.Comment niveler: à l'aide d'une longue règle de maçon (aluminium ou bois) et d'un niveau, niveler le terrain en
formant des rectangles (ou carrés), en plaçant cette règle dans la zone choisie et propre. Lorsque toutes les zones seront de niveau et que la terre
en surplus aura été enlevée, vous pourrez remplir les petites zones qui restent à niveler (avec de la terre propre ou du sable) mais toujours en re-
compactant et re-nivelant par la suite. Il est important que la zone d'installation soit bien tassée et ferme pour que le terrain ne s'enfonce pas lorsque
la piscine sera remplie d'eau.Consultez un professionnel, jardinier, etc.
Nivelleren: In het geval van nivellering van het terrein moeten we nooit aarde bijvoegen op de plaats waar deze ontbreekt, we graven altijd uit daar
waar deze teveel aanwezig is. Op deze manier zullen we de stabiliteit van het terrein garanderen.In eider geval moeten we al het onkruid, de wortels,
stenen enz. …verwijderen.Het proces van de nivellering van het terrein is zeer belangrijk;besteed daar de nodige tijd en aandacht aan opdat uw zwembad
op de juiste manier zijn plaats vindt op het uitgekozen terrein en u zult problemen voorkomen. Wijze voor nivellering: met gebruik van latten of lange
houten tengels.Plaats deze in de grond op het uitgekozen en schone terrein, waarin met behulp van een metselaarsmeetlat (aluminium) en een waterpas
onderling genivelleerde rechthoeken (of vierkanten) worden gevormd.Wanneer alle latten zich dezelfde hoogte bevinden en de overtollige aarde is verwijderd
kunnen de kleine niet-genivelleerde plekken worden gevuld (met schone aarde of grind), warbij steeds de aarde moet worden gevuld samengedrukt om
daarna tot nivellering over te gaan. Het is belangrijk dat de met water wordt gevuld. Raadpleeg een deskundige: een aannemer, een tuinman, enz.
Livellare: Per livellare il terreno non aggiungere mai terra nel punto in cui manca, ma si scaverà sempre nel punto in cui è in eccesso.In questo modo
si garantirà la stabilità e solidità del terreno. Occorrerà comunque eliminare tutte le erbacce, le radici, le pietre, ecc.La procedura di livellamento è molto
importante, occorrerà quindi dedicargli il tempo e la cura necessari affinché la piscina si sistemi perfettamente sul terreno prescelto ed eviterà eventuali
problemi.Come livellare: Dopo aver pulito la zona prescelta, situare sottoterra delle squadre o dei“listelli” di legno lunghi, formando rettangoli (o quadrati)
livellati fra loro, per mezzo di una squadra da muratore (alluminio) e una livella.Quando tutti i“listelli” saranno a livello e dopo aver rimosso la terra eccedente,
si potrano riempire le piccole zone mancanti da livellare (con terra pulita o sabbia di fiume) ma sempre compattando e livellando di seguito. È importante
che sia ben saldo affinché non sprofondi il terreno quando la piscina sarà piena d'acqua. Consultare un professinista: construttore, giardiniere, ecc.
Nivelar:Se se nivelar o terreno nunca se deverá acrescentar terra onde falta, sempre deve-se cavar onde sobra.Desta forma garante-se a estabilidade
do terreno e a sua firmeza. Em qualquer caso devem-se eliminar as ervas, raízes, pedras, etc.O processo de nivelamento do terreno é muito importante.
Deve-se dedicar a ele todo o tempo e atenção necessários para a sua piscina se assentar perfeitamente no terreno escolhido, o que evitará problemas.
Como nivelar: com regras ou “réguas de madeira compridas: coloque-as enterradas na zona escolhida e limpa, formando rectângulos (ou quadrados)
nivelados entre eles, por meio de una regra de pedreiro (alumínio) e um nível.Quando estiverem todas as “réguas” a nível e tirada a terra aí onde sobrar,
poderá encher as pequeñas zonas que faltam por nivelar (com terra limpa ou areia) mas sempre compactando e nivelando depois.É importante que
fique bem firme para não se arrombar o terreno quando a piscina estiver cheia de água. Consulte um profissional (um construtor ou um jardineiro, ou
qualquet outro).

8
Acabado: Encima del terreno limpio y nivelado esparciremos una fina capa (max.1 cm) de arena tamizada.
Lo regaremos y compactamos ( con un rodillo de jardín ). Verificamos que esté bien nivelado.
No usar la arena para nivelar el terreno.El acabado debe ser perfecto.
Finishing: On the cleaned and levelled ground, spread a light coat of sieved sand (max. 1cm).
Water and compact it (with a garden roller). Check that is well levelled.
Do not use the sand to level the ground. The finishing has to be perfect.
Finish: Auf dem sauberen und nivellierten Untergrund wird eine feine Schicht (max.1 cm) gesiebter Sand verteilt.
Diese Schicht wird befeuchtet und verdichtet (mit einer Gartenwalze). Danach noch einmal auf einwandfreie Planierung
prüfen.
Der Sand darf nicht zum Nivellieren des Boden benutz werden. Das Finish muss einwandfrei sein.
Finition: Sur le terrain propre et nivelé, répartir une fine couche (max.1 cm) de sable tamisé.
L'arroser et le compacter (avec un rouleau de jardin). Vérifier qu'il soit bien nivelé.
Ne pas utiliser le sable pour niveler le terrain. La finition doit être parfaite.
Voltooiing: Over het schone en genivelleerde terrein strooien we een fijne laag (maximaal1 cm) gezeefd zand uit.
Deze begieten we en stampen we aan (met een tuinpletter). We verifiëren de juiste nivellering.
Het zand niet gebruiken voor het nivelleren van het terrein. De voltooiing dient volmaakt te zijn.
Finitura: Sul terreno pulito e nivellato si spargerà un sottile strato (max.1 cm) di sabbia setacciata.
Quindi irrigare e compattare (con un rullo da giardino). Verificare che il terreno sia ben livellato.
Non utilizzare la sabbia per livellare il terreno. La finitura deve essere perfetta.
Acabamento: Encima do terreno limpo e nivelado, pôr uma camada fina (max.1 cm) de areia tamisada.
Depois rega-se e compacta-se (com um rodízio de jardim). Verificar se está bem nivelado.
Não utilizar a areia para nivelar o terreno. O acabamento deve ser perfeito.
Tool necessary (not included)
Herramienta necesaria (no incluida)
Outil nécessaire (non compris)
Erforderliches werkzeug (nicht eingeschlossen)
Utensile necessario (non compreso)
Benodigd gereedschap (niet inbegrepen).
Ferramenta necessária (não éstá incluída)
3

9
INSTRUCTIONS
PA RTE 3
COMPONENTS
Draw and clasify all components included before assembly. It's
time to assemble the ladder and the pump, follow the respective instructions. Kits
with missing parts will be covered by the warranty only if reported to the after-sales
service within 15 days as from the date of purchase of the swimming pool.
ELEMENTS
Avant de commencer le montage prenez et séparez les differents
élements qui constituent votre piscine.De même procedez au montage de l'échelle
et de l'épurateur (suivre leurs instructions d'installation et d'utilisation).
Il faut signaler au service après-vente si le kit est incomplet (pièces manquantes),
et ce, dans un délai maximum de 15 jours à partir de la date d´achat de la piscine.
Si cette condition n´est pas respectée, la garantie ne sera pas valide.
BESTANDTEILE
Bestandteile vor demAufbau des Schwimmbeckens überprüfen
und einordnen.Wenn Sie einen KIT erworben haben, bauen sie jetzt die Leiter und
Filteranlage ein. (Beachten Sie die Montageanweisungen).
Spätestens 15 Tage nach dem Pool-Kaufdatum ist der Mangel an Kit-Bestandteilen
dem Kundendienst mitgeteilt zu werden. Andernfalls wird die Garantie unwirksam.
COMPONENTI
Estrarre e classificare i componenti della piscina prima di provve-
dere al montaggio della stessa.Allora è il momento di montare la scala e il depura-
tore (vedere le relative istruzioni per il montaggio).
La mancanza dei pezzi nel kit deve essere informata al servizio post-vendita entro
un massimo di 15 giorni dalla data dell’acquisto della piscina; in altro caso la garanzia
non coprirà la mancanza.
ONDERDELEN
Pak eerst de onderdelen van het zwembad uit en sorteer deze
al vorens met de montage te beginnen.Is dit het moment om de trap en de zuivering-
sinstallatie te monteren (zie de respectievelijke instructies voor de montage daarvan).Het
gebrek aan onderdelen in de kit moet maximaal binnen 15 dagen vanaf de datum
van aankoop van het zwembad worden medegedeeld aan de service na aankoop;
in het tegenovergestelde geval zal het gemis niet door de garantie worden gedekt.
COMPONENTES
Tirar os componentes da piscina e classificá-los antes de começar a
montagem.Monte durante esse tempo a escada e o equipamento de depuração (ver instruções
de montagem respectivas).
A falta de peças no kit deve ser informada ao serviço após venda num prazo máximo
de 15 dias desde a data de compra da piscina, caso contrário não estará coberto
pela garantia.
COMPONENTES
Saque y clasifique los componentes de la piscina antes de iniciar el
montaje.Además es el momento de montar la escalera y la depuradora (vea sus respectivas
instrucciones de montaje). La falta de piezas en el kit debe de ser informada al servicio
postventa en un plazo máximo de 15 días desde la fecha de compra de la piscina, en caso
contrario no estará cubierto por la garantía.

10
IMPORTANT - IMPORTANTE - IMPORTANT
WICHTIG - NOTA - BELANGRIJK - IMPORTANTE
Es muy importante que se fije en el tipo de embellecedores que lleva su piscina cuando saque
y clasifique los componentes:
- Si su modelo de piscina lleva los embellecedores EM (ver foto 1), las páginas en las que aparece
el despiece de los componentes de su piscina son la 12 y la 13.
- Si su modelo de piscina lleva los embellecedores TPL&TP (ver foto 2), las páginas en las que aparece
el despiece de los componentes de su piscina son la 14 y la 15.
FOTO 1
EM
SERIE VARADERO
SERIE BORA BORA
SERIE IRAKLION
SERIE FIDJI
SERIE PACIFIC
FOTO 2
TPL&TP
SERIE MARGARITA
SERIE SKYATHOS
SERIE MAURITIUS
SERIE ATLANTIS
SERIE MOONLIGHT
Please, pay attention to the joint protectors coming with your pool when you take out and classify
its components:
- If your pool comes with EM joint protectors (see picture 1), you can find your pool parts list on pages
12 and 13.
- If your pool comes with TPL&TP joint protectors (see picture 2), you can find your pool parts list on
pages 14 and 15.
Il est très important de faire attention au type d’enjoliveurs dont est équipée votre piscine quand
vous enlevez et classez les composants :
- Si votre modèle de piscine est équipé des enjoliveurs EM (voir photo 1), les pages où figure la vue
éclatée des composants de votre piscine sont la 12 et la 13.
- Si votre modèle de piscine est équipé des enjoliveurs TPL&TP (voir photo 2), les pages où figure
la vue éclatée des composants de votre piscine sont la 14 et la 15.
Es ist sehr wichtig, dass Sie schon beimAuspacken die verschiedeneAusfüllerteile klassifizieren:
- Falls zum Ihren Wasserbeckenmodell die Ausfüller EM (sehen Sie Foto 1) beigelegt wurden. Die
Anweisung zum Einbauen finden Sie auf den Seiten 12 bis 13.
- Falls zum Ihren Wasserbeckenmodell die Ausfüller TPL+TP (sehen Sie Foto 2) beigelegt wurden.
Die Anweisung zum Einbauen finden Sie auf den Seiten 14 bis 15.

12
6
1012
20
24
1012
10
12
11
1
1
8
16
1
1
10
12
100120
2024
10
12
10
12
PLAYA
PU
PCF
PI
L
TPVC
TT
PIPC
T
TPS
PV
11
CH
10
12
EM
PT
6
8
1
8
8
80
16
8
8
16
8
8
1
1
1
8
8
8
80
16
8
CH
PV
PU
EM
T
TPS
PIPC
TT
Ø 460Ø 550 Ø 350
Ø 300 Ø 240
PT
PLAYA
m3
Ø 640
14
28
14
14
1
1
14
140
28
14
14
1
14
32
28 28 28 28 28
32 32 32 32
7
37,63
33,77 27,79
24,94 19,44
17,45 11,25
10,10 8,27
7,41 5,29
4,75
SERIE VARADERO
SERIE BORA BORA
SERIE IRAKLION
SERIE FIDJI
SERIE PACIFIC
132
120
1,17 1,17 1,17 1,17
6,40
1,17 1,17 1,05 1,05 1,05 1,051,05 1,05
6,40 m 5,50 m 4,60 m 3,50 m 3,00 m 2,40 m
5,50 4,60 3,50 3,00 2,40
PCF PI
PVC
LINER
TPVC
page 26

13
4 h.
2- 3
3 h. 3 h. 2 h.
2- 3 2- 3 2- 3
2 h.
2- 3
COMPONENTS - COMPONENTES - ELEMENTS - BESTANDTEILE - COMPONENTI - ONDERDELEN - COMPONENTES
Ø
6,40
m
Ø 3,00
Ø 2,40
m
Ø
5,50
m
Ø
4,60
m
Ø
3,50
m
PU
EM
PLAYA
PU
PCF
L
CH
PV
PI
T
T
TT
PIPC
PI
SF
TPS
TPVC
PT
EM
SERIE VARADERO
SERIE BORA BORA
SERIE IRAKLION
SERIE FIDJI
SERIE PACIFIC

14
CH
PV
TT
PLAYA
m3
1,17 1,17 1,17 1,17
6,40
1,17 1,17
PCF
Ø 4,60Ø 5,50Ø 6,40 Ø 3,50
Ø 3,00 Ø 2,40
PI
PU
T
8
8
8
8
8
CH 1
1
11
10
12
14 8
PCF 6
L1
1
11
14
14
1012
1012
101214 8
PLAYA
20
2428 16
PU
14 8
10
12
PV
111 1
TPVC
100120140 80
T
2828
TT
101214 8T1
120
132
28 28
1,05 1,05 1,05 1,051,05 1,05
6,40 m 5,50 m 4,60 m 3,50 m 3,00 m 2,40 m
5,50 4,60 3,50 3,00 2,40
37,63
33,77
28
1
7
1
8
16
1
8
80
8
27,79
24,94 19,44
17,45 11,25
10,10 8,27
7,41 5,29
4,75
TPL & TP TPL
&
TP
SERIE MARGARITA
SERIE SKYATHOS
SERIE MAURITIUS
SERIE ATLANTIS
SERIE MOONLIGHT
TPL
TP
10
12
14 8PIPC
10
12
14
PI 8
6
T1
323232 3232
PIPC
TPVC
LINER
PVC
page 27

15
PU
PLAYA
PU
PCF
L
CH
PV
PI
T
T
TT
PIPC
PI
SF
TPL
TPVC
T1
TP
T
COMPONENTS
COMPONENTES
ELEMENTS
BESTANDTEILE
COMPONENTI
ONDERDELEN
COMPONENTES
4 h.
2- 3
3 h. 3 h. 2 h.
2- 3 2- 3 2- 3
2 h.
2- 3
Ø
6,40
m
Ø 3,00
Ø 2,40
m
Ø
5,50
m
Ø
4,60
m
Ø
3,50
m
TPL&TP

INSTALLATION
INSTALACION
INSTALLATION
INSTALLATION
INSTALLAZIONE
INSTALLATIE
INSTALAÇÃO
INSTRUCTIONS
Important: The liner used in the
manufacture of all our pools has been
designed for exposure to heat and ultraviolet
rays for a considerable period of time.
However, under certain climatic conditions
and use, the qualities of the liner may vary
slightly.
Importante: El liner utilizado para la
fabricación de todas nuestras piscinas, está
desarrollado para ser expuesto al calor y
rayos ultravioleta un largo período de tiem-
po. Por lo tanto, bajo ciertas condiciones
de clima y de uso, las cualidades del liner
pueden variar ligeramente.
Important: Le liner utilisé pour la fabrication
de toutes nos piscines est conçu pour être
exposé durant une longue période à la
chaleur ou aux rayons ultra-violet.
Cependant, sous certaines conditions
climatiques et d'utilisation, les qualités
du liner peuvent légèrement varier.
•Wichtig: Die zur Herstellung unserer
Becken eingesetzte Folie ist langfristig
wärme und UV-beständig. Jedoch sind unter
bestimmter Witterungs und
Einsatzbedingungen Beeinträchtigungen
der Folieneigenschaften nicht
auszuschließen.
Importante: Il liner adoperato per la
costruzione di tutte le piscine di nostra
produzione è stato concepito per essere
esposto al calore ed ai raggi ultravioletti
per lungo tempo.Nonostante cio, sotto
determinate condizioni climatiche e d’uso,
le caratteristiche del liner possono variare
leggermente.
Belangrijk: De liner, welke gebruikt wordt
bij de vervaardiging van al onze
zwembaden is zodanig ontwikkeld, dat
deze gedurende een lange periode bestand
is tegen warmte en ultraviolette stralen.
Dat is de reden, waarom bij zekere
klimaats- en gebruiksomstandigheden de
kwaliteiten van de liner kunnen variëren.
Importante: O liner utilizado para a
fabricação das nossas piscinas está con-
cebido para ser exposto ao calor e aos
raios ultravioleta durante muito tempo.
Porém, em cer tas condições climáticas e
de uso, as qualidades do material podem
variar.
16
PA RT E 4
When closing the pool plate (CH) using the screws (TT), make sure the screw heads are
facing inwards and the washer and the blind nut outwards (page 20)
. Tighten the screws
without distorting the plate.
A la hora de cerrar la chapa (CH)
con los tornillos (TT), la cabeza de los mismos debe quedar
en la parte interior de la piscina, la arandela y la tuerca ciega en la parte exterior (pag.20). Apriete
los tornillos sin deformar el material.
Pour fermer la tôle (CH) à l’aide des vis (TT), la tête des vis doit rester à l’intérieur de la
piscine, la rondelle et l’écrou borgne à l’extérieur (page 20). Serrez les vis sans déformer
le matériau.
Wenn Sie das Blech (CH) mit den Schrauben (TT) schließen, sollten die Schraubenköpfe
im inneren Seite des Beckens sein, die Unterlegscheibe und die Blindschraubenmutter
jedoch außen (Seite 20). Befestigen Sie die Schrauben ohne dass das Material beschädigt
wird.
Nel momento di chiusura della piastra (CH) con le viti (TT) la testa delle viti deve rimanere
nella parte interna della piscina, mentre la rondella e il dado cieco rimangono nella parte
esterna (pag.20). Stringa le viti senza deformare il materiale.
Bij het sluiten van de plaat (CH)
met de schroeven (TT), moet de kop van deze schroeven in
het binnenste gedeelte van het zwemblad blijven, de ring en de blinde moer in het buitenste gedeelte
(pag.20. Trek de schroeven aan zonder het materiaal te vervormen.
No momento de fechar a estrutura de chapa (CH) da piscina, com os parafusos (TT), a
cabeça dos mesmos deve ficar colocada do lado de dentro da piscina; As anilhas e as
porcas de aperto dos parafusos ficarão do lado exterior (pág 20). Apertar o conjunto dos
três elementos (parafuso, anilha e porca de aperto) sem deformar a estrutura da piscina.
IMPORTANT - IMPORTANTE - IMPORTANT -
WICHTIG - NOTA - BELANGRIJK - IMPORTANTE

PERFILES INFERIORES (PI) para piscinas redondas.
ATENCION: Estos perfiles curvos SON PARALA PARTE INFERIOR de las PISCINAS REDONDAS. Coger cada perfil inferior (PI) y colocar una pieza de estampación (PU) en la mitad de cada
uno,(ver foto 2). Una entre sí los perfiles con las piezas de unión (PIPC) dejando más ó menos 1 cm de separación entre ellos (ver foto 5). Completar el círculo con todos los perfiles. Comience
a colocar la chapa en mitad de una pieza de estampación (PU) situada con antelación en mitad de cada perfil,(ver pag 20). Si al cerrar la chapa el círculo de los perfiles es más pequeño, deberá
separar todos los perfiles entre sí hasta conseguir el diámetro exacto. Si por el contrario el círculo de perfiles es mayor deberá ir juntándolos entre sí hasta igualarlo con el diámetro de la chapa.
NOTA:(LO) Si el terreno no es firme (Hormigón, etc.) se recomienda poner una loseta ó baldosa enterrada (a nivel del suelo ) debajo de cada pieza de estampación PU para evitar que se hundan
los perfiles verticales PV en el terreno con el peso del agua. ATENCIÓN: Las piezas de estampación PU " bajo ninguna circunstancia deben fijarse al suelo por ningún medio, en caso
de realizarse corren riesgo de rotura de la piscina y perdida automática de la garantía ".
* Usar cinta aislante para cubrir las piezas PU y PIPC por la parte interior de la piscina y evitar de esta forma que puedan dañar el liner.
17
BOTTOM SECTION PIECES (PI) for Round Swimming Pools
NOTE: These curved SECTION PIECESARE FOR THE BOTTOMS of ROUND SWIMMING POOLS. Take each bottom section piece (PI) and fit a drop-forged part (PU) in the middle (see photo
2). Join the section pieces to one another with the joining pieces (PIPC), leaving a gap of about 1cm between them (see photo 5). Complete the circle with all the section pieces. Begin fitting the
wallplate in the middle of a drop-forged part (PU) previously positioned half way along each section piece (see page 20). If on completing the wallplate installation the circle made by the section
pieces is too small, open out the section pieces until you achieve the exact diameter. If, on the other hand, the circle of section pieces is too big, you will have to close them up until the circle
matches the diameter of the wallplate. NOTE: (LO ) If the ground is not firm (concrete, etc.), it is advisable to set a tile or slab into the ground under each part PU to prevent the upright supports
PV from sinking under the weight of the water. NOTE: Drop-forged parts PU under no circumstances shall be affixed to the ground by any means; in the event of doing so, you run the
risk of swimming pool breakage and the automatic loss of the warranty.
* Use duct tape to cover parts PU and PIPC on the inside of the pool and thus avoid that may damage theliner.
PROFILÉS INFÉRIEURS (PI) pour Piscines Rondes.
ATTENTION : Ces profilés courbes SONT PRÉVUS POUR LA PARTIE INFÉRIEURE des PISCINES RONDES. Prenez cha que profilé inférieur (PI) et posez une bride (PU) au milieu de chacun
des profilés (cf. photo 2). Assemblez les profilés entre eux à l’aide des pièces d’assemblage (PIPC) en laissant environ 1 cm d’écart entre eux (cf. photo 5). Faites le tour du cercle avec tous
les profilés. Commencez à installer la tôle au milieu d’une bride (PU) qui est déjà posée au milieu de chaque profilé (cf. page 20).Si en terminant l’installation de la tôle, le cercle des profilés est
plus petit, vous devrez séparer tous les profilés jusqu’à obtenir le bon diamètre. Si au contraire le cercle des profilés est plus grand, vous devrez les serrer davantage les uns aux autres jusqu’à
les faire coïncider avec le diamètre de la tôle. ATTENTION : ( LO ) Si le terrain n’est pas solide (béton, etc.), il est recommandé de mettre des carreaux ou un dallage enterré (au niveau du sol)
sous chaque pièce PU pour éviter l’effondrement des profils verticaux (PV) sur le terrain avec le poids de l’eau. ATTENTION: Les pièces d’union PU ne doivent en aucun cas être fixés au
sol par n’importe quel moyen, si cela se produit, vous prenez le risque de déchirer la piscine et de perdre automatiquement la garantie.
*Utiliser du ruban isolant pour couvrir les pièces PU et PIPC sur la partie intérieure de la piscine afin d’éviter tout dommage sur le liner.
UNTERPROFILE (PI) für runde Pools.
HINWEIS: DIESE GEBOGENEN PROFILE SIND FÜR DAS UNTERTEIL RUNDER POOLS BESTIMMT. Auf jedem Unterprofil (PI) befestigen Sie in der Mitte ein Stanzteil (PU) (siehe Foto 2).
Verbinden Sie nun die Profile mit den Verbindungsstücken (PIPC), wobei Sie ca. 1 cmAbstand zwischen beiden belassen (siehe Foto 5). Schließen Sie den Umfang mit sämtlichen Profilen ab.
Legen Sie nun das Blech auf die Mitte eines Stanzteils (PU), das zuvor auf der Profilhälfte angebracht worden ist (siehe Abb. 20). Fällt der Profilkreis beim Schließen des Blechs kleiner aus,
dann trennen Sie die Profile voneinander, bis der Durchmesser erreicht ist. Ist der Profilkreis dagegen größer, dann schieben Sie die Profile zusammen, bis der Blechdurchmesser erreicht ist.
HINWEIS: ( LO ) Wenn der Untergrund nicht fest ist (Beton usw.), wird empfohlen, eine Fliese unter jedes PU-Teil bündig in den Boden einzulassen, damit sich die Senkrechtprofile (PV) nicht
unter dem Gewicht des Wassers in den Boden eingraben. HINWEIS: Unter keinen Umständen sind die PU-Stanzteile in keiner Weise am Boden befestigt zu werden. Dadurch würde die
Gefahr einer Beschädigung Ihres Pools und der frühzeitigen Aufhebung der Garantie bestehen.
* Verwenden Sie Klebeband, um Teile PU und PIPC auf der Innenseite des Pool-Abdeckung und damit vermeiden, dass die Auskleidung beschädigen.
PROFILI INFERIORI (PI) per Piscine Circolari.
ATTENZIONE: Questi profili curvi SONO PER LA PARTE INFERIORE delle PISCINE CIRCOLARI. Prendere ogni profilo inferiore (PI) e situare un pezzo stampato (PU) sulla metà di ciascuno
di essi (vedi fotografia 2). Unire fra loro i profili con i pezzi d’unione (PIPC) lasciando più o meno 1 cm di separazione fra loro (vedi fotografia 5). Completare il cerchio con tutti i profili. Iniziare a
collocare la lamiera sulla metà di un pezzo stampato (PU) precedentemente situato sulla metà di ogni profilo (vedi pagina 20). Se nel chiudere la lamiera il cerchio dei profili è più piccolo, si
dovrà separare tutti i profili fra loro fino ad ottenere il diametro esatto. Se invece il cerchio dei profili è maggiore, si dovranno unire fra loro fino a pareggiarlo con il diametro della lamiera. NOTA:
( LO ) Se il terreno non è solido (calcestruzzo, ecc.), si consiglia di posare una mattonella o una piastrella interrata (a livello del suolo) sotto ogni pezzo PU per evitare che i profili verticali sprofondino
(PV) nel terreno con il peso dell'acqua. ATTENZIONE: I pezzi stampati PU in nessun caso devono essere fissate al suolo per nessun mezzo; in caso di essere eseguito, può provocare
la rottura della piscina e la perdita automatica della garanzia.
* Utilizzare nastro adesivo per coprire le parti PU e PIPC all’interno della piscina e quindi evitare che possanodanneggiare il rivestimento.
BENEDENPROFIELEN (PI) voor ronde zwembaden.
OPMERKING: Deze gebogen profielen ZIJN BESTEMD VOOR DE ONDERKANT van de RONDE ZWEMBADEN. Pak elk benedenprofiel (PI) en plaats een ponsdeel (PU) in het midden van
ieder profiel (zie foto 2). Verbind de profielen met elkaar door middel van de verbindingsonderdelen (PIPC) en laat daarbij ongeveer 1 cm tussenruimte over (zie foto 5). Completeer de cirkel
met alle profielen. Begin met het plaatsen van de wand in het midden van een ponsdeel (PU) dat van te voren in het midden van ieder profiel is geplaatst (zie blz. 20). Wanneer bij het sluiten
van de wand de cirkelomtrek van de profielen te klein is dan zullen alle profielen van elkaar moeten worden gescheiden totdat de juiste diameter wordt verkregen. Als, in het tegenovergestelde
geval de cirkel van de profielen te groot is, dan zullen zij met elkaar moeten worden verbonden totdat bereikt wordt dat deze cirkelomtrek gelijk is aan de cirkelomtrek van de wand. OPMERKING:
(LO ) Wanneer het terrein niet vast is (beton, enz.) wordt aangeraden onder ieder onderdeel PU platte stenen of plavuizen ingegraven in de grond aan te brengen (op gelijk niveau als dat van
de grond) om te voorkomen dat de vertikale profielen (PV) op dit terrein door het gewicht van het water niet kunnen verzakken. Opgelet: De gestampte onderdelen PU moeten onder geen
enkele omstandigheid en op geen enkele manier aan de vloer worden bevestigd. Voor het geval dit wél gebeurt loopt men het risico van een breuk in het zwembad en het daaruit
voortvloeiende verlies van de garantie. * Gebruik tape om delen PU en PIPC op de binnenkant van het zwembad te dekken en aldus te voorkomen dat de liner kunnen beschadigen.
PERFIS INFERIORES (PI) para Piscinas Redondas.
ATENÇÃO: Estes perfis curvos SÃO PARAA PARTE INFERIOR das PISCINAS REDONDAS. Apanhar cada perfil inferior (PI) e colocar uma peça de encaixe (PU) no meio de cada um deles,
(ver fotografia 2). Una entre si os perfis com as peças de união (PIPC), deixando pelo menos 1 cm de separação entre os mesmos (ver fotografia 5). Completar o círculo com todos os perfis.
Comece a colocar a chapa no meio de uma peça de encaixe (PU) situada com antecedência no meio de cada perfil (ver página 20). Se quando fechar a chapa o círculo dos perfis for mais
pequeno, deverá separar todos os perfis entre si até conseguir o diâmetro exacto. Se, pelo contrário, o circulo de perfis for maior, deverá ir juntando-os até igualar com o diâmetro da chapa.
NOTA: ( LO ) Se o terreno não for firme (Betão, etc. ) recomenda-se pôr uma laje ou placa enterrada (ao nível do chão) debaixo de cada peça PU para evitar o afundamento dos perfis verticais
(PV) no terreno com o peso da água. ATENÇÃO: As peças de estampagem PU sob nenhuma circunstância devem fixar-se ao chão por nenhum meio; em caso de realizar-se, corre-
se o risco de ruptura da piscina e da perda automática da garantia.
* Use fita adesiva para cobrir as partes PU e PIPC no interior da piscina e, evitar que possam danificar o liner.
PIPC
PI
PIPC
1cm
5
PI
PI
PIPC
43
PI PU
2
PI
1
PU
PIPC
PI
*
1
2 - 3
(LO)

18
PU
TT
2
* ¡IMPORTANTE! ANTES DEL MONTAJE, DESBARBAR, CON AYUDA DE LIMA Y PAPEL DE LIJA EL BORDE DE LA CHAPA (CH).
Colocar la chapa CH verticalmente sobre un trozo de cartón ( para evitar estropear la superficie preparada para la instalación). Fijarse que el
troquel cuadrado queda situado en la parte superior en contra de la dirección de los vientos dominantes de su zona. Encajar el extremo de
la chapa en el primer perfil PI hacerlo coincidir encima de la pieza de estampación PU. Ahora, desplegarla mientras la introducimos dentro
de los perfiles PI, en el sentido de las agujas del reloj.
Comple ar el circulo y cerrar la chapa CH con los ornillos TT. La cabeza del ornillo debe quedar en la par e in erior de la piscina , la
arandela y uerca ciega en el ex erior (Aprie e los ornillos sin deformar el ma erial).
* IMPORTANT! BEFORE ASSEMBLY, DEBURRING, USING A FILE AND SANDPAPER, THE EDGE OF THE CLOSING WALL (CH).
Fit the wall plating CH verticall on a piece of cardboard (to avoid damaging the area prepared for the installation). Make sure the square and
pierced piece is alwa s located in the superior part and face to dominating winds. Fit the plating extremit and the first profile (PI) together and
make the plating extremit correspond with the top of the joining-piece PU. Now, ou can unfold it introducing it in the profiles PI, working clockwise.
Complete the circle and close the plating CH thanks to the screws TT. The screwhead has o s ay in he in erior par of he pool, he ring
and he blind nu in he ex erior par (Tigh en he screws wi hou dis or ing he ma erial).
* IMPORTANT! AVANT MONTAGE, ÉBAVURER, À L AIDE D UNE LIME ET DE PAPIER DE VERRE, L ARÊTE DE LA PAROI (CH).
Poser la tôle CH verticalement sur un morceau de carton (pour éviter de détériorer la surface préparée pour linstallation). Veillez à ce que la
pièce percée carrée soit toujours située sur la partie supérieure et face aux vents dominants. Emboîter lextrémité de la tôle dans le premier
profilé PI et la faire correspondre avec le dessus de la pièce dunion PU. Maintenant, vous pouvez la déplier en lintroduisant dans les profilés
PI.
Complé er le cercle e fermer la ôle CH avec les vis TT. La ê e de la vis doi res er dans la par ie in érieure de la piscine, la rondelle
e lécrou aveugle dans la par ie ex érieure (Serrez les vis en évi an de déformer le ma ériel).
* WICHTIG! VOR DEM ZUSAMMENBAU ALLE KANTENENDEN MIT FEILE UND SANDPAPIER ENTGRATEN (CH).
Blech CH senkrecht auf ein Stück Pappe stellen (um die für die Installierung vorbereitete Fläche nicht zu beschädigen). Achten Sie darauf, dass
das viereckige Stanzteil oben und entgegen der in diesem Bereich vorherrschenden Windrichtung zu liegen kommt. Passen Sie dann das
Blechende so in das erste Profil PI ein, dass es genau über dem Stanzteil PU liegt. Dann entfalten Sie es und setzen es gleichzeitig im
Uhrzeigersinn in die Profile PI ein.
Vervolls ändigen Sie den Kreis und verschließen Sie das Blech CH mi den Schrauben TT, wobei der Schraubenkopf innen im Pool,
die Un erlegscheibe und die Blindmu er jedoch außen liegen müssen (Ziehen Sie die Schrauben an, ohne das Ma erial zu verformen).
* NOTA! PRIMA DEL MONTAGGIO, SBAVARE, MEDIANTE UNA LIMA E DELLA CARTA VETRATA, LE ESTREMITÀ DELLA LAMIERA (CH).
Montare la lamiera CH verticalmente su un pezzo di cartone (per evitare di rovinare la superficie preparata per l'installazione). Fare attenzione
che lo stampo quadrato sia situato sulla parte superiore e contro la direzione dominante del vento nella propria zona geografica. Inserire l'estremità
della lamiera nel primo profilo PI e farlo coincidere sul pezzo stampato PU. Quindi staccarlo mentre si inserisce all'interno dei profili PI, in senso
orario.
Comple are il circolo e chiudere la lamiera CH con le vi i TT. La es a della vi e deve res are nella par e in erna della piscina, la rondella
e il dado cieco all'es erno (S ringere le vi i senza deformare il ma eriale).
* BELANGRIJK:ALVORENS DE MONTAGE UIT TE VOEREN MOET MEN DE UITEINDEN VAN ELKE HOEK AFBRAMEN MET BEHULP VAN EEN VIJL EN
SCHUURPAPIE (CH).
De plaat CH vertikaal plaatsen op een stuk karton (om te voorkomen dat de voor de installatie gereedgemaakte oppervlakte wordt beschadigd).
Houd er rekening mee dat de vierkant geponste opening aan de bovenkant geplaatst moet zijn en tegenovergesteld aan de richting van de
overheersende wind in de zone. Het uiteinde van de plaat inpassen in het eerste profiel PI en dit laten samenvallen op het ponsdeel PU. Daarna
ontvouwen we het en brengen het, in de richting van de wijzers van de klok, binnenin de profielen PI.
De cirkel vol ooien en de plaa CH slui en me de schroeven TT. De kop van de schroef moe zich aan de binnenkan van he zwembad
bevinden en de slui ring en de dopmoer aan de bui enkan (Druk de schroeven s evig aan zonder he ma eriaal e vervormen).
* IMPORTANTE: ANTES DA MONTAGEM, DESBASTAR COM A AJUDA DE UMA LIMA E DE PAPEL DE LIXA AS PONTAS DA CHAPA (CH).
Colocar a chapa CH verticalmente sobre um pedaço de cartão (para evitar de estragar a superfície preparada para a instalação). Tenha em
conta que o estampo quadrado fica situado na parte superior e contra o sentido do vento dominante da zona onde estiver situada a piscina.
Encaixar o extremo da chapa no primeiro perfil PI, fazendo-o coincidir encima do estampo PU. Estenda-a e introduza-a dentro dos perfis PI,
no sentido das agulhas de um relógio.
Comple ar o círculo e fechar a chapa CH com os parafusos TT. A cabeça do parafuso deve ficar na par e in erior da piscina e a arandela
e a porca cega para o ex erior (Aper e os parafusos evi ando deformar o ma erial).
Tool necessary (not included)
Herramien a necesaria (no incluida)
Ou il nécessaire (non compris)
Erforderliches werkzeug (nicht eingeschlossen)
U ensile necessario (non compreso)
Benodigd gereedschap (niet inbegrepen).
Ferramen a necessária (não éstá incluída)
PI
CH
TT
*

PU
MPR TPR
PI
TPVC
19
3
TPVC
TIRA DE PVC PROTECTORAS (RECUBRIMIENTO INTERIOR DE LA PISCINA):
La tira de PVC se coloca enganchándola a la tuerca más alta del cierre de la chapa y se cuelga la tira hacia el interior de la piscina para que tape las cabezas de
los tornillos.
La Manta o Tapiz: Advertencia: se recomienda limpiar todas las suciedades de la pared y suelo de la piscina con ayuda de una aspiradora antes de colocar la
manta o tapiz.
Colocar la manta protectora o el tapiz en el interior de la piscina, eliminando todos los pliegues, ajustando y cortando el sobrante de la superficie total. Realice el corte
de forma que queden tapados los perfiles inferiores y las piezas metálicas. De esta forma el liner quedará protegido cuando lo instale.
PVC PROTECTIVE STRIP (INTERIOR POOL COVERING):
Attach the PVC strip to the top nut at the joint of the wall plate so that it hangs down inside the pool to cover the screw
heads.
The Ground Cover or floor tapestry - Caution: Clean all dirt from the pool wall and bottom with a vacuum cleaner before placing the ground cover or floor tapestry
in position.
Fit the protective ground cover or floor tapestry in the interior of the pool and smooth out all the creases, adjusting and cutting away excess from the total surface
area. Cut so that the bottom section pieces and the metal parts are covered. This way the liner will be protected when you install it.
PVC-SCHUTZSTREIFEN (INNENAUSKLEIDUNG DES POOLS):
Der PVC-Streifen wird an die am höchsten liegende Mutter des Blechverschlusses eingehängt und anschließend imPoolinnern nach unten gehängt, um die
Schraubenköpfe abzudecken.
Decke / bodendecke: Zu Beachtung: Es wird dringend empfohlen, Wand und Boden des Schwimmbads mit einem Staubsauger von jeglichem Schmutz zu
befreien, bevor die Decke / bodendecke verlegt wird.
Verlegen Sie die Schutzdecke / bodendecke im Poolinnern, beseitigen Sie sich bildende Falten, passen Sie sie ein und schneiden Sie überstehende Teile der Fläche
ab. Schneiden Sie das überstende Stück so, dass die Innenprofile und die Metallteile a
bgedeckt bleiben. Auf diese Weise ist der Liner während des Bezugs geschützt.
STRISCIA DI PVC DI PROTEZIONE (RIVESTIMENTO INTERNO DELLA PISCINA):
La striscia di PVC viene sistemata agganciandola al dado più alto della chiusura della lamiera e si attacca quindi all'interno della piscina affinché copra la testa
delle viti.
La Coperta o tappeto da suolo: Avvertenza: si consiglia di pulire ogni traccia di sporco dalla parete e dal pavimento della piscina con l’aiuto di un aspiratore
prima di sistemare la coperta o tapeto da suolo.
Situare la coperta protettiva o tapeto da suolo all’interno della piscina, eliminando tutte le pieghe, sistemando e tagliando l’eccesso della superficie totale. Fare il
taglio in modo da rendere coperti i profili inferiori e i pezzi metallici. In questo modo il liner rimanerà protetto una volta montato.
BANDE DE PROTECTION EN PVC (RECOUVREMENT INTERIEUR DE LA PISCINE):
La bande de PVC s'accroche à l'écrou le plus haut de la fermeture de la tôle et se tourne vers l'intérieur de la piscine, pour couvrir les têtes des vis.
La Couverture ou tapis de sol: Avertissement : bien nettoyer la paroi et le sol de la piscine avec un aspirateur, pour la débarrasser de toutes les saletés, avant
de poser la couverture ou tapis de sol.
Poser la couverture ou tapis de sol protecteur à l’intérieur de la piscine ; éliminer tous les plis, ajuster et couper ce qui dépasse de la surface totale. Couper de
façon à ce que les profils inférieurs et les pièces métalliques restent couverts. Le liner sera ainsi protégé lors de son installation.
BESCHERMSTROOK VAN PVC (BINNENBEKLEDING VAN HET ZWEMBAD):
De PVC-strook wordt geplaatst door haar vast te haken aan de bovenste moer van de plaatafsluiting. De strook wordt langs de binnenkant van het zwembad
gehangen om de schroefkoppen te bedekken.
De Bedekking / voerbekleding: Waarschuwing: het wordt aanbevolen al het vuil van de zwembandwand en -vloer te reinigen met behulp van een stofzuiger
voordat de bedekking / voerbekleding geplaatst wordt.
De beschermbedekking / voerbekleding aan de binnenzijde van het zwembad plaatsen, alle plooien verwijderen, afstellen en het overtollige van het totaal oppervlak
afsnijden. Verricht het afsnijden op zodanige wijze dat de binnenprofielen en de metalen onderdelen bedekt blijven. Op deze manier zal de liner bij de installatie
daarvan beschermd zijn.
TIRA PROTECTORA DE PVC (REVESTIMENTO INTERIOR DA PISCINA):
A tira de PVC engancha-se à porca mais alta do fecho da chapa e vira-se para o interior da piscina, para tapar as cabeças dos parafusos.
A Manta ou tapete de chão: Advertência: Recomenda-se limpar todas as sujidades da parede e do chão da piscina com a ajuda de um aspirador antes de colocar
a manta ou tapete de chão.
Colocar a manta de protecção ou tapete de chão no interior da piscina, eliminando todas as dobras, ajustando e cortando o sobrante da superfície total. Faça o
corte de maneira que fiquem tapados os perfis inferiores e as peças metálicas. Deste modo, o liner ficará protegido quando instalá-lo.

20
NºSERIE:
º C
25º- 30º
MONTAJE DE LA FUNDA (LINER PVC):
DESPLIEGUE DE LA FUNDA:
Estire y extienda el liner (L) a la sombra para que recupere su textura, al menos 2 horas antes de su colocación. Temperatura ideal:Para manipular el Liner
mejor,procure colocarlo a una temperatura ambiente de entre 25 - 30º C. SITUAR LA FUNDA (L) EN EL CENTRO DE LA PISCINA.DESPLEGARLA CENTRANDO
EL FONDOY ARRIMANDO EL LATERAL HACIA LA CHAPA. LA SOLDADURA QUE UNE EL FONDO CON EL LATERAL DEBE QUEDAR PERFECTAMENTE
ARRIMADA A LOS PERFILES INFERIORES POR TODO EL PERIMETRO DEL FONDO DE LA PISCINA EVITANDO QUE QUEDEN PLIEGUES. ES MUY
IMPORTANTE QUE LA FUNDA QUEDE BIEN CENTRADAY EXTENDIDA.NOTA: Si quedan pliegues en el fondo del liner, no es motivo para cambiarlo por otro
ya que NO es un defecto de fabricación.
Nº SERIE: Localice en el fondo del liner y apunte el Nº de serie en el recuadro de la hoja de instrucciones para posibles reclamaciones.
PI
FITTING THE P.V.C. LINER:
UNFOLDINGTHE LINER:
Stretch and extend the liner (L) in the shade so that it recovers its texture at least 2 hours before it is to be positioned. Ideal temperature: in order to handle the
liner more easily, ensure that it is fitted at an ambient temperature of between 25 - 30º C.PLACE THE LINER (L) IN THE CENTER OF THE POOL, AND START
BY UNFOLDING THE BOTTOM, FOLLOWING THE MAIN AXIS OF THE POOL AND PUSHING THE SIDE UP AGAINST THE WALL PLANTING. THE SEAM
BETWEEN THE BOTTOM AND THE SIDE MUST BE BUTTED AGAINST THE BASE OF THE WALL PLANTING ALL AROUND THE POOL BOTTOM, TO
PREVENTVFOLDS. IT IS MOST IMPORTANT THAT THE PVC LINER BE FULLY EXTENDED. NOTE: if there are creases on the base of the liner this does not
mean that it has to be changed for another since this does NOT indicate a manufacturing defect. SERIAL NO.: located on the base of the liner.Take note of the
serial no.in the box on the instruction sheet for any possible complaints.
MONTAGE DU LINER (PVC) AVEC RAIL D'ACCROCHE (SF):
DEPLIAGE DU LINER:
Etirer et étendre le liner (L) à l’ombre, pendant 2 heures au moins avant la pose pour qu’il puisse récupérer sa texture.Température idéale :Pour faciliter la manipulation
du Liner, il serait préférable de le poser à une température ambiante comprise entre 25 et 30º C. PLACER LE LINER AU CENTRE DE LA PISCINE AFIN DE LE
DEPLIER.CHERCHER LE RAIL D´ACCROCHE (SF PASO 6) QUI SE TROUVE SUR LE REBORD DU LINER.INSTALLER LE RAIL D'ACCROCHE SUR LE HAUT
DE LA CIRCONFERENCE DE LA TOLE, ET AJUSTER LE EN BAS, CONTRE LES PROFILES.SUPPRIMER LES PLIS, IL FAUT ABSOLUMENT QUE LE LINER
SOIT PARFAITEMENT CENTRE ET BIEN TENDU. REMARQUE : S´il y a des plis dans le fond du liner, ce n´est pas la peine de le changer puisque CE N´EST
PAS un défaut de fabrication. Nº DE SÉRIE : Repérer dans le fond du liner le Nº de série et le noter dans l´encart du manuel d´instructions pour d´éventuelles
réclamations.
MONTAGE DER BECKEN-FOLIE (LINER PVC) :
ENTHALTUNG DER BECKEN-LINER:
Entfalten und strecken Sie den Liner mindestens 2 Stunden vor dem Einbau an einem der Sonne abgewandten, schattigen Ort. Ideale Temperatur: Der Liner lässt
sich am besten bei einer Umgebungstemperatur von 25-30ºC manipulieren. LINER (L) IN DER MITTE DES BECKENS AUSBREITEN. DABEI ZENTRIEREN UND
DIE LINER-SEITEN GEGEN DIE STAHLWAND ZIEHEN. DIE UNTERE RUNDE SCHWEIßNÄHTE DES LINERS, MUSS ÜBER DEN GESAMTEN UMFANG DES
BECKENS MÖGLICHST SATT UND OHNE FALTEN AN DEN UNTEREN PROFILEN DER BECKENWAND ANLIEGEN. ES IST AUßERORDENTLICH WICHTIG
DAß, DAS LINER EINWANDFREI ZENTRIERT AUSGEBREITET IST. HINWEIS: Sollten sich am Boden des Liners Falten gebildet haben, so braucht er durch einen
anderen ersetzt zu werden, da es sich NICHT um einen Herstellungsmangel handelt. SERIEN NR. Machen Sie die Serien Nr. am Boden de Liners ausfindig und
notieren Sie diese für evtl. Reklamationen im entsprechenden Kästchen des Anweisungsblattes.
MONTAGGIO DELLA FODERA (LINER PVC):
SROTOLAMENTO DEL TELONE:
Tirare e stendere il liner (L) all’ombra, in modo da recuperare la sua consistenza, almeno 2 ore prima della posa. Temperatura ideale: Per maneggiare meglio il
Liner, è consigliabile posarlo a una temperatura ambiente da 25 a 30º C. COLLOCARE IL TELONE (L) AL CENTRO DELLA PISCINA. INIZIARE DAL FONDO
SEGUENDO LÁSSE PRINCIPALE DELLA PISCINA E AVICCINARE LA PARTE LATERALE VERSO LAMIERA.LA SALDATURA CHE UNISCE IL FONDO ALLA
PARTE LATERALE DEVE ADERIRE PERFETTAMENTE ALLA BASE DELLA PARETE DI LAMIERA PER TUTTO IL PERIMETRO DEL FONDO DELLA PISCINA
EVITANDO COSÌ LA FORMAZIONE DI GRINZE. È ESSENZIALE CHE IL TELONE DI PVC VENGA STESO PERFETTAMENTE. NOTA: Se restano pieghe sul
fondo del liner, non è necessario cambiarlo con un altro, dato che NON è un difetto di fabbrica.Nº DI SERIE: Individuare sul fondo del liner ed appuntare il Nº di
serie sul riquadro del foglio delle istruzioni per eventuali reclami.
MONTAGEVAN HET DEK (LINER PVC) MET FLEXIBEL OMSLAG OM OVER DE PLAAT HEENTE SLAAN:
VASTZETTEN VAN HET ZEIL:
Vouw de liner (L) uit in de schaduw en op z´n minst 2 uur vóór de plaatsing daarvan; strek hem uit zodat deze zijn textuur kan herkrijgen. Ideale temperatuur: Voor
een betere hantering van de Liner dient u ervoor te zorgen dat deze geplaatst wordt bij een omgevingstemperatuur van tussen de 25 en 30º C.DOE DAT MINSTENS
2 UUR VOOR MET DE PLAATSING ERVAN TE BEGINNEN. LEG HET ZEIL (L) IN HET MIDDEN VAN HET ZWEMBAD. BEGIN DE BODEM OPEN TE VOUWEN
LANGS DE WAND VAN DE PLAAT AAN KOMEN TE LEUNEN OVER DE VOLLEDIGE OMTREK VAN HET ZWEMBAD. VERMIJD HIERBIJ DAT ER PLOOIEN
ZOUDEN WORDEN GEVORMD. HET IS VAN GROOT BELANG DAT HET PVC ZEIL GOED WORDT OPENGECOUWD. OPMERKING: Mochten er plooien
achterblijven op de bodem van de Liner dan geeft dat geen reden tot inruil voor een andere daar dit GEEN fabrieksfout inhoudt. SERIENUMMER: Zoek aan de
onderkant van de Liner het serienummer en noteer het in het vakje van de gebruiksaanwijzing voor mogelijke klachten.
MONTAGEM DA COBERTA (LINER PVC):
DESDOBRAMIENTO DA BAINHA:
Estire e estenda o liner (L) na sombra para ele recuperar a sua textura, pelo menos 2 horas antes da colocação.Temperatura ideal: para manipular o liner aconselha-
se uma temperatura ambiente de 25 - 30º C. COLOCAR LA BAINHA (L) NO CENTRO DA PISCINA. COMENÇAR POR DESDOBRAR O FUNDO SEGUINDO O
EIXO PRINCIPAL DA PISCINA E APROXIMANDO O LATERAL À CHAPA.A SOLDADURA QUE UNE O FUNDO COM O LATERAL DEFE FICAR PERFEITAMENTE
ENCOSTADA À BASE DA CHAPA EM TODO O PERÍMETRO DO FUNDO DA PISCINA; EVITAR AS DOBRAS. E MUITO IMPORTANTE QUE A BAINHA DE PVC
FIQUE BEM ESTENDIDA. NOTA: Se ficarem dobras no fundo do liner, não é um motivo para trocá-lo por outro já que não é um defeito de fabricação.
Nº SERIE: Localize no fundo do liner e aponte o Nº de série no quadro da folha de instruções para caso de reclamação.
4
LINER
This manual suits for next models
9
Table of contents
Other GRE Swimming Pool manuals
Popular Swimming Pool manuals by other brands

Jilong
Jilong 1282859 instructions

Intex
Intex Ultra Frame 128310NP owner's manual

Swim'n Play
Swim'n Play XL 7000 instructions

Konifera
Konifera Panama IV Assembly instructions

Trojan Leisure
Trojan Leisure Radiant Pools Metric Series installation manual

Endless Pools
Endless Pools RECSPORT R200 Pre-delivery instructions