GREAT ARBOR GAC-150 Series User manual

i
G R E A T A R B O R C O M M U N I C A T I O N S
GAC-150 Series WiFi Dial
Up Router User Guide
v2.6, June 2012

ii
Table of Contents
GAC-150 Series Wi-Fi Dial Up Router User Guide i
Description 1
Specifications 2
Making the First Connection 3
Configure the Router 5
Start/Stop Connection Remotely 7
Optional Configuration Menu Items 8
Optional: Dialin Mode (Disabled by Default) 8
Optional: Automatic Mode 8
Optional: WiFi Security (Recommended) 9
Optional: Scheduled Dial Up 10
Format of Scheduled Dial Up Command using Crontab 10
Optional: Broadband Configuration 11
Using the Modem with a PC 12
Compatible ISPs 13
Troubleshooting 14
Warranty 16

D E S C R I P T I O N
1
Description
he GAC-150 Series are high performance 802.11n WiFi Routers with an
advanced V.92 standard phone modem to enable Wireless access to the
Internet through a phone line. The GAC-150 Series includes the GAC-150
Gigabit Ethernet WiFi router and the GAC-152 WiFi router which have
100BaseT Ethernet ports. The routers make a dialup connection to the dial up Internet
Service Provider (ISP) of your choice. They come programmed with a free dial up ISP
phone number so that you can start using your WiFi wireless enabled device without a
subscription. The 802.11n WiFi standard allows the WiFi device to be hundreds of feet
away from the router. The GAC-150 Series WiFi antennas are detachable and can be
easily replaced with in-expensive higher gain antennas for even greater range. The
included V.92 standard 56K modem provides the maximum data rate your phone line
can support (usually 40-50 kbps).
The GAC-150 series can be used with both broadband and phone line connections. It is
compatible with most WiFi devices (Laptops, iPad, iTouch, WiFi Smartphones like the
iPhone, Droid, and Blackberry, Gaming devices like the Nintendo DS, etc.). The GAC-
150 Series software platform is based on the Open Source OpenWrt Linux distribution
which is used by thousands of users around the world.
Chapter
1
T

D E S C R I P T I O N
2
Specifications
WiFi Specification
Standards
IEEE 802.11n, (802.11 Lite-N for GAC-152), IEEE 802.11g,
IEEE 802.11b
Wireless Signal Rates
With Automatic
Fallback
11n: Up to 300Mbps(dynamic); (150 Mbps for GAC-152)
11g: Up to 54Mbps(dynamic)
11b: Up to 11Mbps(dynamic)
Frequency Range
2.4-2.4835GHz
Wireless Transmit
Power (MAX)
20dBm(Max. EIRP)
Modulation
Technology
DBPSK, DQPSK, CCK, OFDM, 16-QAM, 64-QAM
Hardware Specification
Interface
4 10/100/1000M LAN Ports (GAC-150)
1 10/100/1000M WAN Port (GAC-150)
4 10/100M LAN Ports (GAC-152)
1 10/100M WAN Port (GAC-152)
1 USB 2.0 Port
1 RJ-11 Phone Modem Port
Phone Modem
V.92 Standard.
Antenna
3dBi Detachable Omni Directional Antenna (X 3 GAC-150,
Single antenna GAC-152)
Power Supply Unit
Input: 110/220 volt
Output: 12VDC / 1.5A Switching PSU
Operating
temperature
0oC~40oC (32oF~104oF)
Storage temperature
-40oC~70oC(-40oF~158oF)
Relative humidity
10% ~ 90%, Non-Condensing
Storage Humidity
5%~95% Non-Condensing

G E T T I N G S T A R T E D
3
Making the First Connection
Setup your router and access the web wirelessly in 5 minutes or less
tart by unpacking the router. The package consists of :
(a) Router, (b) USB Phone-Modem, (c) WiFi Antenna(s), (d) DC
Adapter, and e) Phone cable.
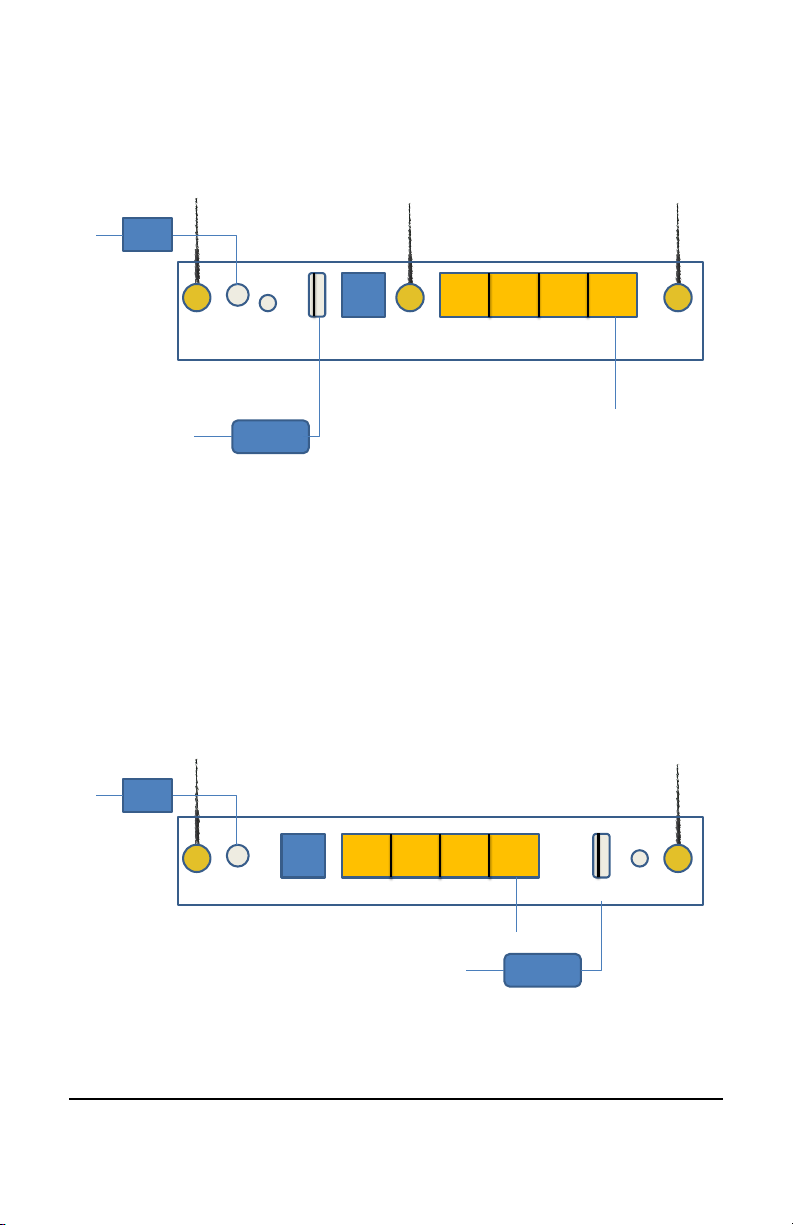
Connections will now be made to the back panel of the Router shown on the
next page. First, screw in the antennas to the antenna connectors at the back. DO NOT
screw them in too tightly to avoid damage the connectors. Attach the black USB phone
modem to the USB slot at the back of the router if it is not already attached to the slot.
Attach the phone cable to the RJ-11 slot on the phone modem and the other end of the
phone cable to a telephone wall jack. Plug in the DC adapter cable to the router and the
DC adapter to the wall power outlet.
Use of a power strip with surge protection for
both power and phone line is recommended.
The router will power up and the
SYS LED in the front will flash. Once it turns solid green the router is ready. Press the
DIAL button on the front of the router to dial-out to the pre-configured free ISP Internet
using the default long distance phone number configured in the router. The dial up
process takes anywhere from 30 seconds to 1 minute depending on the quality of your
phone line and the ISP you are dialing. The LEDs on the black modem will flash during
this process. Once the connection is established, the front USB LED (labeled 3G for the
GAC-152) will start flashing about once per second. If the USB/3G LED does not
flash, remove the power cable from the router, wait for 5 seconds and put the power
back. Once the SYS LED is solid green, press the DIAL button. If the USB/3G LED
does not start flashing once per second after some time then consult the
Troubleshooting Section in this guide.
Turn on your PC and scan for wireless networks. This procedure can be different for
different Operating Systems. For example on Windows XP, you can view the available
WiFi networks by clicking the WiFi icon on the right end of the bottom panel and then
selecting “View Wireless Networks”. The router WiFi ID - OpenWrt will appear. If it
Chapter
2
S

G E T T I N G S T A R T E D
4
doesn’t, wait for 10 seconds, and re-scan (Refresh Network List in Windows XP). Select
OpenWrt and click Connect.
FIGURE 1 Back panel of GAC-150 showing the connections made for phone-modem, power, and LAN
Start a web browser on the PC (Internet Explorer for example) and see if you can access
websites on the Internet. If the USB/3G LED is blinking but you cannot connect to
websites then your PC may not be connected properly to the router. Refer to the
Troubleshooting section for help. Once you are done with the Internet session, press
the same DIAL button to disconnect the connection. The default phone number
configured in the router is a long distance number and you may incur long distance
charges for this first connection. You should now go ahead and customize the router
with the phone number and account information for your own ISP account and
optionally configure WiFi security.
FIGURE 1 Back panel of GAC-152 showing the connections made for phone-modem, power, and LAN
LANWANUSBPWR
Modem
Wall
Phone Jack
To PC
DC
Adapter
Wall
Power
Outlet
LAN
WAN
PWR
Modem
To Wall
Phone Jack
To PC
DC
Adapter
Wall
Power
Outlet
RESET
USB

G E T T I N G S T A R T E D
5
If you want to use the router in wired mode, connect the PC’s LAN port with the supplied LAN cable to any one of the 4
LAN ports on the router. Make sure that the PC is configured to get it’s IP address automatically. Note that PCs are
usually configured for automatic IP address assignment.
Configure the Router
You can skip the configuration process described below if you want to continue using
the pre-configured free ISP and associated long distance number. This may be a good
option if you have an unlimited long distance plan.
Connect via WiFi to the OpenWrt ID as described earlier. Open up your web browser
and enter the address http://192.168.1.1 in the address bar. This is the internal web
configuration page on the router and not a web site on the Internet. The login screen will
appear. Login to the router with user name
root
and password
admin
Click the Network tab to open up the Interfaces page. In this page the DIALUP
interface shows the status of the dial up connection.
FIGURE 2 Interface Status Page
Next click the DIALUP tab under Interfaces and the Dial Up configuration page will
appear as shown in Figure 3 below. Only a few entries on this page need to be changed.
Set the Username and Password to that of your Dial Up ISP Account and specify the
ISP access phone number. Press Save & Apply. The router will store the new entries and
bring the interfaces up. Wait a minute, remove and re-insert power to the router and
once the SYS LED is solid, press the DIAL button to dial your ISP.

G E T T I N G S T A R T E D
6
FIGURE 3 Dial Up Configuration Page
The LEDs on the black modem will flash during this process. Once the connection is
established, the USB/3G LED in front will start flashing continuously once per second.
If the USB/3G LED does not flash, remove the power cable from the router, wait for 5
seconds and put the power back. Once the SYS LED is solid green, press the DIAL
button. The USB/3G LED will begin to flash once per second after the connection is
made (after 30-60 seconds) and you can start accessing the Internet. Remember to press
the DIAL button once you are done to disconnect the connection.
If the USB/3G LED does not flash continuously then click the Status Tab on the top
most row of the web page and then click the Dialup option on the extreme right of the
Status Page. The first line of the log will provide the current status of the dial up
connection. Consult the Troubleshooting section at the end of this guide to diagnose the
issue.

G E T T I N G S T A R T E D
7
FIGURE 4 Dial Up Status Page
Start/Stop Connection Remotely
The dial up connection can also be started and stopped remotely by accessing the web
interface of the router. Refer to Figure 2 and identify the 2 green arrows icon at the far
right of the dialup interface line. Click the icon to start the dial up connection. To close
the connection click the red icon right next to the 2 green arrows icon. If the connection
does not close you may need to click that red icon again. Do not click the red-X icon at
the far right since that will completely delete dial up interface. If you do click that by
mistake then you will have to restore the router to factory defaults to recover the dial up
functionality. Note that there is known bug that sometimes the 3G LED continues to
blink even after the connection is closed using this method.
A Windows PC client application is also available on the User Guide CD which can be
used to start, stop, and check status of the dial up connection. To install the application
copy the dial application on the CD to any folder on the PC. You can then create a
shortcut for the application by pointing to the application and right clicking the mouse
and then moving it to the Desktop for easy access.
To use the application, first make sure the PC is connected to the Openwrt WiFi
network. Next click the dial application or shortcut. A window with Connect,
Disconnect and Status buttons will pop up. Click Connect to start the dialup. Click
OK to exit the Start Window. Next click Status to get status of the connection. The

G E T T I N G S T A R T E D
8
Status message window does not automatically update so click OK to close the window
and click the Status button again to get the latest status.
Optional Configuration Menu Items
In rare cases you may need to change some fields on the Common Configuration Page.
Select pulse dialing if your phone line is still set to the old pulse method of dialing.
Change the modem country code if you are using the router outside USA/Canada so
that modem can recognize the dial tone on the line. A list of country codes can be found
on the web at http://www.katpatuka.org/pub/doc/t.35.html. If your phone line is old
or noisy, it may take a little longer to connect to your ISP. In that case, increase the
Modem Connection Timeout to more than 60 seconds. If call waiting service is available
on your phone line you can set the router to either ignore call waiting during a data
connection (callers get a busy tone) or to drop the data connection and allow the
incoming call. The page also provides the ability to set 2 additional modem
configuration strings. Press Save & Apply to save any changes.
Optional: Dialin Mode (Disabled by Default)
The router also supports the ability to allow external modems to dial into the router
LAN over the phone line. This feature is useful in case the GAC router is at a remote
unattended site and a user would like to connect to PCs on the remote GAC router
LAN. To configure Dialin, enable Select Yes to enable dialin. The number of rings
before the GAC modem picks up the call can also be changed from the default of 3
rings. After clicking Save & Apply, the router needs to be powered off and then powered
on to enable dialin. Dialin to the GAC router can be performed by using the standards
Windows/Mac Dial up Internet Connection client with the username “root” and
password set to the password for root (“admin” by default). For greater security change
the root password by clicking System
and then clicking on the
Admin Password tab
prior to enabling dialin. Upon connection, the dialing PC will be given the IP address
10.4.4.20 and the GAC-modem port IP address will be set to 10.4.4.230. Dial out
connections are still possible (using the DIAL button) in dialin mode. Dial in also requires
the firewall to be set up so that the WAN zone has Input and Forwarding fields set to
accept rather than the default setting of reject.
Optional: Automatic Mode
Access the last field in the Dial Up Configuration page to configure the router to dial up
automatically without pressing the button. In this mode, whenever your PC is connected
to the router (via WiFi or LAN) and you attempt to access the Internet, the router will
make the dial up connection. Enter the time after which the router should automatically
disconnect the connection in case of no activity (180 seconds is recommended). Setting
the time to 0 changes the router from Automatic Mode to Manual Mode. Press Save &

G E T T I N G S T A R T E D
9
Apply to save the new configuration. Note that in Automatic mode, the manual DIAL
button will still work –so you can press the DIAL button to manually start a connection
and press it again to end the connection.
In Automatic mode various programs on your laptop (Virus update, Windows Update,
etc.) may attempt to access the Internet without your knowledge and will trigger a dial up
connection. Once you are connected to the Internet, you will not be able to receive any
calls on your phone line. One way to disconnect the dial up is to disconnect the WiFi
connection on your laptop/device. The dial up connection will be automatically dropped
in 3 minutes or less (Automatic Disconnect Parameter in the Dial Up Configuration
webpage). Another way is to press the DIAL button to disconnect if you are already
connected. As a further precaution, you can use a power strip to switch the power off to
the router when it is not being used.
Optional: WiFi Security (Recommended)
Your WiFi connection can optionally be made secure if you want to be sure that no one
else accesses the Internet using your dial up connection or accesses your PC over WiFi.
Click the Wifi tab (located next to the Interfaces tab) under the Network section. In
the Wireless Overview section, there are 4 images on the extreme right. Click the
“pencil” image to edit the WiFi configuration (Figure 5).
FIGURE 5 WiFi Configuration Page

G E T T I N G S T A R T E D
10
Click the Wireless Security tab in the lower section to set encryption. The most secure
form of encryption is WPA2-PSK and the key can be a mixture of characters and letters.
If your device does not support WPA2-PSK, you can set the encryption to WEP.
However in the case of WEP, the key has to be
exactly 10
characters. After making
the entries, click Save & Apply.
For increased security, you can change the password for the router. Select System and
then Administration. Put in the new password, confirm it and click Save & Apply.
FIGURE 6 Admin Password Configuration Page
Optional: Scheduled Dial Up
The router can be configured to make a dial up connection at particular times of the day,
week, or month and the duration of the connection can also be specified. In order to
create a schedule, first set the TimeZone by clicking on the System Tab, selecting the city
in the same time zone as you desire and then clicking Save & Apply. Next, click on the
Services Tab and then on Scheduled Tasks. Type in the scheduled dialup command
(crontab) in the box (see examples below) and then click Submit. After that turn the
power off and then on to the router to enable the schedule. Note that the router does
not have a real-time clock and gets set with the correct time only after it connects to the
Internet after power on. So if power is lost then the router will reset to the factory set
time and the configured schedule will be affected till the router dials up for the first time.
Format of Scheduled Dial Up Command using Crontab
A crontab file has five fields for specifying the schedule:
* * * * * command to be executed
-- -- -
| | | | |
| | | | +----- day of week (0 - 6) (Sunday=0)
| | | +------- month (1 - 12)
| | +--------- day of month (1 - 31)
| +----------- hour (0 - 23)
+------------- min (0 - 59)

G E T T I N G S T A R T E D
11
* means all values (i.e all days or all months, etc.); ? means omit the specification
For scheduled dial up the command is “ifup dialup” to start the connection and “ifdown
dialup” to end the connection. For example to start the dial up session at 1:00 AM and
end the session at 1:05 AM every day type the following 2 lines in the Scheduled Tasks
box and Submit:
0 1 * * * ifup dialup
5 1 * * * ifdown dialup
To start the dial up session at 5:30 AM every Sunday and end it 5 minutes
later, use the following commands:
30 5 ? * 0 ifup dialup
35 5 ? * 0 ifdown dialup
Optional: Broadband Configuration
If you have a broadband connection (DSL, Cable, Fiber-optic, or satellite) and would like
to use that with the GAC-150 Series, connect the Broadband Ethernet cable to the
WAN port on the router. Access the router administrator console (via
http://192.168.1.1) and select Network/Interfaces/WAN in the same manner as the
Dial Up interface (DIALUP) was selected earlier. Configure WAN as specified by your
Broadband ISP and Save/Apply. In manual button mode of operation the dial up
connection will become the default route to the Internet if the button is pressed. Upon
disconnecting the dial up, the default route will fall back to the Ethernet WAN. In
Automatic dial up mode of operation, the Ethernet WAN route will always be preferred
and dial up connections will only happen if the Ethernet WAN port is physically
disconnected from the broadband service.
Port Forwarding (Redirection)
Port Forwarding can be used to redirect incoming WAN/Dialup connections to servers
on the LAN side of the GAC router. Port Forwarding is useful if web servers, video
cameras and other content servers on the LAN need to be accessed from the Internet.
The Internet connection could be a broadband connection or a scheduled dial up
connection. Typically a dynamic DNS client on the content server is used to associate a
hostname with the current IP address of the GAC router site. This allows users on the
Internet to access the GAC router site with a hostname. The port forwarding
configuration on the router then ensures that those incoming connections are redirected
to the content server. To configure port forwarding first click the Network/Firewall
tab. Next go to the Redirections section of the firewall page and click Add. The port
forwarding (Redirection) page shown in Figure 7 below will be displayed. Select the
incoming protocols (TCP, UDP, TCP and UDP or custom IP protocol name), the ports,
and the IP address of the server on the LAN (Internal IP address) that the traffic is to be
redirected to. For example for a web server on the LAN, the protocol would be TCP
and the port would be 80. You can also map the external port to a different internal port

G E T T I N G S T A R T E D
12
if you wish. Press Save&Apply to save the changes.
FIGURE 7 Port Forwarding (Traffic Redirection Page)
Using the Modem with a PC
You can use the supplied modem directly with a PC/Laptop. Modem drivers for the PC
can be downloaded from the manufacturer’s website.
To prevent unintended dial up which could tie up your phone line, it is
recommended that you power off the router when not in use.
Great Arbor Communications disclaims all responsibility for inadvertent
dial up due to software/hardware malfunction or user configuration,

C O M P A T I B I L I T Y
13
Compatible ISPs
ost dialup ISPs are compatible with Linux and the GAC-150 Series even
though they may state that they do not offer customer support for Linux.
Exceptions are NetZero/Juno and Aol who rely on special PC/Mac dialer
software and are incompatible. In general, the highest speed will be
achieved with ISPs who support V.92 access.
FastFreeDialup.com: www.fastfreedialup.com
FreeDialup.org: www.freedialup.org
The above free ISPs have been tested successfully with the GAC-150 Series. Any user
name/password can be used. Access numbers are in CA and NH respectively can be
connected to anywhere from the country. Sample phone numbers (CA: 1-949-202-1010,
1-925-300-1010; NH: 1-603-371-5050, 1-603-331-0050)
Copper.net: www.copper.net
This ISP has been tested with the GAC-150 Series
Toast.net: www.toast.net
This ISP has not been tested with the GAC-150 Series but is stated to be Linux
compatible and so will likely work. Monthly subscription is required.
Netscape Internet Service: www.getnetscape.com
This ISP has not been tested with the GAC-150 Series but is stated to be Linux
compatible and so will likely work. Monthly subscription is required
Other ISPs who are known to work:
CenturyTel.net, Sympatico.ca, Delmarva Online, AT&T, MSN, Telus(Canada)
Chapter
3
M

T R O U B L E S H O O T I N G
14
Troubleshooting
se the issues and suggested resolution tips below to troubleshoot issues with
the router.
I can’t get connected to the Router
First make sure that the WiFi connection to the router is established. To verify, type the
command
ping 192.168.1.1
on your PC. Lack of a response indicates that the WiFi
connection is not made for some reason and you may have to rescan for networks and
reconnect to OpenWrt. If you can’t make the WiFi connection, connect your PC via the
LAN connection to the router and try the ping test again.
The USB/3G LED does not start flashing after pressing the
DIAL
button
If the USB/3G LED does not start flashing(once per second) in a minute or so after
pressing the button there is a problem in connecting to your ISP. Ensure that the black
modem is connected to the USB port of the router and that the modem is connected to
the phone line. Make sure that no one else is using the phone when you dial up. Also
configure some other ISP access phone number in case the original number is busy.
In many cases, you will have to look at the Dialup Status Screen to diagnose further.
Click Status and then click the Dialup option on the upper right. The page displays
the status of the connection such as “No Dialtone”, “Waiting to Connect”, or
“Modem connected to far end - Doing Password Authentication”, for example. If PPP
authentication fails then check that theISP account user name or password has been
entered correctly. With some ISPs, your full email has to be used as the user name, while
for others like MSN, the username has to be prefixed with a “MSN/” – i.e. for MSN, the
user name for
johndoe
would be MSN/johndoe.
For further assistance select the lines on the web page and Copy/Paste it into an Email
to:
support@greatarbor.com
using normal PC commands (On Windows, you can use
Chapter
4
U

T R O U B L E S H O O T I N G
15
Cntrl-A for Select All, Cntrl-C for Copy, and Cntrl-V for Paste). Also send the router
configuration as an attachment to the support email. The router configuration is
obtained by clicking System, and then clicking Backup/Flash Firmware. In this
screen, select Generate archive to create a file which can be attached to the email.
I made some changes to the router and it doesn’t work any more
Use the Reset to defaults option in the Backup/Flash Firmware page to go back to
the factory configuration. Another way to reset to defaults is to press the reset button at
the back for 8 seconds. All the LEDs will go off and then the SYS LED will start
blinking. The restored factory configuration will come back up in 2-3 minutes and the
SYS LED will be solid green. All your changes will be wiped out so configure the dial up
account again as discussed earlier.
My
DIAL
up speeds are very low
Dialup speeds depend on the condition of your phone line and the modem configuration
of your ISP. It is normal to get download speeds of 40 kbps and upload speeds of 30
kbps.
I can’t receive phone calls
Once you are connected to the Internet, you will not be able to receive any calls on your
phone line. To prevent this, make sure to disconnect after the dial up session or power
off the router.
Troubleshooting Table
Symptom
Next Steps
Factory configured ISP is not
accessible even after pressing
DIAL button
Make sure the phone cable is plugged in OK, Tone/Pulse
Dial is set correctly and the line is not busy
Phone line may be noisy –increase modem connection
timeout.
After unsuccessful call, copy System Log and router backup
file into an email to support
Your ISP is not accessible
Follow above steps and make sure the factory configured
ISP works fine.
Make sure that your ISP access phone number is correct (do
you need to put in the area code ?) - try dialing the number
with a regular phone - if you hear beeps and tones the
number is correct.
Check user name and password for ISP account.
After unsuccessful call, copy System Log and router backup
file into an email to support.
Cannot connect to router via WiFi
Make sure your PC WiFi is enabled and when you view
available wireless networks you can see the OpenWrt
network. If you cannot make a dial up connection please
contact support.

16
Warranty
reat Arbor Communications warrants this product against
defect in materials and workmanship for 1 year after purchase
of the unit. Products requiring warranty service should be
returned to Great Arbor in original packaging after receipt of a
RMA Number. Any product replaced by Great Arbor shall retain a
warranty for the remaining warranty period.
Warranty Exceptions
Any defect caused by misuse, improper installation or maintenance that is not required as per the instructions;
Any unauthorized disassembly and repair;
Any defect caused by improper use in the working conditions beyond the stated ones by the instruction (for example: use
under abnormal temperatures that are too high, low, wet or dry; high sea-level; unstable electric current and voltage and so
on)
Any defect caused by personal disaster or improper maintenance, such as mechanical damage, serious oxidation and
rusting, rat damage, permeating exertion and so on;
Any defect caused by transportation or loading during return shipment;
Any damage caused by natural disasters such as earthquake, fire, flood, lightning strike, or any other natural occurrence;
Any other defects that are not caused by workmanship, technique, product quality and the like.
Notices:
Warranty service stated above is only valid for products sold in the continental USA and Canada.
As for any direct or indirect loss caused by abnormal use of the product, Great Arbor shall only be liable for the duties that are
stipulated by relevant state law.
Great Arbor shall neither, on any account, respond to any loss or damages caused by intangible property such as
applications or configurations, nor respond to any accusation put forward by a third party.
Great Arbor reserves all rights including interpretation and modification to this warranty policy.
Great Arbor shall not be liable for long distance charges or incur any liability for inadvertent dial up due to malfunctioning of
the unit or user
Chapter
5
G

17
Great Arbor Communications
Potomac, MD
www.greatarbor.com
Phone 301-547-3483 • Email support@greatarbor.com
This manual suits for next models
1
Table of contents
Other GREAT ARBOR Network Router manuals
Popular Network Router manuals by other brands

Atlantis Land
Atlantis Land Edge-Core A07-ES5508 Specification sheet

Four-Faith
Four-Faith F3C30 user manual

3Com
3Com OfficeConnect 3CR858-91 installation guide

CTC Union
CTC Union GSW-3208M user manual

HPE
HPE FlexNetwork 6604 installation guide

Patton electronics
Patton electronics SMARTNODE 1200 quick start guide