PAGE 2
!
• THE GRILL IS FOR OUTDOOR USE ONLY!
• KEEP THE GRILL A MINIMUM OF 10 FT. AWAY FROM BUILDINGS
STRUCTURES, ANY FLAMMABLE ITEMS AND VEHICLES DURING USE.
• NEVER USE THE GRILL UNDER COVERED PORCHES, AWNINGS, LOW
HANGING TREE BRANCHES, TRELLIS, OR OVERHANGS OF ANY KIND.
• NEVER USE INSIDE ENCLOSED AREAS SUCH PATIOS, GARAGES,
ENCLOSED ROOMS, BUILDINGS OR TENTS.
• ALWAYS USE THE GRILL ON A HARD, STABLE AND LEVEL SURFACE.
• THE GRILL IS FOR ADULT USE ONLY.
• WARNING! NEVER USE GASOLINE, ALCOHOL OR VOLATILE FLUIDS
TO START OR RESTART FIRES. USE CHARCOAL LIGHTER FLUID ONLY
TO START CHARCOAL. READ AND FOLLOW CHARCOAL LIGHTER
FLUID MANUFACTURER INSTRUCTIONS CLOSELY.
• WARNING! DO NOT OPERATE GRILL WITHOUT ASH TRAY IN PLACE,
DO NOT OPEN ASH TRAY DURING USE.
• DO NOT STORE LIGHTER FLUID OR OTHER FLAMMABLE LIQUIDS OR
MATERIALS ON THE BOTTOM SHELF.
• KEEP CHILDREN AND PETS AWAY WHILE THE GRILL IS BEING USED.
• MITTENS OR GLOVES WILL BE NEEDED TO OPEN THE LID AND
DOORS AS SURFACES WILL BE HOT.
• MOST SURFACES OF THIS GRILL BECOME HOT, USE CAUTION.
• DO NOT MOVE THE GRILL WHILE IT IS BEING USED.
• DO NOT LEAVE UNATTENDED AT ANY TIME WHILE IN USE.
• DO NOT USE IN WINDY CONDITIONS.
• USE CAUTION WHEN OPENING THE LID AS HOT STEAM OR A FLARE
UP COULD CAUSE BURNS.
• BEFORE EACH USE, MAKE SURE THE GRILL IS IN GOOD WORKING
CONDITION.
• FOR LONGER PRODUCT LIFE, KEEP THE CHARCOAL FIRES TO A
RESPECTABLE SIZE, DO NOT OVERLOAD.
• DO NOT ALLOW CHARCOAL TO COME IN CONTACT WITH THE GRILL
SIDES, KEEP CHARCOAL INSIDE CHARCOAL PANS.
• ALLOWING THE CHARCOAL TO CONTACT THE GRILL SIDES WILL
GREATLY REDUCE THE LIFE OF THE METAL AND THE FINISH.
• DO NOT ALTER THE GRILL IN ANY WAY.
• DO NOT USE THE GRILL UNTIL IT IS COMPLETELY ASSEMBLED WITH
ALL PARTS SECURELY TIGHTENED.
• THE SIDE SHELVES CAN HOLD 10 LBS. SAFELY, DO NOT PUT MORE
THAN 10 LBS. ON THE SIDE SHELVES.
• USE CAUTION WHEN HANDLING THE CAST IRON COOKING GRATES,
CAST IRON CAN CHIP, CRACK OR BREAK IF HIT OR STRUCK WITH
A SHARP OBJECT. DO NOT DROP THE CAST IRON GRATES ON THE
GROUND!
• DO NOT LEAN OR PUSH DOWN ON THE SIDE SHELVES.
• USE CAUTION AFTER THE FIRE HAS BEEN EXTINGUISHED- SURFACES
WILL REMAIN HOT FOR SOME TIME.
• BE SURE ALL COALS ARE COLD BEFORE DISPOSING.
• DISPOSE OF COALS PROPERLY.
• THE GRILL MUST BE COMPLETELY COOLED OFF AND ALL EMBERS
MUST BE EXTINGUISHED BEFORE ANY COVER CAN BE USED.
READ FIRST!
RULES FOR VISTA CHARCOAL
GRILL SAFE OPERATION.
!FOOD SAFETY
• RAW MEAT AND POULTRY HAS TO BE KEPT SEPARATE FROM
READY TO EAT FOOD.
• USE CLEAN PLATTERS AND UTENSILS FOR HANDLING COOKED
FOODS.
• COOK POULTRY AND MEATS THOROUGHLY TO KILL BACTERIA.
• USE INSTANT-READ THERMOMETER TO ENSURE PROPER
INTERNAL FOOD TEMPERATURES.
• KEEP PREPARED FOOD AND LEFTOVERS REFRIGERATED.
• WASH HANDS, UTENSILS AND SURFACES WITH SOAP AND
HOT WATER PRIOR TO AND AFTER HANDLING RAW MEAT AND
POULTRY.
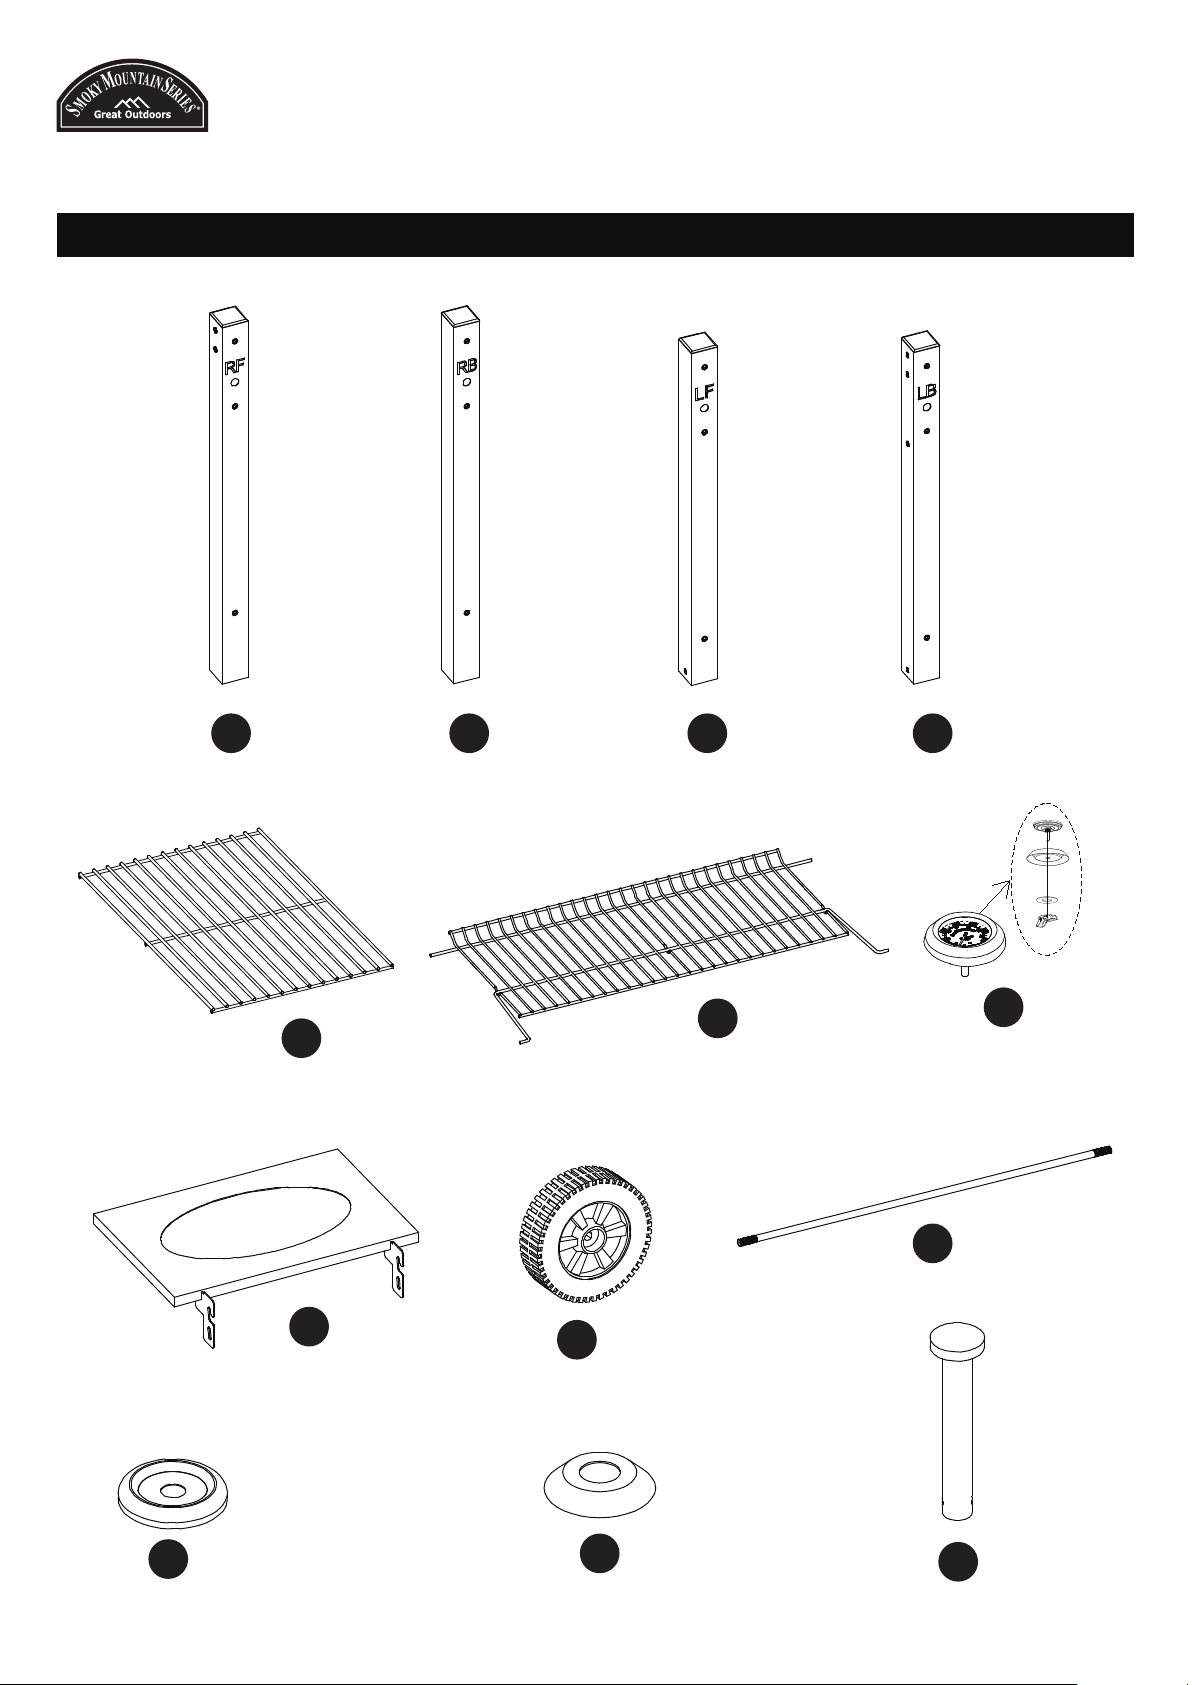
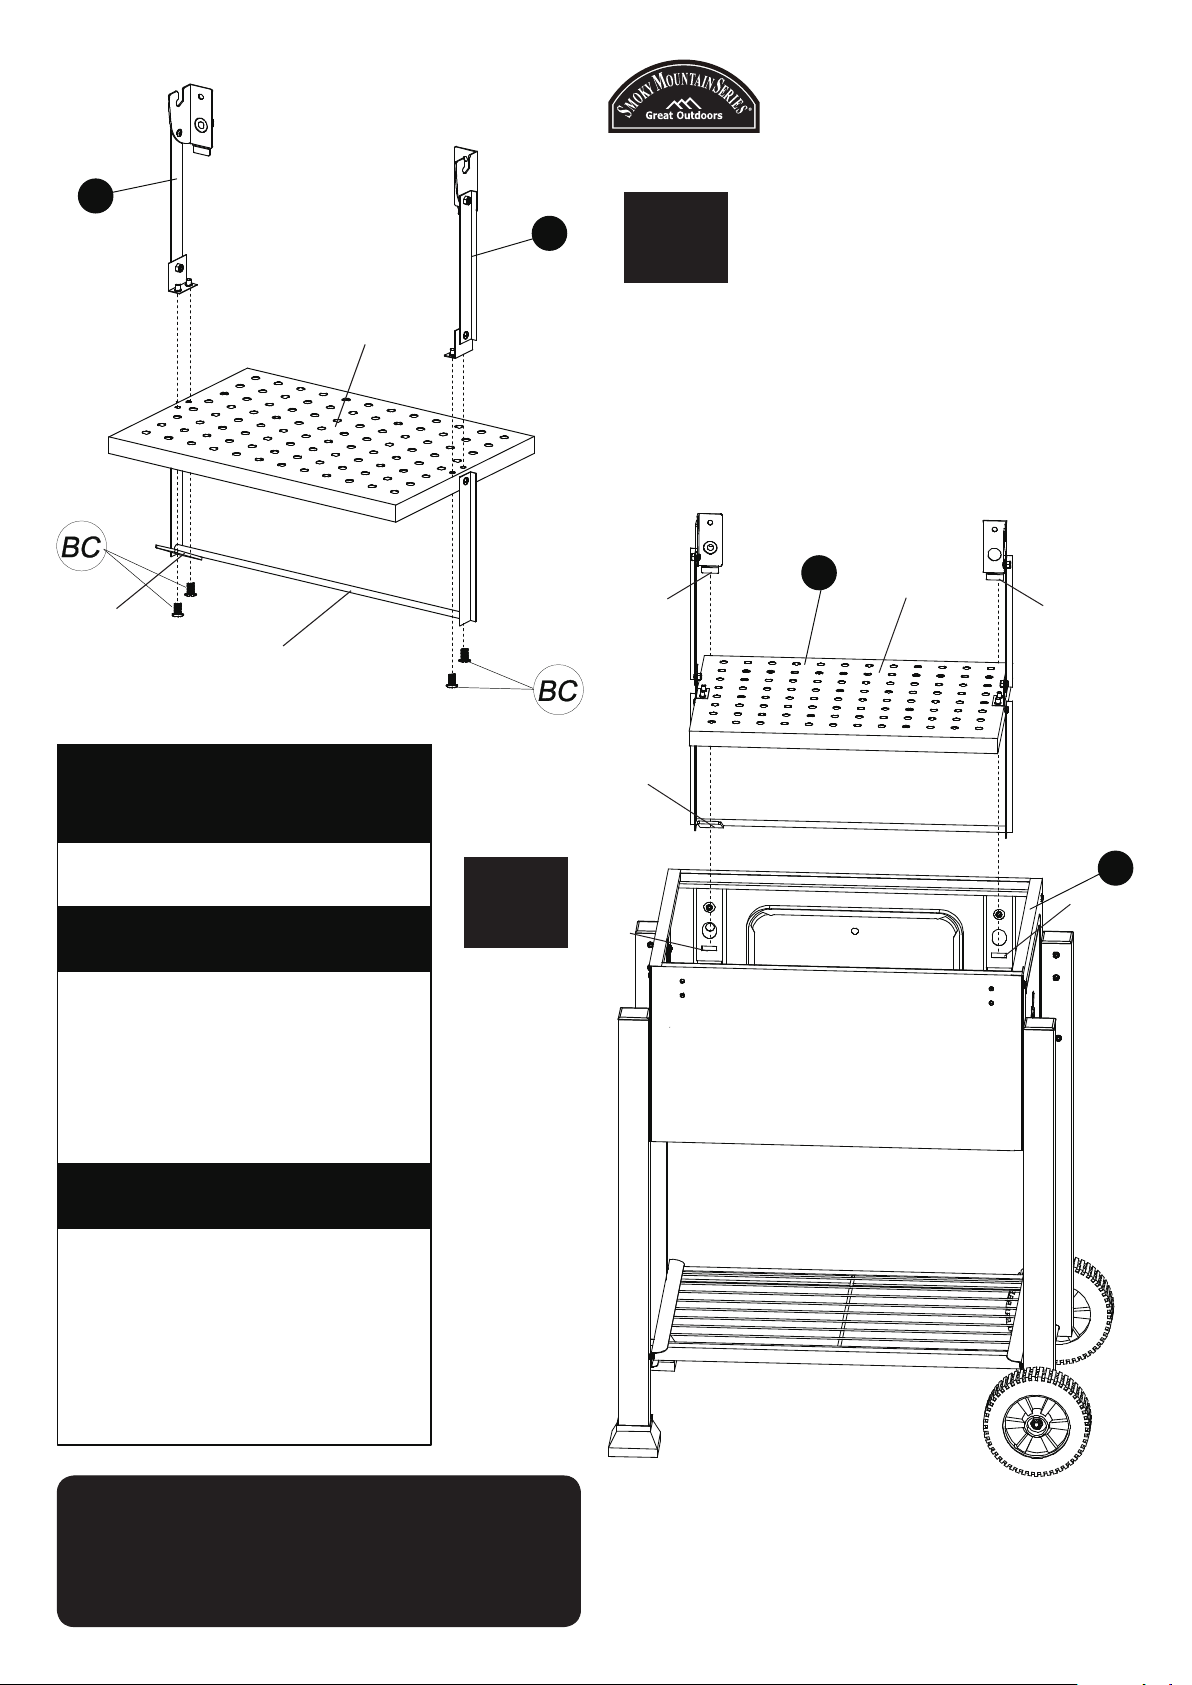
PARTS LIST
When unpacking the grill from the carton, make sure you find and
become familiar with all the parts listed below. Use caution as some
parts may have sharp edges.
GRILL PARTS QTY
A. LID ............................................................................................... 1
B. BACK PANEL................................................................................. 1
C1. LEFT PANEL ................................................................................ 1
D. RIGHT PANEL ............................................................................... 1
E. FRONT PANEL............................................................................... 1
F. CHARCOAL PAN ASSEMBLY.......................................................... 1
F1. LEFT CHARCOAL PAN BRACKET .................................................. 1
F2. RIGHT CHARCOAL PAN BRACKET ............................................... 1
G. ASH TRAY .................................................................................... 1
H. BOTTOM SHELF............................................................................ 1
J. SIDE SHELF .................................................................................... 1
K. LEG, FRONT RIGHT ....................................................................... 1
L. LEG, BACK RIGHT.......................................................................... 1
M. LEG, FRONT LEFT......................................................................... 1
N. LEG, BACK LEFT ........................................................................... 1
P. COOKING GRATES........................................................................ 2
Q.WARMING GRATE......................................................................... 1
R. WHEELS........................................................................................ 2
S. WHEEL AXLE................................................................................. 1
T. CHIMNEY...................................................................................... 1
V. VENTS .......................................................................................... 1
W. LEG FEET ..................................................................................... 2
X. CHARCOAL PAN ADJUSTMENT HANDLE ASSEMBLY..................... 1
Y. CHARCOAL DOOR HANDLE ASSEMBLY ........................................ 1
AC. CHARCOAL DOOR HANDLE KEY................................................. 1
AA. LID HANDLE............................................................................... 1
AB. SMALL HANDLES........................................................................ 1
AJ. BOTTLE OPENER.......................................................................... 1
AE. LID UPPER HINGES...................................................................... 4
AK. THERMOMETER.......................................................................... 1
AF. LID LOWER HINGES .................................................................... 4
BA. HANDLE FINISHING WASHER ..................................................... 4
AD. CHARCOAL DOOR FINISHING WASHER...................................... 1
BK. HINGE PIN.................................................................................. 4
AM. OFFSET FIREBOX ASSEMBLY...................................................... 1
AN. OFFSET FIREBOX LID .................................................................. 1
AP. OFFSET FIREBOX CHARCOAL PAN /GRATE ASSEMBLY ................ 1
AQ OFFSET FIREBOX COOKING GRATE ............................................. 1
!
WARNING!
CARBON MONOXIDE HAZARD!
BURNING WOOD OR CHARCOAL PRODUCES
CARBON MONOXIDE, WHICH HAS NO ODOR
AND CAN CAUSE DEATH IF BURNED IN
ENCLOSED AREAS . NEVER BURN WOOD OR
CHARCOAL INSIDE HOMES, VEHICLES, TENTS
OR ANY OTHER ENCLOSED AREAS.
Vista