Green Power AgriQuip GP33TR/S User manual

INSTRUCTION & MAINTENANCE HANDBOOK
After-Sales Support – Phone: 06 759 8402 or Email: [email protected]
03/23
Models: GP33TR/S – GP115TR/SF
PTO DRIVEN
GENERATOR SET

2
Manufactured by:
ITALY

3
Contents
1. INTRODUCTION TO THE MANUAL ...................................................................................................... 5
2. DESCRIPTION OF THE GENERATING SET .............................................................................................6
2.1 IDENTIFICATION OF THE GENERATING SET ..................................................................................6
2.2 GENERAL FEATURES......................................................................................................................6
2.3 TECHNICAL FEATURES...................................................................................................................7
2.4 ALTERNATOR.................................................................................................................................7
2.5 ELECTRIC CONTROL PANEL ........................................................................................................... 7
2.6 GEARBOX.......................................................................................................................................8
2.7 CANOPY......................................................................................................................................... 8
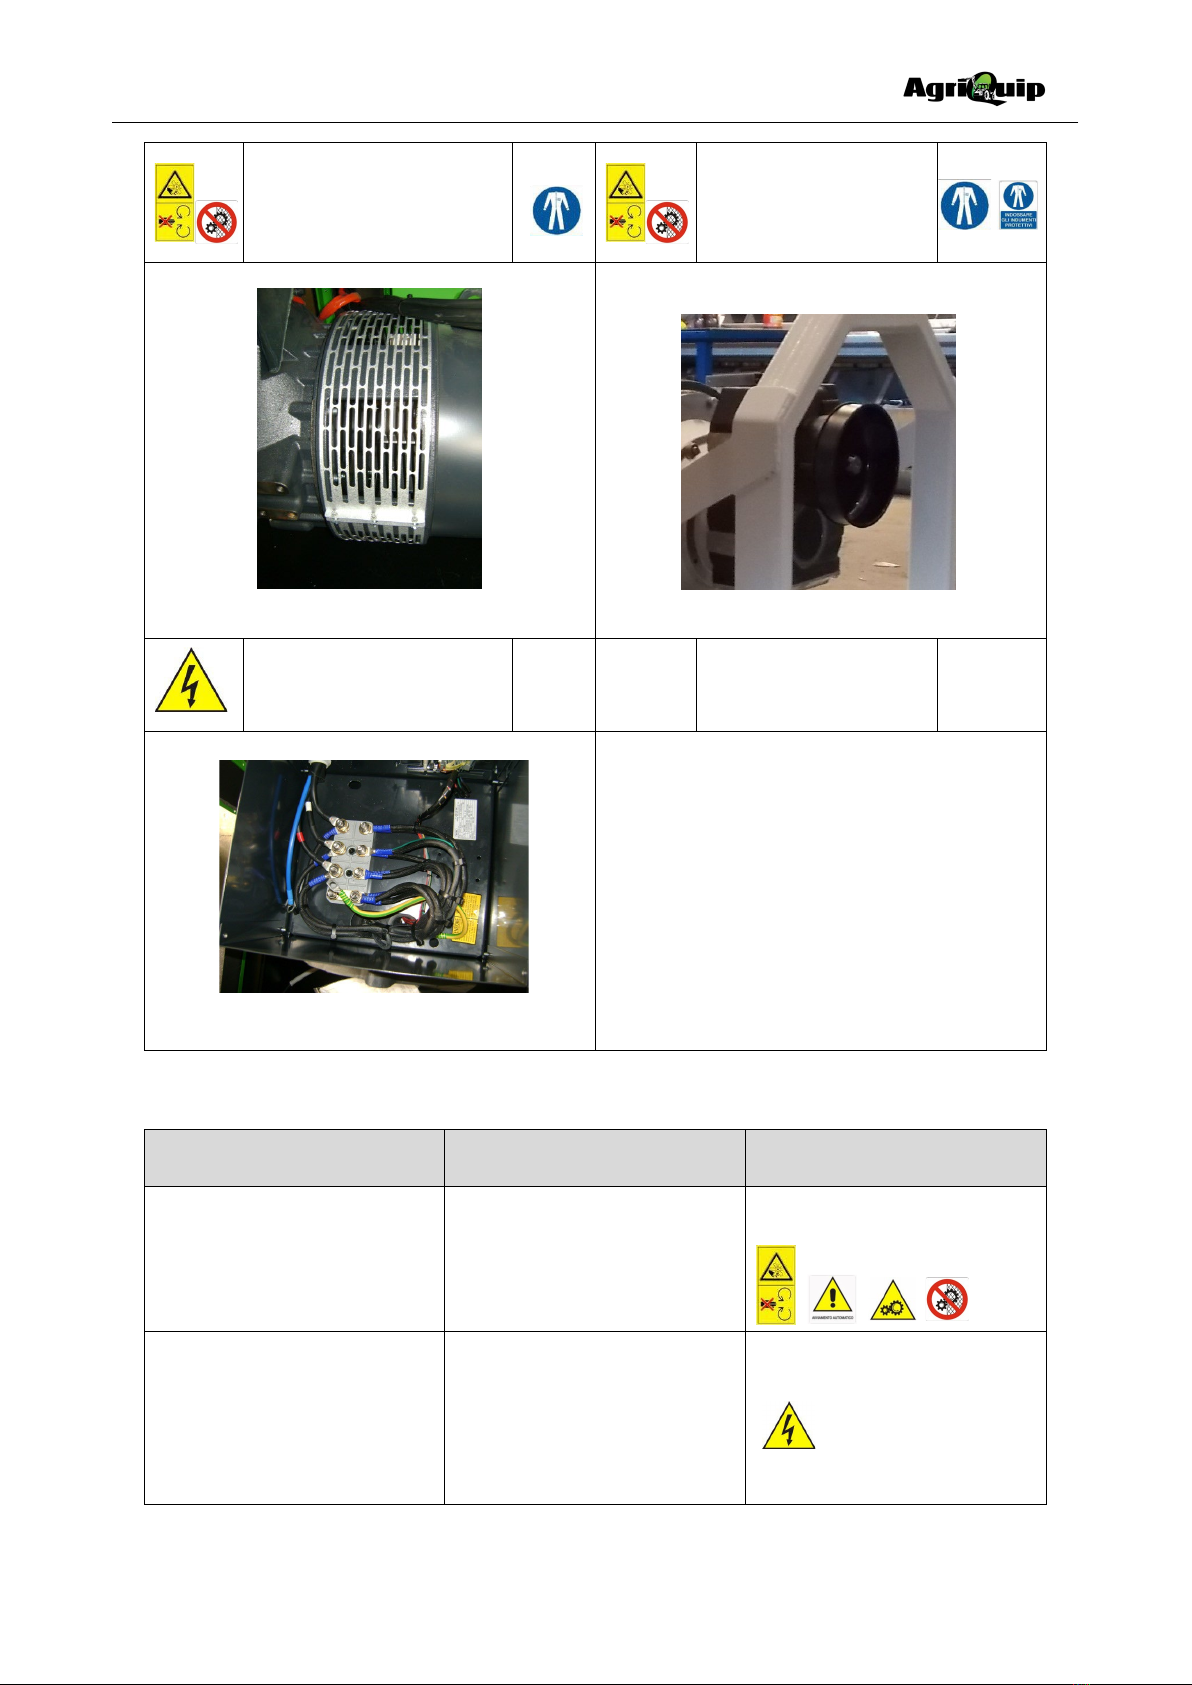
4. DANGER ZONES AND SAFETY GEAR ....................................................................................................8
3.1 DANGER ZONES............................................................................................................................. 9
3.2 RESIDUAL RISKS...........................................................................................................................10
4. MOVING THE GENERATING SET........................................................................................................11
4.1 GENERAL PRECAUTIONS FOR MOVING THE UNIT ......................................................................11
4.2 MOVING METHOD ......................................................................................................................11
4.2.1. MOVING THE GENERATING SET VIA FORKLIFT ...................................................................11
4.2.2. MOVING THE GENERATING SET VIA TRACTOR ...................................................................11
4.2.3 MOVING THE GENERATING SET VIA MOTOR VEHICLE ........................................................11
5. GENERATOR SET USE CONDITIONS...................................................................................................12
5.1. WORKSPACE AND OPERATOR’S SPACE......................................................................................12
5.1.1 WORKSPACE......................................................................................................................... 12
5.1.2 DESCRIPTION OF WORKING PLACE ......................................................................................12
5.2. PERMISSIBLE GENSET USES........................................................................................................12
5.3. GENSET USES NOT PERMITTED..................................................................................................13
5.4 PERSONNEL IN CHARGE OF HANDLING THE GENSETS................................................................13
5.5. ENVIRONMENTAL CONDITIONS.................................................................................................13
6. LOAD CONDITIONS............................................................................................................................ 13
6.1 ANALYSIS OF THE FEATURES OF THE INSTALLATION..................................................................13
6.1.1. NON LINEAR LOADS ............................................................................................................13
6.1.2. RESISTIVE LOADS (bulbs, heaters, resistances, etc.)...........................................................13
6.1.3. CAPACITIVE LOADS (condensers, discharge lamps, X-ray equipment, etc.).......................13
6.1.4. INDUCTIVE LOAD.................................................................................................................14
6.2. LOAD APPLICATION.................................................................................................................... 14
6.3. CONNECTION TO ALTERNATOR .................................................................................................14

4
6.3.1. STAR CONNECTION ............................................................................................................. 14
6.3.2. PHASES CYCLICAL DIRECTION .............................................................................................14
7. INSTALLATION INSTRUCTION............................................................................................................15
7.1. GENERAL INSTALLATION CRITERIA ............................................................................................15
7.2 SAFE DISTANCE ...........................................................................................................................15
7.3 INSTALLATION .............................................................................................................................15
8. ELECTRICAL CONNECTIONS...............................................................................................................16
8.1. INSTRUCTIONS FOR ELECTRICAL CONNECTIONS .......................................................................16
8.2. GROUNDING ..............................................................................................................................16
8.2.1. GENERATING SET WITHOUT EARTH FAULT RELAY DEVICE.................................................16
9. START-UP INSTRUCTIONS .................................................................................................................17
9.1. GENERAL INDICATIONS FOR START-UP......................................................................................17
9.2. NECESSARY CHECKS AND OPERATIONS TO BE CARRIED OUT BEFORE START-UP.....................17
9.3 GENERATOR STARTING ...............................................................................................................18
9.4 TURNING OFF.............................................................................................................................. 18
10. GENERATING SET MAINTENANCE AND INSPECTION......................................................................18
10.1 GENERAL INSTRUCTIONS FOR MAINTENANCE AND INSPECTION ............................................18
10.2 ORDINARY MAINTENANCE........................................................................................................19
10.3 CONTROL PANEL FAULTS ..........................................................................................................19
11. STORAGE INSTRUCTIONS ................................................................................................................19
11.1 ALTERNATOR............................................................................................................................. 19
11.2 ELECTRICAL PARTS ....................................................................................................................19
12. INSTRUCTIONS FOR DECOMMISSIONING.......................................................................................19
13. WARRANTY TERMS .........................................................................................................................20
14. ELECTRICAL SCHEMATICS................................................................................................................ 22

5
1. INTRODUCTION TO THE MANUAL
Thank you for having chosen a AgriQuip generating set manufactured by Green Power Systems SRL in Italy.
We advise you to read carefully this manual, observing safety standards for proper use and maintenance of the generating set.
The manual defines the purposes for which the generating set have been conceived and contain all the information that you
need to use it in a proper and safe way.
The constant observance of the indications guaranties the safety of the man, of the gen set, the right use and a long duration of
it.
The present manual, together with other documents delivered with the generating set are all part of the gen set as per
2006/42/CE standard.
The manual’s objective is to supply information and essential instructions for the right use of the gen set.
The manual and its attached documentation is to be consulted and always accessible to all people involved in the life cycle
of the unit.
Compliance to all safety standards is the client’s responsibility.
WARNING:
The generating set is a machine that should be installed and used by qualified technicians only;
Faults in the installation or use of the generating set can cause serious damages to the unit, installation
and people involved.
Do not let children or animals approach the generator when it is working.
Do not touch the generator with wet hands. It could provoke electric shocks if it used in the wrong way.
All operations must be carried out in accordance with all safety standards.
It is imperative to respect the laws in force in the country of installation: in case the standards differ, the more stringent
standards are to be respected.
Agriquip Limited declines all liability for damages to persons or objects due to improper use of the genset, incorrect
or unreasonable or failure to respect current accident prevention regulations.

6
2. DESCRIPTION OF THE GENERATING SET
2.1 IDENTIFICATION OF THE GENERATING SET
Please look at Fig.1.
1. Machine type
2. Machine code
3. Serial number
4. Year of manufacturing
5. Weight
6. Continuous power
7. Power factor
8. Declared frequency
9. Rated voltage
10. Rated current
11. Performance class
Fig. 1
The serial number, the year of construction, the code of the machine has to be always mentioned while asking for information,
spare parts etc.
2.2 GENERAL FEATURES
Main components
1 Alternator
2 Electric panel
3 Gearbox
4 Frame
5 Leg
6 Canopy
7 Alternator mountings
8 Identification label
9 Attachment points of the tractor
10 Ground terminal
1
2
3
4
5
6
8
9
10
7
Fig. 2
9

7
2.3 TECHNICAL FEATURES
1500 RPM
EQUIPMENT SPECIFICATION
MODEL
(ISO8528/1) 50 Hz
GP33 TR/S
GP55 TR/S GP77 TR/S GP95 TR/SF GP115 TR/SF
Prime power at power factor 0.8 30 kVA 50 kVA 75 kVA 87.5 kVA 100 kVA
Prime power at power factor 0.8
24 kW
40 kW
60 kW
70 kW
80 kW
Voltage available to the terminals 400/230 V 400/230 V 400/230 V 400/230 V 400/230 V
Dimensions (mm) 1140x750x1055 1140x750x1065 1140x750x1065 1140x750x1210 1140x750x1210
Weight (Kg)
2
395
454
506
572
GEARBOX
R.P.M. output
1500
1500
1500
1500
1500
R.P.M. input 430 430 430 840 840
Ratio 1:3.5 1:3.5 1:3.5 1:1.8 1:1.8
Recommended Tractor
Horsepower 60-80 80-100 110-130 130-150 140-180
ALTERNATOR
Brand and model
MECC ALTE
ECP28-VL/4 (*)
MECC ALTE
ECP32-1M/4 (*)
MECC ALTE
ECP32-3L/4 (*)
MECC ALTE
ECP34-1S/4 (*)
MECC ALTE
ECP34-2S/4 (*)
Synchronous with compound
governor voltage
± 1% ± 1% ± 1% ± 1% ± 1%
Pole 4 4 4 4 4
Stator/rotator insulation
H
H
H
H
H
Protection level IP23 IP23 IP23 IP23 IP23
Continuous power
30 kVA
50 kVA
75 kVA
85 kVA
105 kVA
ELECTRICAL PANEL
Magnetothermic circuit breaker YES YES YES YES YES
Single phase socket – NZ
standard 3-pin 1 1 1 1 1
63A cee form 5-Pin Socket 1 - - - -
125A cee form 5-Pin Socket
-
1
1
1
1
Analogue gauges (voltage,
frequency, amp meter) YES YES YES YES YES
Power terminal board NO NO NO NO YES
(*) = or similar brand
In line with our manufacturers policy of continuous development
2.4 ALTERNATOR
The alternator is the rotating electrical machine that transforms the engine’s mechanical energy into electrical energy. All
alternators on AgriQuip gen sets have been purchased by the manufacturer from primary alternator manufacturers and are
therefore able to guarantee the market’s maximum standard.
N.B.: Before carrying out any work on the alternator, carefully read the alternator manual
delivered with the unit.
The alternator generates electrical current that can be dangerous in case of accidental
contact with current sources. However, the alternators used are supplied with suitable
protection according to UNI EN 12601 standard. The danger exists for operations carried out
with terminal board open and the generating set running.
It is important to note that the eventual removal of the hot parts or of rotation parts of the
alternator must be done only by qualified and authorized people. It is necessary to put them
back on before starting up the generating set.
Before carrying out any maintenance operations use the proper safety gear.
2.5 ELECTRIC CONTROL PANEL
The electrical panel is the assembly of all the control instruments of the generating set, and the sockets and the power
terminal board for the total power. Our control panels are mounted in appropriate housings granting a IP42 standard
protection. The electrical design and the electrical schematics are supplied together with this manual.
Before carrying out any work on the electrical panel, carefully read this manual and the
manual of the electrical panel delivered with the unit.
For the utilization of the gen set it is not necessary to open the electrical panel. The
electrical panel while closed has an IP42 protection. The electrical panel has to be locked
and only qualified and authorized staff can open it.

8
Before carrying out any maintenance operations block the generator.
We recommend performing any maintenance employing all PPE required.
Every modifications made on the electrical links and/or the electrical instruments even the
substitutions must be made only after our technicians approval. Unauthorized operations will
also result in immediate forfeiture of the warranty.
2.6 GEARBOX
To correct rotary speed of the tractor and that of the alternator which are different from each other, a step-up gearbox is fitted.
The step-up gearbox consists essentially of gears capable of converting the speed of rotation of the input to the correct speed
for the optimal operation of the alternator.
2.7 CANOPY
The canopy is a protection against the atmospheric agents and protects the operator when the generator is running.
When the gen set is operating it is necessary to keep it closed as the canopy is a protection to
personnel.
The opening of the canopy must only be done by qualified and authorized people. Note: the
canopy is not designed for access while the unit is in operation.
4. DANGER ZONES AND SAFETY GEAR
To avoid exposing personnel to potentially dangerous situations, it is advised that maintenance interventions be carried out
with the control panel in block mode, generating set and accessories isolated from the Mains and by
qualified persons.
Reminder: Compliance with all safety measures are the client’s responsibility.
Safety shoes must be worn before carrying out any work on the generating set in order to avoid slipping and
accidental contact with hot or rotating parts on the unit.
Close fitting clothing must be worn before carrying out any work on the generating set in order to avoid
entanglement with any rotating parts.
Safety gloves must be worn before carrying out any work on the generating set in order to avoid contact with
the unit’s hot parts or dangerous liquids.
Safety glasses must be worn before carrying out any work on the generating set: These are necessary to
avoid eye injury caused by expelled fluid or parts.
Hearing protection must be worn before approaching a generating set.

9
3.1 DANGER ZONES
Following the analysis of risks during designing phase, the following table briefly shows the danger zones on a unit :
Danger Zone Existing
danger
Severity of
the danger
Exposure
frequency Probability
Possibility
of
avoidance
Preventative measures Notes
Connecting part
zone without
permanent
protection
Cut or
amputation
High Very low Low High
Shielding the part via appropriate
permanent protection.
Training personnel responsible for
genset maintenance through the User
and Maintenance manual and labels. Fig. 1
Fig. 4
Alternator
voltage regulator
live parts without
permanent
protection
Electrocution
High Low Average Average
Shielding the part via appropriate
permanent protection.
Training personnel responsible for
genset maintenance through the User
and Maintenance manual and labels.
Information on the necessity of carrying
out all maintenance operations with all
electrical energy fonts disconnected.
After all maintenance operations,
reconnect any protection removed
and/or close the canopy doors before
restarting the unit.
Fig. 2
Moving the
generator set
Crushed
Severe Low Low High
Maintain a safe distance from the unit;
Use adequate means and measures;
Training personnel responsible for
genset maintenance through the User
and Maintenance manual and label s.Fig. 3
1
1
22
3

10
DANGER OF AMPUTATION BY
REMOVING PROTECTIVE
PARTS:
ROTATING PARTS
DANGER OF AMPUTATION
BY REMOVING
PROTECTIVE
PARTS:
ROTATING PARTS
Fig.1 Alternator fan and coupling area
Fig.4 Gearbox
DANGER OF ELECTROCUTION
WHEN PROTECTION
REMOVED: LIVE PARTS
Fig.2 Voltage regulator open
3.2 RESIDUAL RISKS
Residual risk Where to find the symbols Symbols / rules
Cut, amputation, trapping and crashing
Engine fan protection
Do not remove the protections
Electrocution
Electrical parts
The parts with this symbol have charge

11
4. MOVING THE GENERATING SET
All AgriQuip generator sets are equipped with lifting points to be used when loading and unloading the unit.
Each unit’s information tag reports kilos and its mass.
When moving/lifting a genset it is imperative to be extremely careful. All moving operations must be
carried
out be qualified people.
Improper handling can seriously damage the generator and components.
4.1 GENERAL PRECAUTIONS FOR MOVING THE UNIT
To limit the dangers involved in moving a generating set, it is important to carefully follow the guideline set out below:
•Generating sets must be protected from bad weather during transport: the units must be entirely covered.
•Clear the moving zone of all possible obstacles and from all unnecessary personnel;
•Always use properly sized lifting equipment inspected by a licensed organisation. It is prohibited to fasten objects or
accessories on the generating set baseframe that make the unit heavy and subject it to movements unforeseen by
the lifting eyes.
•Do not subject the generating set and lifting equipment to abrupt or undulating movements that pass on stress
dynamics to the structure;
•Do not lift the generating set higher than what is absolutely necessary.
4.2 MOVING METHOD
The generating sets are lifted with different methods according to the unit’s configuration. Below are the main methods of
moving/lifting the genset.
4.2.1. MOVING THE GENERATING SET VIA FORKLIFT
•Using a forklift, the generating set can be pushed by the baseframe. Forklift suitable to the weight of the generating
set must be used (check the weight indicated on the metal plate of the machine).
•Put the forks under the basement keeping the weight balanced.
•Lift the machine from the surface, keeping it at the point nearest to floor;
•Move the machine slowly, making sure there are no people nearby;
•Place it on the floor or on the mean of transport, making sure there are no people nearby.
4.2.2. MOVING THE GENERATING SET VIA TRACTOR
The movement of the generator is normally done when it is coupled to a tractor, from which also receives a mechanical torque
for its operation. In this case the moving must be in accordance with the instructions of the tractor and still observing the same
precautions for the safety of persons to transport by other means.
4.2.3 MOVING THE GENERATING SET VIA MOTOR VEHICLE
During transportation with a motor vehicle, it is important to use suitable shackles / chains to stabilise the unit, in order to avoid
unexpected bumps or jolts which can cause damages to the genset, or worse, overturn the load. It is the carrier’s responsibility
to always respect the highway code in force.

12
5. GENERATOR SET USE CONDITIONS
AgriQuip generators are mainly used when autonomous production of electric energy is needed, or for emergency/stand-by use
when the Mains fails.
5.1. WORKSPACE AND OPERATOR’S SPACE
5.1.1 WORKSPACE
The working spaces of the machine are designed in function to the size of the body of the European population standardised by
EN547-3 with 95% percentile. In particular, it is based on the following principles:
•Each place is tailored to the size of the operator and the tasks to be performed;
•There is enough space for all parts of the body, to allow the task to be performed with the correct working postures
and movements and to facilitate access and postural changes;
•The manual controls of the equipment are suitable and functional to the anatomy of the hand and the size of the
average population;
•When the operator is in the normal position, the control elements are easily accessible when the operator occupies
the normal position. Other important controls, such as emergency stops are easily accessible by the operator.
5.1.2 DESCRIPTION OF WORKING PLACE
During the design of the machine, the manufacturer has taken into account the ergonomic principles that have a favourable
impact on the system of work and the safety of those who work with the machine. It has also been considered the essential
factors required for a machine, such as functionality, safety, maintainability, etc.., in particular man / machine.
Working places
The gen set does not require the presence of the operator during operation. There is only one place for the regulation and
control of the state of the machine.
It is the working place that has to be taken by the operator for the following operations.
•Control of the machine
•Control of the emergency
•Connection of electric utilities
5.2. PERMISSIBLE GENSET USES
The use of AgriQuip generating sets is possible in any case showing mechanic and electric compatibility between the user
system and the genset. The use of the unit is permitted only when its configuration meets the standards in effect for mobile
applications in the place of use. The compatibility between the genset and environmental conditions must also be checked:
standard generating sets are not designed to work in certain environments (ex: environments with danger of explosion, etc.).
The installation, electrical wiring and maintenance, must be carried out by qualified or trained personnel only, who will check
the genset and safety device characteristics.

13
5.3. GENSET USES NOT PERMITTED
It is not allowed to use AgriQuip generating sets showing any mechanical and/or electrical incompatibility between the user
system and genset. The compatibility between the genset and environmental conditions must also be checked, keeping in mind
that the standard unit is not projected for, installations in certain environments, ex. Environments with danger of explosion, etc.
The installation, electrical wiring and maintenance, must be carried out by qualified or trained personnel only, who will check
the genset and safety device characteristics.
5.4 PERSONNEL IN CHARGE OF HANDLING THE GENSETS
The handling of the genset must be carried out by trained personnel only.
The person(s) must be properly instructed on the correct use of gensets and the related residual risks.
5.5. ENVIRONMENTAL CONDITIONS
Standard generating sets should operate protected from the presence of heavy dust, rain, snow, high humidity and direct sun
exposure.
The machine is designed to ensure the rated power in ambient temperatures up to 40 ° C and altitude not exceeding 1000
meters (EN60034-1), unless otherwise indicated.
Near the machine there must be people with loose clothing such as: scarves, foulard, bracelets, etc and any garment must be
fastened with elastic bands at the ends.
6. LOAD CONDITIONS
6.1 ANALYSIS OF THE FEATURES OF THE INSTALLATION
The AgriQuip gensets proper functioning can be affected by equipment characteristics to be supplied; there are User systems
that are compatible only if the power value is much lower than genset’s nominal power, therefore the supply should be carefully
checked.
When supplying a single-phase or unbalanced load, the tolerance on the voltage supplied is not
guaranteed and abnormal vibrations may occur on the alternator; therefore this type of use is not
advised. Anyhow, SINGLE-PHASE loads are allowed on three-phase alternators if the required power
factors do not exceed 1/3 of unit’s rated output on each phase.
6.1.1. NON LINEAR LOADS
Most commonly used nonlinear loads on three-phase systems are those controlled by a thyristor/rectifier, such as static six-
phase or twelve-phase converters, devices used for asynchronous engine control (soft-start), uninterruptible power supply
devices such as UPS, equipment provided with SCR, direct current engines. Lighting systems with gas discharge lamps also
create high frequency harmonics, creating a risk of high neutral current.
In case the system has not been checked, a detailed analysis of sizing before genset start-up is recommended.
Nonlinear loads absorb currents with high level harmonic frequencies, producing distortional waves on
the voltage generated by alternator.
These can cause a malfunction on the regulation system and an uncontrolled rise of voltage, damaging
the genset’s alternator and connected equipment.
6.1.2. RESISTIVE LOADS (bulbs, heaters, resistances, etc.)
An AgriQuip genset can also take on pure resistive loads, but with compound alternators there may be an increase in the
operational voltage. When using one of our genset with pure resistive load, consider that apparent power (kVA) equals effective
power (kW) (as the cosφ is 1.0), therefore electric load has to be 20% less than nominal power in kVA.
Warning: resistive loads are usually single-phase, check that the load on each phase does not exceed 1/3 of rated output.
6.1.3. CAPACITIVE LOADS (condensers, discharge lamps, X-ray equipment, etc.)
It is very unlikely to find a purely capacitive load, usually this type of equipment is used on non-automatic power factor
correction systems; presence of distortional equipment on the supply system should also be checked.
A purely capacitive load increases the voltage produced by genset over the tolerance limits set,
creating possible damage to the alternator and on the user system connected to it. Particular attention
should be towards devices with capacitive effects, such as soft-start devices, static welding set and
discharge lamps, as these are often not compatible with gensets. A genset can supply a capacitive load
for a maximum value corresponding to 20% of rated output of the alternator, but the tolerances on the
voltage output cannot be guaranteed.
In order to avoid above mentioned problems, power factor correction capacity should be calculated on phase displacement (ex:
electric engines with condenser, neon lights with locally corrected power factor, automatic power factor correctors).

14
6.1.4. INDUCTIVE LOAD (electric engines in general, electric fans, motor pumps, winches, etc.)
Electric engines, especially those with cage rotor, have a very high current value during start-up (up to 10 times the rated
current 2) combined to a low power factor.
Generally alternators mounted on our gensets are able to supply an output current equal to 2,5 times rated current for max 10-
15 sec, this period is usually sufficient to start cage engines, with a transient voltage droop of 35% (that decreases within 0.15-
0.30 sec at 15%). As soon as the engine or electric engines are started, the absorbed power will normalize and it will be
possible to start in sequence the other devices in the User system.
All these values must be considered by user when sizing genset. In order to avoid over-sizing due only to starting current, there
are many methods commonly used, even when this type of User system is supplied by the Mains. Examples of devices with the
function of decreasing starting current are: delta-star system, system with wound rotor and rheostatic starter, or else the
modern soft-start system (where compatibility has to be checked with manufacturers for above mentioned reasons).
The power relation between an AgriQuip genset and electric engine to be started, can vary depending on the acceptable
voltage drop for equipment supplied during start-up.
6.2. LOAD APPLICATION
Maximum load that can be applied to a genset in one connection (ex: starting of an electric fan or a motor pump, etc.), depends
mainly on engine characteristics, such as displacement, torque, inertia, regulation system, and supercharging devices.The
current trend is to manufacture engines with high output by decreasing displacement, this is a disadvantage for engine load
absorbing capacity..
It is very important to know in advance if the load to be supplied will be inserted gradually or in one
connection.
This information is necessary to identify the correct genset model.
Generally (depending on engine characteristics there may be important variations) it can be said that:
•Aspirated engines can take a load step equal to 100% of continuous power, with a variation of temporary speed of ≤
10%;
•Turbo engines can take a load step equal to 40-50% of continuous power, with a variation of temporary speed of ≤
10%;
For further details check engine manual provided with genset or contact our tecnichal department.
6.3. CONNECTION TO ALTERNATOR
Alternators used on our gensets are three-phase with neutral and can supply (with limitations) three-phase and single phase
loads at the same time.
Standard alternator can be with six or twelve terminals depending on its voltage:
•With six terminals, windings can be star-type, triangle-type or zig-zag-type.
•With twelve terminals, in addition to standard star-series connection, star-parallel with neutral, triangle-serial, triangle
parallel, zig-zag, zig-zag-parallel and double-delta connections can be added; for further information referring to
obtainable power contact our technical department.
6.3.1. STAR CONNECTION (sample of standard supply)
When a three-phase alternator, at 50 Hz, has a star-connection, it supplies a standard voltage of 400V between phases and
230V between each phase and neutral.
For load distribution follow below instructions:
•Usable power between phase and neutral (voltage 230V) should never exceed 1/3 of rated output;
•Usable power between phases (voltage 400V) should never exceed 2/3 of rated output;
6.3.2. PHASES CYCLICAL DIRECTION
Phases cyclic sequence is R, S, T
Before connecting an AgriQuip genset to the User system, cyclical direction has to be checked with a
specific instrument.
Machinery may endure serious damage in case of inverted direction, this verification has to be
carried out by a qualified technician.

15
7. INSTALLATION INSTRUCTION
7.1. GENERAL INSTALLATION CRITERIA
The installation of the generator must be done by competent and informed.
Faulty installation can create damage to the genset and the User system, and injury to persons.
It is compulsory to install the genset according to the standards in force in the country of installation.
Factors to be considered in the installation of a generator are:
•Genset has been selected according to needs of the electrical load and to environmental conditions (temperature,
altitude and humidity)
•Electrical equipment and panel, if not provided with generating set, are according to Green power Systems srl.
indications, to European standards in force, and to genset specifications;
•Personnel safety has been carefully considered;
•Noise-level issues have been carefully considered;
For any doubt referring to installation location contact AgriQuip Limited on 06-759-8402
The gensets must be located in an area protected from rain, snow, high humidity and direct exposure to
the sun.
Rain or high humidity on an AgriQuip genset alternator, in particular during operation, can cause an
increase in voltage output, winding faults, electric discharge towards ground, with damage to the
genset and injury to persons.
Dust, in particular saline dust, must be avoided. In case radiator or air filters are obstructed,there is the
risk that genset will overheat or be damaged. The baseframe must never be underwater, not even
partially, or else water may damage genset.
7.2 SAFE DISTANCE
A safe distance has to be kept between genset and fuel deposits, inflammable goods (cloths, paper,
etc.), chemicals, according to indications provided by the authority in charge. In order to avoid
potentially dangerous situations, area surrounding genset should be isolated so that unauthorized
people will not be able to get close to the unit. Even if our gensets are manufactured according to
electromagnetic compatibility standards, we suggest NOT to install the genset near machinery that can
be influenced by magnetic fields.
7.3 INSTALLATION
PTO connection
The generator gearbox features as standard a 1-3/8” 6-splined input shaft. AgriQuip supply the correct sized power take off
(PTO) shaft to fit the gearbox shaft and the tractor PTO drive shaft. Keep the generator and the tractor shafts parallel as much
as possible.
In practice, do the following:
1. Firmly fit the machine to the 3 point linkage using the pins provided: any mistakes in the installation could cause
damage to persons and objects, for which AgriQuip shall not be held liable.
2. Fit the PTO shaft to the generator and tractor (with the tractor turned off) making sure it is coupled perfectly so that
when the machine runs both idle and under load there are no vibrations whatsoever.
Do not operate the generator unless is securely connected. With a wrong connection the generator
may tip over forcibly as soon as electrical loads are applied

16
8. ELECTRICAL CONNECTIONS
8.1. INSTRUCTIONS FOR ELECTRICAL CONNECTIONS
Wrong electrical connections can cause damage to the genset and to systems related to it. A qualified
electrician should carry out electrical connections according to the standards in force, and after
ensuring that the genset and User system are compatible.
BEFORE CARRYING OUT THE CONNECTION, CAREFULLY READ THE LOAD APPLICATION CHAPTER
OF THIS MANUAL.
It is advisable to insert a UPS between genset and electronic devices, such as a computer, PLC, etc., to avoid that frequency
and voltage cause improper functioning during transitory phases (load insertion and disconnecting the load).
To protect equipment it is also advised to use a safety device that will cut off the energy supplied by the genset in case voltage
values exceed tolerance levels.
The electrical connection to the User system is a very important operation: safety and good operation of the genset and User
system depend on a correct electrical connection.
Before supplying User system always check:
•Electrical diagram relative to your AgriQuip genset;
•Wires connecting genset to user system are appropriate for voltage produced and are in accordance to the standards
in force;
•Wire type, section length and conductivity characteristics have been calculated considering environment conditions
and in force standards;
•User system or distribution panel are provided with relevant devices to protect them from direct or indirect contacts
and overload;
•User system and genset are compatible, in particular considering power, voltage and frequency. Check genset
voltage indicated on label and verified with a tester;
•Ground is functioning correctly;
•Direction of phases corresponds to User system rotation direction, and none of the phases have been connected to
neutral by mistake;
To supply a system usually supplied by the Mains, it is necessary to install an ATS with the genset, to separate
the Mains form the load when the genset is supplying and vice-versa this avoids any possibility of parallel
functioning. The installation of ATS must be carried out by a qualified electrician.
Do NOT use a standard genset in parallel functioning, with another genset, nor with the Mains.
This use is prohibited and would cause serious damage to the genset.
8.2. GROUNDING
It is compulsory to connect the AgriQuip genset to an appropriate grounding system and check its
functioning before starting the genset.
Such connection has to be carried out based on the installed distribution system and standards in force.
Only qualified personnel should carry out such operations.
8.2.1. GENERATING SET WITHOUT EARTH FAULT RELAY DEVICE
The AgriQuip genset alternator is connected for an IT system, that is with isolated neutral.

17
9. START-UP INSTRUCTIONS
9.1. GENERAL INDICATIONS FOR START-UP
All AgriQuip gensets are tested before leaving the factory. For start-up of an AgriQuip genset, few but careful operations are
required, these are described in detail in this manual as well as the alternator and other equipment manuals.
All start-up, maintenance, repair and modifying operations must be carried out according to safety
standards and only by qualified and trained personnel. For any information contact AgriQuip’s technical
department.
Do not start genset without protections and guards.
9.2. NECESSARY CHECKS AND OPERATIONS TO BE CARRIED OUT BEFORE START-UP
Before start-up carefully carry out following checks.
•Generating set Visual check to ensure component integrity.
•Baseframe Check that bolts are securely tightened and vibration-damping pads.
•Gearbox Visual check to ensure component integrity. Do not start the generator until the PTO shaft guard as been
properly installed.
Serious injury can result from using the generator without the shaft guard in place
Before starting the gen set, check the gearbox oil level see “Periodic Maintenance” section. If necessary, add the
recommended oil to the specific level as follows;
1. Check the oil level by its opening
2. If the oil level is low, remove the breather. Add SAE 90 GEAR LUBE oil through breather opening until oil is at the
right level.
3. When the oil level gearbox is correct, install and tighten the oil level breather
Checking the oil level in the gearbox
Operating the generator with low gearbox oil level may cause gearbox failure.
•Alternator Visual check of alternator parts and of connections to all terminals.
•Electric panel Check components, instruments, switches, earth fault relay device, protections and accessories.
Never start the engine in case of leakage, damage to parts or protections.
If anything unusual is noticed contact AgriQuip’s technical department.
REPLACE OIL EVERY 250 HOURS OF OPERATION

18
9.3 GENERATOR STARTING
Follow the steps below to start the generator:
1. On the front panel of the generator, set the main circuit breaker to the OFF or OPEN position.
2. Plug in the desired electrical loads.
3. Start the tractor engine and engage the power takeoff (PTO) drive.
4. Increase the tractor engine RPM slowly until the voltmeter on the generator panel indicates the right value (395-415
volts and 50 hertz)
5. Set the generator main circuit breaker to the ON or CLOSED position. Now turn on the electrical load you want to
power.
6. Check the voltmeter reading on the panel. If voltage has dropped below the right value, increase the RPM of the
tractor engine just enough to return to the correct voltage.
Do not operate the generator unless it is securely connected to the tractor. With an incorrect connection
the generator may tip over forcibly as soon as electrical loads are applied.
Before starting the generator always ensure that the machine and place of operation have no tools, rags
and anything else that can be drawn from the cooling fan or may damage parts of the GE working.
Never start (or stop) the generator with the main circuit breaker set to ON or CLOSED position. Connect
electrical loads to generator output when the voltmeter indicates the correct value (i.e. 400 V). This
voltmeter reading means that generator a.c. output frequency and voltage are correct. Some electrical
loads may be damaged by incorrect voltage or frequency.
9.4 TURNING OFF
To STOP the generator proceed as follows:
1. Disconnect the individual loads, starting from the lightest ones, or turn the main switch OFF
2. Let the generator and tractor engine run for few minutes at no-load, to cool internal parts.
3. Switch off the tractor, disconnect the plugs.
4. Remove the power take off (PTO) shaft from generator and tractor.
Stopping the engine with the load inserted is damaging to the generating set and User system.
Before stopping the engine, disconnect the load by switching off the magneto-thermal switch.
10. GENERATING SET MAINTENANCE AND INSPECTION
10.1 GENERAL INSTRUCTIONS FOR MAINTENANCE AND INSPECTION
Do not carry out or undertake maintenance and/or repair operations or changes if you do not have the proper knowledge or
have not received precise instructions.
All operation must be carried out respecting security standards and by qualified persons.
Before any check is done, make sure that suitable protective gear is worn as mentioned in this manual.
All operations that require the removal of the protection board must be carried out in the conditions
mentioned above. If removed, protections should be replaced before the next start.
Never work on the machine, whether with hands or tools, while it is operating. Before any maintenance
work make sure that the machine is at a standstill and disconnected from the tractor, or that the tractor
is turned off and the ignition key has been removed, and the switches have been turned OFF
If any malfunctions should arise in the machine, check that they do not depend on a lack of routine maintenance.
Check on a monthly basis or whenever starting up that there are no unusual noises or vibrations. Check that the alternator’s air
ducts are not clogged.
Periodically check the oil level in the over gear. Change oil every 500 working hours and at least every year.
Check on a monthly basis or whenever starting up that the circuit breaker works: while the machine is running (at rated voltage)
press the test button and the breaker must trip. Check the efficiency of the earth connection.
Every 500 working hours and at least every year, check the wear of the brushes and manifold and the correct operation of the
switch board’s measurement instruments, checking their readings with a standard instrument.
1. Never wash the machine with direct or high pressure jets of water or with aggressive agents.
2. Never rest liquid containers or inflammable materials on the machine
3. Keep the machine away from heat sources or humidity and never install it in explosive atmospheres.
4. In case of fire use a powder fire extinguisher.

19
10.2 ORDINARY MAINTENANCE
FREQUENCY OF THE CHECK EVERY 8h EVERY 400h EVERY 2500h MORE
Check that nuts, bolts and pipe fittings are tight
X
Check alternator bearing(s)
5000h
Check alternator insulation
5000h / 2 years
Replace alternator bearing(s)
8000/10000h
NOTE: During the warranty period do not attempt to make repairs or repair parts of the generating set without first
having consulted an authorised service dealer and received written authorisation (verbal authorisation is valid only if
given directly by Green power head office). The manufacturer will null and void the warranty if the products are
repaired without authorisation, even if the breakdown can clearly be attributed to a manufacturer’s defect. In any case
USE ONLY ORIGINAL PARTS.
10.3 CONTROL PANEL FAULTS
NOTES ON THE OPERATION OF THE SWITCHES
The overload cut out may trip for two reasons:
- when the appliance or group of appliances connected require a greater current than the breaker can support.
- because of a short circuit.
In the first case it is sufficient to reduce the load and restart the generator, while in the second case find the cause behind the
short circuit and eliminate it.
Listed below are some faults not tied to the operating parameters of the unit.
ELECTRICAL PANEL MALFUNCTION PROBABLE CAUSE(S) NEXT ACTION TO TAKE
MT switch does not close
Short circuit on the line
Loss on the line
Trip coil fault
Check system
11. STORAGE INSTRUCTIONS
Below are instructions for operations to be carried out on the components before storing to avoid deterioration.
11.1 ALTERNATOR
•Clean internal parts by using compressed air
•Check bearings and greasing
11.2 ELECTRICAL PARTS
•Clean the parts
•Spray appropriate protective liquid
After carrying out the above indicated operations, place the genset in a covered, dry and cool location.
12. INSTRUCTIONS FOR DECOMMISSIONING
When decommissioning, all genset components are to be considered and disposed of as special waste. In particular battery
and engine liquids are dangerous waste. Observance of all rules in force where decommissioning is recommended. Laws in
force in the country of destination must be followed when getting rid of equipment at the conclusion of its use or in case of
demolition.
All genset identification labels and relative documents must be destroyed.

20
13. WARRANTY TERMS
1. All Agriquip gen sets are covered with a comprehensive 12 month warranty against faulty materials and workmanship
provided that:
(i) The gen set is operated in normal use as set out in the parts and operating manual;
(ii) The gen set is correctly serviced and maintained as specified in this operating manual;
(iii) The gen set is worked within its stated capacity (i.e. horsepower limit and P.T.O. speed);
(iv) The gen set is not subject to any modifications, including non-genuine parts, or defects resulting from repair or
alteration performed by anybody other than authorised Agriquip dealers;
(v) Agriquip is in receipt of duly signed pre-delivery and installation certificate;
(vi) The gen set has not been damaged from improper use or by the use of non-genuine parts.
2. Agriquip guarantee, subject to the working conditions mentioned above, that should any defect in workmanship or
materials occur in the gen set, within 12 months from the date of original purchase, we will repair or, at our option,
replace the defective goods without making any charge for labour or materials. We will also allow provision within our
terms and conditions a labour charge of $60 (+GST) where repairs are to be carried out by an authorised dealer.
3. Machines sold into the hire industry shall be void of warranty.
4. The following items are not covered by Agriquip warranty:
(i) Power take-off shafts;
(ii) Freight costs;
(iii) Loss of income from the machine due to warranty fault;
(iv) Use of non-genuine parts to re-instate the machine.
5. Definition of Warranty Period
The warranty expiration date is determined by calendar months from date of delivery to the first owner/user and is not
affected or prolonged because the machine is idle for any part of the warranty period.
6. Agriquip Warranty Procedure:
(i) Phone Agriquip and discuss problem before attempting any repair;
(ii) Any parts required must be supplied by Agriquip unless authorised otherwise by Agriquip;
(iii) Work can only be carried out after authorisation from Agriquip.
This manual suits for next models
1
Table of contents
Other Green Power Portable Generator manuals
Popular Portable Generator manuals by other brands

Fat Cat
Fat Cat GT950 user guide

Polysoude
Polysoude PS 164-2 Operating, maintenance and programming manual

Lincoln Electric
Lincoln Electric SA-250 PERKINS Operator's manual

DUROMAX
DUROMAX XP13000E user manual

Mosa
Mosa GE 20 YSX Use and maintenance manual

Xtreme Power
Xtreme Power 65038 Owner's manual and safety instructions

KUMATSUGEN
KUMATSUGEN GP17000MAT manual

Firman
Firman The Ultimate 4550 owner's manual

Champion
Champion 41115 Owner's Manual and Operating Instructions

Power Tech Generators
Power Tech Generators PTSMH-15 Operator's manual

Firman
Firman WH03041 owner's manual

Lincoln Electric
Lincoln Electric COOL ARC 25 Operator's manual