Greenbroz M LITE User manual

MODEL M LITE DRY TRIMMER
User Manual
GreenBroz.com

MACHINE PARTS IDENTIFIERMACHINE PARTS IDENTIFIER
844.DRY.TRIM info@greenbroz.com greenbroz.com
1. Top Blade
2. Bottom Blade
3. Removable Barrel
4. Lid
5. Removable Control Box
6. Hub Key
(8)
(1)
(5)
(4)
(9)
(10)
(11)
(13)
(2)
(3)
(6)
(7)
(12)
(16)
(17)
(15)
(14)
7. Hub Screw
8. Upper Flower Fin
9. Center Flower Fin
10. Flower Door
11. Flower Ramp
12. Tabletop Stand
DIMENSIONS I WEIGHT I POWERDIMENSIONS I WEIGHT I POWER
DIMENSIONS: 19”H x 18”W x 23”L
WEIGHT: 67Ibs (31kg)
POWER: 10VAC, 60Hz 3A 330W (US)
220VAC, 50Hz 1.5A 330W (International)
13. Trim Collection Bin
14. On / Off Switch
15. Forward / Reverse Switch
16. Speed Control Dial
17. EMERGENCY STOP

844.DRY.TRIM info@greenbroz.com greenbroz.com
UNPACKING & INSTALLATIONUNPACKING & INSTALLATION
UNPACKING
Prior to your first use, you will need to gather the following materials:
• Oil. A sample of our resin clear oil can be found in the user manual pack.
• Isopropyl Alcohol
• Box Cutter or Razor Blade
• Microfiber Cloth
1. Remove the machine from the shipping container and remove all plastic and tape. Keep
your box and shipping materials as it works well to store your machine when not in use.
2. Remove any additional packaging material from the machine.
3. Set your trimmer on a flat, sturdy surface.
4. Remove the Lid, Center Flower Fin, Upper Flower Fin, Hub Screw, and Welded Key. Be
sure to place these items in a secure location as they are vital to the proper operation of
your machine.
5. Remove the Top and Bottom Blades. Do not place tools into the cutting edge of the
blades.
NOTE: Do not bend or pry the blades. You may damage them!
6. Remove the Barrel and Door and place next to the machine.
7. Lightly spray both blades, the Barrel, and the Door with alcohol and wipe down to clean
prior to use. Be sure to cover the Teflon ring on the bottom blade with a cloth so alcohol
does not contact the Teflon ring. Only use a microfiber cloth to clean, as paper towels
or other cloths may catch on the edges of the blades. Wipe from the center of the blade
towards the outer edge, following the pattern of the blade.
8. Place the door on the ramp, making sure the tabs of the door slide into the ramp slots.
9. Insert the Barrel, ensuring the slots of the barrel alight with the slots in the motor mount.
10.Insert the Bottom Blade, ensuring the four slots on the Bottom Blade align with the 4 tabs
on the Motor Mount. Check to make sure the Bottom Blade sits flat on the Motor Mount
by tapping along the edge of the blade in several spots – if the blade moves then it is not
sitting flush with the Motor Mount.
The day has come, and you have an incredible new machine in your hands! Congratulations!
There are a few things to do prior to using your machine for the first time. All parts noted in
this manual will be included with your machine, unless otherwise noted.

844.DRY.TRIM info@greenbroz.com greenbroz.com
UNPACKING
11.(Optional) Place a light film of oil on the outer edge of the Bottom Blade. If using
aerosol spray oil, two quick bursts is sufficient for each area. Use your finger to spread
the oil around the outer area. Other oil applicators that work well are large syringes,
eyedroppers or small refillable shampoo bottles used for traveling.
12.Insert the Top Blade into the machine while making sure the hub (pre-installed on your
Top Blade) lines up correctly with the shaft so that the Welded Key can be inserted into
the motor keyway.
13.Insert the Welded Key into the keyway and secure it down with the Hub Screw (hand
tighten).
14.Insert the Upper Flower Fin and Center Flower Fin into the barrel.
15.Place the Lid on top of the Barrel and twist Clockwise to slide the Lid Handles into the
Barrel Handles.
Congratulations! Your machine is now prepped and ready to use!
CONTROL BOX INSTALLATION
The control box is required to power the motor and allow the operator full control of the
machine.
• The Control Box (1) slides directly into the Control Box Receiver (2)
• The black 4 prong connector (3) screws into to the plug (4) at the back of the Control
Box.
• Four thumb screws (5) are used to attach the Control Box to the Main Housing.
(1)
(2)
(3) (5)
(4)

OPERATING I SHUT DOWNOPERATING I SHUT DOWN
POWERING AND OPERATIONPOWERING AND OPERATION
844.DRY.TRIM info@greenbroz.com greenbroz.com
We recommend reviewing all the disclosures and following all the
instructions to ensure safety and optimal processing.
Prior to use, ensure that the machine placement is sound.
1. To begin using your new Dry Trimmer, plug the power cord into your wall outlet. Plug
the other end into the machine’s power plug and switch the On / Off switch into the ON
position.
2. Ensure the Emergency Stop is not depressed. If it is, rotate the emergency stop clockwise
to release it and give power back to the machine.
3. Remove the lid and place the material to be processed into the cutting chamber.
4. Place the lid onto the barrel and twist clockwise to lock it in place.
5. Set your desired speed with the speed control knob
6. Switch the Forward / Reverse switch into the Forward position to start trimming.
7. You may view the amount of trimmed material being removed by inspecting the trim bin
below the trimmer.
8. As material is processing, you will see a decrease in volume in the cutting chamber, and
material will be visibly more trimmed.
9. Occasionally check for any stems caught between the blades. If stems are caught, toggle
the Forward / Reverse switch into the Reverse position and wait for 1/3 of a rotation to
release material, then switch to Forward.
10.When processing is complete, place a container or bag below the Flower door, and
simply raise the door while the machine is still running to release your trimmed material.
Toggle between forward and reverse to get the last bit out.
11.Repeat until your harvest is complete.
SHUT DOWNSHUT DOWN
To shut down the machine, toggle the Forward / Reverse Switch into the central position and
switch the On / Off Switch into the Off position. From here you can unplug the machine from
the wall.
EMERGENCY STOPEMERGENCY STOP
AT ANY TIME, THE EMERGENCY STOP CAN BE PRESSED AND ALL POWER WILL BE
REMOVED FROM ALL COMPONENTS.
The emergency stop button will have to be slightly turned clockwise to be released and give
power back to any part of the machine.

844.DRY.TRIM info@greenbroz.com greenbroz.com
CLEANING AND SANITATIONCLEANING AND SANITATION
1. Unplug the machine.
2. Remove Lid.
3. Remove both Fins.
4. Remove Hub Screw and Hub Key.
5. Remove Top Blade.
6. Remove Bottom Blade.
7. Remove Barrel.
8. Remove Door.
9. Wipe down all surfaces with alcohol
and lint free cloth.
*** If you are going to pressure wash your machine,
remove the control box, and cap power connections.
PRODUCT PREP AND TROUBLESHOOTINGPRODUCT PREP AND TROUBLESHOOTING
PRODUCT PREPPRODUCT PREP
1. Remove water / fan leaves.
2. Remove flowers from the stems, just as you would
for hand-trimming.
Tip: Cut stem close to flower.
3. Hang drying your flowers keeps them in the best
shape for trimming. Laying buds out to dry tends
to press the leaves against the bud, making them
harder to remove.
4. Stems should snap and leaves should be crispy
and brittle so they break off, (not bend) when you
run your finger down the bud.
*We recommend lowering the humidity on the last
day of the drying cycle in order to crisp them leaves
while keeping the bud spongy and moist.
(7)
(2)
(3)
(4)
(5) (6)
(8)

Make sure the E stop is released.
Make sure the Power Plug on the side
of the machine is in the on position.
Check Power Plug integral fuse.
Ensure power is available.
– 110VAC 60Hz for US Version
– 220VAC 50Hz for UK Version
Check position of power switch above
plug.
– Switch should be in (-) position.
Check Emergency Stop is not
pressed in.
– Rotate Emergency Stop Button clockwise to release.
Check position of Direction Switch. (Middle is off)
– Position Direction Switch in upper position.
Check position of Speed Knob.
– Rotate Speed Knob Clockwise to increase speed.
Check if motor is plugged into control box.
– Plug motor cable into control box.
Check Fuse located above power plug.
– Pull out fuse to check. Replace with 3A fuse.
Check if Welded Key is installed. (Shaft will turn while blade remains stationary)
– Install welded key and hub screw.
844.DRY.TRIM info@greenbroz.com greenbroz.com
TROUBLESHOOTINGTROUBLESHOOTING
ISSUE: Dry Trimmer not powering on:
If there is tension between the motor shaft & “Hub Key”, rotate the Blade in the
opposite direction to release the pressure.
Make sure the Hub & Blade are aligned as loose hardware can prevent the hub
and Top Blade from aligning with the motor shaft.
ISSUE: Hard to insert or remove top blade:

Loose mounting screws holding the blade to the hub can cause the blade to
chatter. Make sure hardware is secure on the hub before processing.
Resin build up can cause vibrating/chattering of the blade as well. If it seems to
be the case, clean blades per the protocol provided.
When stems get caught in between the blades, it could also cause a chattering
sound.
844.DRY.TRIM info@greenbroz.com greenbroz.com
TROUBLESHOOTINGTROUBLESHOOTING
ISSUE: Top blade vibrates or chatters when rotating:
Removing hub prior to cleaning can prevent uneven pressure when removing resin
build up on the underside of the top blade.
Attention: Blue Loctite is suggested if the threads on the screws that secure the hub
to the blade have become loosened.
ISSUE: Take extra precaution while cleaning.:
Any other issues, comments, or complaints can be
submitted to service@greenboz.com.

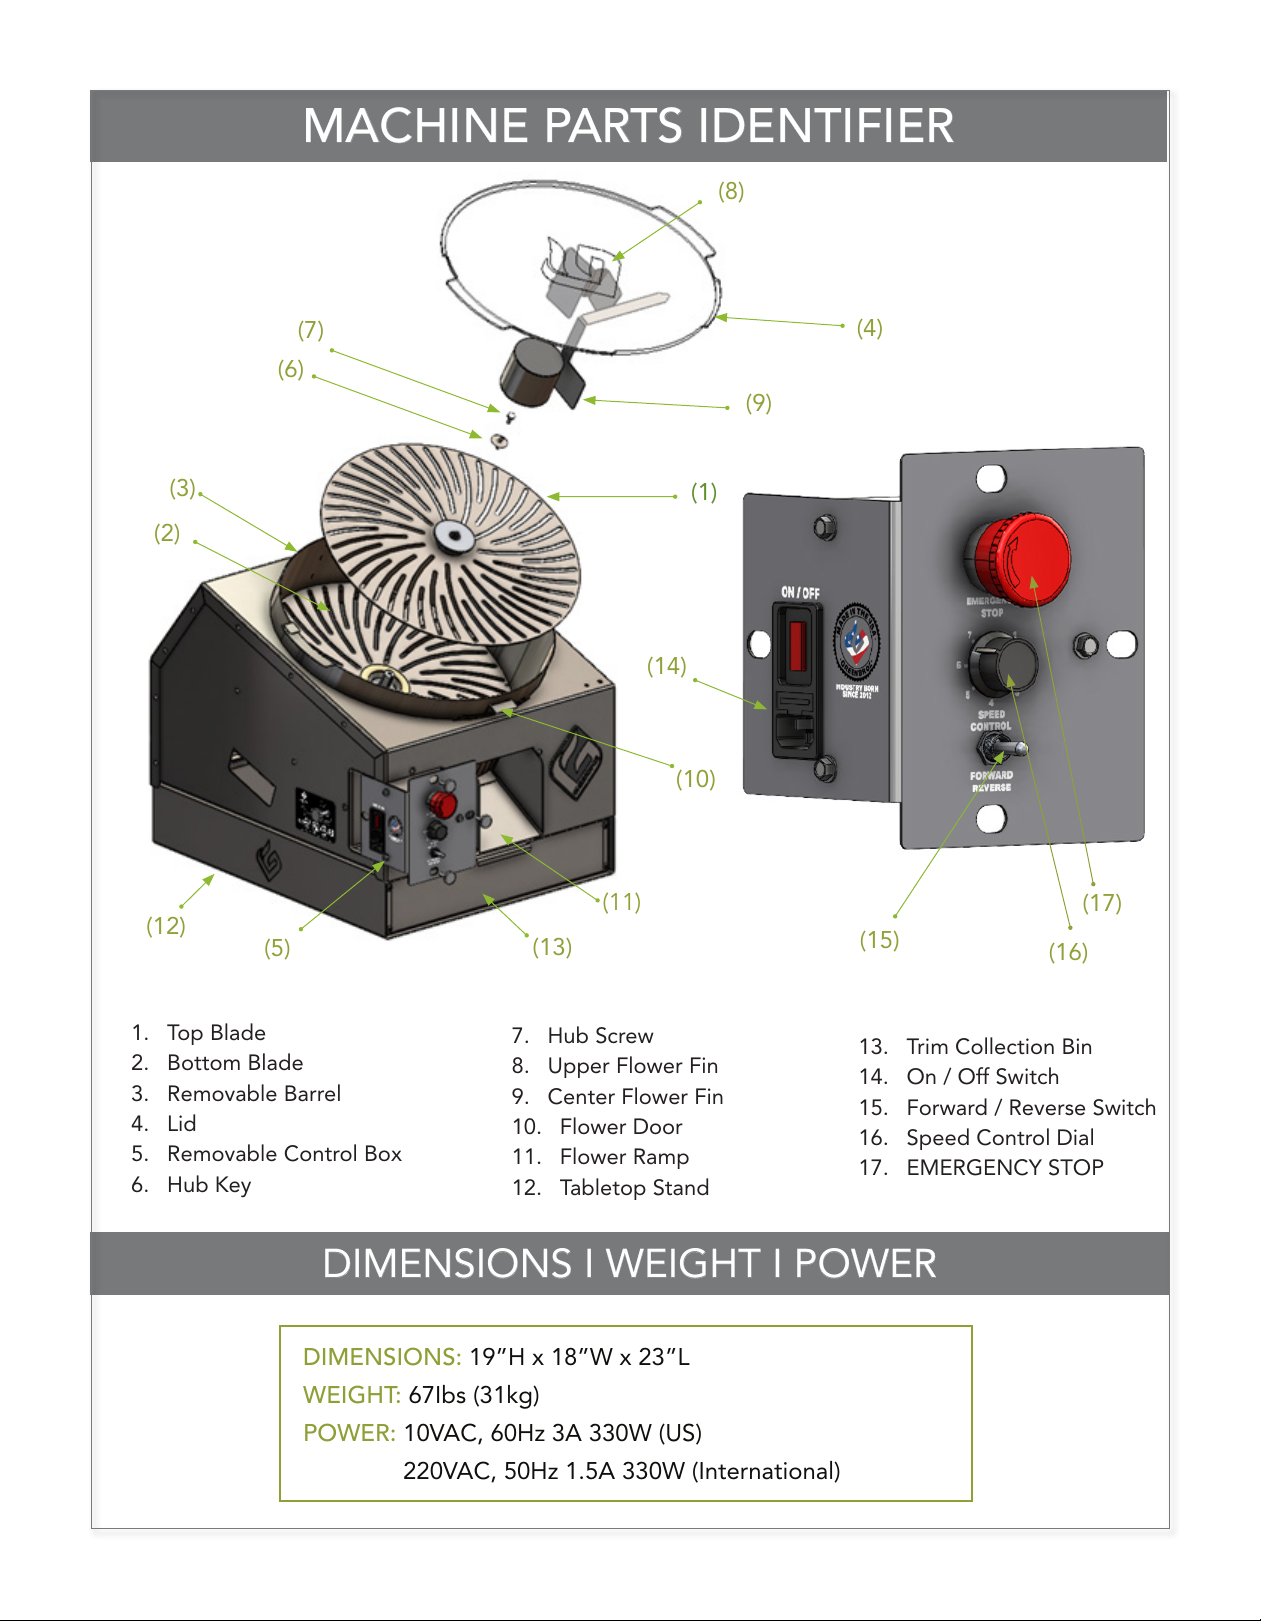
GO TO GREENBROZ.COM TO REGISTER.
Click on the product registration page to register GreenBroz products. You must
register within 30 days of product receipt date to activate your warranty.
Products covered: This limited warranty is limited to GreenBroz, Inc. Dry Trimmer products manufactured by
GreenBroz, Inc. (the “products”) and provides that such product is free from defects in material and workmanship.
Length of warranty: The length of this warranty shall be 36 months from the product receipt date.
To Qualify for this warranty: The product must be purchased from GreenBroz, Inc., or a dealer authorized by
GreenBroz, Inc., to sell the products. This warranty only applies to the first retail purchaser and is not transferable
to subsequent owners.
What GreenBroz will repair or replace under warranty: GreenBroz, Inc. will repair or replace, at its option, any
part that is proved to be defective in material or workmanship under normal use during the applicable warranty
period. Warranty repairs and replacements will be made without charge for parts or labor. Anything replaced
under warranty becomes the property of GreenBroz, Inc. All parts replaced under warranty will be considered
as part of the original product and any warranty on those parts will expire coincidently with the original product
warranty. This limited warranty does not cover normal wear and tear including, but not limited to trim blades,
brush assembly, sweeper bar, hub assembly, tabletop tray, forward-reverse switch, blade tension screw.
To obtain Warranty Service: Contact GreenBroz, Inc. for a return authorization and instructions for warranty.
Exclusions: 1. Any damage or deterioration resulting from neglect of periodic maintenance as specified in
any product owner’s manual or any improper repair or maintenance; 2. Neglect, unauthorized alteration,
modifications, misuse, incorporation of use of unsuitable attachments or parts; 3. Damage caused by dirt,
pressure or steam cleaning the product, salt water, corrosion, rust, varnish, abrasives, and moisture; or 4. Any
product that has ever been declared a total loss or sold for salvage by a financial institution or insurer.; 5. Damage
caused by an independent third party that is not the registered owner.
Disclaimer of Consequential Damage and Limitations of Implied Warranties: This limited warranty is in lieu
of all other expressed or implied warranties, including any warranty of FITNESS FOR A PARTICULAR PURPOSE
OR USE and any implied warranty of MERCHANTABILITY otherwise applicable to this product. GreenBroz, Inc.
disclaims any responsibility for loss of time or use of the product, transportation, commercial loss, or any other
incidental or consequential damage, including lost profits. There are no warranties extended other than as
provided herein. This limited warranty may be modified only by GreenBroz, Inc.
844.DRY.TRIM info@greenbroz.com greenbroz.com
WARRANTY REGISTRATION
UNLESS SUBPOENAED, ALL INFORMATION OBTAINED BY GREENBROZ INC.UNLESS SUBPOENAED, ALL INFORMATION OBTAINED BY GREENBROZ INC.
WILL BE KEPT PRIVATE AND SECURE. GREENBROZ INC. WILL NOT SHARE ORWILL BE KEPT PRIVATE AND SECURE. GREENBROZ INC. WILL NOT SHARE OR
DISTRIBUTE YOUR INFORMATION WITHOUT CONSENT.DISTRIBUTE YOUR INFORMATION WITHOUT CONSENT.
LIMITED WARRANTY

844.DRY.TRIM info@greenbroz.com greenbroz.com

MODEL M DRY TRIMMER
•
YOU
control the finish
• Trim 1 6+ Lbs./Hr.
• The industry's leading batch dry trimmer
RISE-N-SORT™ SYSTEM
•
YOU
control the sizes
•Sort 360 Lbs./Hr.
• The industry's fastest & most gentle size-sorting system
844.379.8746 I GreenBroz.com
GREEN BROZ
TRUE
TO
THE
CROP

VISIT GREENBROZ HQ
• WAREHOUSE TOURS • MACHINE DEMOS • MEET OUR TEAM •
Table of contents
Other Greenbroz Trimmer manuals