GreenIQ GIQ-USWIF-001/EN User manual


EN
1. Your GreenIQ Smart Garden Hub
Thank you for purchasing the GreenIQ
Smart Garden Hub. GreenIQ allows
you to easily control your garden's
irrigation and lighting, and save money
on your water and electricity bills. Your
GreenIQ:
Automatically adjusts irrigation
scheduling based on current and
forecasted weather.
Controls your landscape lighting
based on sunrise and sunset
schedule.
Connects to the Internet wirelessly
or via an Ethernet cable.
Connects to weather, soil moisture,
fertilizer-content and flow sensors.
2. GreenIQ’s Mobile Apps
Please use one of the following mobile
apps to setup and control your Hub:
iOS: http://apple.co/1s9clEw
Android: http://bit.ly/1VhOvSs
Web: https://greeniq.net

EN
You can download GreenIQ’s mobile
app by scanning one of the following
QR codes:
iOS
Android
Web app

EN
3. Setting up your GreenIQ Smart
Garden Hub
Please read the latest setup
instructions in the following link:
http://support.greeniq.co
GreenIQ Support
In this link you’ll find useful resources
for setting up your GreenIQ,
connecting to sensors, connecting to
your landscape lighting and integrating
with popular home automation
platforms such as IFTTT, Amazon
Echo and many more.

EN
4. Your GreenIQ Smart Garden Hub
1. Cover
2. Power Indicator
3. Network Indicator
4. Cover Screws (x3)
5. Mounting Holes (x2)
6. Cable 1 Port
7. Cable 2 Port
8. Ethernet Port (RJ-45)
9. Power Adapter Port

EN
5. Installation Instructions
Warnings
Incorrect installation might damage
the device, and even cause serious
injuries or death from electrical
shock.
Do not plug or apply power to the
unit until you have compiled and
checked all wiring connections.
Before connecting or disconnecting
wires to the unit, disconnect the unit
from main supply by carefully
pulling the power adapter from the
mains inlet.
When completing installation, make
sure that there are no exposed wire
ends.
Never use Ethernet cable for
outdoor installations.
Make sure not to swap Cable-1 and
Cable-2. Swapping cables might
cause permanent damage to your
Smart Garden Hub.
Always use the provided GreenIQ
power adapter.
Never open the device’s enclosure.
Do not attempt to link two or more
units using a single power adapter.

EN
To prevent damage to the unit,
connect only one valve to each
open zone wire.
Always use water-tight connectors
for all wires splice connections.
Selecting a Location
The unit’s location should meet the
following criteria:
1. The unit’s operating temperature
range is 0°C to 40°C (32°F to
104°F). Please avoid exposing the
unit to direct sunlight or other heat
sources.
2. If you plan to use the unit in Wi-Fi
or 3G Mode, you have to make
sure that there is a good wireless
signal reception at the unit’s
location.
3. Make sure that all the connections
are available at the unit’s location:
electrical outlet, irrigation valve
wires, and Ethernet cable with
Internet connection (for Wired-
Mode only).
4. The electrical outlet shall be
located near the GreenIQ Hub and
shall be easily accessible.

EN
Mounting
1. Make sure that the unit’s cover is
not in place.
2. Place the unit against the wall, and
mark the location of the mounting
holes on the wall. You may use the
supplied GreenIQ ruler to mark the
holes’location on the wall.
3. Use the two screws and the two
plastic anchors from the mounting
kit to mount the unit to the wall.
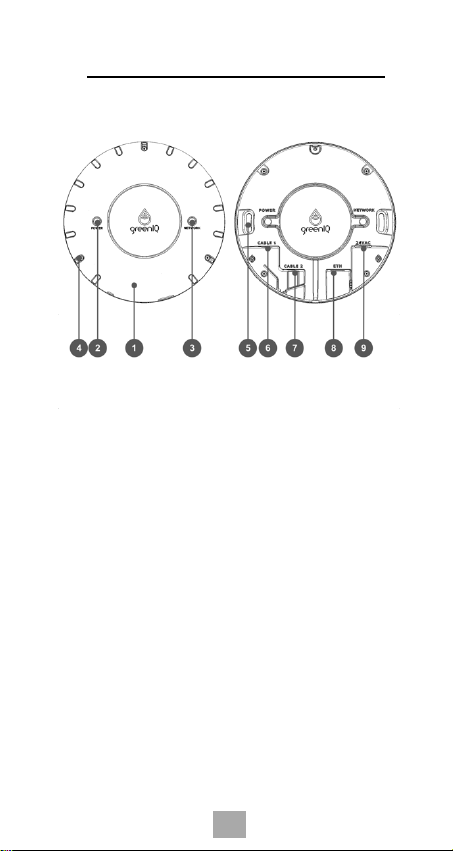
4. Connect the power jack to the
unit’s Power Adapter Port.
5. If you are using Ethernet Cable to
connect to the Internet, you need
to break the Ethernet Port sealing
tab on the unit’s cover, and plug
the Ethernet Cable to the unit’s
Ethernet Port. After breaking the
Ethernet Port sealing tab, the unit
will stop being water resistant.
6. Place the cover on the unit. Use
the GreenIQ Screwdriver and the
three cover screws from the
mounting kit to tighten the cover to
the unit. The cover is an essential
part of the unit’s water resistance.

EN
Connecting the unit to the irrigation
valves
There are several types of irrigation
valves in the market. The GreenIQ
Smart Garden Hub supports only
24VAC valves.
Warning: Never shortcut a GreenIQ
wire with other GreenIQ wire.
Tip:Before replacing your old irrigation
controller, you can use the supplied
sticker kit to mark the existing wires.
Wiring example

EN
CABLE 1
Color
Code
Details
White
V-1
Valve 1
Brown
V-2
Valve 2
Red
V-3
Valve 3
Yellow
V-4
Valve 4
Green
V-5
Valve 5
Blue
V-6
Valve 6
Orange
MAS
Master Valve
Black
COM
Common
CABLE 2
Color
Code
Details
White
L
Lighting Control
Brown
F
Flow Meter
Red
VCC
3.3 VDC
Yellow
S-1
Analog Sensor 1
Green
S-2
Analog Sensor 2
Blue
S-3
Analog Sensor 3
Orange
R
Rain Sensor
Black
GND
Ground

EN
6. Technical Specifications
Part Number:
GIQ-USWIF-001/EN : Wi-Fi Smart Garden Hub
with 120VAC Adapter
GIQ-EUWIF-001/EN : Wi-Fi Smart Garden Hub
with 230VAC Adapter
GIQ-USCEL-001/EN : Cellular Smart Garden
Hub with 120VAC Adapter
GIQ-EUCEL-001/EN : Cellular Smart Garden
Hub with 230VAC Adapter
Size and Weight:
• GreenIQ Smart Garden Hub:
◦Diameter: 15.0 cm (5.91 inches)
◦Depth: 5.3 cm (2.09 inches)
◦Weight: 392 grams (13.83 oz.)
• Package
◦Height: 17.0 cm (6.69 inches)
◦Width: 17.0 cm (6.69 inches)
◦Depth: 17.0 cm (6.69 inches)
◦Total Weight: 1500 gram (3.31 lb.)
Output Ports:
• 6 irrigation zones
• 1 master switch for water pump, fertilizer tank
or other uses
• Supports 24VAC valves. Valve maximum
current rating: 150mA.
• 1 lighting channel (An external relay is
required. Sold separately)
Input Ports
• Flow meter
• Rain sensor

EN
Power Adapter:
• Output: 24VAC, 1A (included)
Communication:
• Ethernet: 10/100BASE-T Ethernet (RJ-45
connector)
• Wi-Fi Model: Complies with 802.11b/g/n
• Cellular Model: HSDPA
Operating Requirements:
• Operating Temperature: -20° to 55° C (-4° to
131° F)
• Relative humidity: up to 95% non-condensing
• Water Resistant (IP-55)


FR
Votre Console de jardin intelligente
GreenIQ
Nous vous félicitons pour votre
acquisition de la Console de jardin
intelligente GreenIQ. GreenIQ vous
permet de commander facilement
l'irrigation et l'éclairage de votre jardin,
tout en faisant des économies sur vos
factures d'eau et d'électricité. Votre
Console GreenIQ :
Règle automatiquement l'irrigation en
fonction des conditions climatiques et
des prévisions météorologiques.
Contrôle votre éclairage de jardin en
fonction des horaires de lever et de
coucher du soleil.
Se connecte à Internet par Wi-Fi ou
câble Ethernet.
Se connecte aux capteurs météo,
d'humidité du sol, de niveau de
fertilisant et de débit.

FR
1. Applications mobiles GreenIQ
Utilisez l'une des applications mobiles
suivantes pour configurer et commander
votre console :
iOS : http://apple.co/1s9clEw
Android : http://bit.ly/1VhOvSs
Web : https://greeniq.net
Vous pouvez télécharger l'application
mobile de GreenIQ en lisant l'un des
codes QR suivants :
iOS
Android
Application web

FR
2. Configuration de votre Console de
jardin intelligente GreenIQ
Consultez les instructions de
configuration les plus récentes sur le lien
suivant :
http://support.greeniq.co
Assistance GreenIQ
Dans ce lien, vous trouverez des
ressources utiles pour la configuration de
votre GreenIQ, la connexion aux
capteurs et à votre éclairage de jardin, et
l'intégration avec les plateformes de
domotique populaires telles qu'IFTTT,
Amazon Echo, et autres.

FR
3. Votre Console de jardin intelligente
GreenIQ
1. Couvercle
2. Témoin d'alimentation
3. Témoin de réseau
4. Vis du couvercle (x3)
5. Orifices de fixation (x2)
6. Port du câble 1
7. Port du câble 2
8. Port Ethernet (RJ-45)
9. Port de l'adaptateur d'alimentation

FR
4. Instructions d'installation
Attention !
Une installation incorrecte peut
endommager l'appareil, voire causer
des blessures graves, ou mortelles,
par choc électrique.
Ne branchez ou ne mettez pas
l'appareil sous tension avant d'avoir
assemblé et vérifié tous les
branchements de câbles.
Avant de brancher ou de débrancher
des fils de l'appareil, débranchez
l'appareil de l'alimentation principale
en retirant avec précaution
l'adaptateur d'alimentation de la prise
secteur.
Une fois l'installation terminée,
assurez-vous qu'il n'existe aucune
extrémité de fil dénudée.
N'utilisez pas de câble Ethernet pour
les installations extérieures.
Assurez-vous de ne pas permuter le
câble 1 et le câble 2. Inverser les
câbles peut causer des dommages
permanents à votre console de jardin
intelligente.
Utilisez exclusivement l'adaptateur
d'alimentation GreenIQ fourni.

FR
N'ouvrez pas le boîtier de l'appareil.
Ne reliez pas deux unités ou plus
avec un seul adaptateur
d'alimentation.
Pour éviter d'endommager l'appareil,
ne branchez qu'une seule vanne à
chaque fil de zone ouvert.
Utilisez exclusivement des
connecteurs étanches sur les
épissures de fils.
Sélection de l'emplacement
L'emplacement de l'appareil doit
répondre aux critères suivants :
1. La plage de température de
fonctionnement de l'appareil est de
0°C à 40°C (32°F à 104°F). Évitez
d'exposer l'appareil à la lumière
directe du soleil ou à d'autres
sources de chaleur.
2. Si vous prévoyez d'utiliser l'appareil
en mode Wi-Fi ou 3G, assurez-vous
que le lieu d'installation de l'appareil
dispose d'une bonne réception du
signal sans fil.
3. Assurez-vous que toutes les
connexions sont disponibles à
l'emplacement de l'appareil : prise
secteur, fils de vanne d'irrigation et
This manual suits for next models
3
Table of contents
Languages:
Other GreenIQ Switch manuals
Popular Switch manuals by other brands

Splash
Splash Bootloader Domestic Installation

Brocade Communications Systems
Brocade Communications Systems SILKWORM 4016 Hardware reference manual

schmersal
schmersal AZM300 operating instructions

ATEN
ATEN CS1942ATC user manual

Artel
Artel INFINITYLINK ILC205 Installation and operation guide

SUTO
SUTO S409 Instruction and operation manual

Ecler
Ecler HUB1616 quick guide

Tekvox
Tekvox SCU21T-KVM user manual

Next Network
Next Network NEXT-POE4110L2-SFP Quick Installation and Initial Configuration

StarTech.com
StarTech.com ENTERPRISE CLASS SV1653DXI user manual

IP-COM
IP-COM F1226P user guide

NETGEAR
NETGEAR GSM7248R - ProSafe Switch Hardware installation guide