manuals.online logo
Brands
  1. Home
  2. •
  3. Brands
  4. •
  5. GREENS
  6. •
  7. Plumbing Product
  8. •
  9. GREENS ASTRO II User manual

GREENS ASTRO II User manual

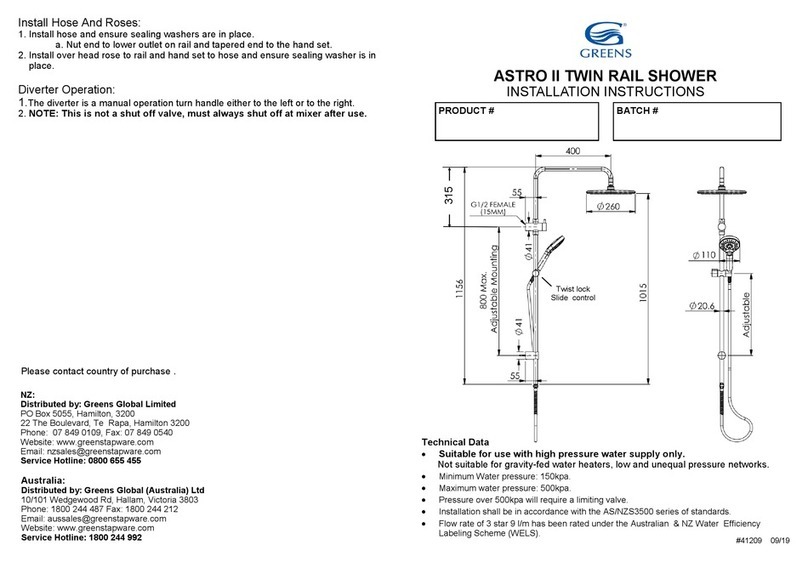
Install Hose And Roses:
1. Install hose and ensure sealing washers are in place.
a. Nut end to lower outlet on rail and tapered end to the hand set.
2. Install over head rose to rail and hand set to hose and ensure sealing washer is in
place.
Diverter Operation:
1.The diverter is a manual operation turn handle either to the left or to the right.
2. NOTE: This is not a shut off valve, must always shut off at mixer after use.
Distributed by: Greens Global AUS PTY LTD
36 Naxos Way, Keysborough VIC 3173
Phone: 1800 244 487 Fax: 1800 244 212
Email: [email protected]
Website: www.greenstapware.com
Service Hotline: 1800 244 992
NZ
Distributed by: Greens Global Limited
PO Box 5055, Hamilton, 3200
22 The Boulevard, Te Rapa, Hamilton 3200
Phone: 07 849 0109, Fax: 07 849 0540
Website: www.greenstapware.com
Email: [email protected]
Service Hotline: 0800 655 455
Please contact country of purchase.
ASTRO II, ROCCO TWIN RAIL SHOWER
INSTALLATION INSTRUCTIONS
BATCH #PRODUCT #
Slide control
Push button
Technical Data
•Suitable for use with high pressure water supply only.
Not suitable for gravity-fed water heaters, low and unequal pressure networks.
•Minimum Water pressure: 150kpa.
•Maximum water pressure: 500kpa.
•Pressure over 500kpa will require a limiting valve.
•Installation shall be in accordance with the AS/NZS3500 series of standards.
•Flow rate of 3 star 9 l/m has been rated under the Australian Water Efficiency Labeling
Scheme (WELS). 41209 07/21
300
B: Bottom bracket
A: Diverter -Top Inlet
Edge level with finish wall
• Top Inlet at the diverter.
• Diverter trim ring is 60mm dia.
• Bottom bracket mount is adjustable with max 560mm Centres.
Install The 15mm Female Inlet Adaptor:
1. At pipe-out stage install a brass 15mm male wingback elbow (not supplied).
a. Remove the adaptor from the diverter.
i. NOTE: Loosen off the 2 grub screws to ensure the O-rings are not cut
on the adaptor.
b. Note: The female inlet adaptor requires minimum of 10mm thread
protruding from the finished wall.
c. Inlet is at the top.
d. Check the height required with customer as there is no height
adjustment.
2. Cut the inlet thread, to a MIN of 10mm thread from finished wall.
3. Install adaptor using a spanner or a 10mm Allen key.
a. Back edge of the adaptor to be level with the finished wall as shown.
Install Mounting Block For Bottom Bracket:
1. Mark out and install mounting block as shown in drawing and inline with the inlet to
ensure rail will be straight.
a. Must screw into a wooden stud or nog.
b. Wall anchor provided for masonry walls.
Installing Rail:
1. Install diverter with rail to inlet adaptor.
a. Lightly grease the O-rings on the inlet adaptor.
b. CHECK: The grub screws top and bottom are not projecting into the
bore.
c. Sealant is required behind the diverter and trim to wall for water seal.
d. Remove the protective tape from seal on the trim ring.
e. Carefully position trim ring against finished wall.
i. Check the grub screw is below the surface to ensure seal inside trim
ring is not cut.
2. Install bottom bracket.
a. Back off grub screw enough for attaching to mount.
b. Remove the protective tape from seal on the trim ring.
c. Sealant is required behind bracket and trim to wall for water seal.
d. Install rail to the mounting block and tighten the grub screw.
i. To adjust bottom rail bracket height, back off the locking screw
inside the bracket, adjust to height required and retighten screw.
e. Carefully position trim ring against finished wall.
i. Check the grub screw is below the surface to ensure seal inside trim
ring is not cut.
3. Install overhead arm to top of diverter, position and tighten the nut.
a. Lightly grease O-rings on the arm. PTO

Other GREENS Plumbing Product manuals

GREENS GISELE User manual

GREENS

GREENS GISELE User manual

GREENS ASTRO II 2513700 User manual

GREENS

GREENS ASTRO II 2513700 User manual

GREENS ASTRO II User manual

GREENS

GREENS ASTRO II User manual

GREENS ASTRO SHOWER MIXER User manual

GREENS

GREENS ASTRO SHOWER MIXER User manual

Popular Plumbing Product manuals by other brands

Gessi RETTANGOLO 20172 manual

Gessi

Gessi RETTANGOLO 20172 manual

Bradley Express SS-2N/BIR3/STD Installation

Bradley

Bradley Express SS-2N/BIR3/STD Installation

HOLL'S Hybrid Combi HL-HC04-K Installation handbook

HOLL'S

HOLL'S Hybrid Combi HL-HC04-K Installation handbook

Signature Hardware PICKENS 920109 installation instructions

Signature Hardware

Signature Hardware PICKENS 920109 installation instructions

DURAVIT Inipi 7509 Series Mounting instruction

DURAVIT

DURAVIT Inipi 7509 Series Mounting instruction

ZEN BRIGHTON instruction manual

ZEN

ZEN BRIGHTON instruction manual

Pfister Zanna F-529-7ZN3 Quick installation guide

Pfister

Pfister Zanna F-529-7ZN3 Quick installation guide

Gessi goccia 35342 Bath Mixing Program

Gessi

Gessi goccia 35342 Bath Mixing Program

BELLOSTA aperio 2705/S Installation instruction

BELLOSTA

BELLOSTA aperio 2705/S Installation instruction

Wellis CLARICE installation manual

Wellis

Wellis CLARICE installation manual

Toto STANDARD T205 quick start guide

Toto

Toto STANDARD T205 quick start guide

Dynamic Saunas DYN6102 owner's manual

Dynamic Saunas

Dynamic Saunas DYN6102 owner's manual

Gessi goccia 33725 Bath Mixing Program

Gessi

Gessi goccia 33725 Bath Mixing Program

Grohe Chiara 33148 instructions

Grohe

Grohe Chiara 33148 instructions

KWC Suprimo 10.271.103.700 Specifications

KWC

KWC Suprimo 10.271.103.700 Specifications

resideo Braukmann VR300 Maintenance Instruction

resideo

resideo Braukmann VR300 Maintenance Instruction

Grohe VITALIO 27 960 manual

Grohe

Grohe VITALIO 27 960 manual

Sensea BACATA manual

Sensea

Sensea BACATA manual

manuals.online logo
manuals.online logoBrands
  • About & Mission
  • Contact us
  • Privacy Policy
  • Terms and Conditions

Copyright 2025 Manuals.Online. All Rights Reserved.