GreenTec LRS 1601 User manual

Page 1af 20
LRS 1601
QUADSAW
Handbook & Spareparts
5. Edition March 2016
©GreenTec Machinery Limited

Page 2af 20
Contents
Contents
Introduction...................................................................................................................3
Important.......................................................................................................................4
Mounting the Quadsaw .................................................................................................5
Operation / Introduction ...............................................................................................6
Maintenance..................................................................................................................6
Driving recommendations.............................................................................................6
Belt diagram..................................................................................................................7
Correct belt adjustment.................................................................................................8
Technical data and description of working tool ...........................................................9
Safety ...........................................................................................................................10
Main Frame 1..............................................................................................................11
Main frame 2 ...............................................................................................................12
Belt tensioner box 1.....................................................................................................15
Belt tensioner box 2.....................................................................................................16
Knife shaft 1.................................................................................................................17
Knife shaft 2.................................................................................................................18
Stickers.........................................................................................................................19
Noise measuring..........................................................................................................20
Suplierinformation and CE-declarations....................................................................20
CE-declaration............................................................................................................20
Warnings, ban and directions. ....................................................................................20
Disassemble.................................................................................................................20

Page 3af 20
Introduction
Dear customer!
GreenTec LRS 1601 Quadsaw is designed
with a background of 20 years of experience
with cutting-tool technology, and building of
special machines. They are made from the
latest technology and recognized safety tech-
nical regulations, standards and regulations.
It is our goal to make a product available in
such a way that, neither during transit by fur-
ther processing and compilation process or the
subsequent use is damage.
This manual contains information and instruc-
tions there are important and useful for the
preservation of LRS 1601 Quadsaw reliability,
dependability and value. Read this manual
carefully and pay particular attention to the
instructions for the avoiding of damage.
The content also makes you familiar with connectivity, use, care and maintenance. And then it helps
to prevent injuries.
We hope, you are happy with your new LRS 1601 Quadsaw.
Best regards:
John Christensen
Sales Director, GreenTec A/S

Page 4af 20
Important
Please ensure that this manual is handed to the operator before using the machine for the first time.
The operator must fully understand the contents of this manual before using this machine.
(If the machine is resold the Manual must be given to the new owner.)
Please, fill out the following information. It is practical information that is useable when ordering
spare parts.
Serial number: ……………………………………………………
Delivery date: ……………………………………………………
Dealer name : ……………………………………………………
Address: ……………………………………………………
……………………………………………………
Tel. / Fax No.: ……………………………………………………
GreenTec A/S
Merkurvej 25
Dk-6000 Kolding
Tel: +45 7555 3644
Fax: +45 7555 4243
E-mail: info@greentec.eu
Http: www.greentec.eu

Page 5af 20
Mounting the Quadsaw
The blade is mounted, so the direction of rotation of the saw goes down (Fig. 1).
Saw is mounted in such a way, that the blade runs straight in the driving direction (Fig. 2).
Mount the hydraulic hoses so the blades are running in correct direction. The drain hose shall
go in free to the hydraulic oil tank.
Check the hydraulic system for leaks.
First time the machine is used. Measure the blades rpm 2600 –2700 by 40 L/min.
Holding this speed is important for the best optimum performance.
This saw can NOT be changed from right to left mounting or vice versa .
Fig. 1.
Fig. 2.

Page 6af 20
Operation / Introduction
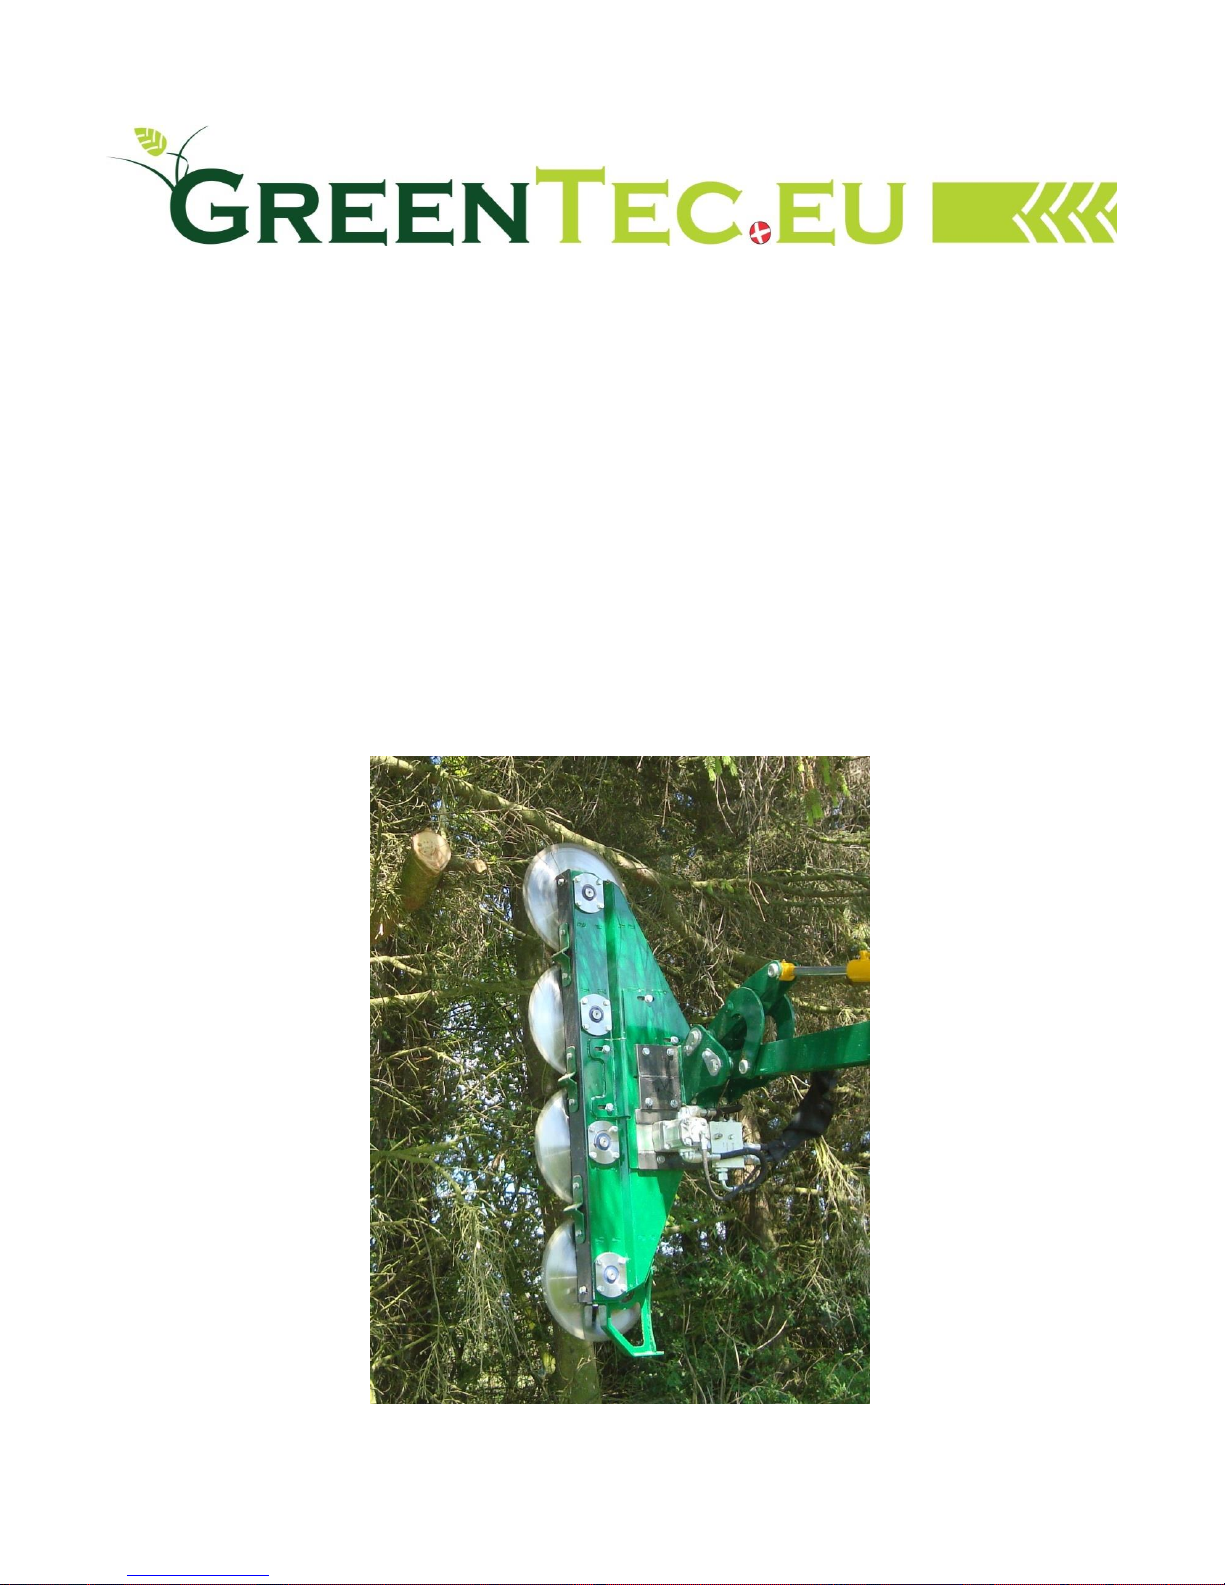
The Quadsaw is used for cutting branches and trees up to a max. diameter of 100 mm without the
branches being torn.
Branches with a diameter over 70 mm, must be cut one of the time.
Vertical cutting is allowed up to a 45 degree angle. Horizontal cutting is possible on hedges with a
width up to. 1,0 m. and a branch diameter up to 40 mm. Thicker branches might stop the blades and
get stuck in the machine.
Maintenance
After 2 hours driving tighten everything. "Easy-Lock" connector with 14 Nm.
Allen-screws for the saw blades with 40 Nm.
After 10 hours work all bolts, screws and”Easy-Lock” retightened
All bolts shall be retightened / checked every 8 hour.
Plastic rail is adjusted down to the blades, with a distance of 1 mm. Is there more than
5 mm intervals, replace the list. Branch deflectors adjusted as closely as possible into the saw
blades, without touching the blades.
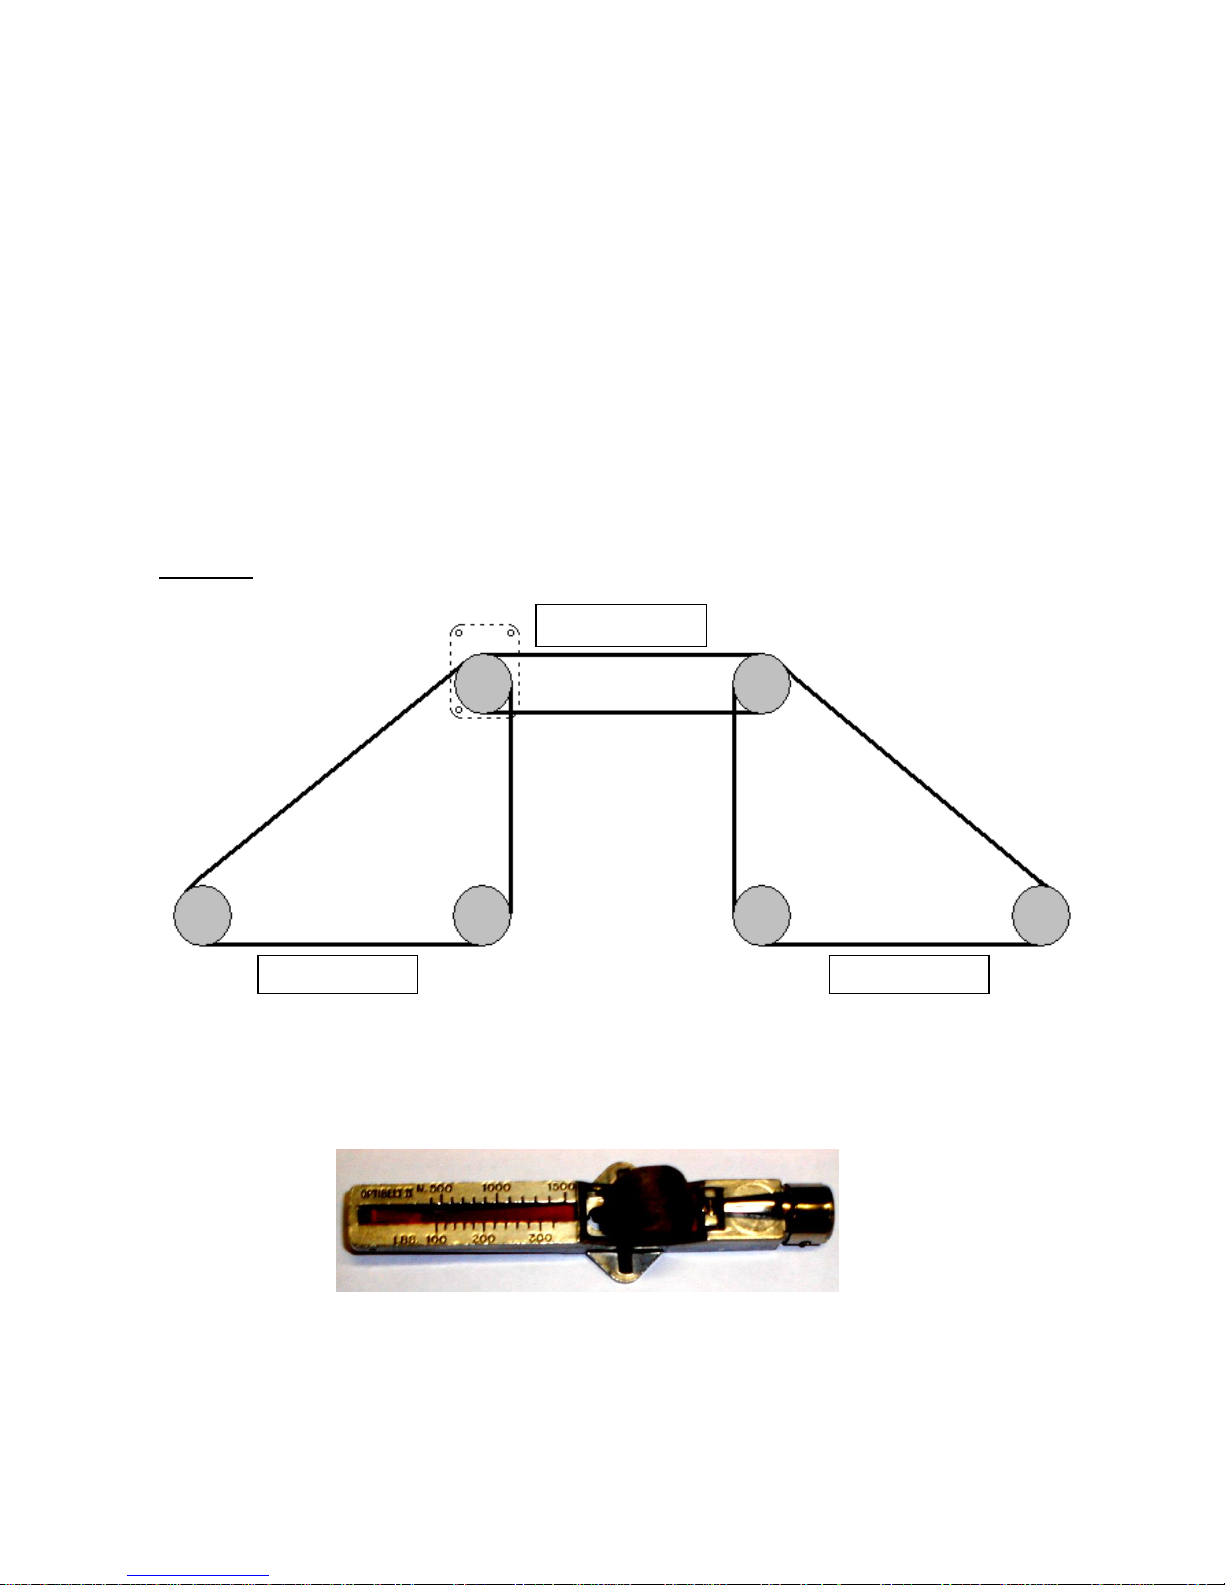
Dismount protection plate to the belts, and clean the house for dirt.
Inspect, and if necessary adjust the belts. (See belt diagram)
After inspection or service ALL protection plates and guards must be replaced.
Driving recommendations
Starting and stopping the saw shall always be at lowest pto. rpm.
It is recommended to travel at a slow forward speed when starting work in order to obtain and keep
the recommended rpm of the blades. Adjust the angle of the saw to approx 90 degrees in relation to
the branches. If a thick branch is approaching the branch reflectors , the working height must be ad-
justed for the branch to hit the saw blades straight on.
If small branches or other unwanted material get stuck in the blades, the machine must be stopped
and cleaned.
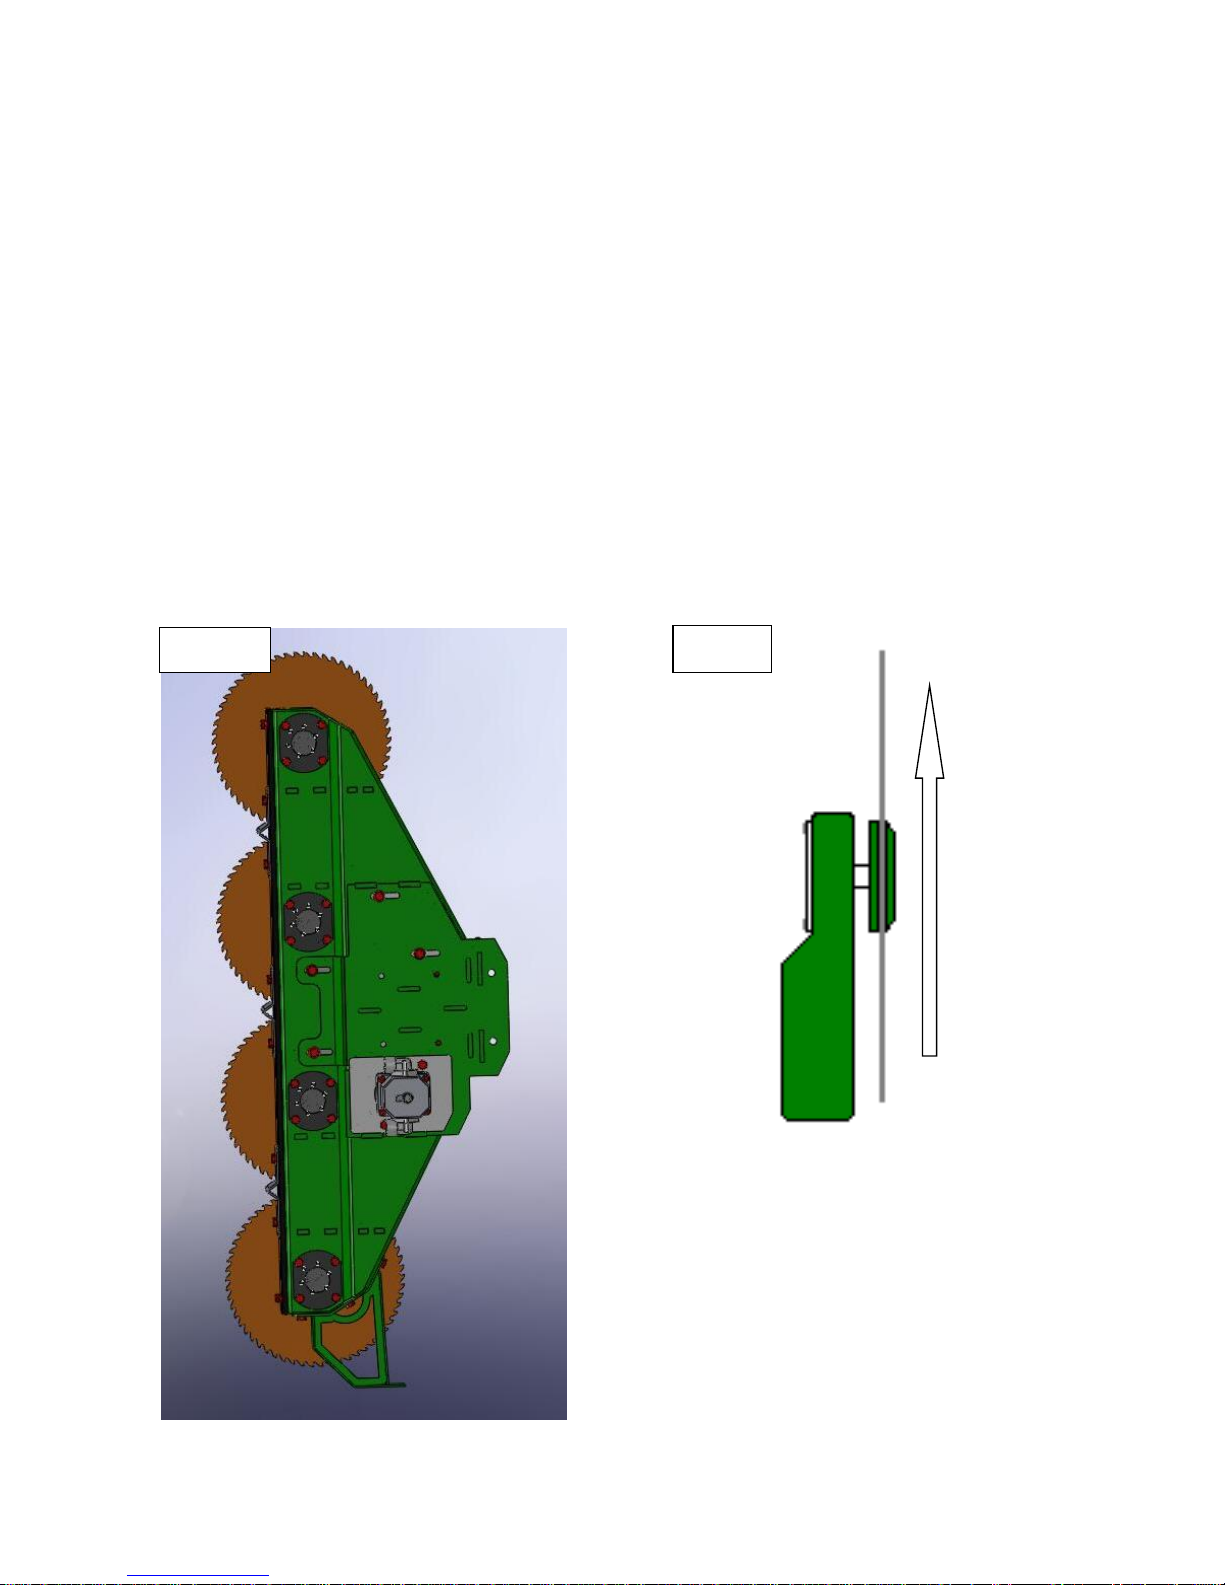
Always ensure that the blades are running vertical related to the direction of the travel. This will pre-
vent the blades from bending too much.

Page 7af 20
Belt diagram
It is utmost importance that the belts are correctly mounted and tightened. When new belts are
mounted they must be tensioned to 700 Nm, for the short and 900 Nm for the long belts.
After 3-5 working hours the belts may have slackened and must be checked.
BEWARE!! The tension has now changed. The short belts is tightened to 550 Nm, the long belts are
tightened to 650 Nm.
Contact GreenTec´s After Sales Department if you have any questions. We might help you with a
piece of good advice.
LRS 1601
Tool for belt tension control
“Optikrik II” Part no. 200155.0
700/550 Nm
900/650 Nm
900/650 Nm

Page 8af 20
Correct belt adjustment
See also "Belt Diagram" for more information.
NOTE!! After adjusting, turn the blades some rounds and then control again.
Recommended tools: Belt measure ”Optikrik II”
17 & 19 mm
17 & 19 mm Ring/fork wrench
Ratchet with short extension
Gloves
Loosen bolts. See arrows Remove cap. See adjustment bolt Loosen 3 bolts. Twist tensioner
Check torque on the center belt Check torque on the lowest belt Check torque on the top belt

Page 9af 20
Technical data and description of working tool
Quadsaw for mounting, on hydraulic hedge cutters.
Frame with 4 shafts, for mounting the saw blade Ø 390 mm.
Drift of each shaft by rib ribbon belts, the entire operation is done by
the hydraulic powered motor. Branch deflectors are placed between the blades.
The Quadsaw is supplied with a special bracket enabling mounting on various vehicles / ma-
chines.
The drive belt is like the supporting part on the carrying frame entirely covered.
LRS 1601
Working width
1600 mm
Blade speed
2600 –2700
Blade diameter
390 mm
Teeth per blade
60 stk.
Material
Hardened metal with special
teeth HM precision blade.
Performance
5 –100 mm branch diameter.
Application
Vertical
Oil flow 17,7 cc
40 L/min. relief valve 200 bar
e. g. Twiga 3000
540 Pto. rpm.

Page 10 af 20
Safety
Never operate the machine with other people present, as it is possible for debris to be thrown
from the saw blades in all directions.
Always ensure all cab safety guards are in place and all tractor windows are closed. Newer al-
low an inexperienced person to operate the machine without supervision.
Never allow children to play o nor around the machine at any time.
Never attempt any maintenance or adjustment without first disengaging the pto / hydraulic
pump, lowering the head to the ground, stopping the tractor engine and applying the tractor
parking brake.
Before leaving the tractor cab always ensure that the saw head is firmly on the ground, no
weight is on the tractors hydraulics and blades have stopped spinning.
Never stop the engine, when the power transmission is engaged.
Always check that all guards are properly fitted, check there are no damaged or loose parts.
Always drive with the correct rotations of the blades (see specifications).
Maximum oil pressure of 250 bar in the hydraulic hoses.
Never transport without the blade protection guards mounted.
Always inspect work area for wire, steel posts, large stones and other dangerous materials. If
such items are found remove them.
Never drive with wire or the like. wrapped around the blades / knife axles. Stop
immediately and remove the unwanted material.
Never attempt to use the machine for any purpose other than that it was designed for.
Ensure that all warning labels are always visible and that they are not damaged, defaced or
missing.
PTO must never be connected during transport.

Page 11 af 20
Main Frame PRE Jan. 2012

Page 12 af 20
Main frame PRE Jan. 2012
Item
Qty.
Part no.
Description
1
1
160100.0
Body
2
See section "Knife Axle"
3
See section "Belt-box"
4
1
160101.0
Lid
5
1
160102.0
Skid
6
1
160129.0
Lid
7
1
160173.0
Construction
8
6
160168.0
Backstop for blade
9
6
200163.0
Allen screws 8x10 mm 12.9
10
9
200104.0
Bolt 10x20 mm
11
3
160112.0
Branch deflector
12
1
160110.0
Plastic rail
13
11
2770421
Bolt
14
11
127B102
Spring washer 10 mm
15
2
160169.0
Washer HD 10 mm
16
1
160140.0
Belt, long
17
1
160140.0
Belt, long
18
1
160141.0
Belt, short
19
1
160162.0
Protective guard for blades
Not
shown
1
160999.0
Up-grade kit "brance lead"
LRS1601
Improved Plastic rail, branch
deflector, skid and guard (see
pos. 11,12,16,17,19,20,21,22 and
23 next page)

Page 13 af 20
Main frame POST Jan. 2012

Page 14 af 20
Main frame POST Jan. 2012
Item
Qty.
Part no.
Description
1
1
160100.0
Body
2
See section "Knife Axle"
3
See section "Belt-box"
4
1
160101.0
Lid
5
1
160129.0
Lid
6
1
160173.0
Construction
7
6
160168.0
Backstop for blade
8
6
200163.0
Allen screws 8x10 mm 12.9
9
9
200104.0
Bolt 10x20 mm
10
4
2770421
Bolt
11
12
127B102
Spring washer 10 mm
12
10
160169.0
Washer HD 10 mm
13
1
160140.0
Belt, long
14
1
160140.0
Belt, long
15
1
160141.0
Belt, short
16
1
160999.05
Skid
17
1
160110.1
Plastic rail
19
2
1302100600
Lynch Pin
20
3
160999.02
Branch deflector. Long
21
1
160999.01
Branch deflector. Short
22
1
160999.07
Protective guard for blades
23
8
931100402
Bolt 10x40 mm
24
1
160103.0
Option plate for Splittevalve

Page 15 af 20
Belt tensioner box 1

Page 16 af 20
Belt tensioner box 2
Item
Qty.
Part no.
Description
1
1
160128.0
Adjustment Box
2
1
200131.0
Bearing cpl.
3
1
200130.0
Motor 17 cc with "Item 28-30"
3A
1
200160.0
Sealkit for Bondioli motor
3B
1
200160.A
Sealkit for Danfoss motor
4
1
160126.0
Belt pulley 105 mm
5
1
160124.0
Roll
6
1
160171.0
Adjustment holder
7
1
160137.0
Belt pulley for motor 105 mm
8
3
160121.0
Lock ring
9
1
160172.0
Adjusting Wheel
10
1
160123.0
Clamping Element (Easy-Lock)
11
2
160119.0
Lock ring
12
4
160120.0
Bearing
13
1
160165.0
Distance ring
14
4
12912080901
8x90 mm Allen screw
15
4
200156.0
Spring Washer 8 mm
16
3
160169.0
Washer HD 10 mm
17
3
931100162
Bolt 10x16 mm
18
2
2770412
Locking nut
19
2
933100802
Bolt 10x80 mm fully threaded
20
4
160170.0
Washer HD 12 mm
21
6
127B122
Spring washer 12 mm
22
6
933120302
Bolt 12x30 mm
23
2
200132.0
Elbow ¾ "with o-ring
24
2
PP45-B
Sealing ring ¼ "
25
1
52BP04
Banjo bolt ¼ "
26
1
42BP0404
Banjo body ¼ "
27
1
200133.0
Spline bush
28
1
HPL14000001010R
Key
29
1
Nut. Included in "Item 3"
30
1
HPL03000005030R
Security lock
31
2
O-ring. Included in "Item 23"
Not shown
200155.0
“Optikrik II”
Tool for belt tension control

Page 17 af 20
Knife shaft 1

Page 18 af 20
Knife shaft 2
Item
*Qty.
Part no.
Description
1
1
160164.0
Bearing
2
1
160122.0
Pulley 90 mm
3
2
160120.0
Bearing
4
1
160114.0
Mounting plate outer
5
1
160111.0
Saw blade
6
1
160115.0
Mounting plate inner
7
2
160121.0
Locking ring
8
6
12912080251
Allen screw
9
4
127B102
Spring washer 10 mm
10
1
160119.0
Locking ring
11
1
160130.0
Seal
12
4
2770421
Bolt 10x30 mm
*Qty. is the number of spending per. axle.

Page 19 af 20
Stickers
Item
Qty.
Part no.
Beskrivelse
1
1
LRS1601KITS
Sticker Kit

Page 20 af 20
Noise measuring
Noise measuring has been made on the machine during normal working conditions at GreenTec A/S
in Denmark, with a Elma 1350B Noise measurer, ICE 651 type II.
The energy A-weighted Sound pressure is lower than 85 dB (A).
The test has been done in a distance of 1 meter from the machines critical noise maker and in a height
of 1.5 meters over the ground.
Suplierinformation and CE-declarations
Company name : GreenTec A/S
Address : Merkurvej 25
Mail code /City : DK-6000 Kolding
Land : Danmark
Tlf : +45 75 55 36 44
Telefax : +45 75 55 42 43
CE-declaration
Producent : GreenTec A/S
Tlf : +45 75 55 36 44
Telefax : +45 75 55 42 43
Machine No. : LRS 1601
Delivery date : _____________
Delivery year : 2014
Warnings, ban and directions.
Warning!
Never attempt any maintenance or adjustment, without first disengaging the pto / hydraulic-pump.
Warning!
Only authorised personal must do maintenance work on the equipment.
Direction!
Read this manual carefully before using the machine.
Disassemble
Machine disengaged from all connections. Removal of the parts must be done according to national
and EU legislation. To ensure the most environmentally friendly removal, the machine must be disas-
sembled and the parts separated as following:
Category:Example of parts:
Rubber and plastic Hoses, plastic strip.
Technical components Pumps, hydraulic hoses.
Pure metal Plates, pipes, guard.
Table of contents
Other GreenTec Saw manuals