manuals.online logo
Brands
  1. Home
  2. •
  3. Brands
  4. •
  5. Grillfest
  6. •
  7. Griddle
  8. •
  9. Grillfest MS-P005-402 User manual

Grillfest MS-P005-402 User manual

OWNER'SMANUAL
Model:MS-P005-402
4 BURNER GAS GRIDDLE
If you smell gas:
1. Shut off gas to the appliance.
2. Extinguish any open flame.
3. If odor continues, keep away from the appliance
and immediately call your gas supplier or your
fire department.
DANGER
1. Do not store or use gasoline or other flammable
liquids or vapors in the vicinity of this or any
other appliance.
2. An LP cylinder not connected for use shall not
be stored in the vicinity of this or
any other appliance.
WARNING:
Before proceeding, make certain that you understand the
IMPORTANT INFORMATION section of this manual.
Hazardous fire or explosion may result if instructions are ignored.
It is the consumer's responsibility to see that the griddle is properly assembled,
installed, and maintained. Failure to follow the instructions in this manual could
result in bodily injury and/or property damage.
FOR YOUR SAFETY IF YOU SMELL GAS:
1. Turn off gas supply at tank.
2. Extinguish all open flames; do not operate any electrical appliances.
3. Ventilate the area.
4. Check for leaks as detailed in this manual.
PRECAUTIONS
1. Leak test all connections after each tank refill.
2. Never check for leaks with a match or open flame.
3. Do not store gasoline or other flammable vapors and liquids in the vicinity of this or
any other appliance
4. Any LP cylinder not connected for use shall not be stored in the vicinity of this or any
other appliance.
5. Do not store a spare LP-gas cylinder under or near this appliance.
6. Never fill the cylinder beyond 80 percent full.
7. If the information in the above two statements is not followed exactly,
a fire causing death or serious injury may occur.
8. Minimum clearance from sides and back of unit to combustible construction,
91 cm/36 in. from sides and 91 cm/36 in. from back. Do not use this appliance under
overhead combustible surface.
9. Do not use this appliance under overhead combustible surfaces.
10. The regulator used in this unit is FRD FR00A. If this regulator fails, it must be
replaced with the exact model and must only be replaced by a professionally licensed,
authorized dealer.
1
DANGER
DANGER
If you smell gas:
1. Shut off gas to the appliance.
2. Extinguish any open flame.
3. If odor continues, keep away from the
appliance and immediately call your gas
supplier or your fire department.
1. Do not store or use gasoline or other flammable
liquids or vapors in the vicinity of this or any
other appliance.
2. An LP cylinder not connected for use shall not
be stored in the vicinity of this or any
other appliance.
To Installer/Assembler: Leave these
instructions with consumer.
To Consumer: Keep this manual for
future reference.
Some parts may contain sharp deges, especially
as noted in these instructions.
Wear protective gloves if necessary.
For residential use only. Do not use for
commercial cooking.
Installation Safety Precautions
•Use griddle, as purchased, only with LP
(propane) gas and the regulator/valve
assembly supplied.
•Griddle installation must conform with local
codes, or in the absence of local codes,
with either the National Fuel Gas Code,
ANSI Z223. 1/ NFPA 54, Natural Gas and
Propane Installation Code, CSA B149.1,
or Propane Storage and Handling Code,
B149.2,or the Standard for Recreational
Vehicles, ANSI A 119.2/NFPA 1192 and
CSA Z240 RV Series, Recreational Vehicle
Code, as applicable.
•Griddle is not for use in or on recreational
vehiclesand/or boats.
•This griddle is safety certified for use in the
United States and/or Canada only Do not
modify for use in any other location.
Modification will result in a safety hazard.
Safety Symbols
The symbols and boxes shown below explain
what each heading means. Read and follow all
of the messages found throughout the manual.
DANGER: Indicates an imminently hazardous
situation which, if not avoided, will result in
death or serious Injury.
WARNING: Be alert to the possibility of serious
bodily injury if the instructions are not followed.
Be sure to read and carefully follow all of
the messages.
WARNING: Be alert to the possibility of serious
bodily injury if the instructions are not followed.
Be sure to read and carefully follow all of
the messages.
CAUTION: Indicates a potentially hazardous
situation which, if not avoided, may result in
minor or moderate injury.
WARNING: This product contains chemicals
known to the State of California to cause cancer
and birth defects or other reproductive harm.
(California law requires this warning be given to
customers in the State of California.)
For more information: www.watts.com/prop65
CALIFORNIA PROPOSITION 65
WARNING
2
DANGER DANGER
DANGER
DANGER
DANGER
DANGER DANGER
FOR YOUR SAFETY............................... 1-2
USE AND CARE..................................... 4-9
ILLUSTRATED PARTS LIST.................... 10-11
HARDWARE.......................................... 11
ASSEMBLY............................................ 12-15
CARE AND MAINTENANCE..................... 16
GRIDDLE CARE & SEASONING............... 17-18
TABLE OF CONTENTS
3
•NEVER store a spare LP cylinder under or near
the appliance or in an enclosed area.
•Never fill a cylinder beyond 80% full.
•If the information in the two points above is not
followed exactly, a fire causing death or serious
injury may occur.
•An overfilled or improperly stored cylinder is a
hazard due to possible gas release from the
safety relief valve. This could cause an intense
fire with risk of property damage, serious injury
or death.
•If you see, smell or hear gas escaping,
immediately get away from the LP cylinder and
appliance and call your fire department.
DANGER
LP Tank Removal, Transport And Storage
• Turn OFF all control knobs and LP tank valve.
Turn coupling nut counterclockwise by hand
only -do not use tools to disconnect. Lift LP
tank wire upward off of LP tank collar, then lift
LP tank up and off of support bracket. Install
safety cap onto LP tank valve. Always use cap
and strap supplied with valve.
Failure to use safety cap as directed may result
in serious personal injury and/or property damage.
LP Tank Valve
Safety Cap
Retainer Strap
• A disconnected LP tank in storage or being
transported must have a safety cap installed (as
shown). Do not store an LP tank in enclosed
spaces such as a carport, garage, porch, covered
patio or other building. Never leave an LP tank
inside a vehicle which may become overheated
by the sun.
• Do not store an LP tank in an area where
children play.
LP Tank
• The LP Tank used with your grill must meet the
following
Requirements:
• LP Tanks must be constructed and marked in
accordance with specifications for LP Tanks of the
U.S. Department of Transportation (DOT) or for
Canada,
CAN/CSA-B339, tanks, spheres and tubes for
Transportation of dangerous goods. Transport
Canada (TC). See LP Tank collar for marking.
• LP Tank valve must have:
• Type 1 outlet compatible with regulator or grill.
• Safety relief valve.
• UL listed Overfill Protection Device (OPD).This
OPD safety feature is identified by a unique
triangular hand wheel. Use only LP Tanks
equipped with this type of valve.
•LP Tank must be arranged for
vapor withdrawal and include
collar to protect LP Tank valve.
Always keep LP Tanks in
upright position during use,
transit or storage.
LP Tank in upright position for vapor withdrawal
Safety Cap
LP (Liquefied Petroleum Gas)
• LP gas is nontoxic, odorless and colorless when
Produced.
• For Your Safety, LP gas has been given an odor
(similar to rotten cabbage)so that it can be smelled.
• LP gas is highly flammable and may ignite
unexpectedly when mixed with air.
LP Tank Filling
• Use only licensed and experienced dealers.
• LP dealer must purge new tank before filling.
• Dealer should NEVER fill LP Tank more than 80% of
• LP Tank volume. Volume of propane in tank will vary
by temperature.
• A frosty regulator indicates gas overfill. Immediately
close LP Tank valve and call local LP gas dealer for
assistance.
• Do not release liquid propane(LP) gas into the
atmosphere. This is a hazardous practice.
• To remove gas from LP Tank, contact an LP dealer
or call a local fire department for assistance. Check
the telephone directory under "Gas Companies'"for
earest certified LP dealers.
4
20 lb
LP Tank Exchange
• Many retailers that sell grills offer you the option of
replacing your empty LP tank through an exchange
service. Use only those reputable exchange
companies that inspect, precision fill, test and certify
their tanks. Exchange your tank only for an OPD
safety feature-equipped tank as described in the
"LP Tank” section of this manual.
• Always keep new and exchanged LP tanks in
upright position during use, transit or storage.
• Leak test new and exchanged LP tanks BEFORE
connecting to grill.
• Place dust cap on cylinder valve outlet whenever
the cylinder is not in use. Only install the type of dust
cap on the cylinder valve outlet that is provided with
the cylinder valve. Other types of caps or plugs may
result in leakage of propane.
LP Tank Leak Test
For your safety
• Leak test must be repeated each time LP tank is
exchanged or refilled.
• Do not smoke during leak test
• Do not use an open flame to check for gas leaks.
• Griddle must be leak tested outdoors in a
well-ventilated area, away from ignition sources
such as gas fired or electrical appliances. During
leak test, keep griddle away from open flames
or sparks.
• Use a clean paintbrush and a 50/50 mild soap and
water solution. Brush soapy solution onto areas
indicated by arrows in figure below. Leaks are
indicated by growing bubbles.
WARNING
If "growing bubbles appear do not use or move
the LP tank. Contact an LP gas supplier or your
fire department!
Do not use household cleaning agents. Damage
to gas valve/hose/regulator components can result.
Connecting Regulator To The LP Tank
1. LP tank must be properly secured onto griddle.
(Refer to assembly section.)
2. Turn all control knobs to the OFF position.
3. Turn LP tanks OFF by turning OPD hand wheel
clockwise to a full stop.
4. Remove the protective cap from LP tank valve.
Always use cap and strap supplied with valve.
Safety Relief Valve
OPD Hand Wheel
Cap
Strap
Type 1 outlet with
thread on outside
5. Hold regulator and insert nipple
into LP tank valve.
Hand-tighten the coupling nut,
holding regulator in a straight line
with LP tank valve so as not to
cross thread the connection.
Nipple has to be centered
into the LP tank valve
5
DonotinsertaPOL
transportplug(plastic
partwithexternal
threads)intotheType1
tankvalveoutlet.Itwill
defeattheSafetyRelief
Valvefeature.
6. Turn the coupling nut clockwise and tighten to a full
stop. The regulator will seal on the back-check feature
in the LP tank valve, resulting in some resistance. An
addional one-half to three-quarters turn is required to
complete the connecon. Tighten by hand only-do not
use tools.
NOTE:
If you can complete the connection, disconnect
regulator and repeat steps 5 and 6. If you are still
unable to complete the connection, do not use this
regulator!
Hold coupling nut and
regulator as shown for proper
connection to LP tank valve.
WARNING
DANGER
• Do not insert any tool or foreign objects into the
valve outlet or safety relief valve. You may
damage the valve and cause a leak. Leaking
propane may result in explosion, fire, severe
personal injury, or death.
• If a leak is detected at any time, STOP and call
the fire department.
• If you cannot stop a gas leak, immediately close
LP tank valve and call LP gas supplier or your
fire department!
• Never attempt to attach this grill to the
self-contained LP gas system of a camper trailer
or motor home.
• Do not use grill until leak-tested.
Leak Testing Valves, Hose and Regulator
1. Turn all griddle control knobs to OFF.
2. Be sure regulator is tightly connected to LP tank.
3. Completely open LP tank valve by turning OPD
hand wheel counterclockwise. If you hear a
rushing sound, turn gas off immediately. There
is a major leak at the connection.
4. Brush soapy solution onto areas where bubbles
are shown in picture below.
5. If “growing” bubbles appear, there is a leak. Close
LP tank valve immediately and retighten
connections. If leaks cannot be stopped do
not try to repair.
6. Always close LP tank valve after performing leak
test by turning hand wheel clockwise.
6
Safety Tips
1. Before opening LP cylinder valve, check the coupling nut for tightness.
2. When griddle is not in use, tum off all control knobs and LP cylinder valve.
3. Never move griddle while in operation or still hot.
4. Use long-handled barbecue utensils and oven mitts to avoid burns and splatters.
5. Maximum on side shelf is 10 lbs.
6. The grease tray must be inserted into griddle and emptied after each use. Do not remove grease tray until
grill has completely cooled.
7. Clean griddle often, preferably after each cookout. If a bristle brush is used to clean any of the grill cooking
surfaces, ensure no loose bristles remain on cooking surfaces prior to grilling.
8. If you notice grease or other hot material dripping from grill onto valve, hose or regulator, turn off gas
supply at once. Determine the cause, correct it, then clean and inspect valve, hose and regulator before
continuing. Perform a leak test.
9. Keep ventilation openings in cylinder enclosure (grill cart) free and clear of debris.
10. The regulator may make a humming or whistling noise during operation. This will not affect safety or use
of grill.
11. If you have a griddle problem see the "Troubleshooting Section
12. If the regulator frosts, turn off griddle and LP cylinder valve immediately. This indicates a problem with the
cylinder and it should not be used on any product. Return to supplier!
CAUTION
• Do not use water on a grease fire. Personal
injury may result. If a grease fire develops,
turn knobs and LP cylinder off.
• Do not leave grill unattended while
preheating or burning off food residue on HI.
If grill has not been regularly cleaned,
a grease fire can occur that may damage
the product.
Ignitor Lighting the Griddle
Do not lean over grill while lighting.
1. In order for the igniter switch to work, please make
sure the battery (AA Battery not included)
is properly installed.
2. Turn OFF gas burner control valves.
3. Turn ON gas at LP cylinder.
4. To ignite, push and turn the IGNITION BURNER
knob to MAX.
5. Push and hold ELECTRONIC IGNITION button
until the IGNITION BURNER lights.
6. If ignition does NOT occur in 5 seconds, turn the
burner controls OFF, wait 5 minutes and repeat
the lighting procedure.
7. To ignite remaining burners, turn each burner knob
in sequence to the position, starting with the burner
closet to the IGNITION BURNER.
8. Once each burner has ignited, turn knobs to
desired setting.
7
WARNING
CAUTION
Turn controls and gas source or tank OFF
when not in use.
If ignition does NOT occur in 5 seconds, turn
the burner controls OFF, wait 5 minutes and
repeat the lighting procedure. If the burner
does not ignite with the valve open, gas will
continue to flow out of the burner and could
accidently ignite with risk of injury.
Burner Flame Check
• Light burners, rotate knobs from to low. You
should see a smaller flame in low position
than seen on. Perform burner flame check
on side burner, also. Always check flame
prior to each use. If only low flame is seen
refer to “Sudden drop or low flame" in
the Troubleshooting.
Turning Grill Off
• Turn all knobs to the OFF position. Turn LP
cylinder OFF by turning hand-wheel
clockwise to a full stop.
Ignitor Check
• Turn gas off at LP cylinder. Press and hold
electronic ignitor button. "Click" should be
heard and spark seen each time between
each collector box or burner and electrode.
See “Troubleshooting" if no click or spark.
Valve check
• Important: Make sure gas is off at LP cylinder
before checking valves. Knobs lock in OFF
position. To check valves, first push in knobs
and release, knobs should spring back. If
knobs do not spring back, replace valve
assembly before using griddle. Turn knobs to
low position then turn back to OFF position.
Valves should turn smoothly.
Hose Check
• Before each use. check to see if hoses are
cut or worn. Replace damaged hoses before
using griddle. Use only identical replacement
part valve/hose/regulator as specified in the
Parts List of this Use and Care Guide.
General Griddle Cleaning
• Do not mistake brown or black accumulation
of grease and smoke for paint. Interiors of gas
grills are not painted at the factory (and should
never be painted). Apply a strong solution of
detergent and water or use a griddle cleaner
with scrub brush on insides of griddle lid and
bottom. Rinse and allow to completely air dry.
Do not apply a caustic griddle/oven cleaner to
painted surfaces.
• Plastic parts: Wash with warm soapy water and
wipe dry. Do not use Citrisol, abrasive
cleaners, degreasers or a concentrated griddle
cleaner on plastic parts. Damage to and failure
of parts can result.
• Painted surfaces: Wash with mild detergent or
nonabrasive cleaner and warm soapy water.
Wipe dry with a soft nonabrasive cloth.
• Stainless steel surfaces: To maintain your
griddle's high quality appearance, wash with
mild detergent and warm soapy water and
wipe dry with a soft cloth after each use.
• Baked-on grease deposits may require the use
of an abrasive plastic cleaning pad. Use only
in direction of brushed finish to avoid damage.
Do not use abrasive pad on areas with
graphics.
• Cooking surfaces: If a bristle brush is used
to clean any of the griddle cooking surfaces,
ensure no loose bristles remain on cooking
surfaces prior to grilling.
8
Storing Your Griddle
• Clean cooking grates.
• Store in dry location
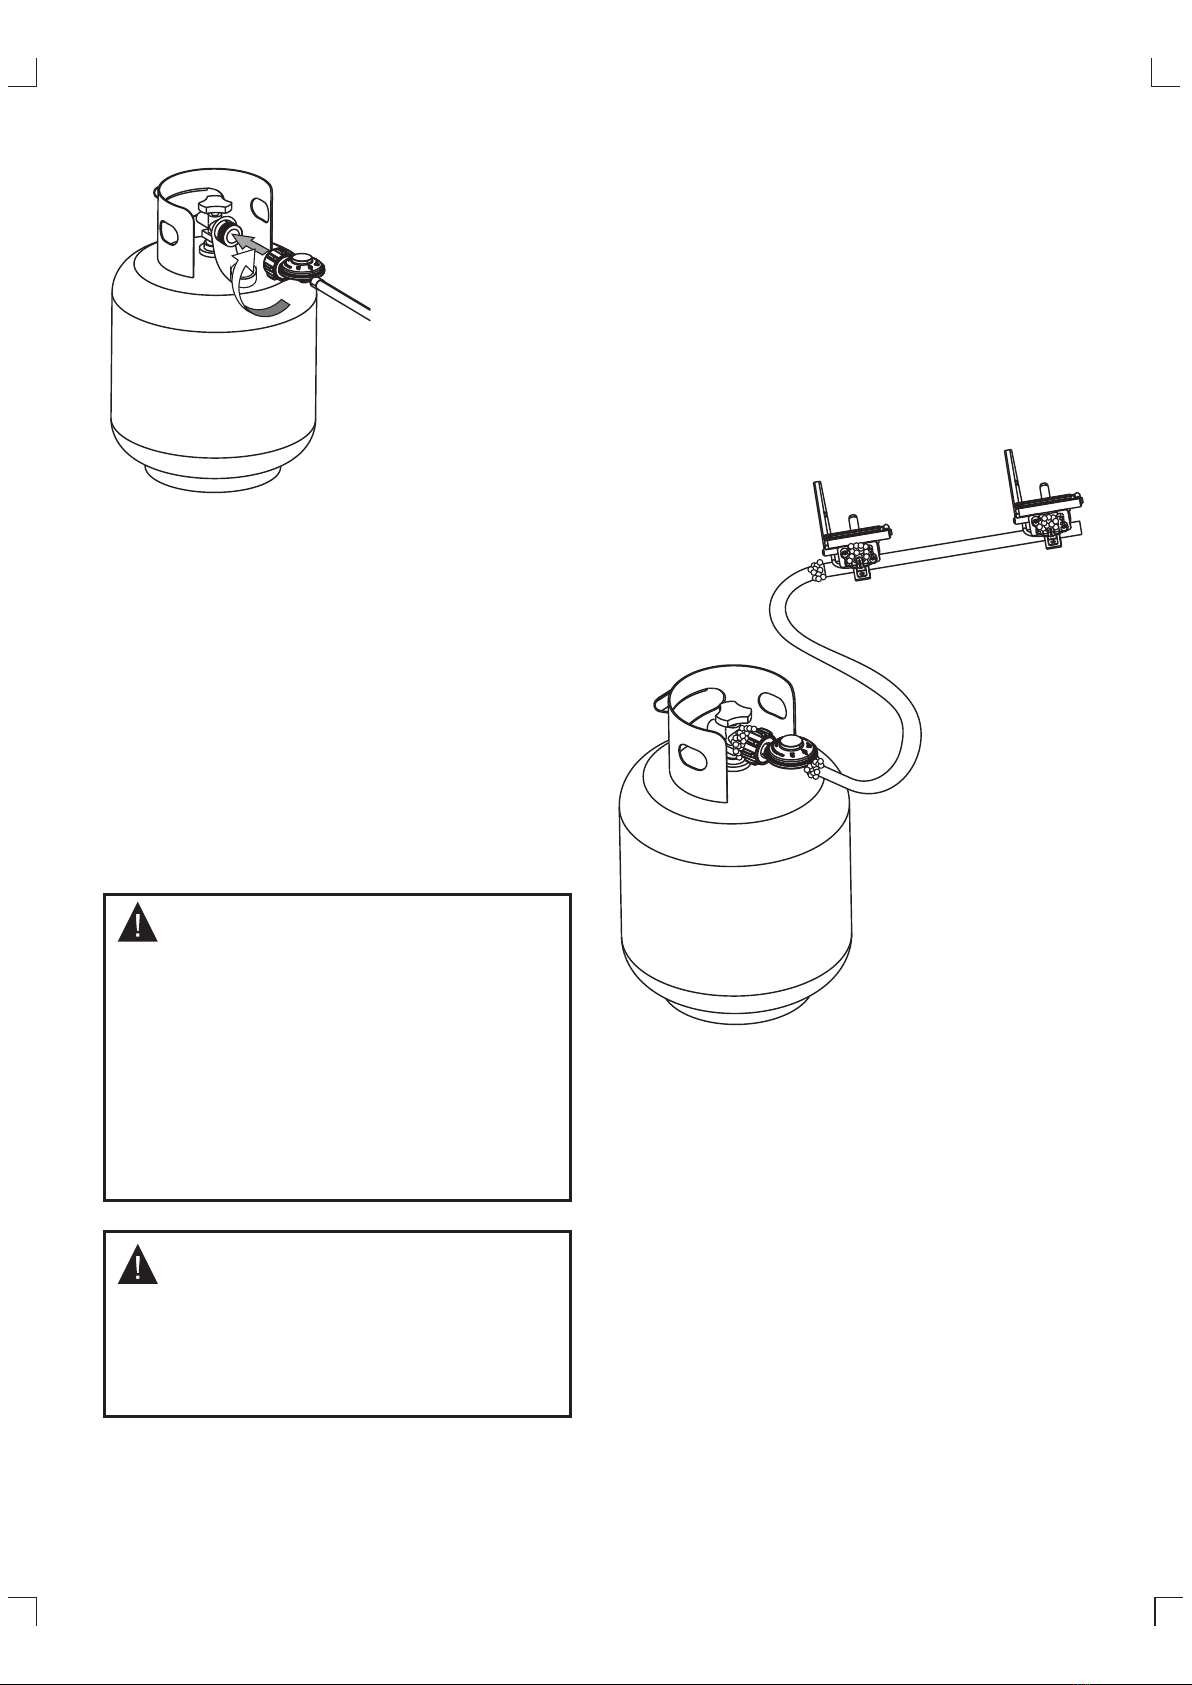
• When an LP cylinder is connected to griddle,
store outdoors in a well-ventilated space and
out of reach of children.
• Cover griddle if stored outdoors. Choose
from a variety of griddle covers offered
by manufacturers.
• Store grill indoors ONLY if LP cylinder is turned
off and disconnected, removed from griddle
and stored outdoors.
• When removing griddle from storage, follow
“Cleaning the Burner Assembly” instructions before
starting griddle.
Cleaning the Burner Assembly
Follow these instructions to clean and/or replace
parts of burner assembly or if you have trouble
igniting griddle.
1. Turn gas OFF at control knobs and LP cylinder.
2. Remove cooking grates and flame tamers.
3. Remove carryover tubes and burners.
4. Detach electrode from burner.
NOTE: Removal/Detachment method will
depend on the burner configuration.
5. Carefully lift each burner up and away from
valve openings. We suggest three ways to
clean the burner tubes. Use the one easiest for
you.
A. Bend a stiff wire(a light weight coat
hanger works well) into a small hook. Run the
hook through each burner tube several times.
B. Use a narrow bottle brush with a flexible
handle(do not use a brass wire brush),run the
brush through each burner tube several times.
C. Wear eye protection: Use an air hose to
force air into the burner tube and out the burner
ports. Check each port to make sure air comes
out each hole.
6. Wire brush entire outer surface of burner to
remove food residue and dirt.
7. Clean any blocked ports with a stiff wire such
as an open paper clip.
8. Check burner for damage, due to normal wear
and corrosion some holes may become
enlarged. If any large cracks or holes are found
replace burner.
VERY IMPORTANT: Burner tubes must
reengage valve openings.
9. Attach electrode to burner.
10. Carefully replace burners.
11. Attach burners to brackets on firebox.
12. Reposition carryover tubes and attach to
burners. Replace flame tamers and
cooking grates.
Food Safety
Food safety is a very important part of enjoying
the outdoor cooking experience. To keep food safe
from harmful bacteria, follow these four
basic steps:
Clean: Wash hands, utensils, and surfaces with
hot soapy water before and after handling raw
meat and poultry.
Separate: Separate raw meats and poultry
from ready-to eat foods to avoid cross
contamination. Use a clean platter and utensils
when removing cooked foods.
Cook: Cook meat and poultry thoroughly to kill
Bacteria. Use a thermometer to ensure proper
internal food temperatures.
Chill: Refrigerate prepared foods and leftovers
promptly.
How To Tell If Meat Is Grilled Thoroughly
• Meat and poultry cooked on a griddle often
browns very fast on the outside. Use a meat
thermometer to be sure food has reached a
safe internal temperature, and cut into food to
check for visual signs of being done.
• Whole poultry should reach165°F/74°C.
Juices should run clear and flesh should not
be pink.
• Hamburgers made of any ground meat or
poultry should reach 160°F/71°c, and be
brown in the middle with no pink juices. Beef,
veal and lamb steaks, roasts and chops can be
cooked to145°F/63°C. All cuts of pork should
reach 160°F/71°C.
• NEVER partially grill meat or poultry and finish
cooking later. Cook food completely to destroy
harmful bacteria.
• When reheating takeout foods or fully cooked
meats like hot dogs, grill to 165° F/64C, or
until steaming hot dogs, grill to 165 F/74 C,or
until steaming hot.
9
ILLUSTRATED PARTS LIST
1. Body………………………………1pc 2. Griddle Top ………………………1pc
3. Side Shelf…………………………2 pcs 4. Bottom Tray ………………………1pc
5. SideHandle……………………1 pc 6. Oil Cup………………………………1 pc
7. Upper Hanger………………………1 pc 8. Upper HangerMounting Bracket
………………1 pc
10
ILLUSTRATED PARTS LIST
9. Lower Fastener……………………1 pc 10. Small Knob …………………… 8 pcs
11. Middle knob……………………5 pcs 12. Large Knob ………………………2 pcs
13. M6×12Screw…………………4 pcs
Items not included
AA
• AA Battery
• LP Tank
Toolsneededforassembly
• Phillip screwdriver
• Crescent wrench
14. M6 Flange NUT………………… 9 pcs
11
WARNING: The manufacture has made every effort to eliminate any sharp edges. However, you
should handle all components with care to avoid accidental injury. Tools required: The only tool
needed is a Philips Screwdriver needed for minimal assembly on the cover and main body handles.
ASSEMBLY:
Please read all instructions thoroughly before proceeding. Find a large, clean area in which to
assemble your grill. Please refer to the parts list and assembly diagram as necessary. Grill assembly
involves large components; therefore, it is advised to have two people set up the unit.
NOTICE: MAKE sure all the plastic protection is removed before assembling.
Step 1:
Install the Bottom Tray. See below
Secure the tray in place with the Large Knob. Repeat step for both sides.
Bottom Tray
M6 Flange
Ignition Button
Insert a AA battery (not included) into the battery
socket with the positive terminal facing out.
Screw on the Ignition Button.
Middle knob
Large Knob
12
Step 2:
Insert Side Shelves and secure with Small Knobs.
Small Knob
Side Shelf
Step 3:
Connect the Side Handle using the M6x12 Screw with M6 Flange Nut.
M6 Flange Nut
M6x12 Screw
SideHandle
13
Step 4:
With help, place the iron Griddle Top on the top of the fire box. Peg legs on the bottom of the
Griddle will line up with docking holes in the top of the appliance body.
Griddle Top
Step 5:
Hang the Oil Cup on the side of the Griddle, just under the drip hole.
Oil Cup
14
Step 6:
Install the cylinder Upper Hanger and Lower Fastener on the left leg assembly. See below.
Step 7:
Hang up the LP Gas Cylinder.
Middle knob
Upper Hanger
M6 Flange
Lower Fastener
15
Regularly clean your grill between uses and especially after extended periods of storage.
Ensure that the grill and its components are sufficiently cool before cleaning.
• Never handle hot parts with unprotected hands.
• In order to extend and maintain the life and condition of your grill, we strongly recommend
that the unit be covered when left outside for any length of time, especially during the winter months.
Burner maintenance:
In most circumstances, burning off the residue after cooking will keep the burner clean. The burner
should be removed and cleaned annually or whenever heavy build-up is found in order to ensure that
there is no blockage (debris, insects) in either the burner portholes or venture tubes. Use pipe cleaner
to clear obstructions. A wire brush can be used to remove corrosion from the burner surfaces. When
refitting the burner, be careful to check that the venture tubes of the burner fit over the valve outlets.
Fittings and Storage:
Annual checking and tightening of metal fittings is recommended. Store the grill in a cool dry place.
Cover the burners with aluminum foil in order to prevent insects or other debris from collecting in the
burner holes. If the grill is to be stored indoors, the gas bottle must be disconnected and left outside.
The gas bottle should always be stored outside, out of reach of children, and in a dry, well-ventilated
area away from any sources of heat or ignition.
CARE AND MAINTENANCE
TROUBLE SHOOTING
PROBLEM POSSIBLE CAUSE SOLUTION
1. Check battery.
2. LP gas cylinder is empty.
3. Faulty regulator.
4. Obstructions in the burner,
5. Obstructions in gas jets or
gas hose.
6. Electrode wire is loose or
disconnected on electrode
or ignition unit.
7. Electrode or wire is
damaged/faulty push button
igniter.
1. Replace with a good battery.
2. Replace with full cylinder.
3. Have the regulator checked
or replaced.
4. Clean burner.
5. Clean jets and gas hose.
6. Reconnect wire.
7. Change electrode and wire
change igniter.
Burner will not light using the
ignition system.
Burner will not light with a
match.
1. LG gas cylinder is empty.
2. Faulty regulator.
3. Obstructions in burner.
4. Obstructions in gas jets or
gas hose.
1. Replace with full cylinder.
2. Have the regulator checked
or replaced.
3. Clean burner.
4. Clean jets and gas hose.
Fire in burner tube has a low
flame or flashback(a hissing or
roaring noise may be heard)
1. LP gas cylinder is empty.
2. Obstructions in burner.
3. Obstructions in gas jets or
gas hose.
4. Windy conditions.
1. Use large cylinder.
2. Clean burner.
3. Clean jets and gas hose.
4. Use grill in a more sheltered
position.
16
Griddle Care Seasoning
Follow these simple cleaning and seasoning steps for optimal performance and long life of your Griddle.
We strongly recommend that the unit be covered when left outside for any length of time, especially
during the winter months.
WHAT IS SEASONING?
Seasoning is the preparation of steel or cast iron cookware for use. There are two reasons for seasoning:
• To coat the cookware to prevent rust
• To create a natural, permanent non-stick cooking surface
Seasoning is an easy, but very important first step when using the Griddle. Unlike synthetically
coated griddles, steel and cast iron can be seasoned repeatedly, constantly restoring the cooking surface.
When you season your griddle, you are preventing rust and providing the cookware with a natural,
permanent non-stick surface.
Remember: Seasoning is an ongoing process that takes time and repeated use before a griddle or pan
Develops a shiny, black surface like your grandmother's cast iron cookware. The more often you cook on and
season your griddle, the more non-stick the surface will become.
Cleaning Griddle
FIRST TIME.
Griddles are pre-seasoned with cooking oil to prevent rust and damage during shipping. For first
time use, wash the griddle in hot, soapy water. THIS IS THE ONLY TIME YOU SHOULD USE SOAP ON
THE GRIDDLE. Rinse and dry completely with paper towels. Proceed with seasoning instructions.
AFTER EACH USE:
To clean the griddle after each use, scrape gently with a spatula and wipe down the griddle surface with a
paper towel. For tough food residue, pour hot water onto the griddle surface and let it boil the residue off.
Wipe again with a paper towel and dry completely. ¼ cup of table salt can also be used to buff off stuck
on food. Proceed with Seasoning Instructions.
SEASONING INSTRUCTIONS:
Remove all food debris with spatula or scraper.
Apply a generous, even coating of cooking oil (olive, vegetable, peanut, etc. )to the griddle surface.
Use a paper towel to spread the oil evenly across the cooking surface of the griddle.
Allow griddle to cool down and store in a cool, dry place.
GRIDDLE CARE SEASONING GUIDE
17
Q. What if my griddle start to rust?
A. If rust appears on the griddle surface, rub it off with steel wool or low grain sandpaper and re-season the
surface. Take care to always completely dry your griddle before storing and keep away from rain and
sprin-lers.
CUSTOMERS IN HUMID OR COASTAL CLIMATES MAY REQUIRE MORE FREQUENT SEASONINGS
AND THE USE OF HEAVIER COOKING OILS TO AVOID RUSTING AND CORROSION.”
Q. What types of cooking oils can I use to season my griddle?
A. We recommend the following oils for seasoning purposes: olive oil, vegetable oil, canola oil, coconut
oil and sesame oil. Lard can also be used to season the griddle top.
Q. Can I use dish detergent to clean my griddle?
A. Grease cutting dish detergents will erase the seasoning on the griddle. For tough spots use table salt
and hot water.
Q. Why does my griddle surface look dull and dry instead of shiny and black?
A. Season is a continuous process. Over time and the more often you season your griddle top, the more
shiny, black and non-stick it will become.
Frequently Asked Questions
18
If you
Dong Fang Jun Ma Trade Co., Ltd.(hereafter, DFJM) warranties that this Product shall be free
from defectsin
workmanship and materials, for a period of 1 Year from the date of original
purchase. Our
obligation under this warranty shall be limited to replacement of parts during the
warranty period.
Our liability shall not extend beyond replacement of parts, This warranty excludes,
normal wear &
tear such as paint loss, discoloration and rust on the Product and its parts or
components, and any
damage arising from any of the following: negligent use or misuse of the
Product, use contrary to
this User’s Manual, or alteration by any one other than DFJM. All
warranty coverage is void if this grill is ever used for commercial or rental purposes; this warranty
is valid only in the USA. The warranty period of 1 year shall not be extended or renewed by the
repair or replacement of parts or compensation for theProduct. If your Product is defective or
otherwise requires service or parts, please call DFJM Customer Service toll-freeat
MONDAY TO
FRIDAY, between 8:30 a.m. and 4:30 p.m. CST. Consumer is responsible for
shipping, handling
and processing of warranty claims after 30 days of purchase date. As proof of
Purchase, a copy of your original purchase receipt must accompany any service request,
LIMITATION OF REMEDIES AND LIABILITY
Weshall not be liable for any incidental or consequential damages for breach of any express or
implied warranty on its Product. Except to the extent prohibited by applicable law, any implied
warranty or merchantability or fitness for a particular purpose on this Product shall be limited to the
duration of the above warranty. Neither us nor anyone else who has been involved in thecreation,
production, or delivery of the Product shall be liable for damages of any type, including but not
limited to any lost profits, lost savings, loss of anticipated benefits, or other incidental or
consequential damages which may arise out of the purchase, use, or inability to use the Product,
whether arising out of contract, negligence, strict tort, or under any warranty, or otherwise, even if
you have been advised of the possibility of such damage or any other claim by any other party.
Our liability for any breach of warranty shall be limited to repair or replacement of the defective part
or parts as described above. Some states do not allow the exclusion or limitation of incidental or
consequential damages, so the above limitation or exclusion may not apply to you. The above
warranty gives you specific legal rights, and you may have other rights which vary from stateto
state.
Thank you for purchasing this grill !
If you need help, have missing or damaged parts, or have any questions ,please email us at
[email protected]
Or, call us toll free at
866-273-2284
(9:00 am-4:00 pm, Monday through Friday, Central Standard Time)
Limited Warranty
Room101ComprehensiveBuilding,No.23YongningStreet,
JianghaiDistrict,Jiangmen,Guangdong,China
JIANGMENMINSHENGKITCHENEQUIPMENTCO.,LTD
Manufactured by:
19

Popular Griddle manuals by other brands

Globe PG24E instruction manual

Globe

Globe PG24E instruction manual

Black Stone Culinary 1932 owner's manual

Black Stone

Black Stone Culinary 1932 owner's manual

Garland GD-15G Specifications

Garland

Garland GD-15G Specifications

Wells GAS GRIDDLES Operation manual

Wells

Wells GAS GRIDDLES Operation manual

Keating Of Chicago MIRACLEAN PRE-2000 manual

Keating Of Chicago

Keating Of Chicago MIRACLEAN PRE-2000 manual

Falcon G350/7P Design, installation and servicing instructions

Falcon

Falcon G350/7P Design, installation and servicing instructions

Star Manufacturing Ultra-Max 824M Installation and operating instructions

Star Manufacturing

Star Manufacturing Ultra-Max 824M Installation and operating instructions

Vremi VRM020292N manual

Vremi

Vremi VRM020292N manual

Lang CLG-24-S Installation, operation, maintenance, & troubleshooting

Lang

Lang CLG-24-S Installation, operation, maintenance, & troubleshooting

Dash DEG200 Instruction manual & recipe guide

Dash

Dash DEG200 Instruction manual & recipe guide

Blaze BLZ-14-SSGP manual

Blaze

Blaze BLZ-14-SSGP manual

Oster Electric with Warming Tray user guide

Oster

Oster Electric with Warming Tray user guide

croydon GR1G instruction manual

croydon

croydon GR1G instruction manual

Star Manufacturing Ultra-Max 824M Specification sheet

Star Manufacturing

Star Manufacturing Ultra-Max 824M Specification sheet

Thulos TH-PA1802XXL manual

Thulos

Thulos TH-PA1802XXL manual

Lang 224SHE Installation & operation instructions

Lang

Lang 224SHE Installation & operation instructions

Black Stone 1833 Parts & Assembly

Black Stone

Black Stone 1833 Parts & Assembly

Moffat Blue Seal Evolution Series GP516-B Technical data sheet

Moffat

Moffat Blue Seal Evolution Series GP516-B Technical data sheet

manuals.online logo
manuals.online logoBrands
  • About & Mission
  • Contact us
  • Privacy Policy
  • Terms and Conditions

Copyright 2025 Manuals.Online. All Rights Reserved.