Grupo Epelsa K-scale User manual

Revision 1.1 Page1 of 92

Revision 1.1 Page2 of 92

Revision 1.1 Page3 of 92
1. RECOMMENDATIONS FOR USE.....................................................................5
2. IGNITION..........................................................................................................5
3. SALE SCREEN AND PACKAGING SCREEN...................................................6
3.1. Sale.................................................................................................................6
3.2. Packaging .......................................................................................................6
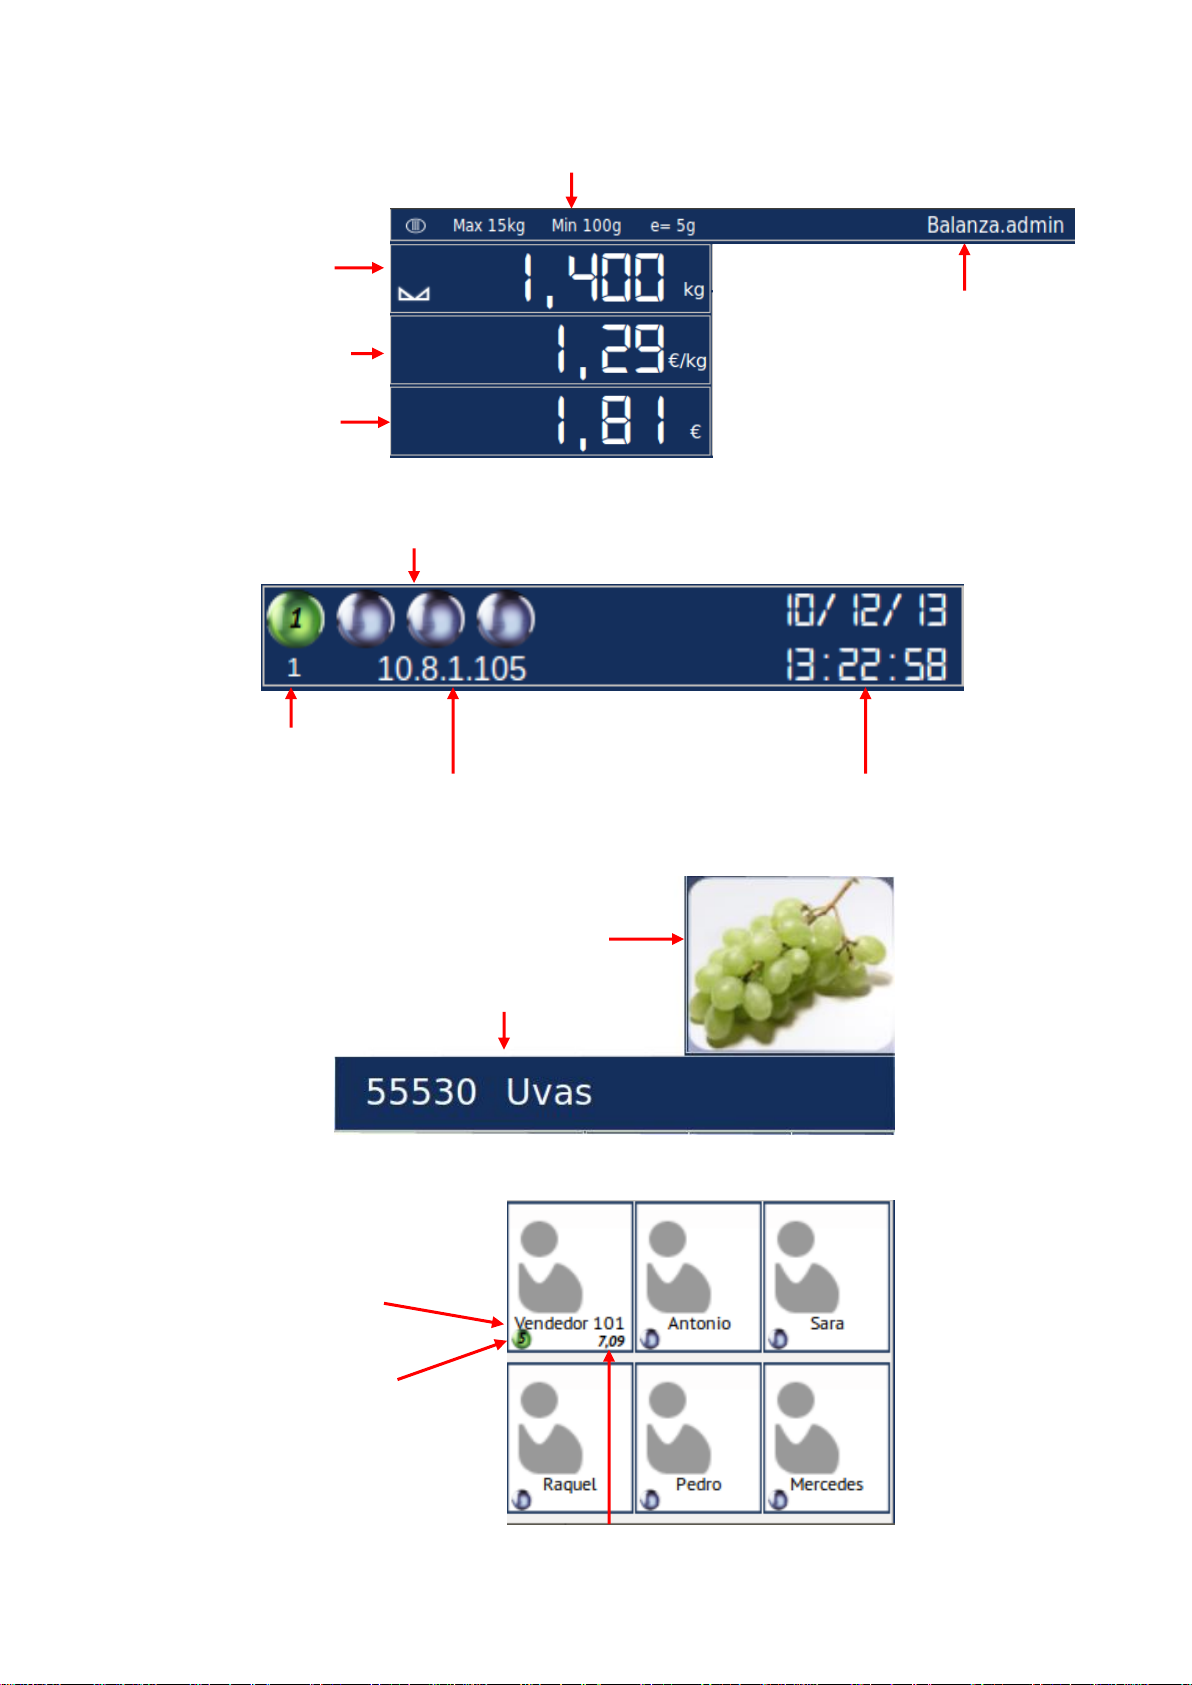
3.3. Indicators area ................................................................................................7
3.4. Network...........................................................................................................7
3.5. Product Information.........................................................................................7
3.6.Seller keys.......................................................................................................7
3.7. Status icons.....................................................................................................8
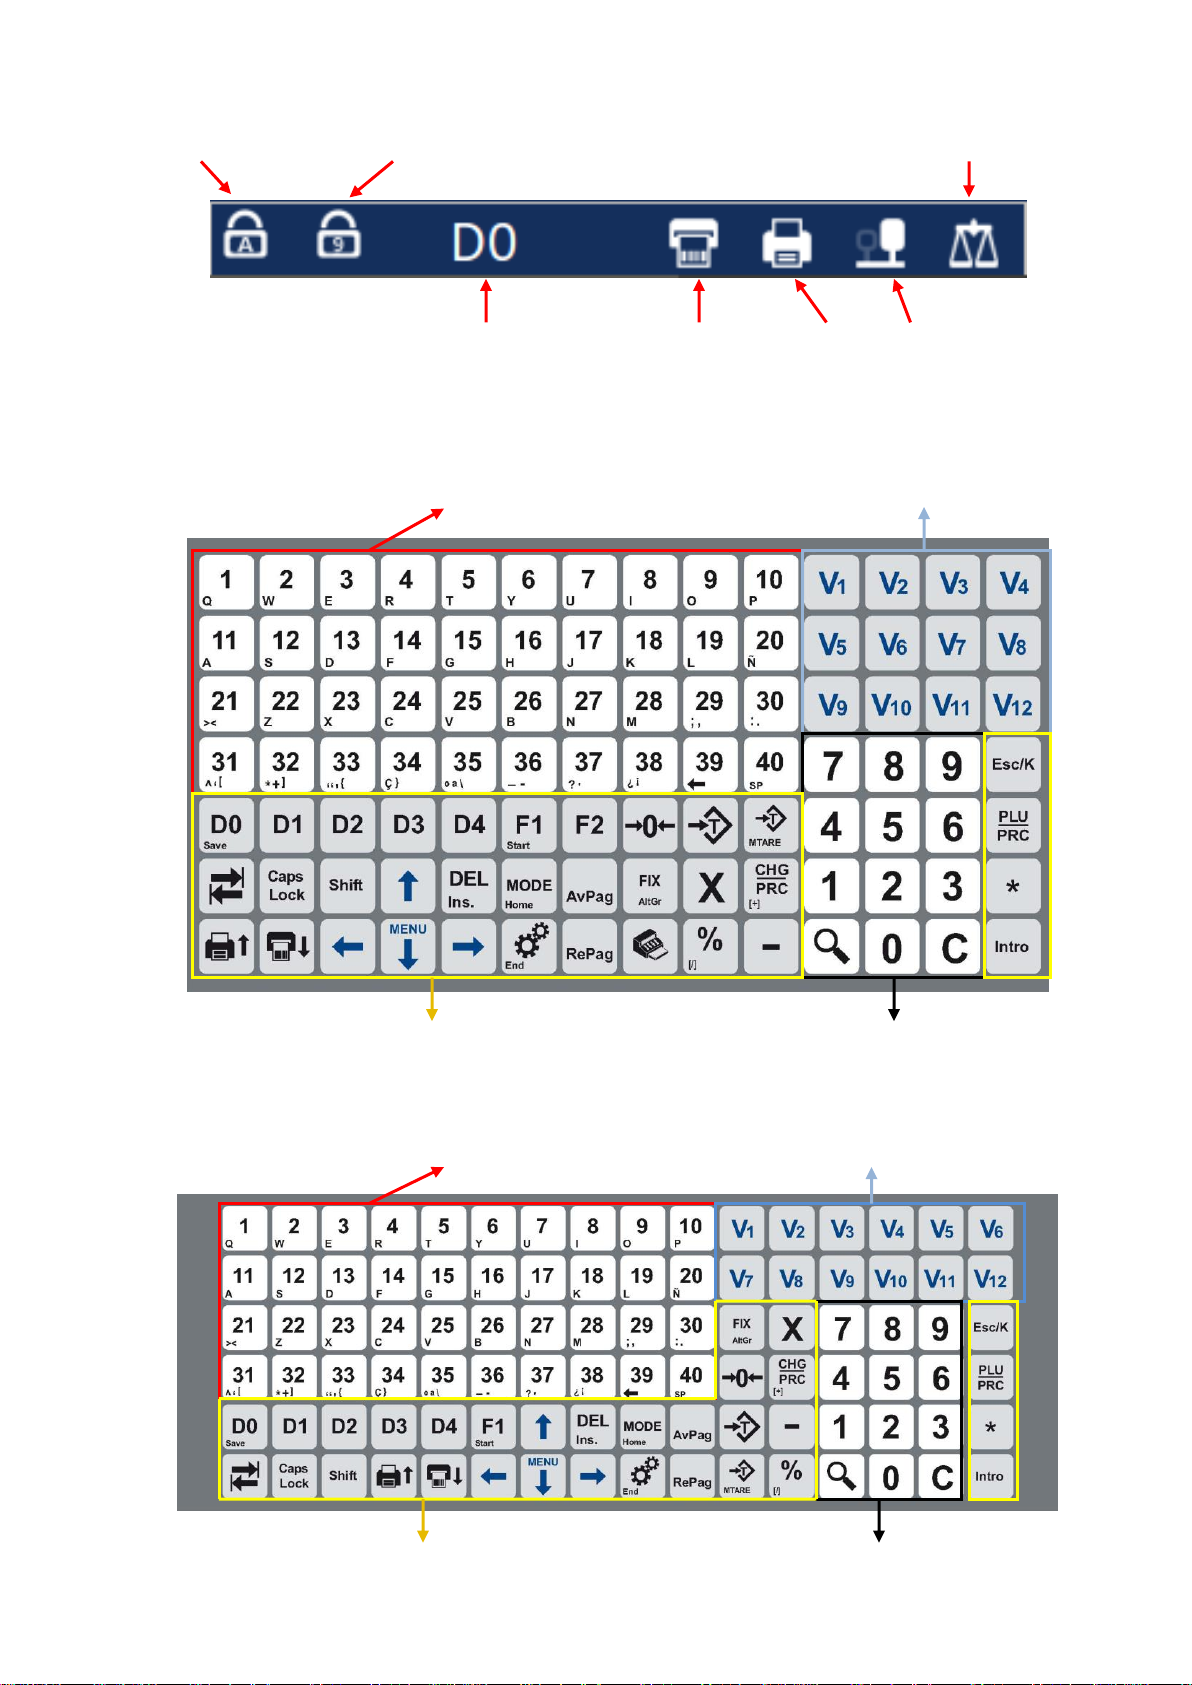
3.8. Button keypad.................................................................................................8
3.8.1.Counter Scale Button keypad (14x7; 98 keys) ...............................................8
3.8.2. Suspended Scale Button keypad (16x6; 96 keys)..........................................8
4. Work mode (Sale and Packaging).....................................................................9
4.1. Sale mode.......................................................................................................9
4.1.1. Sale operations: ..............................................................................................9
4.1.2. Subtotal...........................................................................................................9
4.1.3. Total. .............................................................................................................10
4.2. Packaging mode ...........................................................................................10
4.2.1. Packaging operations: ..................................................................................10
4.2.2. Total Packed.................................................................................................11
4.3. Tare weight, (different types). .......................................................................11
4.3.1. Manual Tare weight.......................................................................................11
4.3.2. Manual Fixed Tare weight.............................................................................11
4.3.3. Numeric tare weight......................................................................................11
5. MAIN MENU....................................................................................................12
5.1. Accessing the Main Menu.............................................................................12
6. SET-UP...........................................................................................................13
6.1. Accessing the Set-up Menu..........................................................................13
6.2. Item set-up:...................................................................................................13
6.3. Item prices.....................................................................................................20
6.4. Hotkeys set-up..............................................................................................21
6.5. Sellers set-up................................................................................................23
6.6. Counter Set-up..............................................................................................24
6.7. Identification Texts Set-up. ...........................................................................26
6.8. Barcode Set-up (EAN13). .............................................................................28
6.9. Cattle.............................................................................................................30
6.10. Nutritional information...................................................................................33
6.11. Codified Tare weight.....................................................................................36
6.12. Items categories:...........................................................................................38
6.13. Item sections:................................................................................................40
6.14. VAT ...............................................................................................................41
6.15. Clients. ..........................................................................................................42
6.16. Payment methods.........................................................................................44
6.17. Quality levels Set-up.....................................................................................45
7. SETTINGS. .....................................................................................................47
7.1. Accessing the Settings Menu........................................................................47
7.2. Accessing the Scale Menu............................................................................47
7.2.1. Scale Settings...............................................................................................48
7.2.2. Types of Sale................................................................................................49
7.2.3. Work Settings................................................................................................50
7.2.3.1. Scale Mode Configuration (Sale)..................................................................51
7.2.3.2. Packaging mode Configuration.....................................................................54
7.2.3.3. POS mode Configuration..............................................................................55
7.2.4. Display (Advertisement, Screen). .................................................................56
7.2.5. Regional Configuration (date and time)........................................................59
Table of Contents

Revision 1.1 Page4 of 92
7.2.6. Users.............................................................................................................59
7.2.6.1. Change user..................................................................................................60
7.2.6.2. Maintenance of Users...................................................................................60
7.2.6.3. Default user selection. ..................................................................................61
7.3. Accessing the Settings Menu........................................................................61
7.3.1. Tickets and labels. ........................................................................................62
7.4. Accessing the Communications Settings Menu............................................63
7.4.2. Network.........................................................................................................64
7.4.2.1. Own scale network........................................................................................64
7.4.2.2. Explore..........................................................................................................65
7.4.2.3. Create/Rename Server Scale.......................................................................66
7.4.2.4. Connect to a scale network...........................................................................67
7.4.2.5. Copy database..............................................................................................67
7.4.2.6. Separate scale from network........................................................................68
7.5. Accessing the Printer Configuration Menu. ..................................................69
7.5.1. Selecting a printer. ........................................................................................69
7.5.2. Selecting a Labeller.......................................................................................70
7.5.3. Printing Parameters. .....................................................................................70
7.5.4. Label Calibration...........................................................................................71
7.6. Weight configuration. ....................................................................................71
7.6.1. Weight adjustment, Weight configuration and scale serial number..............72
7.6.2. Weight verification.........................................................................................72
7.6.3. Auto Zero. .....................................................................................................73
7.7. Accessing the Installation Settings Menu. ....................................................73
7.7.1. Label formatting selection.............................................................................74
7.7.2. Ticket formatting selection. ..........................................................................74
7.7.3. Type of Sale Maintenance. ...........................................................................75
7.7.4. Special settings.............................................................................................76
7.7.5. Security Copy................................................................................................79
7.7.5.1. Store Security Copy......................................................................................79
7.7.5.2. Restore Security Copy..................................................................................80
7.7.5.3. Initialise Database.........................................................................................80
8. REPORTS.......................................................................................................81
8.1. Accessing the Reports Menu........................................................................81
8.2. Selecting Lists...............................................................................................81
8.3. Sales Reports................................................................................................83
8.4. Removal of tickets.........................................................................................84
8.5. Clearing the inventory...................................................................................86
8.6. Clearing Automatic Operations.....................................................................86
9. CHANGE USER..............................................................................................86
9.1. Accessing the Change User Menu. ..............................................................86
10. ABOUT............................................................................................................87
11. CLOSE PROGRAM.........................................................................................89

Revision 1.1 Page5 of 92
1. RECOMMENDATIONS FOR USE.
AVOID HITTING THE
SCALE
DO NOT USE SHARP
OBJECTS ON THE
SCREEN
AVOID EXPOSURE TO
THE SUN
DO NOT CLEAN THE
SCALE WITH SOLVENT
DO NOT THROW WATER
DIRECTLY ON THE
SCALE
DO NOT EXPOSE THE
SCALE TO VIBRATIONS
2Kg.
FOR ITS CORRECT FUNCIONING,
PLACE A KNOW WEIGHT ON THE
PLATE AND VERIFY HOW EXACT
IT IS.
IN ORDER TO CLEAN THE SCALE,
USE DRY SOFT SUEDE OR WET IT
SLIGHTLY IN SOAPY WATER WITH
NEUTRAL PH
We want to provide the user of the scale with some very useful recommendations.
The performance of the device you have just acquired will be better if you pay as much
attention as possible to the instructions which are included in this Manual.
Please, forget about the traditional apathy that surrounds the use of manuals, and don't wait
until everything “goes wrong” to consult it. Instead, if you read the manual, you will be able to
enjoy the device's optimal services from the very beginning.
2. IGNITION
1.- Activate the switch located on the lower area of the scale.
1
º

Revision 1.1 Page6 of 92
3. SALE SCREEN AND PACKAGING SCREEN.
3.1. Sale
3.2. Packaging

Revision 1.1 Page7 of 92
3.3. Indicators area
METROLOGIC CHARACTERISTICS
WEIGHT INDICATOR
SALE TYPE/USER
PRICE INDICATOR
COST INDICATOR
3.4. Network
NETWORKED SCALES
SCALE NUMBER
SCALE IP ADDRESS DATE AND TIME
3.5. Product Information
ITEM PICTURE
ITEM DESCRIPTION
3.6. Seller keys
SELLER'S NAME
NUMBER OF OPERATIONS
TOTAL COST OF SALE

Revision 1.1 Page8 of 92
3.7. Status icons.
CAPITAL LETTERS NUMERIC KEYPAD SCALE
ITEM TABLES LABELLER PRINTER NETWORK
(D0 TO D4)
3.8. Button keypad.
3.8.1.Counter Scale Button keypad (14x7; 98 keys)
HOTKEYS AND ALPHANUMERIC KEYBOARD SELLER KEYS
FUNCTION KEYS NUMERIC KEYS, SEARCH
DELETE
3.8.2.Suspended Scale Button keypad (16x6; 96 keys)
HOTKEYS AND ALPHANUMERIC KEYBOARD SELLER KEYS
FUNCTION KEYS NUMERIC KEYS, SEARCH
DELETE

Revision 1.1 Page9 of 92
4. Work mode (Sale and Packaging)
4.1. Sale mode.
4.1.1.Sale operations:
This can imply three different cases:
a) Place a weight on the plate, select a product and press seller.
b) Place a weight on the plate, press the key , type a price and press seller.
c) For products that are not weighed, press the key and then the process is the same
than with the other two cases, but without placing weight on the plate.
As we continue performing operations, we will see a list showing the seller and the products
in the ticket
After this, the seller can select either Subtotal or Total (finish the sale with all the products in
the ticket).
4.1.2. Subtotal.
From the sale screen, press the key then select the seller, and the ticket will appear on
the screen.
While on the Subtotal mode, the user can perform the following actions:
Cancel line; with we place ourselves in the line we want to cancel.
Order; to mark something as Order, press .
Assign a client; press and introduce the client's code, or press and select client.
Apply a discount on the total sale; press .
Eliminate-Delete ticket; press .
Print ticket; press .

Revision 1.1 Page10 of 92
Exit Subtotal model; press .
4.1.3.Total.
To obtain the total of a sale from a seller and close the ticket the user must press as
well as the corresponding seller.
4.2. Packaging mode
4.2.1.Packaging operations:
a) Select the seller who is going to perform the operation.
b) After that the user must select the item (through hotkeys or the item's code) or the price he is
going to perform the packaging with.
c) Pressing the key we can start packing items. Every time the weight is modified, a label
will be printed.
d) Pressing we will change the packaging to manual.
As we perform packaging operations, the scale will show a list of the printed labels per seller.

Revision 1.1 Page11 of 92
4.2.2.Total Packed.
Once we finish packing, by pressing a label will be printed with the total price, indicating
the total number of operations and labels issued.
4.3. Tare weight, (different types).
4.3.1.Manual Tare weight.
Place a weight on the plate. Press .
Task indicator activated.
TARE WEIGHT INDICATOR
To eliminate the tare weight, retrieve the weight from the plate.
4.3.2.Manual Fixed Tare weight.
Having the Tare weight on display, (see section above) Press again .
To eliminate the tare price without having any item on the plate press .
4.3.3.Numeric tare weight.
To introduce a numeric tare weight press .
A table appears for the user to introduce the value of the
tare weight.
With the numeric keypad, introduce the tare weight's value
in Kg. You validate it by pressing .
If the weight is correct, this will be reflected as the fixed
tare weight on the display.

Revision 1.1 Page12 of 92
5. MAIN MENU
5.1. Accessing the Main Menu
The user accesses the Main Menu from the Sale or Packaging window, pressing
If the user passwords are activated, both the User and Password information will be required.
Example: USER AND PASSWORD
User: admin
Password: admin
Press if the password is correct, the user will access the MAIN MENU.
Press as many times as is needed to go back to the work screen.

Revision 1.1 Page13 of 92
6. SET-UP.
6.1. Accessing the Set-up Menu.
Choose Programming with the cursors , and press .
Press as many times as is needed to go back to the work screen.
6.2. Item set-up:
From the "Set-up menu", select the option "Items" and press .

Revision 1.1 Page14 of 92
The user will access the Item Set-up section.
Type the item's code.
If the item already exists, (it has been previously set-up), its information will be displayed.
If the item does not exist (it's the first time it is introduced), the user must complete the fields
that appear on the screen with the information to be set-up.
With the Tab key we move through the different fields to be set-up.
The different fields are completed with the alphanumeric keyboard.

Revision 1.1 Page15 of 92
By pressing the key when located on the Code field, a list of available items is shown.
Here the user can select the item he is looking for with the numeric keypad.
Once selected, press :
Pressing the key when located on the Item field, we can select the image that will be
assigned to the product: (the path is: sistema de
archivos\home\pcscale\.pcscale\resources\icons\item

Revision 1.1 Page16 of 92
Definition of available fields for Items
Field
Type of Data
minimum
maximum
Size
Description
Code
Numeric
1
999999
6
Item code
Name
Alphanumeric
~60
Item description
Short name
Alphanumeric
~30
Short description of item
Weighed
Group
Weighed (checked box)
Units (unchecked box)
Sale method:
Sale by weight
Sale by units
Counter
Numeric
1
99
2
Item counter
PLU
Numeric
0
999
3
PLU number
Icon
Alphanumeric
File name connected with the item
EAN13
Alphanumeric
EAN13
Code EAN13 to select the items
through the scanner.
Counter; it is necessary to programme it if the access if done or has been set-up through Plu.
PLU Number; it is necessary to set-up whether the access will be done through Plu.
Pressing the user accesses the Price tab, where the price, discount and the VAT type
is set-up.
With the user moves through the different fields to be programmed.
In order to select the VAT, the user has to locate the VAT field, and with the up and down
keys, select the value (a previously set-up value)
Definition of available fields for price.
Field
Type of Data
VALOR
minimu
m
VALOR
maximu
m
Size
Description
Prices
Numeric
0
9999.99
6
Sale price
VAT
Numeric
0
9
1
Type of VAT to apply to the item
Discount %
Numeric
0
99.9
3
Type of discount to apply to the item

Revision 1.1 Page17 of 92
Pressing the user will go to the Packaging tab, where he can find the specific set-up of
the packaging information for that item.
With the user moves through the different fields to be set-up.
By pressing the key while the user is on the Label field, he will see a list of the
available label formats in the scale.
With and later the user can select the label format he desires.

Revision 1.1 Page18 of 92
Definition of available fields for packaging.
Field
Type of Data
VALOR
minimu
m
VALOR
maximu
m
Size
Description
Expiry date
Numeric
0
999
3
Expiry date
Preferred
consumption
Numeric
0
999
3
Preferred consumption days
Tare weight
Numeric
0
2/3 full
scale
5
Only for items sold by WEIGHT
Label
Text
Label file name assigned to the
item.
EAN13 Print
Alphanumeric
EAN-13
Code EAN-13 to print labels if
programmed
Mixed
With checked box, the item works in mixed mode (the price is calculated per
amount introduced)
Mixed Weight
Numeric
0
Full scale
5
Only for Mixed sale items
Pressing the user goes to the Item description tab.
In “Descriptive 1, 2, 3, 4 y 5” up to 100 characters can be programmed.
For "Long descriptions", the user can programme up to 1000 characters.
With the user moves through the different fields to be programmed.
Pressing the user goes to the Groups tab, where the groups or families the article
belongs to are set-up
(Quality group: it allows the user to assign a quality logo on the item's hotkey).

Revision 1.1 Page19 of 92
With the user moves through the different fields to be set-up.
Definition of available fields for Groups.
Field
Type of Data
VALOR
minimu
m
VALOR
maximu
m
Size
Description
Category
Numeric
0
99
2
Item category
Part
0
99
2
Item section
Type of sale
Type of sale available for
working on
Quality levels
Alphanumeric
8
Group selection for Quality
Level
The key searches for families, sections or
levels of quality stored or set-up.
The user can select any of these criteria
with .
Pressing all set-up data is stored.
Press as many times as is needed to go back to the work screen.

Revision 1.1 Page20 of 92
6.3. Item prices.
From the "Set-up menu", select the option "Item prices" and press .
Then we can see the item list.
The search is performed by introducing the code with the cursors .
To make the search easier, it can be arranged:
by code; through
by name; through
Table of contents