GU Electronic FORD SYNC3 THC2 User manual

1
Instruction Manual
FORD SYNC3 THC2 for F-150(2015years), FX4, Mustang

GU Electronic
INDEX
Specifications
1. Main Spec. --------------------------------------
2. Diagram -----------------------------------------
3. Components ------------------------------------
4. Exterior ------------------------------------------
Settings
1. Dip Switch ---------------------------------------
2. Original button ----------------------------------
3. Touch calibration---------------------------------
4. Key board ----------------------------------------
5. OSD Menu ---------------------------------------
Installation
1. Diagram------------------------------------------
2. Caution ------------------------------------------
2
3
4
5
7
8
9
11
13
13
21
22

GU Electronic
Specification
1. Main spec.
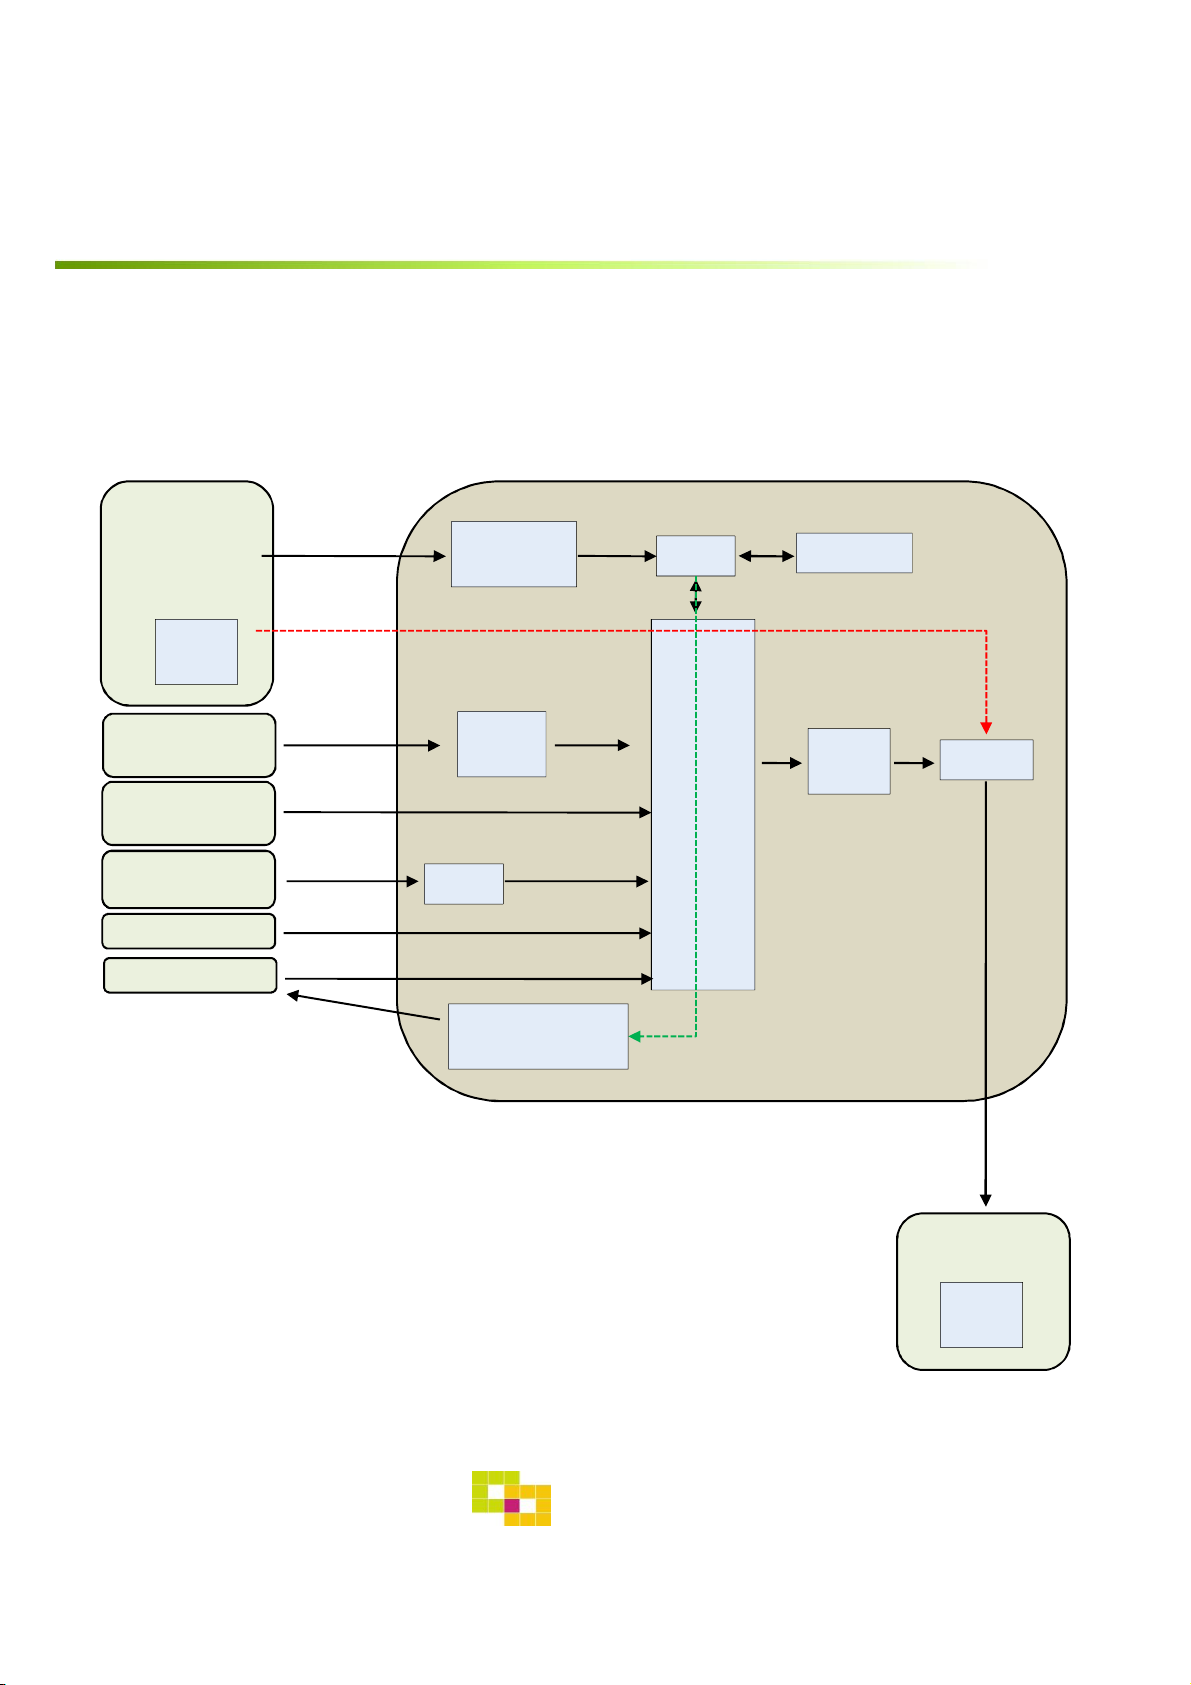
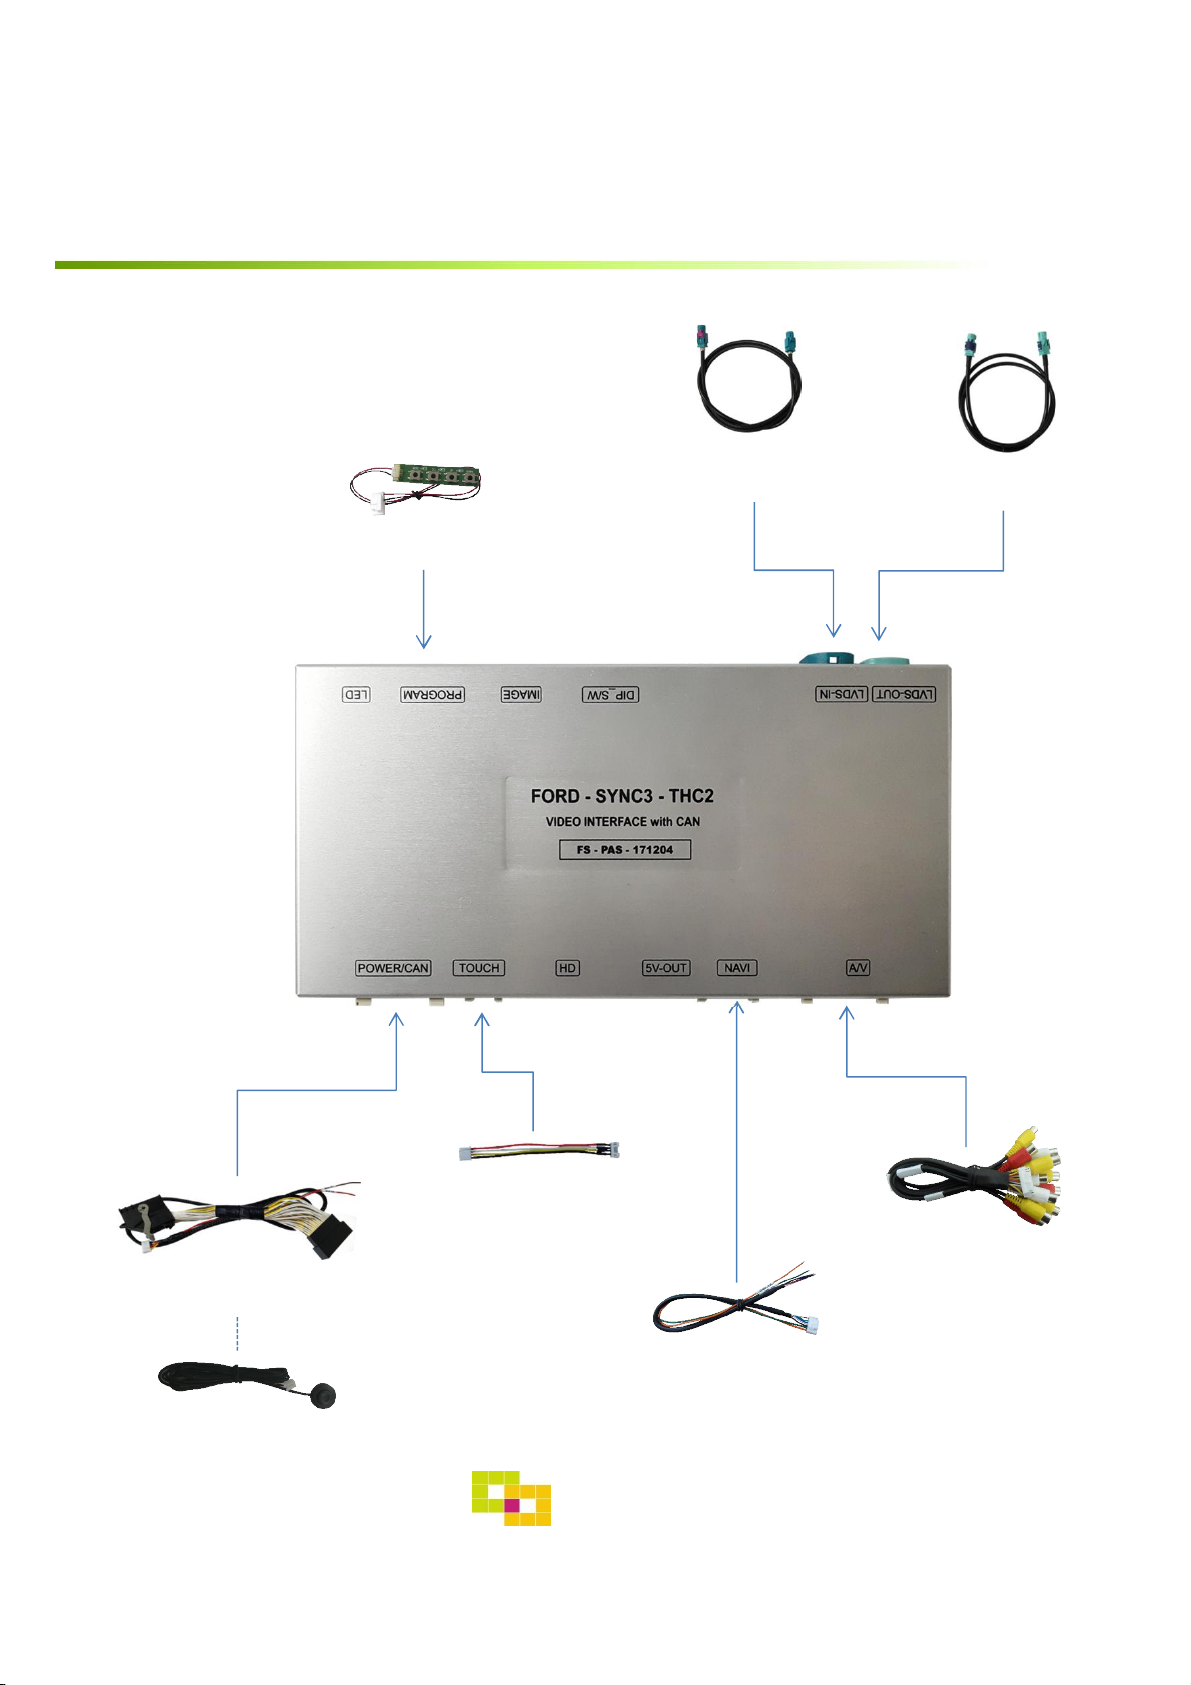
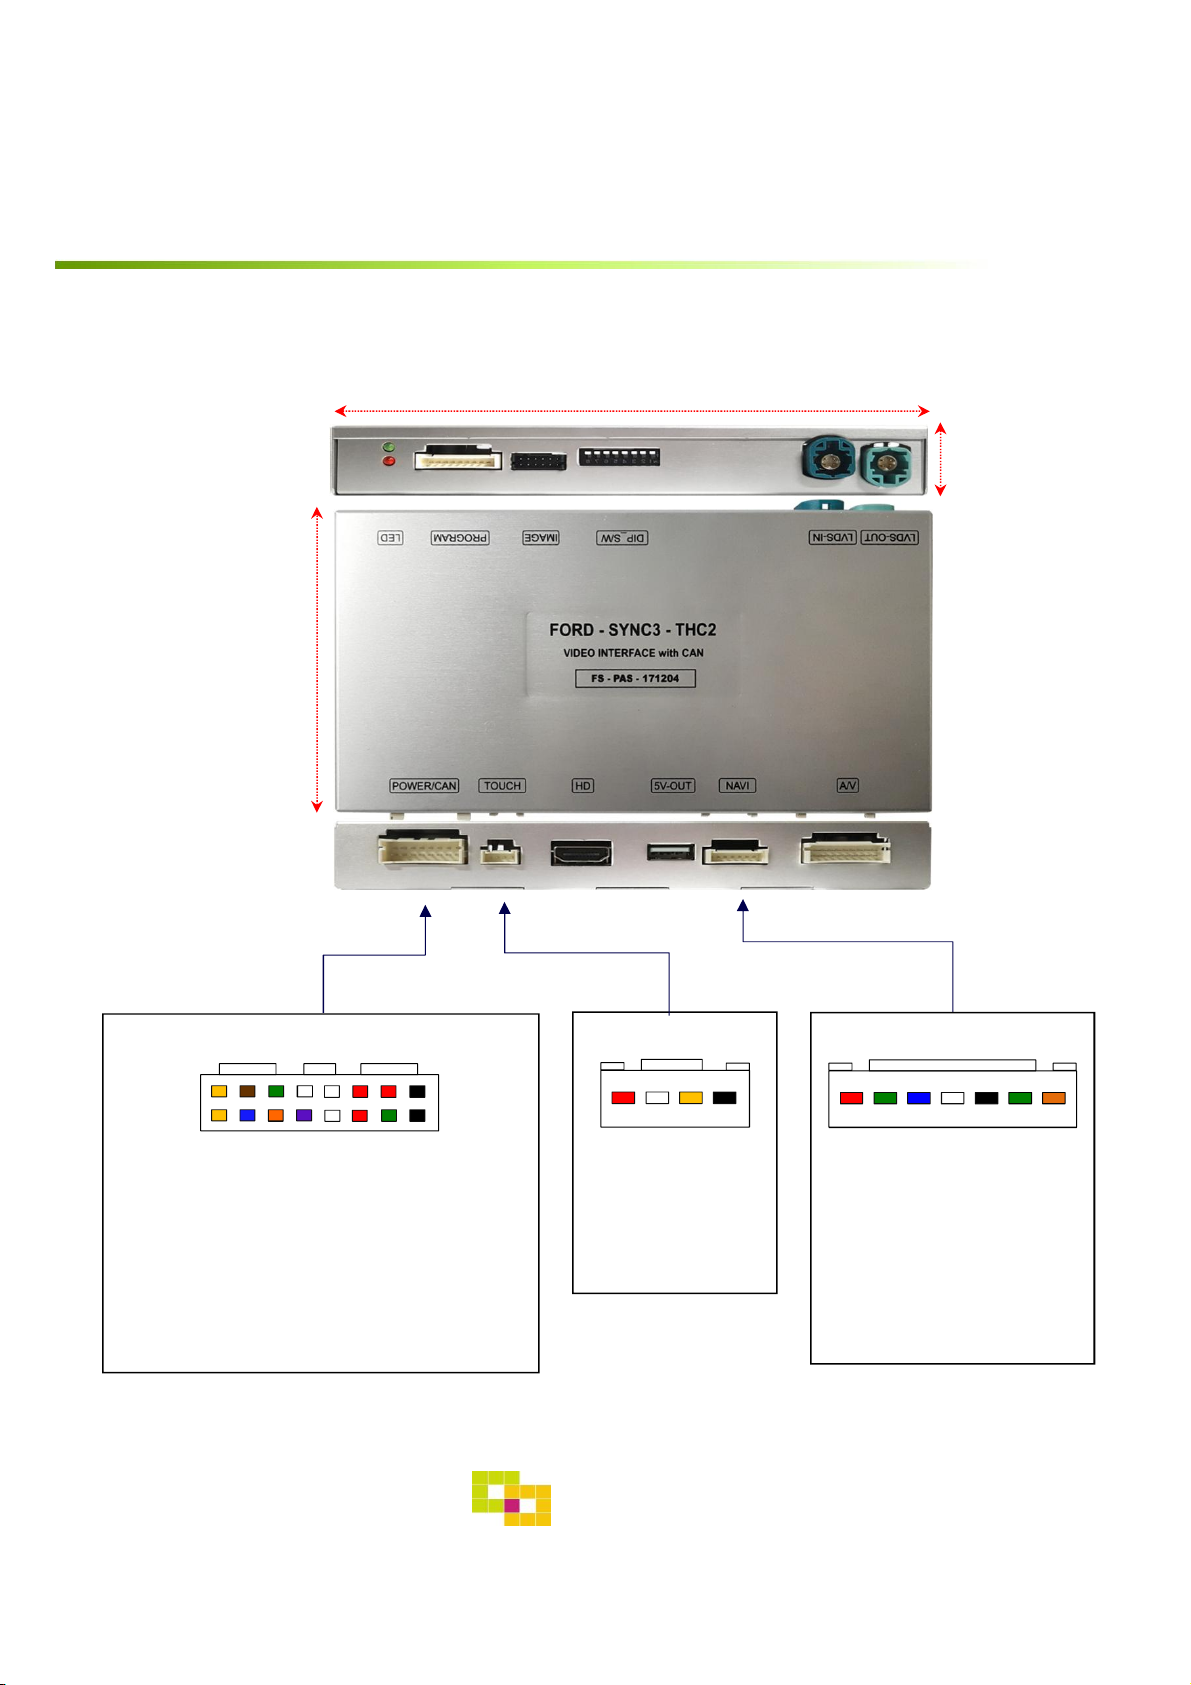
1-1 Input Spec. (MULTI VIDEO INTERFACE)
- 1 x Analog RGB Input (Navigation System output)
- 1 x HDMI Input (Mirroring System source)
- 2 x A/V Input (External video source).
- 1 x CVBS(REAR CAMERA) Input. (Rear camera source)
- 1 x CVBS(FRONT CAMERA) Input. (Front camera source)
- 1 x LVDS Input. (Car Command System)
1-2 Output Spec.
- 1 x LCD Output (LCD Operation)
- 1 x Resistive Touch Output
1-3 Power Spec.
- Input Power : 8VDC ~ 24VDC
- Consumption Power : 12Watt, Max
1-4 Switch Input mode
- Possible to switch input mode through original button
2. Features
- Possible to register IR code of DVD/DTV
- Display dynamic PAS(Parking assistance system)
- Easy installation by Jack by jack
- Possible to switch from external screen to OEM Phone mode screen
automatically when phone rings
- Possible to switch from external screen to OEM climate mode screen
automatically when changing climate value
- Possible to switch from external screen to OEM Audio mode screen
automatically when adjusting audio volume level
3

GU Electronic
Specification
2. Diagram
4
INTERFACE
Scaler
(PIP)
MCU
CAR
COMMAND
SYSTEM CAN
EEPROM
CAN
RECEIVER
LVDS
TX RELAY
LVDS
TX LVDS
REAR CAMERA
POWER
COMPOSITE
RGB
NAVIGATION
SYSTEM
CVBS1
CVBS2
FRONT CAMERA
MUX
REAR CAMERA
Mirroring HDMI
RX
HDMI
CAR
TFT-LCD
LVDS
RX

GU Electronic
Specification
3. Components
5
Power Cable 1EA
(Code: CB-FDSY00-PW-CMX)
OSD Board 1EA
(Code: CB-OSD10-CMX)
RGB NAVI Cable(7pin) 1EA
(Code: CB-RGB7-CMX)
LVDS In Cable
(Code: CB-LVDS-CMX-06) LVDS Out Cable
(Code: CB-LVDS-CMX-03)
Touch Cable(KD-900) 1EA
(Code: CB-LRVx51-TOUCH-CMX)
Mode S/W 1EA
(Code: CB-MODE2-CMX)
A/V Cable 1EA
(Code: CB-AV20-CMX)

GU Electronic
Specification
6
3. Components (Option)
Option : HDMI cable 1EA
(Code: CB-MIRA-CMX-01)
Option : Mirroring 1set
(Code: CB-MIRA-CMX)

*Touch Connect
① Y-
②X
③Y+
④X+
Specification
4. Exterior
164mm
25mm
7
83mm
GU Electronic
*NAVI Connect
① R DATA (Red)
②G DATA (Green)
③B DATA (Blue)
④SYNC (White)
⑤GND (Black)
⑥DVB-T IR (Green)
⑦DVD IR (Orange)
①②③④⑤⑥⑦
①②③④
*POWER Connect
1. Battery (Yellow)
2. Battery (Yellow)
3. Rear-DET (Brown)
4. Front-DET (Blue)
5. CAN1-L (Green)
6. CAN1-H (Orange)
7. N.C
8. N.C
1 15
2 16
9. N.C
10. N.C
11. ACC (Red)
12. Rear-VCC (Red)
13. Front-VCC (Red)
14. Mode (Green)
15. GND (Black)
16. GND (Black)

Settings
1. Dip Switch
* ON : DOWN , OFF : UP
NO. Function Selection
1 NAVI ON : Skipping NAVI
OFF : Display
2 AV1 (DVB-T) ON : Skipping AV1 (DVB-T)
OFF : Display
3 AV2 (DVD) ON : Skipping AV2 (DVD)
OFF : Display
4 HDMI ON : Skipping HDMI
OFF : Display
4 N.C
6
Car Model
ON :-
7 ON : Mustang
8 ON : F-150(2015years), FX4
* Example
8
GU Electronic
SYNC3 7” F-150(2015years) FX4 Mustang

9
Settings
2. Original button – Steering Wheel (Switching Mode)
GU Electronic
※ The screen is switched in order as the pictures below
※ Possible to set the use of Steering Wheel button in OSD menu (P.15)
NAVI
OEM AV1(DTV) AV2(DVD)
Long Press “LEFT button” or “Voice button” : switching mode
Short Press “LEFT button” or “Voice button” : switching to OEM screen directly
※ If it does not work, Please see the following page.

10
Settings
2. Original button – Steering Wheel (Switching Mode)
GU Electronic
※ Possible to set the use of Steering Wheel button in OSD menu (P.15)
Long Press “LEFT button” or “Voice button” : switching mode
Short Press “LEFT button” or “Voice button” : switching to OEM screen directly
※ The screen is switched in order as the pictures below
NAVI
OEM AV1(DTV) AV2(DVD)
※ If it does not work, Please press Dip sw no.8 down

11
Touch the “+” correctly
Settings
GU Electronic
3. Touch screen – Touch calibration
Touch OEM screen in any mode more than 11
sec. For calibration
(This function can be activated only one time
after switching mode)
OR
Setup for Touch calibration
(OSD Menu – Utility – Calibration – Execute
or Cancel)

12
Settings
3. Touch screen – DVD, DTV control
•DTV – Please contact a supplier in advance for using this function
[Button type-1] [Button type-2]
•DVD
※ Calibration : Touch any point of screen more than 11sec to start a touch calibration
[Power] [Search] [Up] [Down]
[Power] [Menu]
[Return][USB]
[Stop]
[DVD up]
[Play/pause]
[Power]
[MIC]
[Rewind]
[Play Previous
chapter]
[DVD down]
[FF]
[Play Next
chapter]
GU Electronic
※ To use this function, It is necessary to offer the remote IR code to manufacturer
or setting OSD IR – Ctrl(P. 19)

Settings
4. OSD Key board
5. OSD Menu
※Press “MENU” button on Key board
13
GU Electronic
① MENU :Activating OSD Menu
② SEL :Selection
③ Up :Moving upward (Increasing value)
④ Down :Moving downward (Decreasing value)
MENU SEL UP DOWN
①②③ ④
Config - NAVI-RGB : Setup for the type of RGB
Config - DVB-T(DMB) : Setup for the type of DVB-T(DMB)
Config - DVD : Setup for the type of DVD
Config - HDMI : Setup for the type of HDMI
Reset : Reset all value

14
Settings
5. OSD Menu
※Press “MENU” button on Key board
Option
•RearCam-Type : Setup for rear camera
ExtDevice - External rear camera
OEM - Original camera
•RearCam-Power : Setup for Rear VCC wire in power cable
ON - +12V out always (current consumption : 200mA)
AUTO - +12V out in rear mode only (200mA)
OFF - Power OFF
•RearCam-Det : Setup for Rear detection
CAN - By CAN
WIRE - By rear cam detect wire
OFF - Rear detection OFF
•AV Mode : Change “Rear” input as Video input
ON - Video input (Rearcam TYPE in OSD menu should be “OEM”)
OFF - Rear input
•FrontCam-Type : Setup for front camera
ExtDevice - External rear camera
OEM - Original camera
GU Electronic

15
Settings
5. OSD Menu
※Press “MENU” button on Key board
OEM
NAVI
AV1(DVB-T)
AV2(DVD)
REAR FRONT
OEM
NAVI
AV1(DVB-T)
AV2(DVD)
Select time of display
1~30 second
GU Electronic
Option
•FrontCam-Power : Setup for Front VCC wire in power cable
ON - +12V out always (current consumption : 200mA)
AUTO - +12V out in rear mode only (200mA)
OFF - Power OFF
•FrontCam-Det : Setup for front detection
ExtDevice - External rear camera
OEM - Original camera
•FrontCam-RcvOpt : Selecting time of displaying Front camera before switching to
RGB, DVD, OEM from Rear
•Steering Wheel : Setting for Steering wheel button (Switching Mode)
LEFT - Steering wheel Left button ON
RIGHT - Steering wheel Right button ON
OFF - OFF
•UI DVB-T(DMB) : Setting DVB-T(DMB) UI ICON - ON or OFF

Option
•UI DVD : Setting DVD UI ICON - ON or OFF
•ScrChg-Call : Setup for switching from external screen to OEM Phone mode screen
automatically when phone rings - ON or OFF
* After hanging up the phone, the screen will be switched to external screen
automatically. To displaying the phone mode screen continually, Please touch the
climate screen when it appears.
•ScrChg-Climate : Setup for switching from external screen to OEM mode screen
automatically when changing climate value - ON or OFF
* The Climate mode screen will appear only for 2 sec. To displaying the climate mode
screen continually, Please touch the climate screen when it appears.
•ScrChg-Audio-Vol : Setup for switching from external screen to OEM mode screen
automatically when changing audio volume level - ON or OFF
* The Audio mode screen will appear only for 2 sec. To displaying the audio mode
screen continually, Please touch the climate screen when it appears.
•NAVI COM (N.C)
16
Settings
5. OSD Menu
※Press “MENU” button on Key board
GU Electronic

17
MENU IMAGE NAVI
Config
Option
Image
Screen
Parking
Brightness
Contrast
Color- RED
Color- GREEN
Color- BLUE
50
50
50
50
25
MENU Screen NAVI
Config
Option
Image
Screen
Parking
Horizontal
Vertical
Scale X Up
Scale X Down
Scale X Up
50
50
50
50
50
MENU IMAGE Rear
Config
Option
Image
Screen
Parking
Brightness
Contrast
Saturation
Hue
Sharpness
50
50
50
50
25
- NAVI(RGB) Image / Screen
- DVD, DVBT, NAVI-AV, REAR, FRONT Image
Settings
GU Electronic
5. OSD Menu
※Press “MENU” button on Key board
Image
Screen
Image

Settings
- Parking guide line ON/OFF
Selecting a use of packing guide line
(OSD Menu – Parking – Line display – ON
or OFF)
18
Parking line “ON”
MENU SEL UP DOWN
Left Right Down
UP
- Adjust the position of Parking guide line
Possible to adjust the position of line
by Keypad in Horizontal / Vertical menu
※ After pressing the “Horizontal” / “Vertical” in OSD menu
The OSD screen automatically disappears.
In this state, Please adjust the position by Keypad
- Warning Language for rear screen
Selecting a type of language (OSD Menu – Parking – Warning Lang)
5. OSD Menu
※Press “MENU” button on Key board
GU Electronic

19
GU Electronic
Settings
- OSD
- Utility
•Utilityy– INTERFACE SOFTWARE
•OSD – Horizontal
•OSD – Vertical
•OSD – Display : Setting time for displaying OSD menu
•OSD – Transparency
•OSD – Language : Setting language of ODS menu
5. OSD Menu
※Press “MENU” button on Key board
- IR – Ctrl (p.19)

① Select IR Ctrl àDVB/DVD à
Learn to register IR code
※ Caution
•Delete :
ALL Clear – Delete all value
Clr – Delete one button’s Value
•Play/Pause:
To use button, Please register
the IR code in power / Pause menu
separately
20
- IR Ctrl
MENU DVB-T(DMB) DVD
OSD
IR-Ctrl
Utility
DVB - T
DVD
Sel Learn Cancel
User
Sys
MENU DVB-T(DMB) DVD
OSD
IR-Ctrl
Utility
ALL - Clear
POWER
SCAN
CH+
CH-
____ _____
____ _____
____ _____
____ _____
MENU DVB-T(DMB) DVD
OSD
IR-Ctrl
Utility
New Code :
Cfm Code :
____ _____
____ _____
Save Clr Cancel
① ②
③
② All Clear : Remove all value of
Remote control registered before
Select one of the buttons registering
to move on to next step
③ Press a button on the remote control
of DVD/DTV then the IR code will be
appeared on “New code” menu. Press the
same button one more time to confirm
the IR code. (Cfm code = confirm code)
GU Electronic
Settings
5. OSD Menu– Register IR code
※Press “MENU” button on Key board
DVB - T
IR-Ctrl IR-Ctrl
IR-Ctrl
Table of contents
Other GU Electronic Car Stereo System manuals