Guide Gear 699784 User manual

Congratulations on your Guide Gear™ purchase.
Take your game to the next level with field-tested Guide Gear™ products
for a confident, competitive edge that strikes the perfect balance between
performance and value.
200W/800A Power Pack 699784
For assistance with your Guide Gear™ product, please contact the Sportsman’s
Guide customer service at 1-800-888-5222 7am-7pm CST Mon-Fri or e-mail us
at: custserv@sportsmansguide.com.
www.SportsmansGuide.com

Page 2 of 13
Intended Use
The GUIDE GEAR 200W 800A Power Pack is easy to use and designed for years of reliable service.
It can run many AC& DC appliances whenever you need power for work or play, at home or on the
road. The 200W 800A power pack has a battery inside, it is designed for Jumpstarting vehicles as
SUVs, trucks, and vans.
The GUIDE GEAR 200W 800A power pack can:
Power 115V AC appliances
Power 12V DC appliances
Charges USB-chargeable devices
Jumpstart vehicle engines
LED light for emergency
Abbreviations and Acronyms
A
Ampere
AC
Alternating Current
Ah
Amp-hours
DC
Direct Current
mA
Milli-Ampere
V
Volt
LED
Light-Emitting Diode
PSI
Pounds per Square Inch
Specifications
12V DC Power Section
Boost Ampere
800A instantaneous cranking amps
Battery
20Ah 12V Sealed lead-acid battery
Jump Start Cables (size/length)
6AWG / 2Ft
AC charging adapter
15V 400mA
12V DC power socket
20A max. (fuse protected)
5V USB output
3.1A shared for two USB ports
Air compressor
100 PSI (lb./in2)
115V AC Power Section
Output Power
Continuous output power
Five Minute AC output power
AC output surge capacity
200W
220W
400W
Output Voltage
105V-125V
Output Frequency
58Hz-62Hz
Output Wave Form
Modified Sine Wave
Low battery alarm
11±0.3VDC
Low battery shutdown
10.5±0.3VDC
Physical Specifications
Ambient operating temperature range
32℉-104℉(0℃-40℃)
Storage temperature range
32℉-86℉(0℃-30℃)
Package Dimensions LxWxH
36 X 27X27.5cm
Weight
17.6 lbs. (8kg).

Page 3 of 13
Important Safety Information
⚠WARNING
Read and understand all instructions. Failure to follow all instructions may result in serious injury
or property damage.
The warnings, cautions, and instructions in this manual cannot cover all possible conditions or
situations that could occur. Exercise common sense and caution when using this power pack.
Always be aware of the environment and ensure that the tool is used in a safe and responsible
manner.
Do not allow persons to operate or assemble the power pack until they have read this manual and
have developed a thorough understanding of how it works.
Do not modify this power pack in any way. Unauthorized modification may impair the function
and/or safety and could affect the life of the product. There are specific applications for which the
product was designed.
Use the right tool for the job. DO NOT attempt to force small equipment to do the work of larger
industrial equipment. There are certain applications for which this equipment was designed. It will
be safer and do a better job at the capacity for which it was intended. DO NOT use this equipment
for a purpose for which it was not intended.
Industrial or commercial applications must follow OSHA requirements.
⚠WARNING
This power pack may contain chemicals known to the State of California to cause cancer, birth
defects or other reproductive harm.
Some dust created by power sanding, sawing, grinding, drilling, and other construction activities
contains chemicals known to the State of California to cause cancer, birth defects, or other
reproductive harm. Some examples of these chemicals are:
-lead from lead-based paints,
-crystalline silica from bricks and cement and other masonry products, and
-arsenic and chromium from chemically-treated lumber.
Your risk from these exposures varies, depending on how often you do this type of work. To
reduce your exposure to these chemicals: work in a well-ventilated area, and work with approved
safety equipment, such as dust masks that are specially designed to filter out microscopic
particles.
Handling power cords on corded products may expose you to lead, a chemical known to the State
of California to cause cancer and birth defects or other reproductive harm. Wash your hands after
handling.
⚠WARNING
WORK AREA SAFETY
Inspect the work area before each use. Keep work area clean, dry, free of clutter, and well lit.
Cluttered, wet, or dark work areas can result in injury. Using the power pack in confined work
areas may put you dangerously close to other cutting tools and rotating parts.
Do not use the power pack where there is a risk of causing a fire or an explosion; e.g., in the
presence of flammable liquids, gases, or dust. The product can create sparks, which may ignite
the flammable liquids, gases, or dust.

Page 4 of 13
Do not allow the power pack to come into contact with an electrical source. The tool is not
insulated and contact will cause electrical shock.
Keep children and bystanders away from the work area while operating the tool. Do not allow
children to handle the power pack.
Be aware of all power lines, electrical circuits, water pipes, and other mechanical hazards in your
work area. Some of these hazards may be hidden from your view and may cause personal injury
and/or property damage if contacted.
⚠WARNING
PERSONAL SAFETY
Stay alert, watch what you are doing, and use common sense when operating the power pack. Do
not use the power pack while you are tired or under the influence of drugs, alcohol, or medication.
A moment of inattention while operating the tool may result in serious personal injury.
Dress properly. Do not wear loose clothing, dangling objects, or jewelry. Keep your hair, clothing
and gloves away from moving parts. Loose clothes, jewelry, or long hair can be caught in moving
parts. Air vents on the tool often cover moving parts and should be avoided.
Wear the proper personal protective equipment when necessary. Use ANSI Z87.1 compliant
safety goggles (not safety glasses) with side shields, or when needed, a face shield. Use a dust
mask in dusty work conditions. Also use non-skid safety shoes, hardhat, gloves, dust collection
systems, and hearing protection when appropriate. This applies to all persons in the work area.
Do not overreach. Keep proper footing and balance at all times.
Ensure the power switch is off prior to plugging in the tool.
Remove keys or wrenches before connecting the tool to an air supply, power supply, or turning on
the tool. A wrench or key that is left attached to a rotating part of the tool may cause personal
injury.
Secure the work with clamps or a vise instead of your hand when practical. This safety precaution
allows for proper tool operation using both hands.
⚠WARNING
ELECTRICAL SAFETY
Grounded tools must be plugged into an outlet properly installed and grounded in accordance
with all codes and ordinances. Never remove the grounding prong or modify the plug in any way.
Do not use any adapter plugs. Check with a qualified electrician if you are in doubt as to whether
the outlet is properly grounded. If the tools should electrically malfunction or break down,
grounding provides a low resistance path to carry electricity away from the user.
Double insulated tools are equipped with a polarized plug (one blade is wider than the other). This
plug will fit in a polarized outlet only one way. If the plug does not fit fully in the outlet, reverse the
plug. If it still does not fit, contact a qualified electrician to install a polarized outlet. Do not change
the plug in any way. Double insulation eliminates the need for the three wire grounded power cord
and grounded power supply system.
Do not allow the product to come into contact with an electrical source. The tool is not insulated
and contact will cause electrical shock.
Avoid body contact with grounded surfaces such as pipes, radiators, ranges, and refrigerators.
There is an increased risk of electric shock if your body is grounded.

Page 5 of 13
Do not expose power tools to rain or wet conditions. Water entering a power tool will increase the
risk of electric shock.
Do not abuse the power cord. Never use the power cord to carry the tools or pull the plug from an
outlet. Keep the power cord away from heat, oil, sharp edges, or moving parts. Replace damaged
power cords immediately. Damaged power cords increase the risk of electric shock.
⚠CAUTION
POWER PACK USE AND CARE
Do not force the power pack. Products do a better job and are safer when used in the manner for
which they are designed. Plan your work, and use the correct product for the job.
Check for damaged parts before each use. Carefully check that the power pack will operate
properly and perform its intended function. Replace damaged or worn parts immediately. Never
operate the power pack with a damaged part.
Do not use a power pack with a malfunctioning switch. Any power tool that cannot be controlled
with the power switch is dangerous and must be repaired by an authorized service representative
before using.
Disconnect the power/air supply from the product and place the switch in the locked or off position
before making any adjustments, changing accessories, or storing the tool. Such preventive safety
measures reduce the risk of starting the tool accidentally.
Store the power pack when it is not in use. Store it in a dry, secure place out of the reach of
children. Inspect the tool for good working condition prior to storage and before re-use.
Use only accessories that are recommended by the manufacturer for use with your power pack.
Accessories that may be suitable for one product may create a risk of injury when used with
another tool. Never use an accessory that has a lower operating speed or operating pressure than
the tool itself.
Keep guards in place and in working order. Never operate the product without the guards in place.
Do not leave the power pack running unattended.
⚠WARNING
Do not use the power pack with life support systems or other medical equipment or devices.
Keep children away from the Power Pack. The AC power generated by the power pack is as
lethal as a normal wall outlet.
Do not expose the power pack to rain, snow, spray, or bilge water.
Make sure the Power Pack wiring is of proper size and rating and in good condition. Operating the
power pack with damaged wiring may void warranty
Do not use the power pack if it is dropped, hit, worn, broken, or damaged
Do not attempt to service or disassemble the power pack. It does not have user-serviceable parts
Do not insert any foreign objects into the AC outlet, 12 V DC outlet, jump start cable port or
ventilation hole. This power pack generates potentially lethal AC power same as a normal
household wall outlet.

Page 6 of 13
Disconnect the power source from the power pack, before attempting to clean or operate the
power pack. Turning OFF the power pack does not reduce the risk of electric shock.
Have a qualified technician perform any service work
Do not insert any foreign objects into the outlets, vents, or fan openings of the power pack.
Do not cover or obstruct the ventilated openings of the power pack. Doing so may cause
overheating.
When working on electrical equipment, always ensure someone is nearby to aid you in case of
emergency
Do not allow the clamps of the boosting cable to touch each other or another common conductor
as it causes a spark and/or damages the equipment.
Always connect the clamps to the correct terminals. A reverse polarity connection damages the
unit and/or creates a spark or explosion
This may lead to accumulations of hydrogen causing exposure to fire and explosion hazards. This
condition is typically found in marine appliances or portable generators with DC output.
Do not connect the power pack to any AC appliance with neutral conductor connected to ground,
as doing so may damage the power pack
Do not expose the power pack to temperatures over 104°F (40°C).
Main Parts of Product
Reference.
Subassembly
1
Boosting Manual switch
2
DC socket fuse
3
12V DC sockets
4
115V AC outlets
5
Press to decrease the desired pressure for compressor
6
Press to increase the desired pressure for compressor
7
Press to set the desired pressure for compressor, press again to start working
8
Air compressor On/Off switch
9
Swivel work light
10
LCD display
11
Charging port
12
USB ports
13
Work light switch (ON-SOS-flash-OFF)
14
USB ON/OFF switch
15
Inverter ON/OFF switch

Page 7 of 13
Reference.
Subassembly
16
12V DC ON/OFF switch
17
Boosting cable (positive)
18
Hose holding compartment
19
Handle
20
Boosting cable (negative)
21
Reverse connection indicator (RED)
22
Correct connection indicator (Green)
Before Each Use
⚠WARNING
1. Charge unit fully prior to each use.
2. Follow all instructions published by the battery manufacturer and the manufacturer of the
equipment in which the battery is installed.
3. Make sure the area around the battery is well-ventilated.
4. Never smoke or allow a spark or flame in vicinity of the engine or batteries.
5. Be careful not to drop a metal object on the battery or allow a metal tool to simultaneously touch
the positive and negative cable ends or battery terminals. It might spark or short circuit the battery
or other electrical parts and cause an explosion.
6. Remove personal metal items such as rings, bracelets, necklaces, and watches when working
with batteries. Batteries produce a short-circuit current high enough to weld a ring or other similar
objects to metal, causing a severe burn.
7. Someone should be within range of your voice, or close enough to come to your aid when you
work near batteries.
8. Have plenty of fresh water, soap and a supply of baking soda on hand in the area of the batteries
in case of contact with battery acid. Baking soda neutralizes lead acid battery electrolyte.
9. The product is supplied with a rechargeable, sealed lead acid battery. This battery is self-
contained and not consumer replaceable. Batteries must be disposed of properly when they no
longer hold a charge.
Operating Instructions
⚠WARNING
SPARK AND EXPLOSION HAZARD
Do not operate the booster pack in compartments containing batteries or flammable materials, or in
locations that require ignition-protected equipment.
Operating AC Appliances
The power pack has two AC power outlets for use with AC appliances. Follow these steps to operate
AC appliance:
1. Press the “ inverter” ON/OFF switch button to activate the AC outlets, you can see the AC outlet
icon on LCD screen and battery voltage and status. Make sure the battery is fully charged before
use.
2. Open the AC outlet plastic covers.
3. Plug the power cord of AC appliance into the AC outlet
4. Turn ON the AC appliance.

Page 8 of 13
5. Press the “inverter” ON/OFF switch button to turn off inverter after each use.
6. Recharge the power pack immediately after use. Refer to Recharging the Power Pack with AC
Charger
⚠WARNING
SPARK AND EXPLOSION HAZARD
In case of using many AC appliances, use an AC power bar for additional AC outlets. However,
for continuous operations the combined loads must be less than 200 W. The power pack will
operate for a longer time on a single full charge if lower wattage appliances are used.
Some appliances may be difficult or impossible to operate using this power pack. They may have
high surge requirements or may be incompatible with the output waveform of this power pack.
Do not use equipment that requires a pure sine wave power source as the output of the power
pack is non-sinusoidal.
Equipment with high surge requirements cannot be operated with the power pack. Failure to
comply may lead to equipment damage or personal injury.
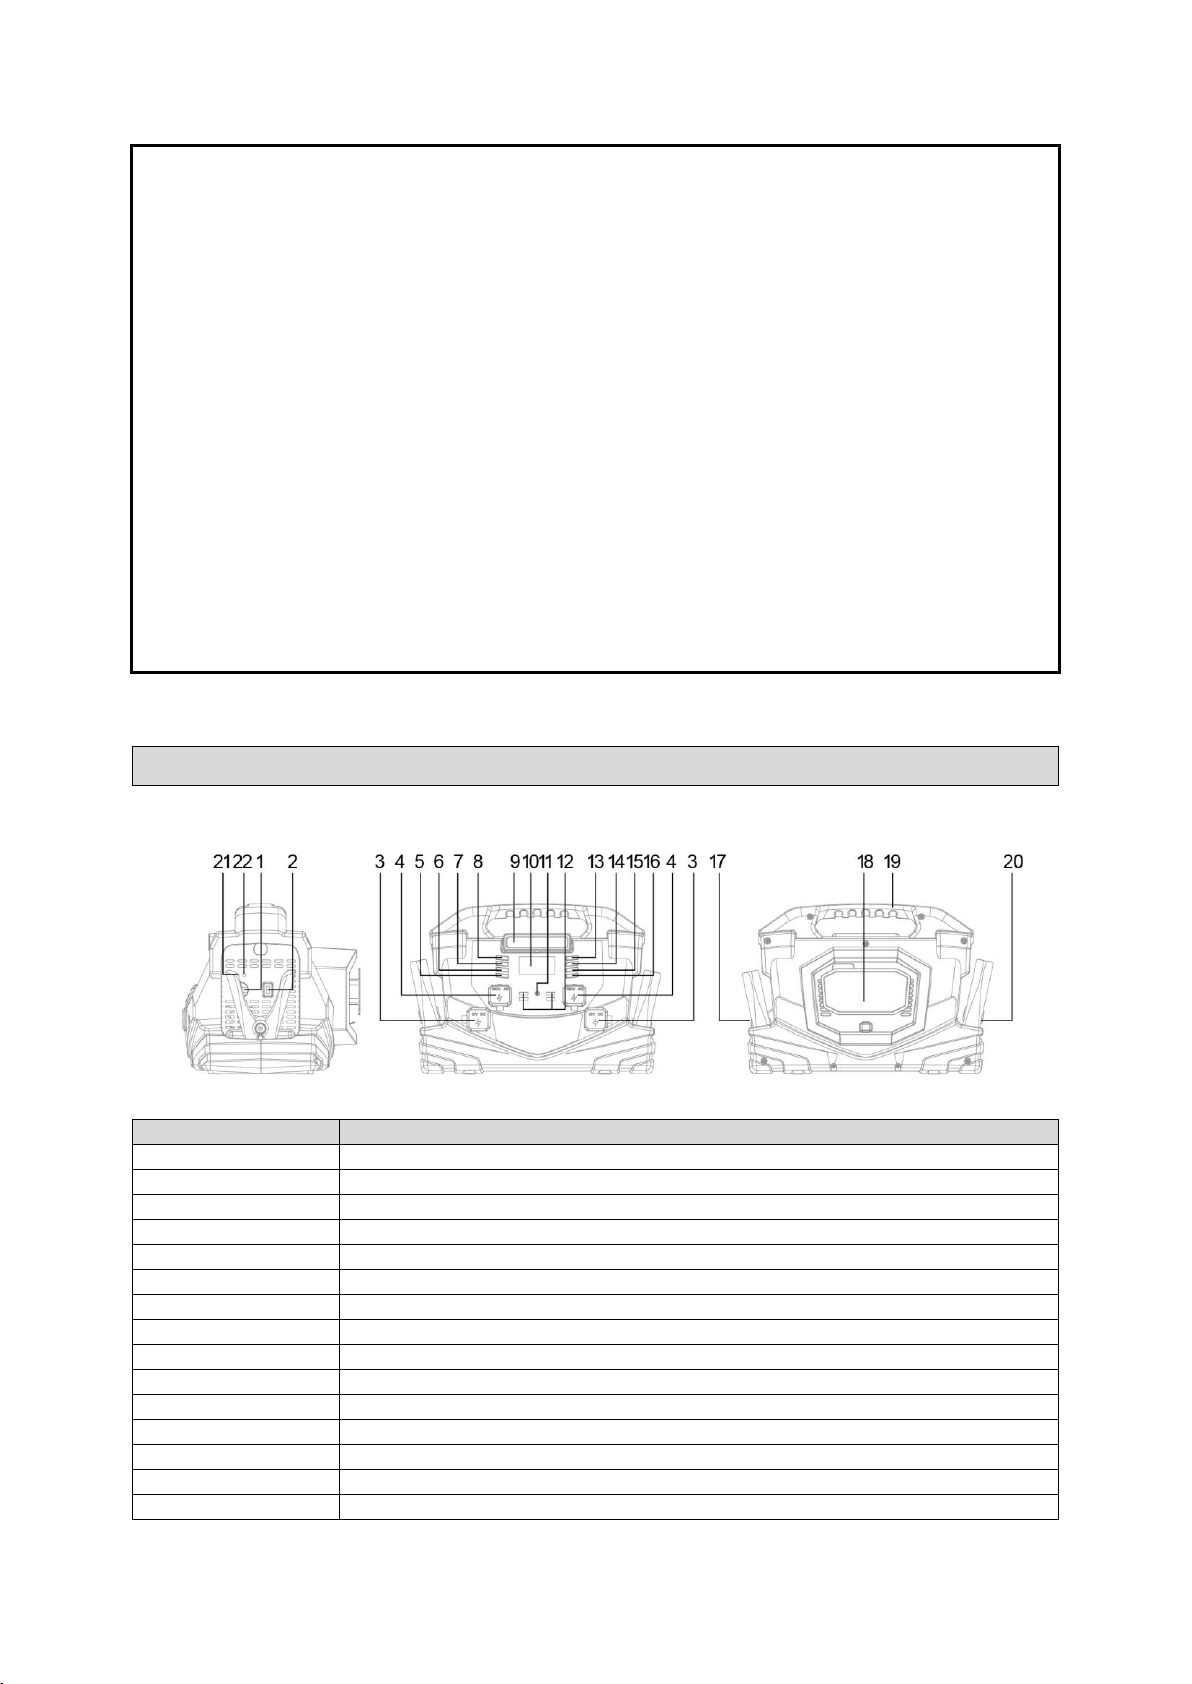
Operating 12V DC Appliances
1. Press the “DC” ON/OFF switch button to activate the DC sockets, you can see indication on LCD
screen and battery voltage and status. Make sure the battery is fully charged before use.
2. Open the DC outlet plastic cover.
3. Plug the power cord of DC appliance into the DC socket
4. Turn ON the DC appliance.
5. Press the “ DC” ON/OFF switch button to turn off DC power after each use.
6. Recharge the power pack immediately after use. Refer to Recharging the Power Pack with AC
Charger
Operating 5V USB Appliances
Using USB Ports
1. Plug one end of USB cable (not provided) into the USB power port and other end to the USB-
chargeable device e.g. MP3 player.
2. Press the USB ON/OFF button to activate the USB power. There will be indication on LCD screen
and battery voltage and status. Make sure the battery is fully charged before use.
3. Press the USB button again to turn off USB after use. Failure to do so may discharge the internal
battery to dead.
4. Recharge the power pack immediately after use. Refer to Recharging the Power Pack with AC
Charger
⚠CAUTION
EQUIPMENT DAMAGE
Never connect the USB power port directly to a computer USB outlet. Doing so may cause damage
to both the power port and USB outlet.

Page 9 of 13
Operating LED Work Light
1. Press the Light button to turn on the LED light
2. The LED light has multiple functions, (ON-SOS-Flash-OFF) , press light button to select the
desired function. And turn off the LED light after use. Failure to do so may discharge the internal
battery to dead.
3. Recharge the power pack immediately after use. Refer to Recharging the Power Pack with AC
Charger
Jumpstarting an Engine
1. Make sure your vehicle is a negative ground system. If it is a positive ground system vehicle or
you are unsure, please consult the vehicle’s owner’s manual.
2. Check the battery status before boosting engine by pressing any button on right of the LCD.
3. Turn off all accessories in vehicle.
4. Engage the park/emergency brake of the vehicle.
5. Engage the transmission in park mode for an automatic transmission vehicle or engage the
transmission in neutral for a manual transmission vehicle.
6. Place the booster pack on a flat, stable surface close to the battery of the vehicle.
7. Connect the negative (black) clamp from the power pack to the chassis of the vehicle.
8. Connect the positive (red) clamp from the power pack to the positive (+) terminal of the battery in
the vehicle.
9. If the connection is correct, the green indicator on positive side panel is on, the move to step 11.
10. Disconnect the clamps from the battery of the vehicle if the connections are reversed ( RED
reverse polarity indicator is ON and alarm is sounding), and repeat the steps 7 , 8 and 9, then
proceed to step 11.
11. Turn ON the boosting power switch of the power pack when the correct connection indicator is on .
12. Crank the engine for 1–3 seconds or until it starts, whichever is first.
13. Turn OFF the ON/OFF switch after using the booster pack.

Page 10 of 13
14. Disconnect the positive (red)(+) clamp and then the negative(black) (–) clamp from the battery of
the vehicle.
15. Store the clamps separately after use.
16. Recharge the booster pack immediately after use.
⚠WARNING
Allow the power pack to cool down for at least 3 minutes after each boost.
Follow these instructions carefully for boosting your vehicle. The instructions may be different
from those mentioned for other boosting products or cables.
If boosting a boat engine, purge the engine compartment and vent all fumes before boosting.
Do not crank the engine for more than 5 seconds. The power pack feature is designed only for
short term operation. Failure to comply may cause damage to the device.
⚠CAUTION
EQUIPMENT DAMAGE
Use only the supplied boost cables to boost a vehicle or boat engine that has a 12V starting
battery.
Ensure that the power pack is placed away from the moving parts of the engine and power pack
power ON/OFF switch is in OFF position.
Make sure the cable clamps are connected correctly to the battery terminals. A reversed polarity
connection (positive to negative) may cause a spark and damage the equipment. If the cable
clamps are connected in reverse, the reverse polarity LED indicator glows red and the audible
alarm will sound.
If the glow of the correct connection indicator is green without the sound alarm, the connections
are proper.
Ensure that the power pack and the cables are away from the belts, fans or any other moving part
of the engine.
Using the Air Compressor
⚠WARNING
The compressor is designed for short term operation only. Operating the compressor over an
extended period of time will cause the compressor unit to overheat, which could lead to fire.
Allow the compressor to cool down for 10 minutes after each 10 minutes of continuous operation.
Do not leave the compressor unattended while in operation
Keep out of children.
If the power pack shuts off due to an over-temperature condition, turn OFF the air compressor
switch and allow the compressor to cool down for 15 minutes before re-starting.
The power pack cannot be used to inflate large capacity inflatables such as float tubes, large air
mattresses, transport truck tires, and inflatable boats. These types of products require extended
inflating time which may damage the compressor.

Page 11 of 13
Inflating Vehicle, Motorcycle, and Bicycle Tires
1. Check battery capacity status by pressing any button on the right of the LCD screen, to ensure
that the battery is fully charged.
2. Uncoil the compressor hose from unit.
3. Ensure the locking lever of the valve connector is fully extended.
4. Remove the valve cap from the valve stem of the tire.
5. Latch the valve connector firmly and completely over the valve stem and push down on the
locking lever so that it locks onto the valve stem.
6. If you do not need to preset the PSI, press the top left compressor ON/Off button to start working.
7. If you would like to preset the pressure on the LCD screen, please press the “SET” button, then
press up or down arrow to adjust PSI.
8. Press the “SET” button again to start inflating. Air compress will stop when reach the desired PSI.
NOTE: If the tire is not inflated to the desire pressure after 10 minutes, turn the air compressor off and
allow it to cool for 10 minutes before resuming inflation.
9. Lift the locking lever of the valve connector back to the fully extended (upright) position and
unlatch from tire valve. Stow the air compressor fill hose back in the storage .
10. Reinstall the valve cap back onto the tire valve stem.
11. Recharge the unit after each use.
Recharging the Battery
⚠WARNING
Always ensure that internal battery is fully charged. Do not overcharge the battery.
Leaving a battery in a discharged state or without recharging every 90 days may result in
permanent damage to the battery and poor boosting performance.
Do not operate AC or DC appliances while the power pack is being charged. Doing so may
damage the charging adapter.
Do not attempt to recharge the internal battery if it is frozen.
Use the supplied AC charger to recharge the unit.
Recharge the unit periodically to maintain maximum battery capacity and extend unit life.
Recharging the Power Pack
1. Turn off all accessories before recharging.
2. Plug one end of included AC charger into charging input port of the power pack and other end to
115 V AC electrical socket.
3. The charging status will be displayed on LCD screen
Do not unplug the power cord until the battery is fully charged. It may take 48 hours or more to fully
recharge the power pack battery provided the voltage is 115 V AC.
Maintenance
Maintain the power pack by adopting a program of conscientious repair and maintenance in
accordance with the following recommended procedures. It is recommended that the general

Page 12 of 13
condition of any booster pack be examined before it is used. Keep your booster pack in good repair.
Keep handles dry, clean, and free from oil and grease. The following chart is based on a normal
operation schedule.
Maintenance Interval
Maintenance Point
Before operating or after using
Clean the exterior surface of the booster pack with a damp
cloth to prevent accumulation of dust and dirt.
After using
Make sure inverter/USB/LED/DC are OFF
Make sure ON/OFF Power Switch to OFF position after use.
Make sure disconnecting the 12V DC appliances after use to
avoid over discharge of booster pack’s internal battery
Make sure the plastic covers on the 12V DC outlet are closed
after use.
Extending battery lifespan
Recharge the battery at least once every 90 days. This will
extend the durability and efficiency of the battery.
Troubleshooting
Use the table below to troubleshoot problems before contacting service personnel or your local
dealer. If the problem continues after troubleshooting, call your local dealer for assistance.
Failure
Possible Cause
Corrective Action
The power pack does not jump start
vehicle
That battery in the jump
starter is not fully charged.
Fully charge the power pack
The engine start
capacity exceeds the
power pack jumpstart
capacity
Use a higher capacity
Power pack.
Battery of the vehicle
is damaged
Replace the vehicle
battery
No charging indication on LCD screen
when recharging
No AC power at the
AC wall outlet
Ensure power is available
at the AC wall outlet
The AC charger is
faulty
Replace the 115 V AC
charger
Not fully charged unit for more than 72
hours.
The output of the AC
charger is low.
Replace the 115 V AC charger.
Switches are in the “ON”
and a AC or DC
load is connected.
Place all switches in “OFF” position
and disconnect all loads.

Page 13 of 13
Failure
Possible Cause
Corrective Action
The run time for
appliance is less
than expected.
The internal battery is
not fully charged.
Recharge the power pack by using
the AC charger until the unit is fully
charged.
The alarm sounds and reverse
connection indicator is on.
The jump start cables are
connected incorrectly.
Connect the jump start cables the
correct way.
The AC appliance does not operate,
alarm is sounding and “Over load” on
screen.
The overload protection
feature trips, as the AC
appliance is rated more
than 200 W.
Use AC appliance with a power
rating of less than 200 W.
The AC appliance does not operate,
alarm is sounding. “Low input” on
screen.
The battery has
discharged to less
than 11 V.
Recharge the battery.
The AC appliance does not operate,
alarm is sounding. “Overheat” on
screen.
The power pack is
overheated due to
poor ventilation or
excessively warm
environmental conditions.
Allow the power pack to cool for
15 minutes or
more. Clear blocked ventilation
opening or
remove objects covering the
power pack, then
restart the power pack.
Table of contents