GV X12 User manual

- 1 -
Owners Manual
GV X12 Vacuum Cleaner
GV- We Know Clean!

- 2 -
Contents
Safety Instructions ----------------------------------------------------------------3
Components & Equipment -------------------------------------------------------4
Trouble Prevention ------------------------------------------------------------5
Tool Assembly & Instructions ----------------------------------------------------6
Vacuum Operating Instructions -------------------------------------------------7-8
Transportation & Storage ---------------------------------------------------------9
Technical Data -----------------------------------------------------------------9
Factory Warranty -----------------------------------------------------------------9
Congratulations on the purchase of your new GV X12 HEPA Vacuum Cleaner! The GV X12 is
attractive, powerful and makes your cleaning easier.
•Powerful deep cleaner – an amazing 12 amp motor produces 107 CFM of air flow
•Specialized powerful Turbo Brush allows it to quickly vacuum all surfaces
•1 Year Factory Warranty
•Reduces allergies with 3-level filtration system
•HEPA washable filter
•Bag change indicator
•A tool for nearly every job
•Lightweight and compact storage

- 3 -
IMPORTANT SAFETY INSTRUCTIONS
When using an electrical appliance, basic precaution should always be followed, including the following:
READ ALL INSTRUCTIONS
BEFORE USING THIS APPLIANCE
WARNING-to reduce the risk of fire, electric shock, or injury:
1. Do not leave vacuum cleaner plugged in. Unplug from outlet when not in use and before servicing.
2. To reduce the risk of electric shock, do not use outdoors or on wet surfaces.
3. Use only as described in this manual. Use only manufacturer’s recommended attachments.
4. Do not use with damaged cord or plug. If vacuum cleaner is not working as it should, has been dropped,
damaged, left outdoors, or dropped into water, take it to a service center.
5. Do not pull on cord, carry on cord, use cord as a handle, close door on cord, or pull cord around sharp
edges or corners. Do not run vacuum cleaner over cord. Keep cord away from heated surfaces.
6. Do not unplug by pulling on cord. To unplug, grasp the plug, not the cord.
7. Do not handle plug or vacuum cleaner with wet hands.
8. Do not put any object into openings. Do not use with any opening blocked. Keep free of dust, lint, hair and
anything that may reduce airflow.
9. Keep hair, loose clothing, fingers and all parts of body away from openings and moving parts.
10. Turn all controls off before unplugging.
11. Use extra care when cleaning on stairs.
12. Do not use to pick up flammable or combustible liquids, such as gasoline, or use in areas where they may
be present.
13. Hold plug when rewinding onto cord reel. Do not allow plug to whip when rewinding.
14. Unplug before connecting the hose.
15. Do not pick up anything that is burning or smoking, such as cigarettes, matches, or hot ashes.
16. Do not use without dust bag and/or filter in place.
17. If the supply cord is damaged, it must be replaced by the manufacturer, its service agent or a similarly
qualified person in order to avoid a hazard.
SAVE THESE INSTRUCTIONS!

- 4 -
COMPONENTS AND EQUIPMENT
1. Floor tool nozzle/ Turbo Brush Nozzle
2. Telescopic tube
3. Parking fixture
4. Tool Caddy
5. Suction release port (for delicate dusting)
6. Suction hose
7. Suction Control Regulator
8. Cord rewinder button
9. ON/OFF button
10. Dust bag change indicator
11. Suction hose connection
12. Carrying handle
11
12
1
3
2
4
9
7
10
8
56

- 5 -
PREVENTION
Switch off the vacuum cleaner immediately if the air intakes, the floor brushes or the telescope tube becomes
blocked. Before starting the vacuum cleaner up again remove the substance causing the blockage:
1. Never use the vacuum cleaner in the immediate
vicinity of hot bodies and do not suck up hot
objects such as cigarette ends or ashes.
2. Only place the plug in the socket when your hands
are dry.
3. Please remove large of sharp objects from the floor
before using the vacuum cleaner to avoid any
possible damage to it.
4. Do not pull by the main cable when pulling out the plug.

- 6 -
Tool Assembly & Instructions
1. Fit the hose on the vacuum cleaner by inserting
the rotating hose connection into the vacuum
cleaner until you hear a click. To remove the
hose, press the button at the side of the hose
connection and pull it out.
2. Assembling the telescope tube and accessories
2.1: Fit the telescopic tube into the other end of the hose by
shoving together and twisting.
2.2: Adjust the length of the telescopic tube by pushing
the locking mechanism down and pulling in the
bottom section of the tube to a suitable length.
When parking, shorten the tube as far as possible.
2.3: Fit the floor tool brush into the telescope tube.
Turbo Carpet Nozzle The turbo nozzle is uniquely designed to vacuum hard floor surfaces,
throw rugs, low pile carpet and thick pile carpet. This allows you to
quickly get your vacuuming done. Keep the brushroll free of hair and carpet string as that will improve
cleaning ability.
Floor Tool
The floor nozzle has two settings. When cleaning hard
surfaces (hardwood flooring, flooring tiles, etc.), the nozzle

- 7 -
brushes should be extended. When cleaning carpets and mats,
the brushes should be retracted into the nozzle. Press the
brush change button to switch between the two settings
Crevice/Duster Tool
Same tool can be used for dusting or
cleaning hard to reach places.
Upholstery Tool
For furniture, curtains, drapes, couches, etc.
VACUUM OPERATING INSTRUCTIONS
Vacuum cleaning
1. Before using the device, first roll out a sufficient length of electric cord and plug into the electrical wall socket.
The yellow mark on the electric cord is the maximum length that must not be exceeded.
To turn on the vacuum press the foot pedal button on the casing with your foot.
2. To rewind the power cord, press the button with one hand and guide the cable with the other hand to
ensure that the cord does not whip causing damage.
Caution: Never operate the vacuum cleaner without the dust bag or motor
filter; otherwise the device could be damaged.

- 8 -
Changing the dust bag
If the vacuum’s suction is reduced, this may be because the bag needs
changing. Remove the floor attachment from the main wand, set the suction
force regulation to MAX, switch on vacuum cleaner using the on/off button,
and keep an eye on the bag change indicator. If it is red, the bag must be
changed.
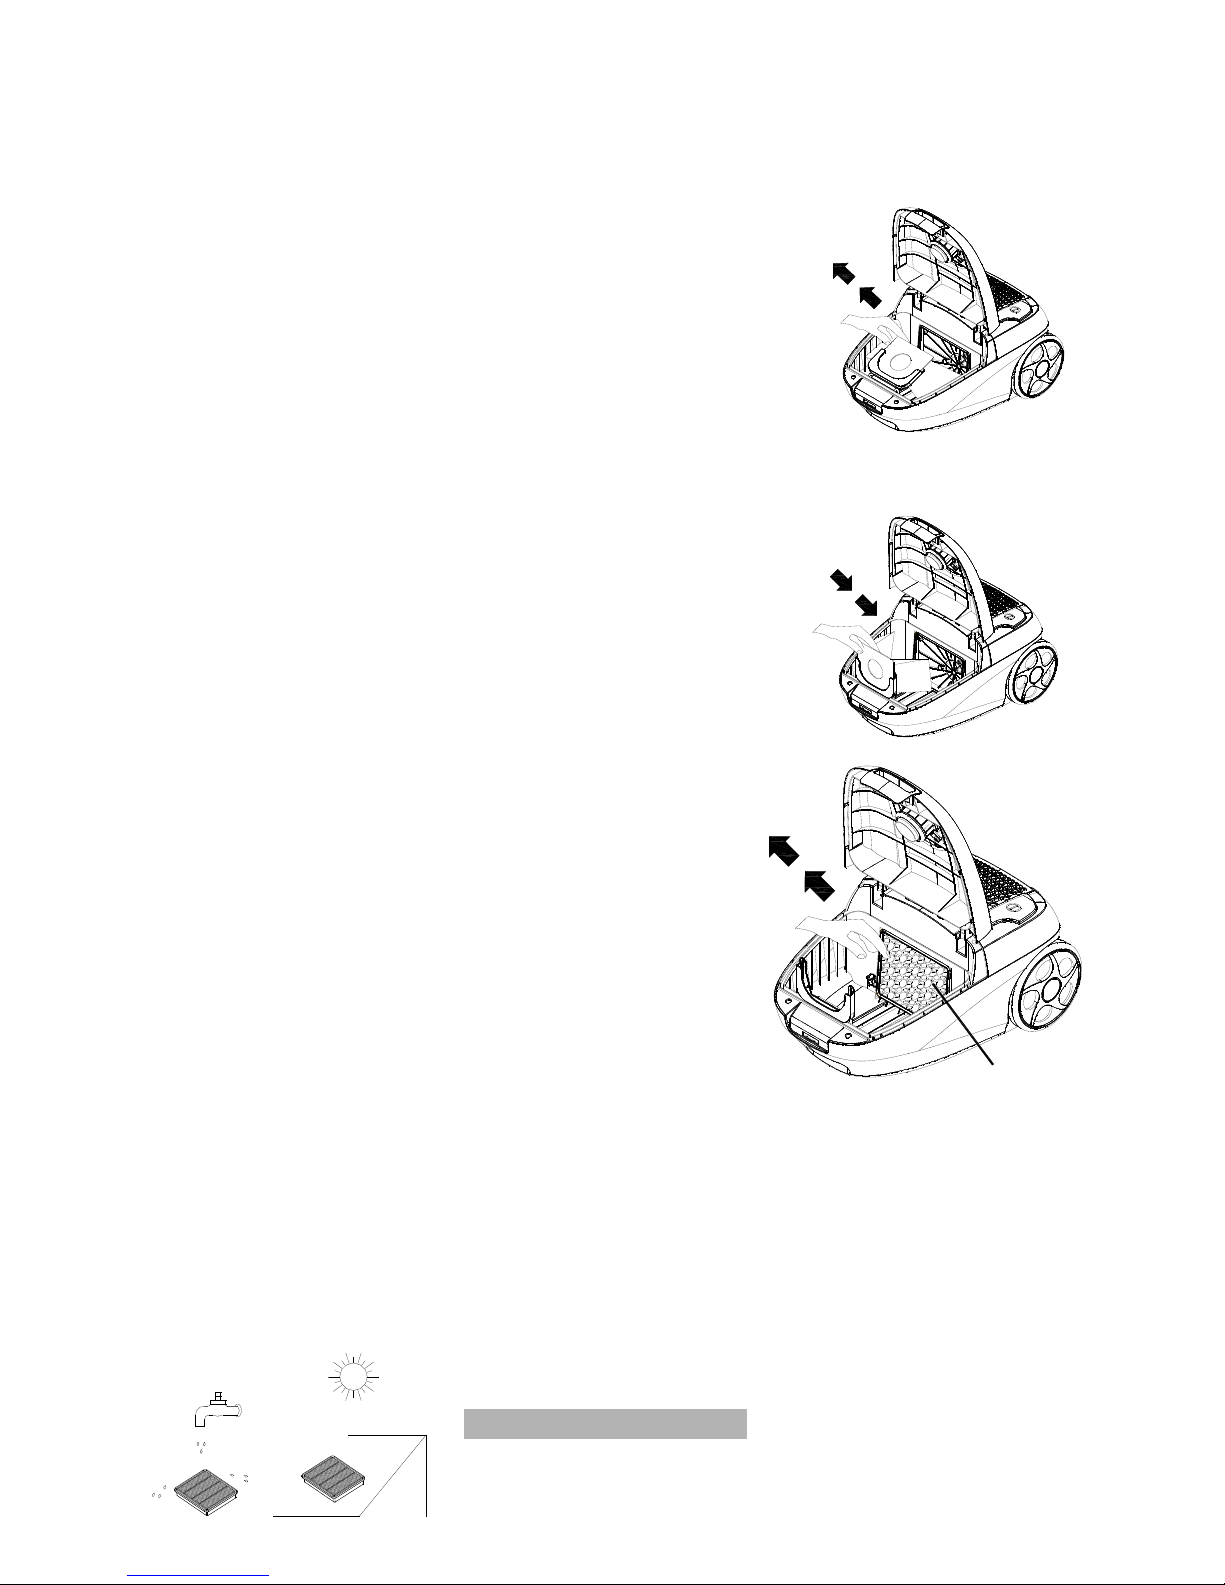
1. Turn off and unplug cleaner.
2. Remove the hose, open bag cover by pushing
latch up with fingers and lifting bag cover.
3. Grasp the millboard at the top of the dust bag and
carefully remove the bag from the vacuum cleaner.
4. Throw the bag in the trash bin. Make sure that there are no holes in it.
5. Insert a new dust bag in the vacuum cleaner.
The vacuum cleaner must never be used without a dust bag.
6. Close the vacuum cleaner again.
7. For best performance replace the bag after sweeping up large quantities
of fine material such as fine sand, cement, drywall dust, etc.
Cleaning the motor filter
1. The motor filter can be found in the dust bag container.
It protects the motor from dust and should be cleaned
at least twice a year, when it is dirty, or if suction force is reduced.
2. Pull the filter holder up out of the vacuum cleaner.
3. Open the filter holder, and remove the filter. Rinse the filter in tepid
water, and allow it to dry completely. Do not use a hair dryer or
anything similar to dry the filter
4. Return the filter to the holder, and snap the filter holder back in
place.
IMPORTANT! Never use the vacuum cleaner without a motor filter.
Cleaning & Washing the exhaust HEPA air filter
The exhaust HEPA air filter cleans the air a final time before it leaves the vacuum cleaner. You can clean the
exhaust HEPA air filter as follows:
1. Switch off the vacuum cleaner and disconnect the plug from the wall outlet.
2. Open the exhaust air grill (this is at the rear of the cyclone vacuum cleaner).
3. The exhaust air filter is visible when the grill has been opened.
4. Rinse the filter under cold running water and allow to dry.
5. Put the exhaust air filter back into place (or replace with a new one) and place in the grill.
6. Close the exhaust air filter grill.
Transport and Storage
MotorFilter

- 9 -
1. You can lift and carry the vacuum cleaner using the carrying handle. Never pull or lift the vacuum cleaner
by the cord.
2. Before putting the vacuum away, rewind the cord. Switch off the socket, unplug, and press the cord rewind
button until the cord is fully rewound.
3. To save space, the vacuum can be stored upright on its end cover. The telescopic tube can be hung on the
vacuum cleaner by inserting the parking fixture into the vertical parking holder.
Cleaning
Clean the vacuum cleaner by wiping it with a damp cloth.
You must not use any form of strong, solvent or abrasive cleaning agent.
Technical Data
Motor Size
12 AMPS
Hose Length
5.5 feet
Rated frequency
60Hz 120V
Cord Length
23 feet
Power
70 CFM
Color
White
Reservoir volume
5.3 Gallons
Noise
≤75dB
Unit Dimensions
19 x 13 x 9 Canister
ONE (1) YEAR LIMITED WARRANTY
GV warrants this product free from defects in material and workmanship for a period of one (1)
year from the date of the original purchase, when utilized for normal household use, subject to
the following conditions, exclusions, and exceptions:
If your appliance fails to operate properly while in use under normal household conditions within
the warranty period, please contact your authorized GV dealer you purchased the unit from.
You may also contact GV at the address below. Non-durable parts including, without limitation,
filters, accessories, brushes, belts, and electrical parts, which normally require replacement, are
specifically excluded from warranty.
This warranty is limited solely to the cost of the repair or replacement of the unit at our option.
This warranty does not cover normal wear of parts and does not apply to any unit that has been
tampered (by unauthorized user) with or used for commercial purposes. This limited warranty
does not cover damage caused by shipping damage, misuse, abuse, negligent handling, or
damage due to faulty packaging or mishandling in transit.
This warranty is extended to the original purchaser of the unit only and is not transferable.
*IMPORTANT: Before sending unit back for warranty work, contact your authorized GV
retailer you bought the unit from first. Unauthorized warranty claims may be sent back.
Authorized Warranty claims: GV shall be responsible for all parts and labor and the
customer shall be responsible for all shipping charges to and from the GV service center.
We are constantly striving to improve our products. Therefore, the specifications contained
herein are subject to change without notice.
GV
8498 S. Welby Farm Rd
West Jordan, UT 84088

- 10 -
For your records:
Please record your Model Number: ___________________
Please record your Purchase Date: ___________________
Note: Please keep your original sales receipt. It provides proof of purchase date in the
event of a warranty claim.
GV………..We Know Clean!
Table of contents
Other GV Vacuum Cleaner manuals