GVM GVM-8RS User manual

书本形式,封面内页留白
90.00 mm
GVM-8RS
TAB
ON
OFF
130.00 mm

C O N T E N T S
Product introduction Page 1-------------------------------------------
Disclaimers Page 1--------------------------------------------------------
Product parameter Page 2---------------------------------------------
Product structure analysis Page 3------------------------------------
Installation method Page 4~6-----------------------------------------
Description of product control keys Page 6-----------------------
Function & instruction for using Page 7-----------------------------
Use and preservation Page 8------------------------------------------
Simpie faults and troubleshooting Page 8-------------------------
Packing list Page 9--------------------------------------------------------
Precautions Page 9-------------------------------------------------------

1
PRODUCT
INTRODUCTION
We believe that once using our product correctly, you can make huge progress
when shooting. Before using the product, you are strongly recommended to
read the instructions below carefully.
The main features of the product are:
③ 8 kinds of scene lights can be simulated: lightning, police car, candlelight, TV,
broken light bulb, party, Disco, paparazzi.
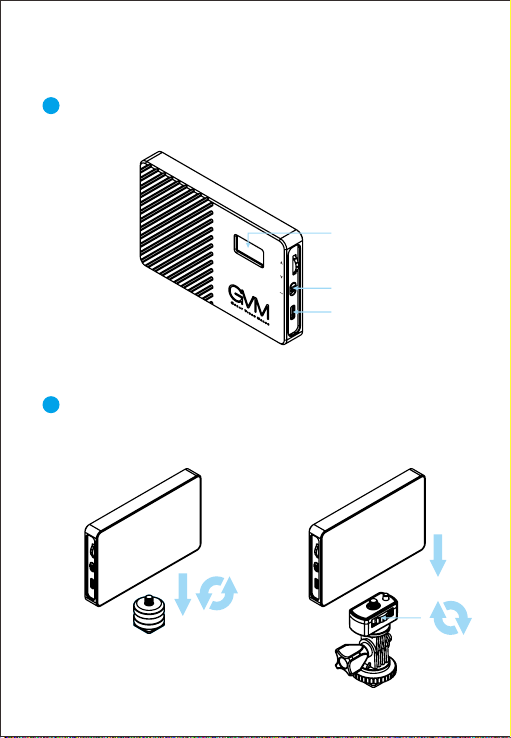
② With electronic display and stable system. Small size and light weight, it can
be hand-held to customize control to fill light, and it is easy to carry. Let you
shoot the results you want easily.
① Infinitely adjustable RGB color and dual color temperature characteristics,
brightness / color temperature / RGB hue / color purity. It can be controlled
at will, the color temperature range is 2700~7500K. Having 60 LED beads
help to restore and enrich the colors of objects, to provide you with natural
and vivid shooting effects.
Welcome to “GVM-8RS”. This product is specially designed for senior photography
enthusiasts. The product is suitable for live / outdoor / studio photography, and
also for YouTube video shooting.
1.
DISCLAIMERS
Before using this product, please read the instructions carefully and make
sure use the product correctly. If you don't obey the instructions and
warnings, you maybe cause harm to yourself and the people around, or
even damage the product and other things around.
2. Once you use this product, you are deemed to have read the disclaimer
and warning carefully, understand and acknowledge all the terms and
contents of this statement, and promise to take full responsibility for the
use of this product and possible consequences.

2
PRODUCT
PARAMETER
Brand: GVM
Product Name: Photography Light
Product model: GVM-8RS
Product Type: Photography fill light
Number of lamp beads: 60
Product net weight: 160g
Product size (mm): 116*72*16mm
Heat dissipation: self-heating
Product material: aluminum alloy
Function/Features: High CRI, RGB light, Aluminum alloy shell, scene light
Color rendering index: ≥97
Color temperature: 2700~7500K
Brightness: 1060lux/0.5m, 225lux/1m
HUE: 0°~360°
SAT: 0%~100%
Light adjustment method: stepless dimming
Power: 8W
Charging voltage: DC 5V
Charging cable: Type-c charging cable (standard)
Charger: None
Place of Origin: China. Huizhou

3
TAB
ON
OFF
Compound knob
button
Switch button
OLED display
Charging port
1/4 screw hole
1/4 screw hole
PRODUCT
STRUCTURE ANALYSIS

4
2
TAB
ON
OFF
Switch button
OLED display
Charging port
You can choose to install the supplied hot shoe bracket or small pan-tilt
according to your needs. The installation steps are as follows:
Hot shoe bracket installation steps small pan-tilt installation steps
1Fully charge the lamp firstly (charger current>2A), and the screen can
display the battery level after power on.
INSTALLATION METHOD

5
3
Hot shoe bracket installation steps
Small pan-tilt installation steps
Install it on the camera as shown below

6
4Loosen the angle locking knob of
the small pan-tilt, you can adjust
the angle of the small pan-tilt, and
tighten the angle locking knob after
adjusting the angle.
1
2
3
4
Charging port: connect the charging
cable to charge the lamp
Switch button: dial up to turn on, dial
down to turn off
Electronic display: display the current
information of the photography light.
Compound knob: Long press this
knob to switch the light mode;short
press this knob to select the light
parameter;turn this knob to adjust
the currently selected light parameter.
DESCRIPTION OF
PRODUCT CONTROL KEYS
1
2
4
3

7
② Adjust brightness (BRG): Range 0%~100%
Long press the compound knob to switch modes. Modes include:
CCT, HSI, SCENE
CCT(dual color temperature mode): Adjustable brightness, color temperature
① Mode selection:
SCENE(scene light mode): Adjustable scene light, there are 8 kinds of scene light:
Lightning, Cop Car, Candle, TV, Bad Bulb, Party, Disco, Paparazzi.
There is brightness adjustment in any mode. Long press the compound knob
button to switch to the desired mode → short press the compound knob button
to select BRG → turn the compound knob button to adjust the brightness.
③ Adjust color temperature (CCT): Range 2700~7500K
Long press the composite knob button to switch to CCT mode short press →
the composite knob button to select CCT turn the composite knob button to →
adjust the color temperature.
④ Adjust hue (HUE): Range 0°~360°
Long press the compound knob button to switch to HSI mode short press the →
compound knob button to select HUE turn the compound knob button to adjust →
the hue.
⑤ Adjustable color purity (SAT): Range 0%~100%
Long press the composite knob to switch to HSI mode short press the composite →
knob to select SAT turn the composite knob to adjust the color purity. →
HSI(RGB color light mode): Adjustable brightness, hue, color purity
FUNCTION & INSTRUCTION
FOR USING
⑥ Adjust the scene mode (SCENE):
Long press the compound knob button to switch to SCENE mode short press →
the compound knob button to select MOD turn the compound knob button to →
switch scenes short press the compound knob button to select the parameter →
to be adjusted rotate the compound knob button to adjust the currently →
selected parameter.

8
USE AND PRESERVATION
Clean : Please do not clean during charging. And use wet cloth rather than any
detergent or soluble liquid, avoiding damaging the surface layer.
Repairing : If there is fault or performance degradation, do not unpack the shell
by yourself, avoiding damage the machine and lose the right of maintenance.
When there is a fault, do not hesitate to contact us, and we will do our best to
deal with the problem.
Accessories : Please use the accessories provided by manufacturer and
approved ones, in order to maximize the performance.
Guarantee : Do does not modify the product, or you will lose the right of
maintenance.
Power : Ensure that the power supply is within the required range of use, too
high or too low will affect the work. The built-in battery is not removable.
Do not put the product in a highly humid, strong electromagnetic field, direct
sunlight, high-temperature environment. If not use the product for a long time,
disconnect the power.
Light indicator
does not light
up.
Check if the battery is out of
power. Use the light after charging it.
Color cannot be
adjusted
Check whether the color purity
SAT value is too low or 0; the
color purity value is 100, the
color difference is the most
obvious.
Increase the color purity SAT
value in HSI mode
Phenomenon Check the product Troubleshooting
SIMPIE FAULTS
AND TROUBLESHOOTING

9
1
Charging Cable
N a m e
Q u a n t i t y
N o t e s
1
1
1
1
GVM-
8RS
Photography
Light
PACKING LIST
Hot Shoe
Bracket
Small Pan-tilt
User Manual
PRECAUTIONS
①Please use the matching power adapter or lithium battery with the same
specification to power the product. Do not use power adapter with different
output voltage parameters.
The product is not waterproof, please use it in rainproof environment.②
The product is not anti-corrosion, therefore do not let the product touch any
corrosive liquid.
③
When using the product, make sure the product is put firmly and prevent
from falling and damage.
④
If the product will not be used for a long time, please switch off the power
to reduce energy loss.
⑤

FacebookGVM Official
website
Web: www.gvmled.com
B&H Email: bh@gvmled.com
GVM Email: support@gvmled.com
Amazon Email: amazonsupport@gvmled.com
Warehouse Add: 4301 N Delaware ave, unit D. PHILADELPHIA, PA19137, USA
封底
Table of contents
Other GVM Camera Accessories manuals
Popular Camera Accessories manuals by other brands

Gardena
Gardena PBA 18V/36 P4A Operator's manual

Axler
Axler FCS-1428 quick start guide

Zhiyun
Zhiyun Crane-M user guide

Photogenic Professional Lighting
Photogenic Professional Lighting AKC160 Operator's manual

Expion360
Expion360 EX-360XDP-C user manual

Bioenno Power
Bioenno Power BLF-2450AS quick start guide