HAEGER FC-563.004A User manual

Ceiling Fan / Ventoinha de Teto
Ventilador de Techo / Ventilateur de Plafond
HELI FAN
FC-563.004A
User instructions / Instruções de uso
Instrucciones de uso / Mode d’emploi
RoHS


GB
Instructions for use 1
Dear costumer
Thank you for having chosen a HÆGER product.
The HÆGER products have been produced to think about the welfare of the
consumer privileging the most raised standards of quality, functionality and
assign. We are sure you will be happy with this appliance.
We assume that the user is familiar with the common procedures of handling
household appliances.
Before using the appliance for the first time please read carefully and thoroughly
through these operating instructions and the safety advice, completely
familiarising yourself with the appliance. Retain these instructions for future
reference and pass them on to whoever might acquire the appliance at a future
date.
General Safety Rules
To ensure the success of the Ceiling Fan’s Installation, be sure to read the
following general safety rules before beginning.
•The Ceiling Fan installation should be carried out by a qualified
electrician.
•To ensure a correct installation, be sure to read the instructions and re-
view the diagrams thoroughly before commencement.
•All electrical connections must be carried out in accordance with
local codes and regulations, or the national Electrical Code. If you are
unfamiliar with the installation of electrical wiring, secure the services
of a qualified electrician.
•Before connecting the device, ensure that electrical supply and
frequency coincides with the technical dates indicated in technical
plate. This apparatus must be earthed.
•The method of disconnection from the mains supply must incorporate
a switch or isolator with a minimum contact separation of 3 mm on all
poles.
•Make sure that when the fan is fitted in the chosen position there is not
possibility of the rotating blades coming into contact with any object.
Blades should be at least 2.30 m from floor and 1m form the walls when
fan is hung.

English
2 Instructions for use
•Before beginning, disconnect power by removing fuse or turning off
circuit breaker.
•Once fan installation is completed make sure that all connections are
secure to prevent fan from falling.
•Do not insert anything into the fan blades when ceiling fan is
operating.
•Fan must be turned off and stopped before reversing fan direction.
•Check that the means of fitting the fan to the ceiling is capable of
supporting the weight of the fan when in operation. (Minimum 4 times
the weight of the fan).
•If the supply cord is damaged it must be repaired by the Authorized
Service Agent.
•This appliance must be installed following the national regulations for
electrical installations.
•This product is designed only for use in habitable zones (and not for
sites constantly exposed to moisture).
•Do not install the ceiling fan in a bathroom or a site with high moisture
content.
•Do not immerse the appliance in water or other liquid.
IMPORTANT NOTE: The warnings, safeguards and instructions given in this
manual are not exhaustive and do not necessarily cover all eventualities.
It must be understood that common sense, caution and care are factors
which cannot be built into any product. These factors must be supplied
by the person(s) caring for and operating the unit.
Children and Frail Individuals
•In order to ensure your children’s safety, please keep all packaging
(plastic bags, boxes, polystyrene etc.) out of their reach.
•Caution! Do not allow small children to play with the foil as there is a
danger of suffocation!
•The appliance may be used by children 8 years or older
and by persons with reduced physical or mental
capabilities, if they are under supervision or if they have
been instructed in the use of the appliance in a safe
manner and understand the potential risks. Children must

English
Instructions for use 3
not carry out cleaning and maintenance of the appliance,
unless they are 8 years or older and under supervision.
Children younger than 8 years have to be kept away from
the appliance and its power supply.
•Children should be supervised at all times in order to ensure that they
do not play with the device.
Overview of the appliance
A. Motor housing
B. Metal blades
C. Security bolt
D. Security blade bolt
E. Lower canopy
F. Downrod
G. Canopy screws
H. Upper canopy
I. Support hook plate
J. Electric wires
K. Electric box
L. Wall control
Installation Instructions
•Free the product from packaging, taking care not to leave its elements
(plastic bags, polystyrene, etc...) within reach of children, as they are
potential sources of danger.
•Make sure the appliance is complete. If you notice visible damage to the
unit, the power cord or the power plug does not use it but take care to have
it checked by authorized personnel.
•Use the product only as described in this manual. Any other type use is not
recommended and may result in fire, electric shock or injury to persons.
•This product is intended for household use only. It should not be used for
professional or industrial use. The manufacturer is not liable for any damage
caused by improper use.
Preliminary Operations
•Find an appropriate location for the fan.
•The fan must be installed by an electrical installation’s expert.
•Consult a qualified electrician if in doubt about installation of the product.
•During the installation process you need the help of a second person
supporting the fan.

English
4 Instructions for use
Security Measures
•Do not install the fan in damp rooms (bathrooms etc.)
•Use the product only in inhabited areas not subject to moisture.
•Do not fix the unit to wet surfaces (painted) or metal surfaces that can
conduct electricity.
•The location of appliance must allow a secure connection to the power
supply.
•For fixing only screws must be used (do not use wire or other materials).
•Keep a minimum distance of 2.3 meters between floor
and ceiling fan and 1 meters of the walls.
•The electrical system must comply with local regulations.
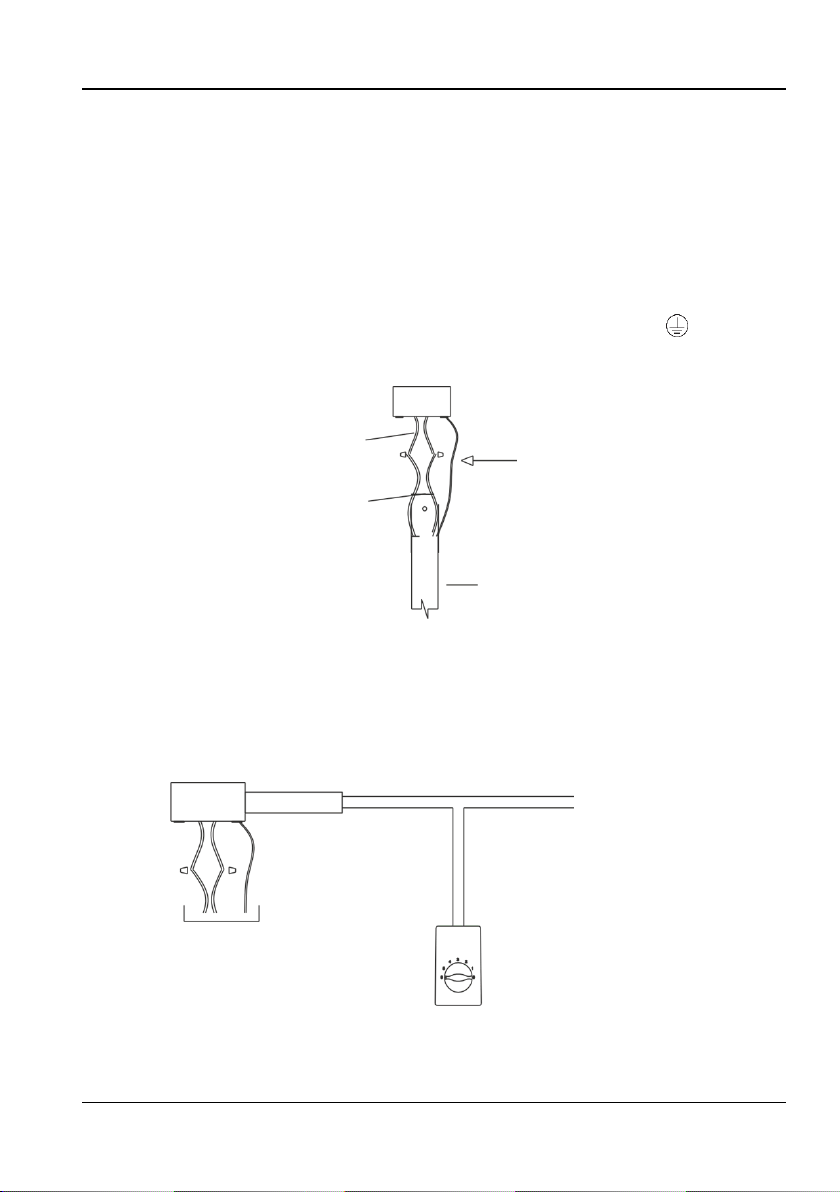
•To avoid the risk of electric shock, connect the grounding fan appropriately.
•Be careful when working in the vicinity of the fan blades in operation.
•IMPORTANT. During installation and maintenance of the appliance switch
off main power. It is not enough merely to turn off the switch.
•Ensure that there are no current pipes or wires behind the mounting points.
Steps to follow for assembly and installation of fan
1. Turn off power at fuse box to avoid possible electrical shock.
2. Install the mounting bracket (hook) to
the ceiling, using the screws provided
and taking all the safety measures
mentioned above. The mounting plate
should be able to hold a weight of at
least 20.8kg.
NOTE - Proper care must be taken when
mounting to concrete ceilings. For safe
mounting, these ceilings may require
stronger screws and plastic plugs or
anchors than supplied with the product.
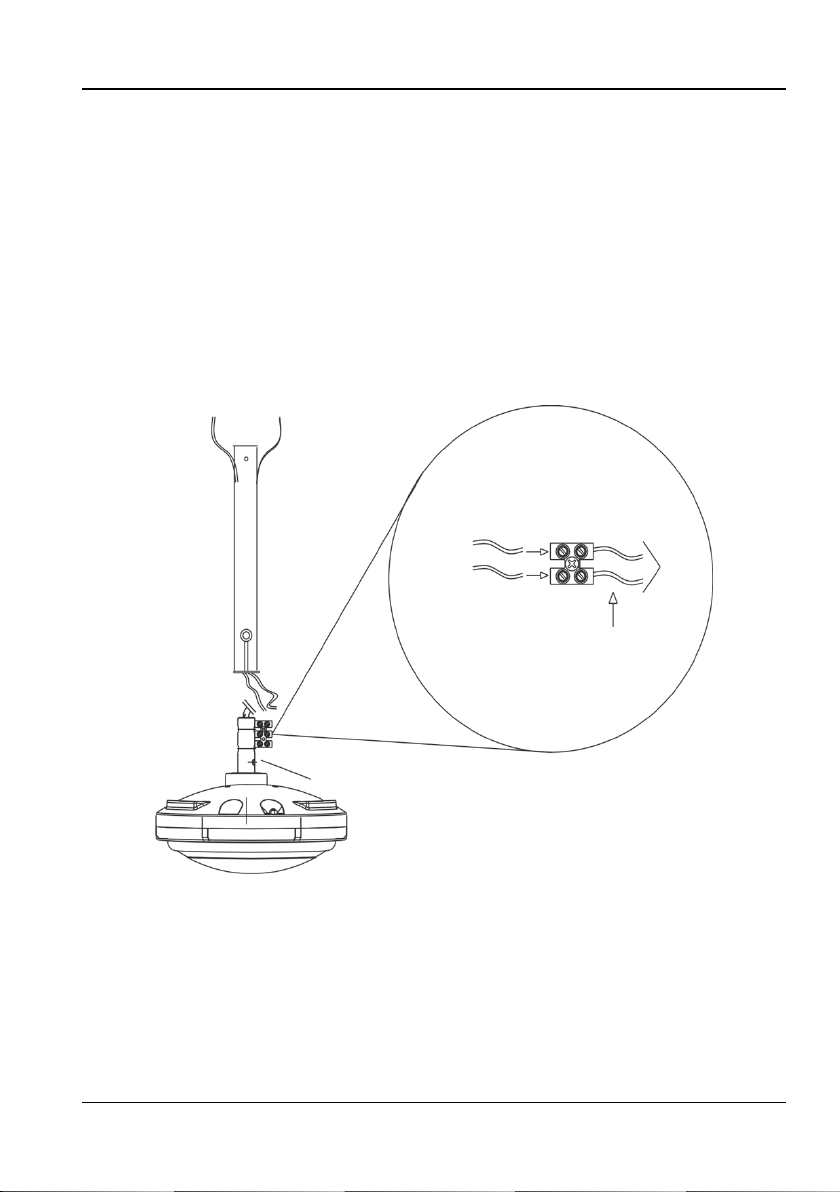
3. Procedure to install fan mounting rod:
a) Insert the upper and lower canopy
into the mounting rod before starting
the motor assembly(a), since these
serve to cover the electrical
connections. Insert the electrical
cables through the hallow shaft. The wires are inserted from the bottom
to top.

English
Instructions for use 5
b) Insert the lower end of the mounting rod(b) into the motor yoke(d),
aligning the holes in the rod with those in the yoke.
c) Pass the safety screw(c) through the hole.
d) Insert the flat washer(e), followed by the pressure washer(f) and the
hexagonal nut(h).
e) Fix the nut, making sure it is tight.
f) Finally, secure the connection with the safety pin (g) by placing it through
the safety screw.
g) Make the electrical connection on the terminal that is in the yoke of the
motor and tighten the screws.
h) Once finished, hang your fan on the mounting plate hook and make the
electrical connection on the main terminal.
i) Check that the wires are free and housed in the correct way and position
the top cap near the support plate. Tighten the screw properly.
WARNING: Be careful not to damage the cables with the safety screw when
going through the holes.
Connection toward
electric motor
Insert the mounting rod
cables in the terminal

English
6 Instructions for use
WARNING: If you do not install and tighten the safety screw, washers, nut and
safety pin correctly, there is a risk that the fan will fall.
Electrical connections
Carry out electrical connections according to the diagram shown and described
below.
- BROWN wire “LIVE”: motor phase
- BLUE wire “NEUTRAL”: common neutral for motor
- GREEN / YELLOW wire: Grounding, corresponding to the symbol .
NOTE: The colour of cables in the electrical installation may vary.
Install the 5-speed wall control
Connect the wires to the fan and those coming from the ceiling with terminal
block according to the wiring diagrams provided below: the fan is controlled by
wall control switch.
Mounting rod
Green (Earth) in case of
not having this cable in
your electrical installation,
connect to electrical box.
Brown (Live)
Blue (Neutral)
Wall Control
Power supply
Live
Neutral
Connection
to fan

English
Instructions for use 7
Blade Installation
The screws for installing the fan blades have already been screwed into the
motor housing. Unscrew them and remove them from the motor housing. Take
a fan blade and screw it to the motor housing using the two screws. Repeat the
process for the other two fan blades
IMPORTANT: Be careful not to support yourself on the fan blades, as these could
then become unbalanced and cause vibration or shaking of the fan.
Operating mode
The fan is equipped with a wall-mounted speed regulator which works by rotating
the knob to select from OFF to max rotation. Switch it in a clockwise or anti-
clockwise direction.
The speed regulator has six positions:
POS
FUNCTION
POS
FUNCTION
0
OFF
1
Low speed
2
Low Medium speed
3
Medium speed
4
High Medium speed
5
High speed
Wall Control
Electric
Motor
Line (brown)
Neutral (blue)
Earth
Green/yellow
Red
Capacitor
White
Black
Terminals
b)
a)
c)
Metal blade

English
8 Instructions for use
Maintenance
1. The fan‘s natural movement can cause certain connections to loosen.
Check mounting connections, fastening parts, and blade accessories twice
a year. Check that they are well fastened.
1. Clean the fan periodically to help maintain its new appearance. Do not use
water to clean it, as this may damage the motor or the wood, or could
cause electrical shock.
2. Use only a soft brush or microfiber cloth as to not scratch the finish. The
veneer is sealed with a layer of lacquer to minimize discoloration or loss of
shine.
3. It is not necessary to oil the fan. The motor contains bearings with permanent
lubrication.
Important: Make sure there is no electrical power before starting to perform the
indicated maintenance.
Trouble shooting guide
The fan does not start
1. Check the fuses and circuit breakers.
2. Review the connections of the terminal block according to the indications
in the installation.Ensure the power is off before doing this.
3. Make sure that the sliding switch is firmly in the position of up or down. The
ventilator does not work when the button is in the middle.
4. Make sure that the stabilizing tongue-pieces of the motor are off.
5. Finally, if the fan will not start call an electrician do not attempt to touch the
internal parts.
The fan is noisy
1. Check that the screws in the motor casing are attached correctly.
2. Check that the screws fastening the blade brackets to the engine block are
properly tightened.
3. If using an optional light fitting, ensure the glass is properly fitted and / or the
screws holding the glass are firm.
4. If a solid-state speed control has been fitted this can cause noises in the
motor do not use these controls.
5. Allow at least 24 hours for the fan to settle, as many noises will go away. Each
blade set is weighed and is a complete set, if installing more than one fan
do not mix the blades as this can cause wobble.

English
Instructions for use 9
The fan oscillates
1. Check the blades are securely fastened to the holders.
2. Check the blade holders are tight on the motor.
3. Ensure the mounting bracket is properly screws to the ceiling.
4. Most fan oscillation problems are caused by uneven blade levels. Check this
level by choosing a point on the ceiling above the end of one of the blades.
Measure this distance. Keeping the measurement within 3mm, rotate the
fan until the next blade is positioned for measurement. Repeat for each
blade. To set a blade end down, insert a washer (not supplied) between the
blade and the blade holder to the screw closest to the motor. To adjust one
blade, end up, insert a washer (not supplied) between the blade and the
blade holder to the two screws farthest from the motor.
5. If the blade oscillations are still visible, exchange two adjacent blades to
redistribute the weight and possibly cause smooth operation.
Technical Data
Models:........................................................... FC-563.004A
Rated voltage range:.................................... 220-240V~50Hz
Rated power:................................................. 70W
Motor insulation class:.................................... E (120˚ C)
Protection index:............................................ IP20
Recommended surface area: ...................... 18~20 m2
Motor net weight: .......................................... 2.4kg
Blade size: ...................................................... 610 x 123 x 0.9mm
Running in 5 speed: ....................................... 135 / 170 / 200 / 240 / 300 rpm
Fan sound power level: ................................. 58.1 dB(A)
Maximum fan flow rate: ................................ 217.62 m3/min
Service value: ................................................ 3.51 (m3/min)/W
Maximum air velocity: ................................... 3.45 meters/sec
Measurement standard for service value:.... IEC60879:1986+ (corr.1992)
Declaration of Conformity
This product has been tested and produced according to all relevant current CE
guidelines, such as:
-electromagnetic compatibility Directive 2014/30/EU,
-Low voltage Directive (LVD) Directive 2014/35/EU,
-RoHS with its amendments Directive 2011/65/EU,
and has been constructed in accordance with the latest safety regulations.
The CE mark attests this product with all relevant directives.

English
10 Instructions for use
Disposal –Environment policy
This appliance is marked according to the European directive 2012/19/EU on
Waste Electrical and Electronic Equipment (WEEE).
By ensuring this product is disposed of correctly, you will help prevent potential
negative consequences for the environment and human health, which could
otherwise be caused by inappropriate waste handling of this product.
This symbol on the product, or on the documents accompanying the
product, indicates that this appliance may not be treated as household
waste. Instead it shall be handed over to the applicable collection point
for the recycling of electrical and electronic equipment.
Disposal must be carried out in accordance with local environmental regulations
for waste disposal. For more detailed information about treatment, recovery and
recycling of this product, please contact your local city office, your household
waste disposal service or the shop where you purchased the product.
Guarantee
This unit is covered by a 24 months (*) warranty, from the purchase date, and
covers the repair free of charges of the damaged due to the manufacturer fault
or defected components. The distributor reserves the right to change the unit for
an equivalent model.
The warranty does not cover any damaged caused by incorrect use, lightning,
incorrect installation, external factors or any intentional damaged. The warranty
does not cover damage thus attributable to falls, blows, spill, exposure to extreme
environmental conditions or deterioration caused by normal use of plastic parts
or keyboards, as well as by the use of batteries other than those specified in this
manual.
For the repairing, during the warranty period, the unit shall be sent to the
distributor or reseller, or to the address indicated by them, and must be jointed
the warranty certificated and the respective original invoice or selling ticket,
where the buying date is expressed indicated.
The consumer is protected by the guarantee provided by Directive 1999/44/CE
of European Parliament and Council of 25 May.
(*) Only for European Union countries

PT
Manual de Instruções 11
Estimado Cliente
Obrigado por ter escolhido um produto HÆGER.
Os produtos HÆGER foram concebidos a pensar no bem-estar do consumidor,
privilegiando os mais elevados padrões de qualidade, funcionalidade e designe.
Estamos certos da sua satisfação pela aquisição deste produto.
Partimos do princípio que o utilizador possui conhecimentos gerais sobre o
manuseamento com eletrodomésticos.
Antes da primeira utilização, leia cuidadosa e totalmente estas instruções de
utilização e de segurança e familiarize-se com as funções do aparelho. Guarde
estas instruções e, se necessário, entregue-as a terceiros.
Normas gerais de segurança
Para uma instalação segura do seu ventilador de teto, leia as seguintes
normas de segurança antes de iniciar a instalação.
•A instalação do ventilador deve ser executada por um técnico
qualificado.
•Para assegurar uma instalação perfeita, leia o manual de instruções
e estude os diagramas antes de iniciar a instalação.
•Todas as ligações elétricas devem conferir as normas locais e
nacionais vigentes. Se não está familiarizado com as instalações
elétricas solicite os serviços de um técnico qualificado.
•É imprescindível comprovar que as características elétricas
(voltagem, intensidade da corrente e a frequência) que constam na
placa do motor são compatíveis com as da instalação. Este aparelho
deve ser ligado à terra.
•O método de desligamento da rede elétrica deve incorporar um
interruptor ou disjuntor com uma separação de contactos mínima de
3 mm em todos os polos.
•Assegure-se que o local da instalação deixa a rotação da hélice do
ventilador livre. As pás devem estar a pelo menos 2,30mts do solo e
1m das paredes.
•Antes de começar a instalação desligue a energia elétrica
removendo o fusível ou desligando o disjuntor elétrico.
•Depois de instalar o ventilador, certifique-se que todas as fixações
estão corretas para evitar uma queda do ventilador.

Português
12 Manual de Instruções
•Nunca introduza quaisquer objetos entre as pás enquanto o
ventilador está em movimento.
•O ventilador deve estar desligado e parado antes de trocar a
direção da rotação.
•Comprove que o ponto de fixação do aparelho é capaz de suportar
o peso do ventilador em movimento (no mínimo 4 vezes o peso do
ventilador).
•Se o cabo de ligação estiver danificado recorra a um serviço técnico
autorizado.
•O aparelho deve ser instalado de acordo com a regulamentação
nacional para instalações elétricas.
•Este produto é destinado somente para uso em zonas habitáveis (e
não para locais constantemente expostos à humidade).
•Não instale o ventilador de teto em um banheiro ou um local com
alto teor de humidade.
•Não mergulhe o aparelho em água ou outro líquido.
NOTA IMPORTANTE: as advertências, salvaguardas e instruções dadas
neste manual não são exaustivas e não abrangem necessariamente
todas as eventualidades. Deve ser entendido que o senso comum,
cautela e cuidado são fatores que não podem ser incorporados em
qualquer produto. Esses fatores devem ser fornecidos pela (s) pessoa (s)
que mantêm e operam o ventilador.
Crianças e pessoas débeis
•Para a segurança dos seus filhos, não deixe partes da embalagem
(sacos plásticos, papelão, esferovite, etc.) ao alcance dos mesmos.
•Aviso! Não deixe crianças pequenas brincarem com folhas de
plástico. Perigo de asfixia!
•O aparelho pode ser usado por crianças de 8 ou mais
anos de idade e pessoas com reduzida capacidade física
ou mental, se estiverem sob supervisão ou se foram
instruídos sobre o uso do aparelho de forma segura e
entenderem os riscos potenciais. As crianças não devem
realizar trabalhos de limpeza e manutenção do aparelho,
a menos que tenham oito ou mais anos de idade e
estejam sob supervisão. Crianças menores de 8 anos

Português
Manual de Instruções 13
devem ser mantidas longe do aparelho e da sua fonte de
alimentação.
•As crianças devem ser vigiadas para evitar que brinquem com o
aparelho.
Elementos do aparelho
A. Caixa do motor
B. Pás metálicas
C. Parafuso de segurança
D. Parafuso de segurança da pá
E. Cobertura inferior
F. Barra de extensão (haste)
G. Parafusos da cobertura
H. Cobertura superior
I. Placa de suporte
J. Fios elétricos
K. Caixa elétrica
L. Controlo de parede
Instruções de Instalação
•Retire o produto da respetiva embalagem, tomando cuidado para não
deixar os elementos da embalagem (sacos de plástico, esferovites, etc.) ao
alcance das crianças, como potenciais fontes de perigo.
•Assegure se da integridade do aparelho. Se encontrar algum dano visível
no aparelho, no cabo de alimentação ou na ficha, não o ligue sem antes
ser visto por uma pessoa qualificada.
•Use o produto somente como descrito neste manual. Qualquer uso
diferente do previsto pode causar incêndio, choque elétrico ou ferimentos
pessoais.
•Este produto é destinado ao uso doméstico. Não deve ser usado para fins
profissionais e industriais. O fabricante não se responsabiliza por quaisquer
danos causados por uso indevido.
Operações Preliminares
•Localize um local apropriado para o ventilador.
•O ventilador deve ser instalado por uma pessoa especializada em
instalações elétricas.
•Consulte um eletricista qualificado em caso de dúvida sobre a instalação
deste produto.
•Durante o processo de instalação pode ser necessária a ajuda de uma
segunda pessoa para suportar o ventilador.
Medidas de Segurança
•Não instale o ventilador em quartos húmidos (banheiros, etc.)
•Use o produto somente em áreas habitadas e que não tenham humidade.

Português
14 Manual de Instruções
•Não ligue o dispositivo a superfícies molhadas (pintadas de fresco) ou
superfícies de metal que possam conduzir eletricidade.
•A colocação do aparelho deve permitir uma ligação segura à fonte de
alimentação.
•Para a fixação devem ser usados apenas parafusos (não use arame ou
outros materiais).
•Mantenha uma distância mínima de 2,3m entre o chão
e o ventilador e de 1m das paredes.
•O sistema elétrico deve cumprir com as regulamentações locais.
•Para evitar risco de choque elétrico ligue o ventilador à terra elétrica de
forma adequada.
•Tenha cuidados redobrados ao trabalhar perto das pás quando o
ventilador está em funcionamento.
•IMPORTANTE. Durante a instalação e manutenção do aparelho mantenha
a alimentação principal desligada. Não basta desligar somente o
interruptor.
•Certifique-se que não há tubos ou fios elétricos a passarem nos pontos de
montagem.
Etapas a seguir para montagem e instalação de ventilador
1. Desligue a corrente na caixa de
disjuntores para evitar um possível
choque elétrico.
2. Instale o suporte de montagem
(gancho) no teto, usando os parafusos
fornecidos e tomando todas as medidas
de segurança mencionadas acima. A
placa de montagem tem de ser capaz
de suportar um peso mínimo de 20,8 kg
NOTA –Quando a montagem é feita em
tetos de cimento têm de ser tomados os
devidos cuidados. Para que a
montagem seja segura, estes tetos
podem exigir a utilização de parafusos
e de buchas de plástico, ou ganchos,
mais fortes que os fornecidos com o
produto.
3. Procedimento para instalar a haste de montagem do ventilador:

Português
Manual de Instruções 15
a) Insira as coberturas superior e inferior na haste de montagem antes de
iniciar a montagem do motor(a), pois elas servem para cobrir as
ligações elétricas. Insira os cabos elétricos através do veio de saliência.
Os fios são inseridos de baixo para cima.
b) Insira a haste de fixação(b) no jugo do motor(d), alinhando os furos na
haste com os do jugo.
c) Passe o parafuso de segurança(c) pelo orifício.
d) Insira a arruela lisa(e), seguida da arruela de pressão(f) e da porca
hexagonal(h).
e) Fixe a porca, certificando-se de que está bem apertada.
f) Finalmente, fixe a ligação com o pino de segurança(g) colocando-o
através do parafuso de segurança.
g) Faça as ligações elétricas no terminal que está no jugo do motor e
aperte os parafusos.
h) Uma vez terminado, pendure seu ventilador no gancho da placa de
montagem e faça a ligação elétrica no terminal principal.
i) Verifique se os fios estão livres e abrigados da maneira correta,
posicione a cobertura superior perto da placa de suporte. Aperte o
parafuso corretamente.
Ligação em direção
ao motor elétrico
Insira os cabos da haste
no terminal

Português
16 Manual de Instruções
ATENÇÃO: Tenha cuidado para não danificar os cabos com o parafuso de
segurança ao passar pelos orifícios.
ATENÇÃO: Se não instalar e apertar o parafuso de segurança, arruelas, porca
e pino de segurança corretamente, existe o risco de o ventilador cair.
Instalação elétrica do ventilador
Execute as ligações elétricas de acordo com o diagrama mostrado e descrito
abaixo.
- Fio castanho “FASE”: fase do motor
- Fio AZUL “NEUTRO”: neutro comum para motor
- Fio VERDE / AMARELO: Aterramento, correspondente ao símbolo .
NOTA: A cor dos cabos na instalação elétrica pode variar.
Instalar o controle de parede de 5 velocidades
Ligue os fios ao ventilador e aqueles que vêm do teto ao bloco de terminais
de acordo com os diagramas fornecidos abaixo. O ventilador é controlado
por um interruptor de controle de parede
Haste
Verde/Amarelo (Terra).
Caso não tenha este
cabo em sua instalação
elétrica, ligue diretamente
à caixa elétrica.
Castanho (Fase)
Azul (Neutro)
Controlo de parede
Caixa elétrica
Fase
Neutro
Ligação ao
ventilador

Português
Manual de Instruções 17
Instalação das pás
Os parafusos para instalação das pás do ventilador já foram aparafusados no
alojamento do motor. Desaperte-os e retire-os da carcaça do motor. Pegue
uma pá do ventilador e aparafuse-a ao compartimento do motor usando os
dois parafusos. Repita o processo para as outras duas pás do ventilador.
IMPORTANTE: Tenha cuidado para não se apoiar nas pás do ventilador, pois elas
podem se desequilibrar e causar vibração ou trepidação do ventilador.
Modo de Funcionamento
O ventilador é equipado com um regulador de velocidade montado na parede
que funciona girando o botão para selecionar entre OFF e rotação máxima.
Mudar no sentido horário ou anti-horário.
O regulador de velocidade tem seis posições:
POS
FUNÇÃO
POS
FUNÇÃO
0
Desligado
1
Velocidade Baixa
2
Velocidade Média baixa
3
Velocidade Média
4
Velocidade Média alta
5
Velocidade Alta
Controlo de parede
Motor
Fase
(castanho)
Neutro (azul)
Terra
Verde/amarelo
Vermelho
Condensador
Branco
Preto
Terminais
b)
a)
c)
Pá de metal

Português
18 Manual de Instruções
Manutenção
1. O movimento natural da ventoinha pode fazer com que algumas conexões
se vão soltando. Verifique as conexões de suporte, as peças de fixação e
os acessórios das pás duas vezes por ano. Certifique-se de que estão
apertadas.
2. Limpe a ventoinha regularmente para ajudar a manter a aparência nova
ao longo dos anos. Não use água para limpar a ventoinha, pois pode
danificar o motor ou a madeira e causar descargas elétricas.
3. Useapenasumaescovasuaveouumpanoquenãorisqueoacabamento.Orev
estimentoélacadoparaminimizara descoloração ou a perda de brilho.
4. Não é necessário colocar óleo na ventoinha. O motor contém rolamentos
de lubrificação permanente.
NOTA IMPORTANTE: Antes de iniciar a manutenção do ventilador, assegure-se
que este está desligado da rede elétrica.
Guia de localização de avarias
O ventilador não arranca
1. Reveja os fusíveis ou o interruptor do circuito principal e secundários.
2. Reveja as ligações do bloco de terminais, de acordo com o que se indica
na insta- lação.ATENÇÃO: Não se esqueça de cortar a eletricidade
principal.
3. Certifique-se de que o interruptor deslizante se encontra firme na posição
de cima ou de baixo. O ventilador não funciona quando o interruptor está
a meio.
4. Certifique-se de que foram retiradas as linguetas estabilizadoras do motor.
5. Se mesmo assim o ventilador não funcionar, chame um eletricista
qualificado. Não trate de reparar as ligações elétricas internas sem ter
experiência para o fazer.
O ventilador faz ruído
1. Certifique-se de que todos os parafusos da caixa do motor estão bem
apertados.
2. Certifique-se de que os parafusos que fixam o suporte da pazinha ao motor
estão apertados.
3. Se usar um conjunto de luzes opcional, certifique-se de que os parafusos
que fixam as telas de vidro estão apertados à mão. Certifique-se de que a
lâmpada está bem firme no recetáculo e de que não está a tocar na tela
de vidro. Se a vibração persistir, retire a tela e instale uma tira de borracha
Table of contents
Languages:
Other HAEGER Fan manuals

HAEGER
HAEGER Elite Tower TF-R36.005A Installation instructions

HAEGER
HAEGER Little Wind FA-012.008A User manual

HAEGER
HAEGER TF-029 003A User manual

HAEGER
HAEGER New Tornado FF-018.006A User manual

HAEGER
HAEGER Home Wind User manual

HAEGER
HAEGER SF-16W.009A User manual

HAEGER
HAEGER HF-18R 001A User manual

HAEGER
HAEGER Hover Wind FF-020.007A User manual

HAEGER
HAEGER HEXAFAN User manual

HAEGER
HAEGER SF-16W.006A User manual