HAEGER Xplorer FX-31 User manual

EN User Manual
P Manual de Utilização
Model:
X
plore
r
FX-31
PMR – 2 Way Rádio
Emissor / Receptor PMR

EN The features described in this manual are
published subject to modifications.
P As características descritas neste manual são
publicadas sob reserva de modificações.
•The CE Symbol indicates that the unit complies with
the essential requirements of the R&TTE directive.
•O símbolo CE indica que esta unidade cumpre com
os requisitos essenciais da Directiva R&TTE.
For use / Para uso em:
AT, BE, CH, CY, CZ, DE, DK, EE, GR, E, FI, FR, GB,
HU, IRL, I, LT, LU, LV, MT, NL, PL, PT, SE, SK, SI

Index
1. INTRODUCTION....................................................................1
2. INTENDED PURPOSES ..........................................................1
3. SAFETY INSTRUCTIONS........................................................1
3.1 General ..............................................................................1
3.2 Burning Injuries..................................................................1
3.3 Personal Safety..................................................................2
3.4 Poisoning Danger ..............................................................2
3.5 Legal ..................................................................................2
3.6 Notes..................................................................................3
4. INCLUDED IN PACKAGE ........................................................3
5. CLEANING AND MAINTENANCE .............................................3
6. DISPOSAL OF THE DEVICE....................................................3
7.GETTING STARTED..............................................................4
7.1 Diagram and functions.......................................................4
7.2 LCD Screen .......................................................................4
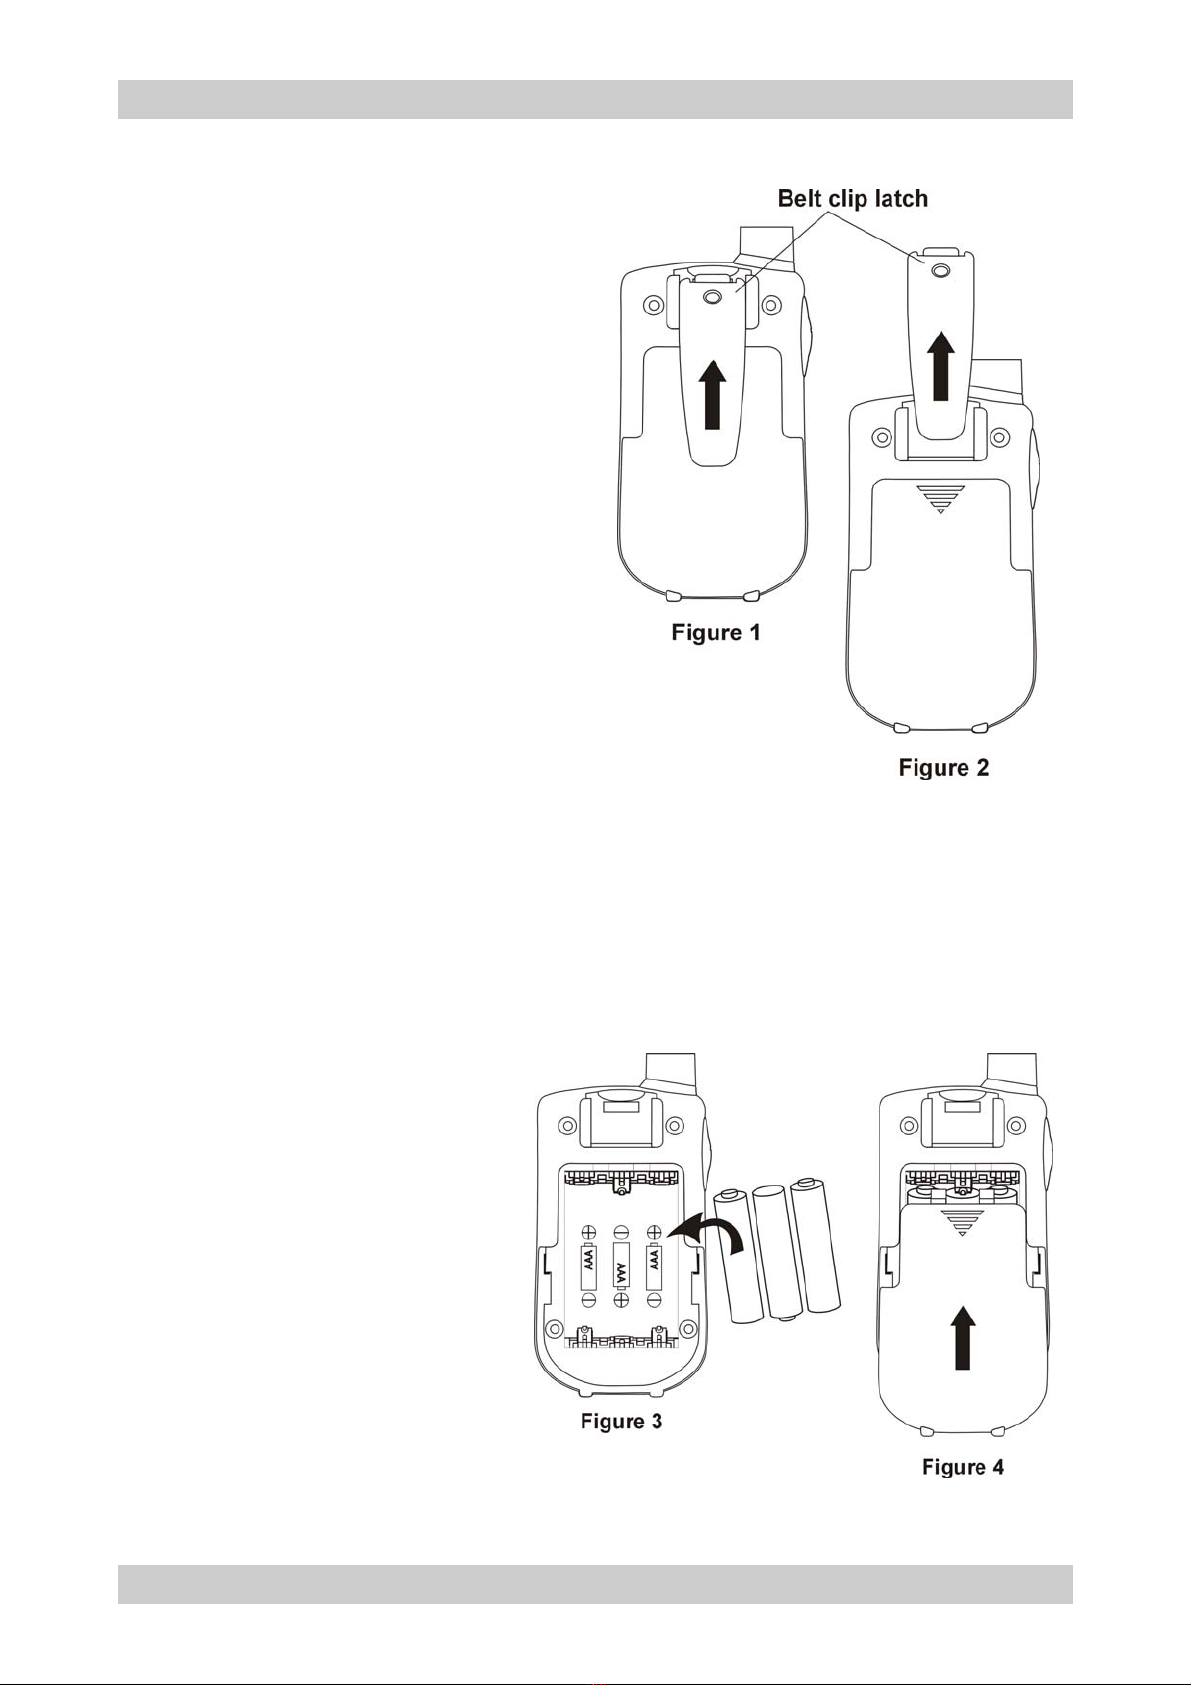
7.3 Removing Installing the Belt Clip .......................................5
7.4 Battery Installation .............................................................5
8. OPERATION ........................................................................6
8.1 Turning the Unit ON/OFF...................................................6
8.2 Transmitting (sending) .......................................................7
8.3 Receiving a Call.................................................................7
8.4 Adjusting the Speaker volume ...........................................7
8.5 Transmitting end-of-call Tone (Roger Beep)......................8
8.6 Selecting a Channels.........................................................8
8.7 Calling (Paging) Tone ........................................................8
8.8 Monitoring the current channel .........................................9
9. AUXILIARY FEATURES ..........................................................9
9.1 Power Saving.....................................................................9
9.2 Low Battery Meter Indicator...............................................9
10. SPECIFICATIONS ............................................................10
11. CHANNEL FREQUENCY TABLE.........................................10
12. WARRANTY ...................................................................10
12.1 Warranty Period...............................................................10
12.2 Warranty Handling ...........................................................10
12.3 Warranty Exclusions ........................................................11
13. CE CONFORMITY DECLARATION .....................................11

Índice
1. INTRODUÇÃO ....................................................................13
2. FINALIDADE ESPECÍFICA.....................................................13
3. INSTRUÇÕES DE SEGURANÇA.............................................13
3.1 Geral ................................................................................13
3.2 Queimaduras ...................................................................13
3.3 Segurança Pessoal..........................................................14
3.4 Perigo de Envenenamento ..............................................14
3.5 Legislação........................................................................14
3.6 Notas:...............................................................................15
4. CONTEÚDO DO PACOTE.....................................................15
5. MANUTENÇÃO E LIMPEZA...................................................15
6. ELIMINAÇÃO DO APARELHO.................................................16
7.PRIMEIROS PASSOS ..........................................................16
7.1 Diagrama e funções.........................................................16
7.2 Visor LCD.........................................................................17
7.3 Retirar/Instalar o Clipe para cinto ....................................17
7.4 Colocação das pilhas.......................................................17
8. OPERAÇÃO.......................................................................19
8.1 Ligar/Desligar a unidade..................................................19
8.2 Transmitir (enviar)............................................................19
8.3 Receber uma chamada....................................................20
8.4 Ajustar o Volume do altifalante ........................................20
8.5 Tom de fim-de-chamada (Roger Bip) ..............................20
8.6 Mudança de Canais.........................................................20
8.7 Tonalidade de Chamada (Paging)...................................21
8.8 Monitorar o canal actual..................................................21
9. FUNÇÕES AUXILIARES .......................................................21
9.1 Poupança de Energia ......................................................21
9.2 Indicador de Bateria Fraca...............................................22
10. ESPECIFICAÇÕES...........................................................22
11. TABELA DE FREQUÊNCIAS ..............................................22
12. GARANTIA ....................................................................23
12.1 Período de Garantia.........................................................23
12.2 Modo de Funcionamento da Garantia .............................23
13.3 Excluído da Garantia .......................................................23

English
1
1. INTRODUCTION
Thank you for purchasing the Xplorer FX-31.It’s a short range, low
powered radio communication device that has no running costs
other than the minimal cost of the batteries.
The Xplorer FX-31 operates on Private Mobile Radio frequencies
and can be used in any country where PMR446 frequencies are
authorised as indicated on the packing box and in this manual.
2. INTENDED PURPOSES
It can be used for different professional as well as for recreational
purposes. For example: to keep in contact during travelling with 2 or
more cars, biking, skiing. It can be used to keep in contact with your
children when they are playing outside, etc.
Restriction:
Check the local regulations before using it outside the
country where it was purchased. The standard may be
prohibited in this country.
3. SAFETY INSTRUCTIONS
3.1 General
Please read carefully through the following information
concerning safety and proper use. Make yourself familiar with all
functions of the device. Keep this manual on a safe place for future
use.
3.2 Burning Injuries
•If the cover of the antenna is damaged, do not touch because
when an antenna comes in contact with the skin, a minor burn
may result when transmitting.
•Batteries can cause property damage such as burns if
conductive material such as jewellery, keys or beaded chains
touches exposed terminals. The material may complete an
electrical circuit (short circuit) and become quite hot. Exercise
care in handling any charged battery, particularly when placing it

English
2
inside a pocket, purse or other container with metal objects. Do
not replace or charge batteries in a potentially explosive
atmosphere. Contact sparking may occur while installing or
removing batteries and cause an explosion.
3.3 Personal Safety
•Use in cars: do not place your device in the area over an air bag
or in the air bag deployment area. Air bags inflate with great
force. If a communicator is placed in the bag deployment area
and the air bag inflates, the communicator may be propelled with
great force and cause serious injury to the occupants of the
vehicle.
•Keep the radio at least 15 centimetres away from a pacemaker.
•Turn your radio OFF as soon as interference is taking place with
medical equipment.
•Do not replace batteries in a potentially explosive atmosphere.
Contact sparking may occur while installing or removing
batteries and cause an explosion.
•Turn your communicator off when in any area with a potentially
explosive atmosphere. Sparks in such areas could cause an
explosion or fire resulting in bodily injury or even death.
•Never throw batteries in fire as they may explode.
3.4 Poisoning Danger
•Keep the batteries away from small children.
3.5 Legal
•In some countries it is prohibited to use your PMR while driving a
vehicle. In this case leave the road before using the device.
•Turn your unit OFF when on board an aircraft when instructed to
do so. Any use of the unit must be in accordance with airline
regulations or crew instructions.

English
3
•Turn your unit OFF in any facilities where posted notices instruct
you to do so. Hospitals or health care facilities may be using
equipment that is sensitive to external RF energy.
•Replacing or modifying the antenna may affect the PMR radio
specifications and violate the CE regulations. Unauthorised
antennas could also damage the radio.
3.6 Notes
•Does not touch the antenna while transmitting, it could affect the
range.
•Remove the battery if the device is not going to be used for a
long period.
4. INCLUDED IN PACKAGE
•2 x Xplorer FX-31
•User manual with service card
5. CLEANING AND MAINTENANCE
•To clean the unit, wipe with a soft cloth dampened with water.
Don’t use a cleaner or solvents on the unit; they can damage the
case and leak inside, causing permanent damage.
•Battery contacts may be wiped with a dry lint-free cloth.
•If the unit gets wet, turn it off and remove the batteries
immediately. Dry the battery compartment with a soft cloth to
minimize potential water damage. Leave the cover off the battery
compartment overnight or until completely dry. Do not use the
unit until completely dry.
6. DISPOSAL OF THE DEVICE
Dispose of the unit and used batteries in an
environment friendly manner.
Do not dispose of batteries in normal household
garbage.

English
4
7. GETTING STARTED
7.1 Diagram and functions
7.2 LCD Screen
Channel Number. Changes from 1 to 8 as
selected by the user
Displays when Battery level goes low
Displayed when channel selection mode
Displayed when volume selection mode
Displayed when transmitting a signal
Displayed when receiving a signal
Antenna
PTT(push to talk)
button
- press and hold to
transmit.
(Power) button
- press and hold to
turn the PMR Unit
ON or OFF.
(UP)/(DOWN)buttons
- press to change
channels, volume, and
to select settings
durin
g
p
ro
g
rammin
g
.
MENU button
- press to program the
PMR settin
g
s.
LCD screen
- Displays the current
Channel selection and
other radio s
y
mbols.
CALL button
- press to send a ringing
Tone to other PMR units.
MIC
(
micro
p
hone
)
S
p
eake
r

English
5
7.3 Removing Installing the Belt Clip
1. To remove the clip from the
unit, push the belt clip
towards the antenna, while
pulling the clip tab as shown
in Fig.1.
2. When re-installing the belt
clip, a click indicates the Belt
Clip is locked into position.
7.4 Battery Installation
1. Remove the belt clip.
2. Press the battery cover and slide it down.
3. Insert 3x ‘AAA’ alkaline batteries following the batteries’ polarity
marked on battery compartment. See Fig 3.
4. Replace the Battery
Cover and Belt Clip.

English
6
Notes:
•Use only same type and make of batteries on the PMR
units.
•The PMR units have a built-in Power Saver (PS) for
maximum battery life, but when not in use, turn the units
OFF to save battery power.
•Remove the batteries if the units will not be used for a long
period of time.
7.5 Battery meter
The battery icon is located in the left corner of the LCD panel. This
battery icon will be displayed when low battery status. These
indicate that the battery level reaches its minimum level, at this
stage the handset will emit two beep tones and then it will
automatically turn off the power.
7.6 Battery life
The PMR has a built in power saver feature to make the batteries
last longer. But when you are not using the handset, it's better to
switch off to save the battery power.
8. OPERATION
8.1 Turning the Unit ON/OFF
To Turn ON
a. Press and hold the /M (Power) button. A special
“beep" sound will be heard. The LCD screen will
display the current channel.
To switch OFF
b. Press and hold the /M (Power) button. A special
“beep" sound will be heard and the LCD screen
will turn blank.

English
7
8.2 Transmitting (sending)
a. Press and hold the PTT (Push to Talk) button to
transmit your voice. The transmit signal icon “TX”
will display on the LCD screen.
b. Hold the unit in a vertical position with the Mic
(Microphone) 5 cm away from the mouth. While
holding the PTT button, speak into the
microphone in a normal tone of voice.
c. Release the PTT button when you have finished
transmitting.
Important:
•In order for other people to receive your transmission, they
must also be on the same channel that you are currently
using. Refer to the "Changing Channel" section for more
information.
•When the PTT and/or CALL buttons are continuously
pressed, your PMR cannot receive any transmissions.
8.3 Receiving a Call
The unit is continuously in receiving mode when it is
turned ON and not transmitting. When a signal is
received on the current channel, the receive signal
icon “RX” will be displayed on the LCD screen.
8.4 Adjusting the Speaker volume
There are 8 volume levels; the current speaker
volume level is displayed on the LCD screen.
To adjust the speaker volume level, press the ▲(UP)
button to increase, or press the ▼(DOWN) button to
decrease.

English
8
8.5 Transmitting end-of-call Tone (Roger Beep)
The transmitting end-of-call tone is a signal which is
automatically transmitted whenever the PTT button is
released. This alerts the receiving party that you have
ended the transmission, and you are now in receive
mode.
8.6 Selecting a Channels
The PMR has 8 available channels. To select a
channel, in normal mode:
a. Press the
/M (Menu) button, the channel icon
“ “ on the LCD screen will start blinking.
b. While the Channel icon is blinking, press the ▲
(UP) or ▼(DOWN) button to select the desired
channel. The channel changes from 1 to 8, or vice
versa.
c. Press the /M (Menu) button to confirm your
setting and return to the standby mode.
Note:
Refer to the "Channel Table" section of this Owner’s
Manual for detailed frequency listing.
8.7 Calling (Paging) Tone
You can use the CALL button to send a tone to other
users on the same channel. To activate this feature:
a. With the PMR in normal mode, press and release
the CALL button. The unit will transmit a 2-second
page tone to the other unit/s set with the same
channel within transmitting range.

English
9
8.8 Monitoring the current channel
Normally the FX-31 will not pick up very weak signals.
But you can monitor the current channel for all
sounds.
To activate monitoring feature:
a. Press the ▲(UP) and ▼(DOWN) buttons at the
same time. The receiving symbol ( ) appears on
the display. Your handset will pick up any signals
on the current channel, including background noise.
b. Press the PTT button to stop monitoring.
9. AUXILIARY FEATURES
9.1 Power Saving
Your PMR unit has special circuitry designed to
extend the life of your battery. When the unit is not
used for 4 seconds, it will automatically switch into a
low power mode. The Power Saving feature does not
affect the PMR ability to receive transmissions. When
a signal is detected, it automatically returns to full
power mode.
9.2 Low Battery Meter Indicator
The PMR can detect the low battery level when
battery voltage goes low. The battery icon will display
the low battery status as follows:
When battery voltage at low battery level. The empty
battery symbol will appear at this stage and continue
to blink.
The battery icon will continue to blink until it totally
drains the battery voltage.

English
10
Note: To have good communication, once the battery
reaches it low battery level, replace the batteries by new
ones.
10. SPECIFICATIONS
Channels Available 8 Channels
Output Power(TX) 0.5W
Range Up to 3 Km (2 Miles)
11. CHANNEL FREQUENCY TABLE
Channel Frequency(MHz) Channel Frequency(MHz)
1 446.00625 5 446.05625
2 446.01875 6 446.06875
3 446.03125 7 446.08125
4 446.04375 8 446.09375
12. WARRANTY
12.1 Warranty Period
HÆGER units have a 24-month warranty period. The warranty
period starts on the day the new unit is purchased. Consumables or
defects causing a negligible effect on operation or value of the
equipment are not covered.
The warranty has to be proven by presentation of a copy of the
original purchase receipt, on which the date of purchase and the
unit-model are indicated.
12.2 Warranty Handling
A faulty unit needs to be returned to an authorized service centre
including a valid purchase note. If the unit develops a fault during the
warranty period, the service centre will repair any defects caused by
material or manufacturing faults free of charge.

English
11
The service centre will at its discretion fulfil its warranty obligations
by either repairing or exchanging the faulty units or parts of the faulty
units. In case of replacement, colour and model can be different
from the original purchased unit.
The initial purchase date shall determine the start of the warranty
period. The warranty period is not extended if the unit is exchanged
or repaired by the appointed service centres.
12.3 Warranty Exclusions
Damage or defects caused by incorrect treatment or operation and
damage resulting from use of non-original parts or accessories are
not covered by the warranty.
The warranty does not cover damage caused by outside factors,
such as lightning, water and fire, or any damage caused during
transportation.
No warranty can be claimed if the serial number on the unit has
been changed, removed or rendered illegal.
13. CE CONFORMITY DECLARATION
We HaegerTec s.a., Praceta Cidade de Londres, 1, Parque Industrial do
Arneiro, 2660-314 S. Julião do Tojal, Portugal, declare that the following
product:
2 Way Radio: PMR
Model: Xplorer FX-31
Brand Name: Haeger
is in conformity with the following standard:
Protection of the user’s health and safety
- EN60950-1(2002)
EMC Requirements
- EN301489-5 v1.3.1 (2002-08),
- EN301 489-1 V1.8.1 (2008-04),
Radio Requirements
- EN300296-2 v.1.1.1 (2001-03),
The product complies with the essentials requirements of the European
Parliament and Council’s, directive R&TTE 1995/5/EC on user’s safety and
electromagnetic interference.

English
12

Português
13
1. INTRODUÇÃO
Agradecemos o facto de ter adquirido o Xplorer FX-31. Este é um
dispositivo de rádio comunicação de baixa potência e de curto
alcance, que não possui custos de funcionamento, à parte do custo
mínimo de pilhas.
O Xplorer FX-31 funciona em frequências de Rádio Móvel Privadas
e pode ser utilizado em qualquer país aonde se encontre autorizado
o funcionamento de PMR, conforme indicado na embalagem e
neste manual.
2. FINALIDADE ESPECÍFICA
O aparelho pode ser utilizado para finalidades profissionais diversas
assim como actividades recreativas. Por exemplo: para manter
contacto durante viagens entre 2 ou mais automóveis, ciclismo,
actividades de ski. Este pode ser utilizado para manter contacto
com as crianças quando estão fora de casa a brincar, etc..
Restrições:
Consulte as leis locais antes de utilizar este dispositivo
fora do país aonde foi adquirido. A norma pode estar
proibida nesse país.
3. INSTRUÇÕES DE SEGURANÇA
3.1 Geral
Leia por favor atentamente todas as informações referentes a
segurança e como utilizar correctamente o aparelho. Familiarize-se
com todas as funções do aparelho. Mantenha este manual em um
local seguro e acessível para futuro uso.
3.2 Queimaduras
•Se a cobertura da antena estiver danificada, não toque na
antena porque quando em contacto com a pele, poderá sofrer
ligeiras queimaduras durante uma transmissão rádio.

Português
14
•As pilhas podem ocasionar danos materiais tais como
queimaduras quando materiais condutivos como jóias, chaves
ou fios de pérolas tocam nos terminais visíveis. Estes materiais
podem fechar o circuito eléctrico (curto-circuito) e ficar
extremamente quente Tome os devidos cuidados ao manusear
qualquer bateria carregada, especialmente ao colocá-la no
interior de bolsos, carteira ou outros recipientes com objectos
metálicos.
3.3 Segurança Pessoal
•Uso em automóveis: não coloque este dispositivo sobre zonas
onde se encontram as almofadas de ar (airbags) ou zonas
previstas para desdobramento das mesmas. As almofadas de ar
são insufladas com um forte impacto. Se o comunicador for
posicionado na área de desdobramento e a almofada é
insuflada, poderá ser projectado com extrema força e ocasionar
lesões aos ocupantes do veículo.
•Mantenha o PMR afastado pelo menos 15 centímetros de
estimuladores cardíacos.
•DESLIGUE o PMR se verificar que existe interferências com
equipamentos médicos.
•Não substitua pilhas em ambientes onde possam ocorrer
explosões. A formação de faíscas por contacto pode ocorrer
quando colocar ou remover as pilhas provocando a explosão.
•Desligue o seu comunicador quando se encontrar em ambientes
propícios a explosões. Faíscas ocasionadas nestes ambientes
poderão provocar explosões ou fogo ocasionando lesões
corporais ou inclusive morte.
•Nunca deite as pilhas no fogo pois podem explodir.
3.4 Perigo de Envenenamento
•Mantenha as pilhas fora do alcance das crianças
3.5 Legislação
•Em alguns países está proibido o uso do PMR quando está a
conduzir um veículo. Para situações de emergência, saia fora da
estrada para poder usar o aparelho.

Português
15
•DESLIGUE o aparelho no interior de aviões quando for avisado
para o fazer. Qualquer uso destes aparelhos deverá ser feito em
conformidade com as normas comuns de aviação ou instruções
da tripulação de voo.
•DESLIGUE o aparelho em locais onde existem afixados avisos
para tal. Os hospitais ou centros de saúde poderão estar a usar
equipamentos que são sensíveis a energias externas de RF.
•A substituição ou modificação da antena pode afectar as
especificações de rádio PMR. O uso de antenas não
autorizadas poderá igualmente danificar o aparelho.
3.6 Notas:
•Não toque na antena durante transmissões, isto poderá afectar
o alcance da mesma.
•Retire as pilhas se o dispositivo não for utilizado durante um
longo período de tempo.
4. CONTEÚDO DO PACOTE
•2 x unidades PMR Xplorer FX-31
•Manual de Instruções
5. MANUTENÇÃO E LIMPEZA
•Para limpar o aparelho utilize um pano macio humedecido em
água. Não utilize produtos de limpeza ou solventes pois podem
danificar a carcaça e provocar infiltrações causando danos
permanentes.
•Os contactos da bateria podem ser limpos com um pano seco.
•Se o aparelho se molhar, desligue-o e retire imediatamente as
pilhas. Seque o compartimento das pilhas com um pano macio
para reduzir potenciais danos provocado por água. Deixe o
compartimento das pilhas destapado durante a noite ou até
estar completamente seco. Não utilize o aparelho até estar
completamente seco.

Português
16
6. ELIMINAÇÃO DO APARELHO
Elimina a unidade e pilhas usadas de forma
ecologicamente segura.
Não deite fora as pilhas depositando as mesmas
em contentores de lixo doméstico.
7. PRIMEIROS PASSOS
7.1 Diagrama e funções
Antena
Botão PTT (premir
para falar)
- premir e manter
para falar.
Botão (Power)
- premir e manter
para LIGAR/
DESLIGAR PMR.
Botões (CIM
A
)/(BAIXO)
- premir para mudar
canais, volume e
seleccionar
configurações durante
a
p
ro
g
ramação.
Botão MENU
- premir para
programar as
confi
g
ura
ç
ões PMR.
V
isor LCD
- Mostra o Canal actual
e outros símbolos.
Botão CALL (CHAMAR)
- premir para enviar sinal
de toque a outro PMR.
MIC
(
microfone
)
Altifalante
Table of contents
Languages:
Other HAEGER Two-way Radio manuals