Hagan ZR User manual

Please read these instructions carefully
WARNING: ZR bindings are designed, developed and
manufactured for racing and/or extreme use, and as such do NOT
correspond to any international safety standard and do NOT have
any system for calibration of the release values. The use of this
product can cause injuries or damage to the user, other people
and/or property. Use of the Hagan ZR is at the participant’s personal
risk and responsibility.

…moves mountains
(EN) ENGLISH
Thank you for choosing the Hagan ZR.
Hagan ski touring bindings are constructed using the most sophisticated design principles
and advanced engineering standards. Hagan bindings are completely made in Europe to
satisfy the needs of top athletes who are constantly looking for lightness and reliability. For
your interest and for safety reasons we ask you to read the following instructions carefully
and to act accordingly.
BEFORE PERFORMING ANY OPERATION, MAKE SURE YOU FULLY UNDERSTAND
THESE INSTRUCTIONS
GENERAL WARNINGS AND RECOMMENDATIONS:
•Hagan ZR bindings are designed and tested to work with ski boots with "TECH" inserts.
The Tech inserts must be standard hooking plates in original dimensions without excess
wear. Using ski boots with non-standard inserts or with very worn inserts may change the
bindings functionality and can create a risk for the user. Before each use check the general
wear of equipment and, in case of doubt, contact an authorized dealer.
•Hagan ZR bindings do not comply with DIN/ISO standards regarding safety; Hagan ZR
are extreme racing bindings and do not have any system for calibration of the release
system.
•During transport, dirt or salt can infiltrate the bindings and interfere with correct
functioning. Always protect the bindings from these external agents during transport.
•In the up-hill setting the bindings do not have any release function and are completely
locked on the boot.
•Upon stepping into the toe piece, check that the pins are correctly and completely
inserted into their seats on the boot toe.
•Before skiing downhill, please remember to place the toe locking lever in downhill
position. Failing to do so will increase the risk of injury for the user.
•Before each use check that the binding or other accessories do not have worn or
damaged parts, that the release system is correctly working and that the binding is not
contaminated by dirt, debris, snow or ice. If there are some defected or broken parts
please contact an authorized dealer Hagan for the service.
•Never use bindings with damaged or extremely worn parts.

1. MOUNTING INSTRUCTIONS
Check the content of the box while purchasing and make sure that it contains all the
components (2 toe units, 2 heel units, 16 x 11mm screws, 1 paper drilling template).
Hagan ZR bindings should be mounted by skilled staff, preferably an AUTHORIZED or
SPECIALIZED DEALER of Hagan products.We recommend the use of a Hagan
Mechanical Drilling Jig to mount the bindings. If you don’t have a Hagan mechanical
drilling jig you may use the Hagan paper drilling templates included in the binding
packaging. Then follow the instructions described in the next section.
IT IS IMPORTANT TO STRICTLY ADHERE TO THE INSTRUCTIONS IN THIS GUIDE.
FAILURE TO DO SO COULD RESULT IN INCORRECT SKI/BOOT ALIGNMENT AND/
OR IMPROPER BINDING FUNCTION.
PAPER DRILLING TEMPLATE INSTRUCTIONS
1) Trace the longitudinal ski center line to achieve the correct alignment of toe and
heel . (Picture 1)
2) If the toe position point is already marked on the ski, proceed to point 3 of the
instructions, otherwise please proceed as follows:
-Place the ski boot center mark in line with the ski boot center line marked on
the ski.
-Mark across the ski a line aligning with the inserts at the toe of the ski boot.
(Picture 1)
Picture 1
3) Place the drilling template on the ski with the arrow placed toward the ski tip and
align:
•Continuous Line “3” with the longitudinal center axis line on the ski.

•Continuous Line “1” with the cross axis of the toe holes marked in step 2.
(Picture 1)
4) Attach the drilling template to the ski with tape in this position.
5) Mark the ski through the holes labeled “1”.
6) Remove the drilling template and place the toe piece on the ski to check correct
alignment of the holes.
7) Remove the toe piece from the ski and drill the holes previously marked, using a Ø
4,1 mm drill bit (unless otherwise recommended by the ski manufacturer), at least
with the same depth of screws insertion (e.g. if the screws is 11 mm, drill at least 6
mm).
8) Mount the toe piece on the ski using glue and the supplied screws, checking the
correct alignment of the binding before fully tightening the screws.
9) Hook the boot in the toe piece and place it flat on the ski. Mark on the ski a line at
the back of the boot’s rear metal binding insert. (Picture 2)
Picture 2
10) Remove the boot and place the drilling template on the ski, with the arrow pointing
to the tip, aligning Continuous Line “3” with the longitudinal ski center line and
Continuous Line “2” with the metal insert mark. (Picture 3)
11) Tape the drilling jig on the ski in this position.
12) Mark the ski through the holes labeled “2”.
Picture 3

13) Remove the drilling template and place the heel piece on the ski to check the correct
alignment of the marked holes.
14) Check that the boot’s metal insert is 4 mm from the internal vertical face between the
heel piece’s spring. (Picture 4)
15) Remove the heel base and drill marked holes using a Ø 4,1 mm drill bit (unless
otherwise recommended by the ski manufacturer) at least with the same depth of
screws insertion (e.g. if the screw is 11 mm, drill at least 6 mm).
16) Tighten the heel unit on the ski with the 4 supplied screws.
Picture 4 Picture 5
IMPORTANT: TO FACILITATE HEEL PIECE INSTALLATION, ROTATE THE TURNING
BODY 45° TO SEE THE MOUNTING HOLES. (Picture 5)
2. PRACTICAL USE INSTRUCTIONS
Please carefully follow the instructions and illustrative pictures in this guide.
WARNING: HAGAN ZR BINDINGS ARE EXTREME RACING BINDINGS AND DO
NOT HAVE ANY SYSTEM FOR CALIBRATION OF THE RELEASE VALUE OR ANY
SAFETY SYSTEM. THE USER USES THESE PRODUCTS AT THEIR OWN RISK.
WARNING: A WRONG EXECUTION OF THE FOLLOWING PROCEDURES MAY
CAUSE A RISK OF SERIOUS INJURIES TO THE USER OR THIRD PARTIES.
WARNING: BEFORE PROCEEDING WITH THE FOLLOWING OPERATIONS, CHECK
THAT THE BINDING IS IN OPTIMAL CONDITIONS. REMOVE DEBRIS AND SNOW
OR ICE FROM THE BINDING IN ORDER TO AVOID THE RISK OF MALFUNCTION
OR BREAKAGE.

2.1. UPHILL MODE
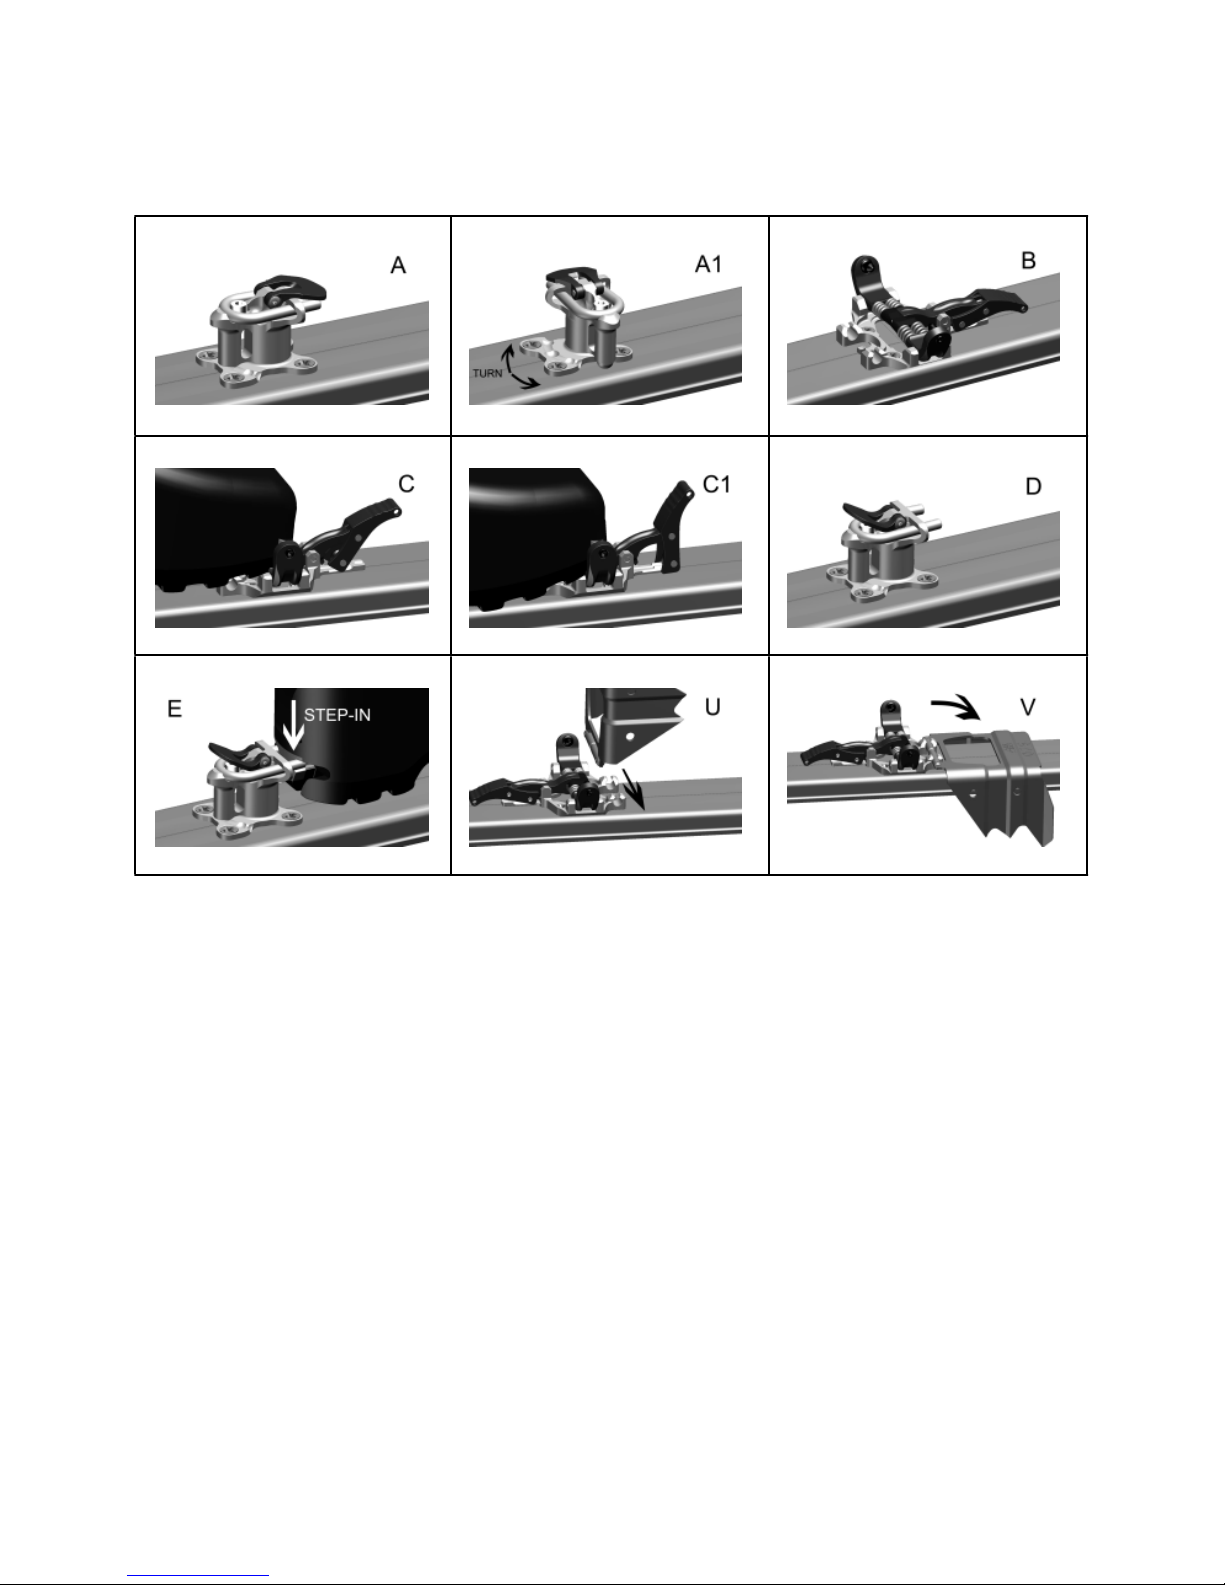
•Check that the heel is in position as in picture A with the heel cover lowered over the
hooking pins. Alternatively, you can use the heel in “boot-on-the-ski” position,
turning the upper body to the right or left, to obtain the position in picture A1.
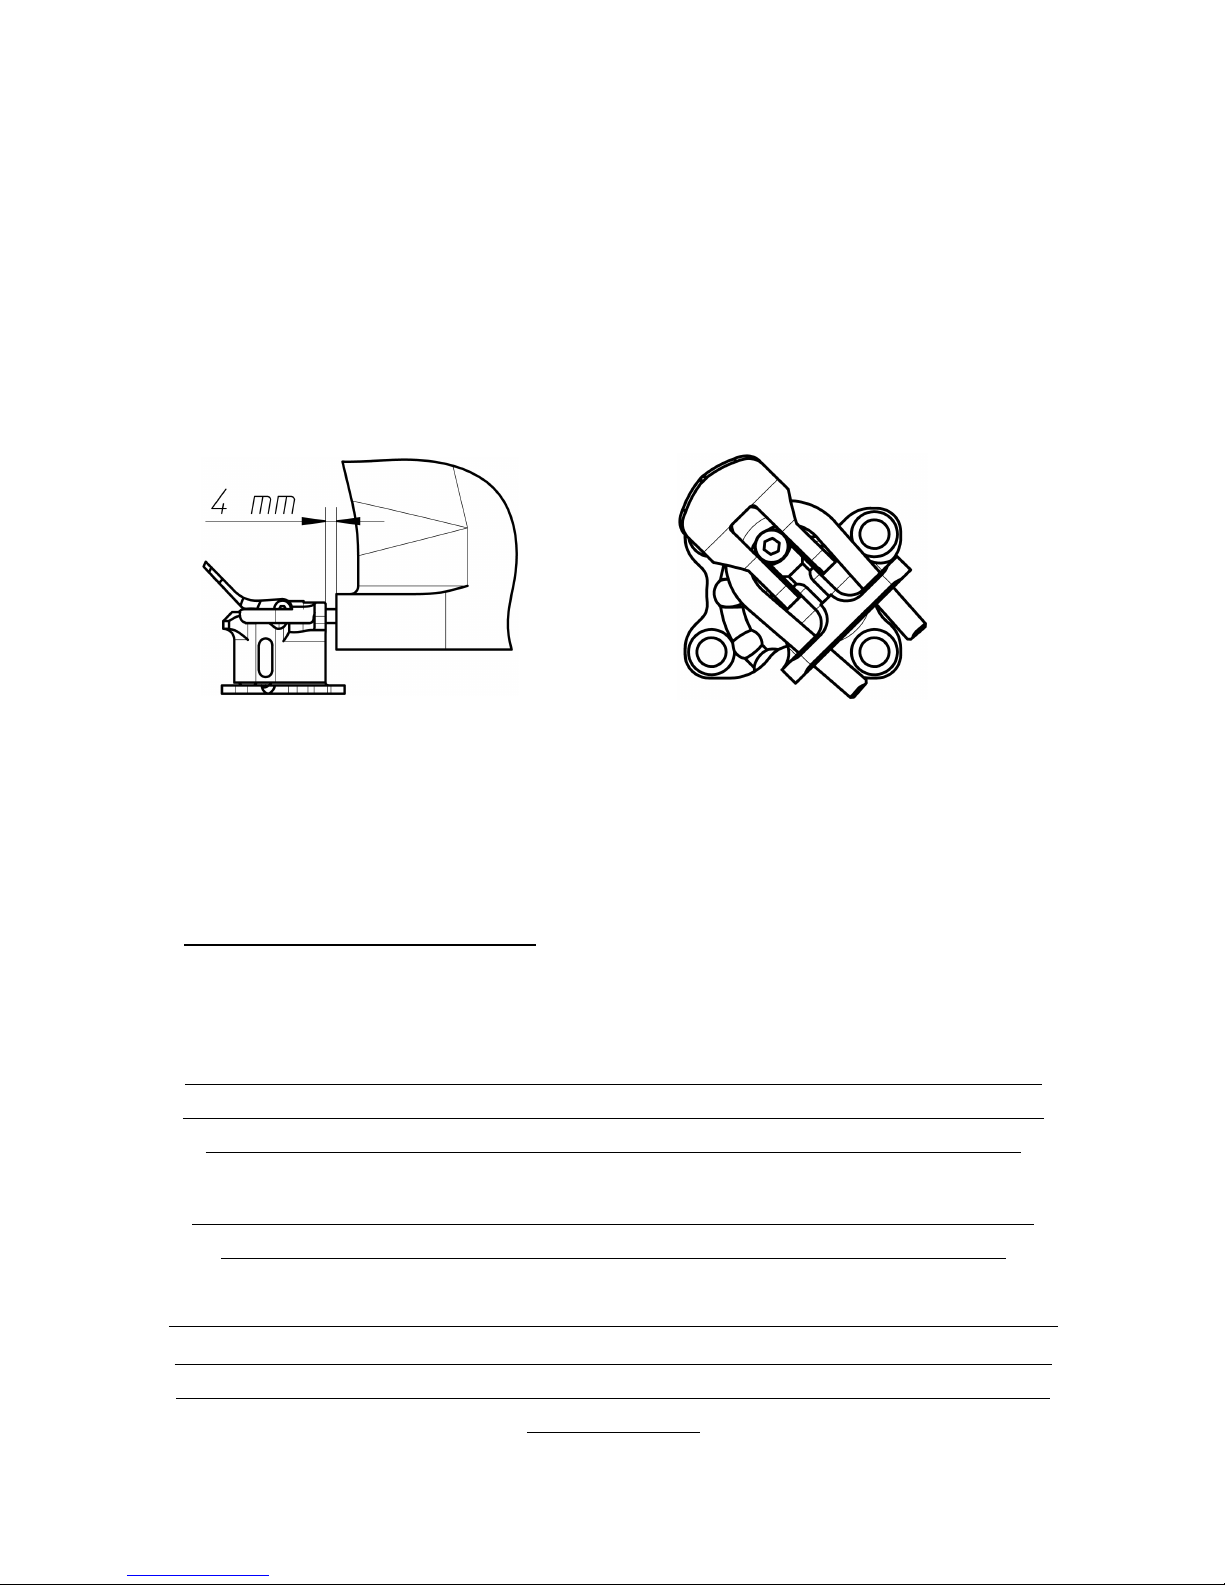
•Check that the toe is in position as in picture B; if not, push down the frontal lever to
obtain the correct position.
•Insert the tip of the boot into the toe piece , and push down until the final hooking of
the binding, as in picture C. Then SLIGHTLY pull the frontal lever towards you to lock
the toe (picture C1), and get ready for the uphill. The toe binding may inadvertently
and undesirably release if not locked while skinning uphill.
2.2. DOWNHILL MODE
WARNING: SKIING WITH THE FRONTAL LEVER OF THE TOE IN UPHILL (LOCKED)
POSITION PREVENTS RELEASE OF THE BINDING, INCREASING THE RISK OF
INJURIES. THE USER CHOOSES THIS SKIING MODE AT THEIR OWN RISK.
•Check that the heel is positioned as in picture D with the cover lifted off the heel
body, exposing the hooking pins.
•Check that the toe is positioned as in picture B; if not, push down the front lever to
obtain the correct position.
•Insert the tip of the boot into the toe piece, and push down until the final hooking of
the binding, as in picture C. Check that the front lever is unlocked for the downhill. If
not, slightly push on the front lever to obtain the right position. (picture C)
•Then push down with the heel of the boot on the hooking pins of the heel unit to
obtain complete and secure entry like in picture E.
2.3. BINDING STEP-OUT
•In uphill mode: push the locking lever into downhill position (picture C )and then act
as written below.
•In downhill position: push the locking lever until the tip of the boot unlocks, then turn
the boot tip and lift the boot to get it completely free from the front and heel units of
the binding.
3. BINDING ACCESSORIES AND THEIR USE
The Hagan ZR binding is completed by a series of accessories that increase its
adjustability, versatility and performance:

- HEEL ADJUSTMENT PLATES — Hagan adjustment plates: ultra-light plates that allow
adjusting the heel position by 30 mm or 60 mm.
- CRAMPONS — This ultra light accessory can be installed on the ZR binding through the
integrated crampon system.
HOW TO USE CRAMPONS
WARNING: THE CRAMPONS MUST BE USED ONLY IN CERTAIN SNOW
CONDITIONS; USING CRAMPONS IN WRONG SNOW/GROUND CONDITIONS
COULD DAMAGE THE CRAMPONS OR THE BINDINGS AND CAN CAUSE RISK OF
INJURY FOR THE USER.
•Place the crampon in the crampon hook, positioning it at 90° to the ski. (picture U)
•Once correctly inserted, rotate the crampon to obtain the position in picture V.
The use of other than Hagan accessories can compromise the working features of the ZR
binding. We advise using original accessories only and having them installed by an
authorized dealer.
4. CARE, MAINTENANCE AND STORAGE
•Periodically lubricate the joints or rotation points of the Hagan ZR binding with
waterproof silicon-based grease to preserve optimal performance.
•Check the status of the bindings before each use — especially the contact elements
between the boot and binding. If in bad condition or excessively worn, they should
be replaced.
•If the ZR bindings are stored for a long period of time, have them checked by a
specialized dealer before re-use.
•Carefully clean the binding after each use with water to remove dirt, salt, sand or
debris. Do not use high pressure sprayers or harsh chemical solvents.
•Store skis in a dry place, avoiding excessive heat, with the toe piece in the “closed”
position to preserve the elasticity of the springs.
•Do not modify the ZR binding. Any tampering or change can compromise the
binding’s functionality and raise the risk of injury. Modifications will cancel the
warranty.

5. WARRANTY AND LIMITED LIABILITY
Hagan warrants to the initial purchaser that “ZR” bindings will be free from material
and manufacturing defects for a period of two (2) years from the date of purchase.
Hagan refuses any and all other express or implied warranties. This guarantee
applies only to the original buyer. The guarantee does not cover damage or faults
caused by use different from that indicated in these instructions or in the guarantee,
nor by modifications or negligence. The warranty does not cover damage caused
by incorrect assembly of the binding. There are no other express guarantees apart
from those described. Hagan is not responsible for direct or indirect damage or
expenses incurred while using, or by the inability to use, our equipment. Hagan will
not take any responsibility for losses or compensation requests on behalf of a third
party which could derive from the binding’s use. In case of material defect, the
costumer has the right to repair or substitution of the item or of part of it, in
Hagan’s discretion. In order to receive the services offered by the guarantee, the
costumer must obtain authorization from an authorized dealer. This limited warranty
applies only to items which have been used in an appropriate way and which have
been properly maintained. The guarantee is not valid for items damaged or worn
during normal use. Defects that are repaired under warranty must be accompanied
by proof of purchase and a “REQUEST FORM” issued by an authorized dealer.
Hagan advises that the pictures and descriptions included in this user’s guide are
illustrative only. Hagan reserves the right to modify or delete each product or
process described in this user instructions manual.

ILLUSTRATIVE PICTURES

WARRANTY ACTIVATION FORM
NAME!……………………..… SURNAME……………..…………………………..
PRODUCT!MODEL!: …………………………………………………………………
DATE OF PURCHASE!: ………./……./…………...
NOME ……………………………..COGNOME …………………........................
MODELLO!: ………………………………………………………………………….
DATA D’ ACQUISTO!: ………./……./…………….
NOM …………………………..PRENOM…………….……………………………
MODELE DE PRODUIT: ........................................................................................
DATE D'ACHAT: …......... / ....... / ...............
ATTENTION: The warranty will be valid only if submitted with this
correctly filled form.
SHOP STAMP AND SIGNATURE COSTUMER SIGNATURE
_________________________ _____________________
DATE ____________________
Table of contents
Other Hagan Accessories manuals
Popular Accessories manuals by other brands

Dufco
Dufco 48-2025.000 manual

Humminbird
Humminbird 360 Imaging installation guide

X-lander
X-lander Around the World XQ Instructions for use

GDS Corp
GDS Corp GDS-48 Operation and maintenance manual

Intracom
Intracom WiBASTM OSDR-HUB Installation

System Sensor
System Sensor RTS451 Installation and maintenance instructions

STA-RITE
STA-RITE SR user manual

Iritech
Iritech IRISHIELD-UART MO 2120 Hardware manual

Vega
Vega VEGAFLEX 86 Quick setup guide

IFM
IFM Efector 200 OGH2 Series Operating instruction

MADRIX
MADRIX USB light sensor Quick start guide & technical manual

Audiophile Systems
Audiophile Systems Audiophile 192 user guide