hager TJA670 domovea Basic User manual

1
6LE007140D
TJA670 domovea Basic
TJA470 domovea Expert

2
CONTENTS
1INTRODUCTION.................................................................................................................4
1.1 Purpose of the document..............................................................................................................................4
1.2 General information on the KNX installations...............................................................................................4
2GENERAL DESCRIPTION..................................................................................................5
2.1 Introduction to the system.............................................................................................................................5
2.2 System overview...........................................................................................................................................5
2.3 The domovea solution ..................................................................................................................................6
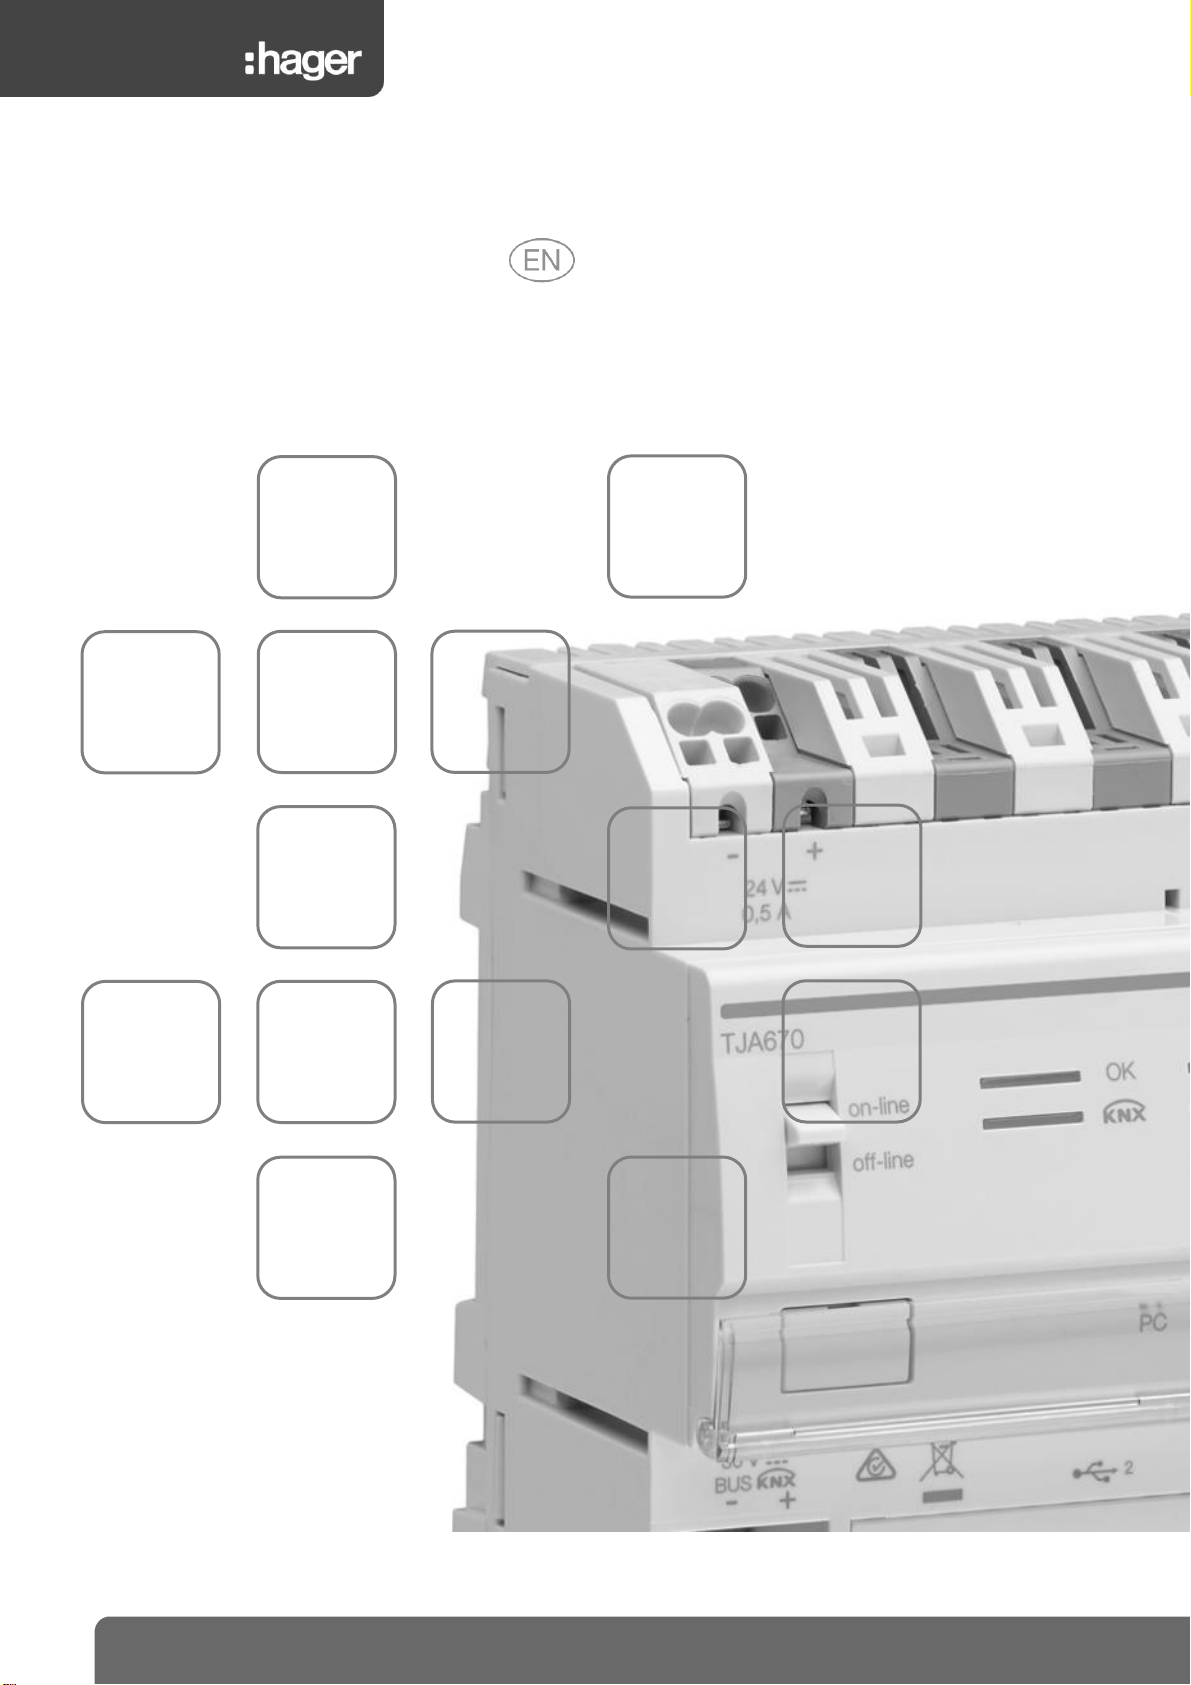
2.4 Introduction to the domovea TJA670-TJA470 server...................................................................................6
2.4.1 The configuration server..............................................................................................................................................................6
2.4.2 Software version update for the domovea server.........................................................................................................................7
2.4.3 Auto/Router functionality..............................................................................................................................................................8
2.4.4 Technical specifications...............................................................................................................................................................9
2.5 Software installation....................................................................................................................................10
2.5.1 Installing the Hager Pilot application..........................................................................................................................................10
2.5.2 Launching the Hager Pilot application........................................................................................................................................10
2.5.3 Accessing the configurator without using hager Pilot .................................................................................................................10
2.5.4 Logging onto the server.............................................................................................................................................................10
2.6 Using the system ........................................................................................................................................11
2.6.1 Installing the domovea Client application...................................................................................................................................11
2.6.2 Launch the domovea application ...............................................................................................................................................11
2.6.3 Log in using the domovea application........................................................................................................................................11
2.7 Connexion KNX IP secure..........................................................................................................................12
2.8 Connection using the KNX / IP bridge........................................................................................................14
2.8.1 The remote connection can only be made with the TJA470 Domovea Expert server.Connection with a local network...............14
2.8.2 Connection with a remote network.............................................................................................................................................15
3FIRST USE........................................................................................................................17
3.1 New project.................................................................................................................................................17
3.2 From a backup file ......................................................................................................................................17
3.3 Using relearning..........................................................................................................................................17
4MY PROJECT...................................................................................................................18
5RELATED FUNCTIONS IN THE MENUS.........................................................................19
5.1 Account configuration .................................................................................................................................19
5.2 Settings.......................................................................................................................................................19
5.2.1 Configuration.............................................................................................................................................................................19
5.2.1.1 Update..............................................................................................................................................................................19
5.2.1.2 Interface ...........................................................................................................................................................................20
5.2.1.3 Remote access.................................................................................................................................................................20
5.2.1.4 Time management............................................................................................................................................................21
5.2.1.5 domovea...........................................................................................................................................................................21
5.2.1.6 Easytool............................................................................................................................................................................21
5.2.2 Users.........................................................................................................................................................................................21
5.2.2.1 The transfer of administrators’ rights.................................................................................................................................21
5.2.2.2 The creation and management of additional accounts ......................................................................................................22

3
5.2.3 Data management.....................................................................................................................................................................22
5.2.3.1 Data management............................................................................................................................................................22
5.2.3.2 Resources management...................................................................................................................................................23
5.2.4 About.........................................................................................................................................................................................23
6MY DOMOVEA INSTALLATION ......................................................................................24
6.1 Dashboard ..................................................................................................................................................24
6.2 Installation...................................................................................................................................................25
6.2.1 Devices......................................................................................................................................................................................25
6.2.2 Groups ......................................................................................................................................................................................25
6.3 Automations................................................................................................................................................26
6.3.1 Sequences ................................................................................................................................................................................26
6.3.2 Home status ..............................................................................................................................................................................27
6.4 Measures ....................................................................................................................................................28
6.4.1 Measures...................................................................................................................................................................................28
6.4.2 Subscriptions.............................................................................................................................................................................28
6.5 Managing user rights ..................................................................................................................................29
6.6 Configuration...............................................................................................................................................29
7LIST AND DETAILS OF DEVICES...................................................................................30
7.1 KNX devices ...............................................................................................................................................30
7.1.1 Comfort......................................................................................................................................................................................30
7.1.2 Access security..........................................................................................................................................................................31
7.1.3 Sensors.....................................................................................................................................................................................32
7.1.4 Energy.......................................................................................................................................................................................32
7.1.5 Generic......................................................................................................................................................................................33
7.1.6 Network.....................................................................................................................................................................................33
7.2 Cameras .....................................................................................................................................................33
7.3 IOT devices.................................................................................................................................................34
7.3.1 Philips Hue................................................................................................................................................................................34
7.3.2 Sonos........................................................................................................................................................................................34
7.3.3 Netatmo.....................................................................................................................................................................................34
7.3.4 Tado..........................................................................................................................................................................................34
7.4 Additional connectivity control point............................................................................................................35
7.4.1 Alexa.........................................................................................................................................................................................35
7.4.2 Google Home ............................................................................................................................................................................35
7.4.3 IFTTT ........................................................................................................................................................................................35

4
TJA670 domovea Basic
TJA470 domovea Expert
1 INTRODUCTION
1.1 Purpose of the document
The purpose of this document is to familiarise the domovea server installer with the configuration interface. This
document sets out the steps for the installer to perform this configuration. To do this, the following conditions are
generally required:
- the physical installation must be carried out,
- the server must be connected to the Internet via a router with the DHCP server function activated,
- the installer must be equipped with a mobile device (smartphone, tablet, PC) connected to the same network
as the server,
- the installer must have a company account on the myHager portal.
Note: We strongly recommend the installer has their own DHCP router (Wifi + 3G/4G) to perform the configuration and
tests on the system locally (via Wifi) or over the Internet (via 3G/4G).
1.2 General information on the KNX installations
A KNX installation is an electrical installation in which products communicate between themselves via a wired bus or
radio to send or receive commands.
A KNX installation comprises different types of products that can be classed:
- According to their connection with the KNX bus:
-Wired products: they are connected to the KNX bus by a cable that meets the KNX specifications.
-Radio products: they are connected to the bus by a radio connection that meets the KNX radio
specifications. The radio communication can be:
a) One-way: the products are senders only.
b) Two-way: the products are both senders and receivers.
- According to their function in the installation
-Input products: they send commands (push-buttons, switches, motion detectors, etc.). An input
product can have several input channels: push-buttons with several switches, etc.
-Output products: they receive commands and activate the connected applications (lighting, roller
shutters, etc.). An output product can have several output channels: lighting output module with 6
channels to run 6 lighting circuits, etc.
-Systems products: they are necessary for the correct operation of the installation: power supply to the
bus, wired bus/radio bus media coupler, etc.

5
TJA670 domovea Basic
TJA470 domovea Expert
2 GENERAL DESCRIPTION
2.1 Introduction to the system
domovea is the command and display software for KNX and IoT installations. It enables access to all of the home
automation functions from the computer terminals (smartphone, tablet, PC, etc.) in the home. In addition to the usual
controls, there are new functions for comfort and security: triggering sequences (sequence of programmed or
immediate actions), changing the configuration of the house according to events or periods, using images to visualise
the correct execution of past or current commands, with a single click.
2.2 System overview
The domovea system is comprised of three modules:
- The Server: A TJA670 or TJA470, a physical interface between the KNX bus and the local network in the
home.
- The Client: This software is the client interface. It must be installed on a smartphone, tablet or PC.
- The Configurator: This software is used to configure and program the client interface. It enables access to the
server from a PC, smartphone or tablet via the hager Pilot application or a web browser.
The following diagram describes the physical architecture of a domovea installation:

6
TJA670 domovea Basic
TJA470 domovea Expert
2.3 The domovea solution
The domovea server has 2 solutions:
- domovea basic, offering basic features
- domovea expert, offering more advanced features
Below is a summary table:
Function
TJA670 (domovea basic)
TJA470 (domovea expert)
Integrated KNX Easytool
Yes
Yes
Number max. of KNX and IoT appliances
500
500
Number max. of IP cameras
5
50
Google, Alexa, IFTTT services
Yes
Yes
Number of user sequences (client)
50
50
Number of advanced sequences (configurator)
No
100
User rights management
Yes
Yes
User personalisation
Yes
Yes
Installer and client remote access
Yes
Yes
KNX / IP bridge
Local access only
Local and remote access
Regulation –Number of Thermostat
No
10
Doorphone integration
No
Yes
The KNX / IP bridge allows parameterization of the KNX installation with ETS software over an IP connection.
2.4 Introduction to the domovea TJA670-TJA470 server
2.4.1 The configuration server
The server is a piece of equipment that creates a link between an IP environment and the KNX bus systems. It
involves the use of two applications, the first being the Hager configuration application, Pilot, and the second being the
domovea application for the end user.
The product is connected:
- on the one hand by a KNX bus via a
connector ;
- on the other hand by a local IP network via
one of the two Ethernet ports .
OS compatibility:
For Hager Pilot and domovea, the version must
be no earlier than: iOS 11 or Android 6

7
TJA670 domovea Basic
TJA470 domovea Expert
The following table summarises the meaning of each LED
LED function
LED ref
Status
Description
Power
Off
No power
Blinking green
Product start-up phase
Green light is on
Product on
Blinking red
Product powered by reserve (10 s. max.)
Red light is on
Software loading error
Ethernet 1
and 2
and
Off
No network (or operating on power reserve (10 s. max.))
Blinking green
No DHCP server detected, operating on fallback IP address
Green light is on
Network detected and IP address allocated
Red light is on
IP address conflict
Blinking red
Waiting for IP address allocation
Remote
access
Off
No remote connection (deactivation via software)
Blinking green
Attempt to establish remote connection
Green light is on
Remote connection operational
Red light is on
Error in establishing remote connection
2.4.2 Software version update for the domovea server
It is mandatory to update the domovea server software version before any first use.
There are 2 ways to update:
Automatic:
Configuration tool connector in an Internet box. Connection to the network and the remote server is
made automatically for the update (see Chapter 5.2.1.1 Update)
Manually:
The update file is available on the Hager site.
To update the domovea server software version:
- Take a blank USB key.
- Copy the update file to the USB key,
- Insert the USB key into the USB ports of the
configuration server. The "OK" LED flashes for
approximately one minute then remains on.
- Remove the USB key.
The server is updated with the new software version.

8
TJA670 domovea Basic
TJA470 domovea Expert
2.4.3 Auto/Router functionality
The 2 Ethernet ports can be used interchangeably to connect the server to the local network. These 2 ports are 2
switched ports connected to the same logical interface on the TJA670-TJA470 (switch).
Switches
Ethernet port behaviour
COM
SEL
Ethernet Port 1
Ethernet Port 2
Internet
connection
status
Bus status
KNX
Online
Auto
This is the normal operating mode for the TJA670- TJA470
when it is connected to an external router (ISP box).
The interface is configurable with a DHCP client or fixed IP
address.
- With a client DHCP (default factory set mode), the server
waits for an IP address coming from a DHCP server
connected to the network (the router). If, after 40 seconds,
no address has been attributed, the server automatically
takes the fallback address: 192.168.0.253 /
255.255.255.0.
- With a static IP address, the server immediately
recognises the settings defined in the “Configuration-
Network” tab in the configurator settings menu:
-Interface IP address
-Sub-network mask
-Default server address
N.B. with a fixed IP address, the module does not automatically
switch to the fallback address if there is an IP address conflict on
the network (other device already using the IP address defined).
active
active
PC
To use when a PC is directly connected to the server. This mode
activates the DHCP server built into the module. The 2 ports are
interchangeable and configured with the following parameters:
- Interface IP address: 192.168.0.253
- Sub-network mask: 255.255.255.0
- Default server address: 192.168.0.1
- range of IP addresses that can be attributed by the
TJA670-TJA470 DHCP server: 192.168.0.10 to
192.168.0.50
active
active
Offline
Auto /
PC
This mode is a fallback mode in which the server interface is
configured in DHCP client mode.
- If no IP address is attributed by a DHCP server after a
wait of 40 seconds, the server automatically assumes the
following fallback address: 192.168.0.253 /
255.255.255.0.
inactive
inactive

9
TJA670 domovea Basic
TJA470 domovea Expert
2.4.4 Technical specifications
KNX power supply
KNX bus TBTS 30 V
Consumption on the bus line
10 mA max - 30 V
External power supply or PoE
24 V to 30 V via Hager SELV power
supply TGA200 type or via PoE
Standard/Standby consumption on the 2-wire bus
35 mA / 12 mA - 24 V
Max consumption on the auxiliary power supply
760 mA max - 24 V
Standby consumption on the 24 V Ethernet and non-connected
USB
330 mA
Maximum dissipation (24 V output)
10 W without USB, 15 W with 2 USB
max
PoE power supply consumption
PoE Class 3: 13 W
Ethernet network communication
2 x 100/1000 BaseT
Max 24 V power cable length
10 m
Bus connection
0.2 –1.5 mm²
Power supply socket
0.75 - 2.5 mm²
Ethernet/IP network socket
2 x RJ45
Operating T°
-5°C to + 45°C
Storage T°
- 20°C to + 70°C
Width (REG)
6TE
Dimensions (L x H x D)
106 x 90 x 67 mm
USB2 Interface
2
Installation method
DIN rail (EN60715)
Operating altitude
< 2000 m
Pollution level
2
Surge voltage
4 kV
Protection ratings
• box: IP20
• box under faceplate: IP30
Impact resistance
IK04

10
TJA670 domovea Basic
TJA470 domovea Expert
2.5 Software installation
2.5.1 Installing the Hager Pilot application
•On a mobile device:
ofind and download the hager Pilot application from the
App Store®or Google Play Store®,
oinstall the hager Pilot application; an icon will appear on
the screen.
•On Windows PC:
ofind and download the hager Pilot application from the
Hager website,
oinstall the hager Pilot application; an icon will appear on
the screen.
2.5.2 Launching the Hager Pilot application
Locally connect the mobile or stationary equipment to the network on which the server is connected
•launch the hager Pilot application. A selection window of servers is displayed,
•select server TJA670-XXXXX or TJA470-XXXXX.
If the server does not appear on the list,
•click Add a server,
•add the server by entering either:
oThe IP address
oThe name of the server (TJAxxx-xxxxxx)
oThe serial number
To add a remote server (not connected to the local network), you must enter the serial number of the
device. This is visible in the Remote Access menu where the serial number is contained in the address (For
example: https://kj4f6s8kvcywvd.domovea.com, the serial number will be kj4f6s8kvcywvd).
You are connected to the server.
For more information, please see tutorial 1 - Start and set up a domovea installation with Hager
TJA670-TJA470 at www.hager.com/domovea.
2.5.3 Accessing the configurator without using hager Pilot
In some cases, the configurator must be accessed directly without using the hager Pilot application.
•Using the web browser
To connect in this way, the server IP address must be known: it is the address given by the local DHCP server if the
switch is set to “auto” (if the switch is set to “PC”, launch the web browser and enter the default gateway IP
address: 192.168.0.253).
•Using the file browser
The server supports the UPnP function. UPnP devices are displayed in Windows under the Network section. Double-
clicking on the TJA670 or TJA470 icon opens the configuration interface in the web browser.
2.5.4 Logging onto the server
At this stage of installation, you can only log on with the administrator profile as only this account is active. The
administrator access information is as follows:
•User name: admin
•Password: 1234
•Click Login

11
TJA670 domovea Basic
TJA470 domovea Expert
2.6 Using the system
To use mobile devices or a PC with the server, they must have the domovea application
2.6.1 Installing the domovea Client application
The application is designed to operate with a tablet or smartphone.
•On a mobile device:
ofind and download the domovea application from the App
Store®or Google Play Store®,
oinstall the domovea application; an icon will appear on
the screen.
•On Windows PC:
ofind and download the domovea application from the
Hager website,
oinstall the domovea application; an icon will appear on
the screen.
2.6.2 Launch the domovea application
Locally connect the mobile or stationary equipment to the network on which the server is connected
•launch the domovea application; a selection window of servers is displayed,
•select server TJA670-XXXXX or TJA470-XXXXX.
You are connected to the server via the domovea application.
2.6.3 Log in using the domovea application
At this stage of installation, you can only log on with the administrator profile as only this account is active. The
administrator access information is as follows:
•User name: admin
•Password: 1234
•Click Login
For more information, please visit www.hager.com/domovea.- Discover the domovea application

12
TJA670 domovea Basic
TJA470 domovea Expert
2.7 Connexion KNX IP secure
KNX Secure devices are able to encrypt and decrypt telegrams, thus adding an extra level of security to a KNX
installation. This level of security can be used both during the commissioning of KNX installations as for KNX
installations at runtime.
There are two types of encryption:
- KNX IP Secure : Telegrams are entirely encrypted and applied only to the KNX IP medium. This encryption
must be used for KNX installations using an external IP network such as the Internet.
- KNX Data Secure : Telegrams are partly encrypted and applied to any KNX communication medium. This
encryption can be used for the KNX IP medium, but only for the part of the KNX installation that is not exposed
to an external IP network.
The procedure below describes how to set up KNX IP Secure with the domovea server.
Before setting up the ETS project, the following conditions must be fulfilled:
- The ETS software must have at least version 5.7.4 (v1093).
- The first connection to the KNX bus must be made in a local network via the domovea server.
Installing the application:
-Download the KNX product data file (knxprod) depending on the version of the domovea server
▪PS_TJA470_V101_T1.KNXPROD for version TJA470
▪PS_TJA670_V102_T1.KNXPROD for version TJA670
-Start ETS
-In the Bus section, select the interface corresponding to the local server.
-Open the concerned ETS project and select the server version from the product catalogue.
-Installing the domovea server in the project.
If the project is not yet secured at that time, ETS will ask to enter a new password.
-Add the KNX certificate of the device using the QR code or manually.
the KNX certificate of the device can be found in the Interface section of the domovea server.
-Enable Secure Commissioning in the device properties in the Settings tab.
-Perform a full download of the device.

13
TJA670 domovea Basic
TJA470 domovea Expert
Check that the slow bus communication option in the project details is unchecked so that the
download is done correctly.
Your KNX project is now password protected.
This commissioning password can be found in the device properties under the IP tab.
You can now activate your secured service with the commissioning password and use your local interface.

14
TJA670 domovea Basic
TJA470 domovea Expert
2.8 Connection using the KNX / IP bridge
The domovea server is used to connect via IP to the KNX bus for product configuration by ETS. It uses the KNXnet /
IP standard and establishes communication between KNX lines and data networks using the Internet Protocol (IP).
Access to use the server as an IP bridge can be done locally or remotely.
2.8.1 The remote connection can only be made with the TJA470 Domovea Expert server.Connection with a local
network
With ETS, the domovea server appears as a communication interface with the KNX bus.

15
TJA670 domovea Basic
TJA470 domovea Expert
2.8.2 Connection with a remote network
(Only with TJA470 Domovea Expert)
In order to establish a remote connection using the KNX / IP interface, the following conditions must be fulfilled:
- Administrator rights are transferred (see chapter 5.2.2.1)
- Installer access is activated (see chapter 5.2.2.2)
- The KNX/IP secure process is running in the ETS project (see chapter 2.7)
- Remote access is activated (see chapter 5.2.1.3)
Downloading the application:
-Download the domovea secured proxy app from knx.org using your KNX account.
-Download the product license for the domovea secured proxy app
Please have your ETS key number (KNX-xxxxxxxx) with you, in order to generate a licence for the
application during the download.
Installation of the application in ETS
-Insert the ETS licence key
-Start ETS
-Click on the Apps section in the lower right corner.
-Select Compatibility Mode App to activate the application.
-Restart ETS to enable the application
-Click on the Apps section in the lower right corner.
-Click on + and select the domovea secured proxy app x.x.x.x.etsapp file that you have previously
downloaded.
-Restart ETS to enable the application
Installation of the license
-In ETS, click on the License section in the lower right corner.
-Click on + and select the domovea secured proxy app- xxx.license file that you have previously
downloaded.
KNX project
-Open the KNX project secured beforehand
-Select the domovea device
-Enable Secure Tunnelling in the device properties in the Settings tab
-Go to the Apps tab and select the domovea secured proxy app
-Enter the email address and password for your My Hager account
-Select from the list the domovea server set up in your project and click Start.

16
TJA670 domovea Basic
TJA470 domovea Expert
The remote connection is now established.
To complete the connection, make sure that the connection to the remote interface is valid.
On the Interface tab, you can reset the settings for the KNX connection by clicking on Reset KNX/IP
interface . If the KNX IP Secure process was performed before the reset, simply reload the participant at
ETS level to recover the service.
Selection of the interface for remote connection
For more information, please see tutorial 2-Connect domovea expert to ETS using KNX IP tunneling
at www.hager.com/domovea.

17
TJA670 domovea Basic
TJA470 domovea Expert
3 FIRST USE
After selecting the server and during first use, there are 3 ways of starting the installation:
•by creating a new project,
•by importing a backup file,
•by relearning the installation,
3.1 New project
This enables the creation of a new installation authorising a manual configuration of domovea.
•click on New project,
•enter the name of the project
Note: As an option, information related to the installation can be entered by clicking on Client information
For more information, please see tutorial 3 - Create a new domovea project using Hager Pilot and
the easytool at www.hager.com/domovea.
3.2 From a backup file
This enables the creation of a new installation from a backup file.
There are 5 file formats:
Configuration
File extension
Backup file
Easytool
*.txa
Installation configured with Easytool (TXA100)
TX100
*.txh
Installation configured with the TX100 configuration tool
domovea 1
*.ddb
domovea 1* configuration
domovea 2
*.hbox
domovea 2* configuration
ETS
*.knxproj
Installation configured with ETS (KNX configuration software)*
* Using the Easytool configuration tool is no longer possible.
•click Import,
•select the backup file.
For more information, please see tutorial 4 - Import a .hbox project in domovea with Hager Pilot at
www.hager.com/domovea.
3.3 Using relearning
This enables the creation of a new installation when there is no installation backup. This is possible by performing
relearning on the installation.
Note: Only products known to the Easytool configuration tool will be included.
•click on Relearn.

18
TJA670 domovea Basic
TJA470 domovea Expert
4 MY PROJECT
Project domovea basic TJA670
Project domovea expert TJA470
This enables the project to be configured:
•Using the Easytool configuration tool:
-click on the Easytool symbol
A KNX product configuration window appears, enabling the installation to be configured.
For more information, refer to the installer manual for the TXA100 configuration tool
•• Using the Access configuration tool (only with TJA470 Domovea Expert):
-click on the Access symbol
A configuration window appears, enabling the intercom application to be configured.
For more information, refer to the TJA510 Gateway Configuration Manual
•Using the domovea configurator:
-click on the domovea symbol
A configuration window appears, enabling the domovea client application to be configured.

19
TJA670 domovea Basic
TJA470 domovea Expert
5 RELATED FUNCTIONS IN THE MENUS
5.1 Account configuration
This enables the connected user account to be configured. When you are connected, the general settings are
accessible from the drop-down menu on the top right.
•click on , a drop-down menu appears,
•click on .
A window appears:
•the Activation field activates or deactivates the user profile,
•a Description free field enables information about the user to be added,
•an Edit password button enables the user password to be changed,
•the Language field enables the configurator language to be changed when the user connects to their profile,
•the Time format field enables the time format to be changed,
•click on Save to confirm your choices.
5.2 Settings
5.2.1 Configuration
This enables the product to be configured. When you are connected, the general settings are accessible from the
drop-down menu on the top right.
•click on , a drop-down menu appears,
•click on Configuration.
5.2.1.1 Update
Click on Update to view the software versions:
•the server version (application software version),
•the BSP version (motherboard software version),
•the JVM version (JAVA virtual machine software version).
Under Update to select the update mode:
•Automatically install updates: the new software version will be installed automatically (default value: active),
•Install update: the new software version is installed manually,
•Check for updates: check whether a new software version is available,
•Never check if updates are available: the configuration server does not check whether a new software
version is available (default value: not validated),
•click on Save to confirm your choices.

20
TJA670 domovea Basic
TJA470 domovea Expert
5.2.1.2 Interface
Click on Interface to view:
•the Device name, which you can change, if necessary,
•the KNX address of the configuration server, which you can change if necessary,
•the KNX Certificate of the configuration server, enabling installation in KNX Secure,
•the KNX Serial Number of the configuration serverthe MAC address of the configuration server,
•the IP detection: automatic or manual (depending on requirements),
•the DNS server: automatic or manual (according to requirements),
•click on Save to confirm your choices.
Click on Reset KNX/IP Interface to reset the KNX connection settings.
If the KNX IP Secure process has been completed before the reset, simply reload the participant at ETS
level to recover the service.
5.2.1.3 Remote access
Remote access enables connection to the configuration server and the client from a device connected to the Internet.
Click Remote access to view:
•the Remote address field: the http address link of the configuration server,
•Use of remote access (default value: activated): enables the installer to intervene remotely,
•click on Save to confirm your choices.
You can connect remotely using:
•hager Pilot or domovea client.
oselect server TJA670-XXXXX or TJA470-XXXXX.
If the server does not appear on the list,
oclick Add a server,
oadd the server by entering either:
▪The IP address
▪The name of the server (TJAxxx-xxxxxx)
▪The serial number
To add a remote server (not connected to the local network), you must enter the serial number of the
device. This is visible in the Remote Access menu where the serial number is contained in the address (For
example: https://kj4f6s8kvcywvd.domovea.com, the serial number will be kj4f6s8kvcywvd).
•a device connected to the Internet
olaunch the WEB browser,
oin the address box, enter the pathway for remote access (for example:
https://kj4f6s8kvcywvd.domovea.com),
othe WEB browser launches at the login page. Enter the User name and Password.
For more information, please see tutorial 5 –Enable remote access with easytool and with domovea
at www.hager.com/domovea.
This manual suits for next models
1
Table of contents
Other hager Server manuals
Popular Server manuals by other brands

Dell
Dell PowerEdge M1000e Configuration guide

TriLink
TriLink AirProjector KJ-200 user manual

Siemens
Siemens SINUMERIK 840Di sl/840D sl Function manual

Sun Microsystems
Sun Microsystems Sun Fire X4150 Server Product notes

IntesisBox
IntesisBox BACnet/IP Server-Notifier ID3000 installation manual

ANTAIRA
ANTAIRA STW-602C quick start guide