Hagleitner XIBU Assembly instructions

www.hagleitner.com
Innovative Hygiene.
XIBU Tips and Tricks
eng
January 2018

Content
XIBU TISSUEPAPER
Technical package .......................................................................................................................................................................... 4
Replacing the cover assembly.................................................................................................................................................... 5
Change the lid clip .......................................................................................................................................................................... 6
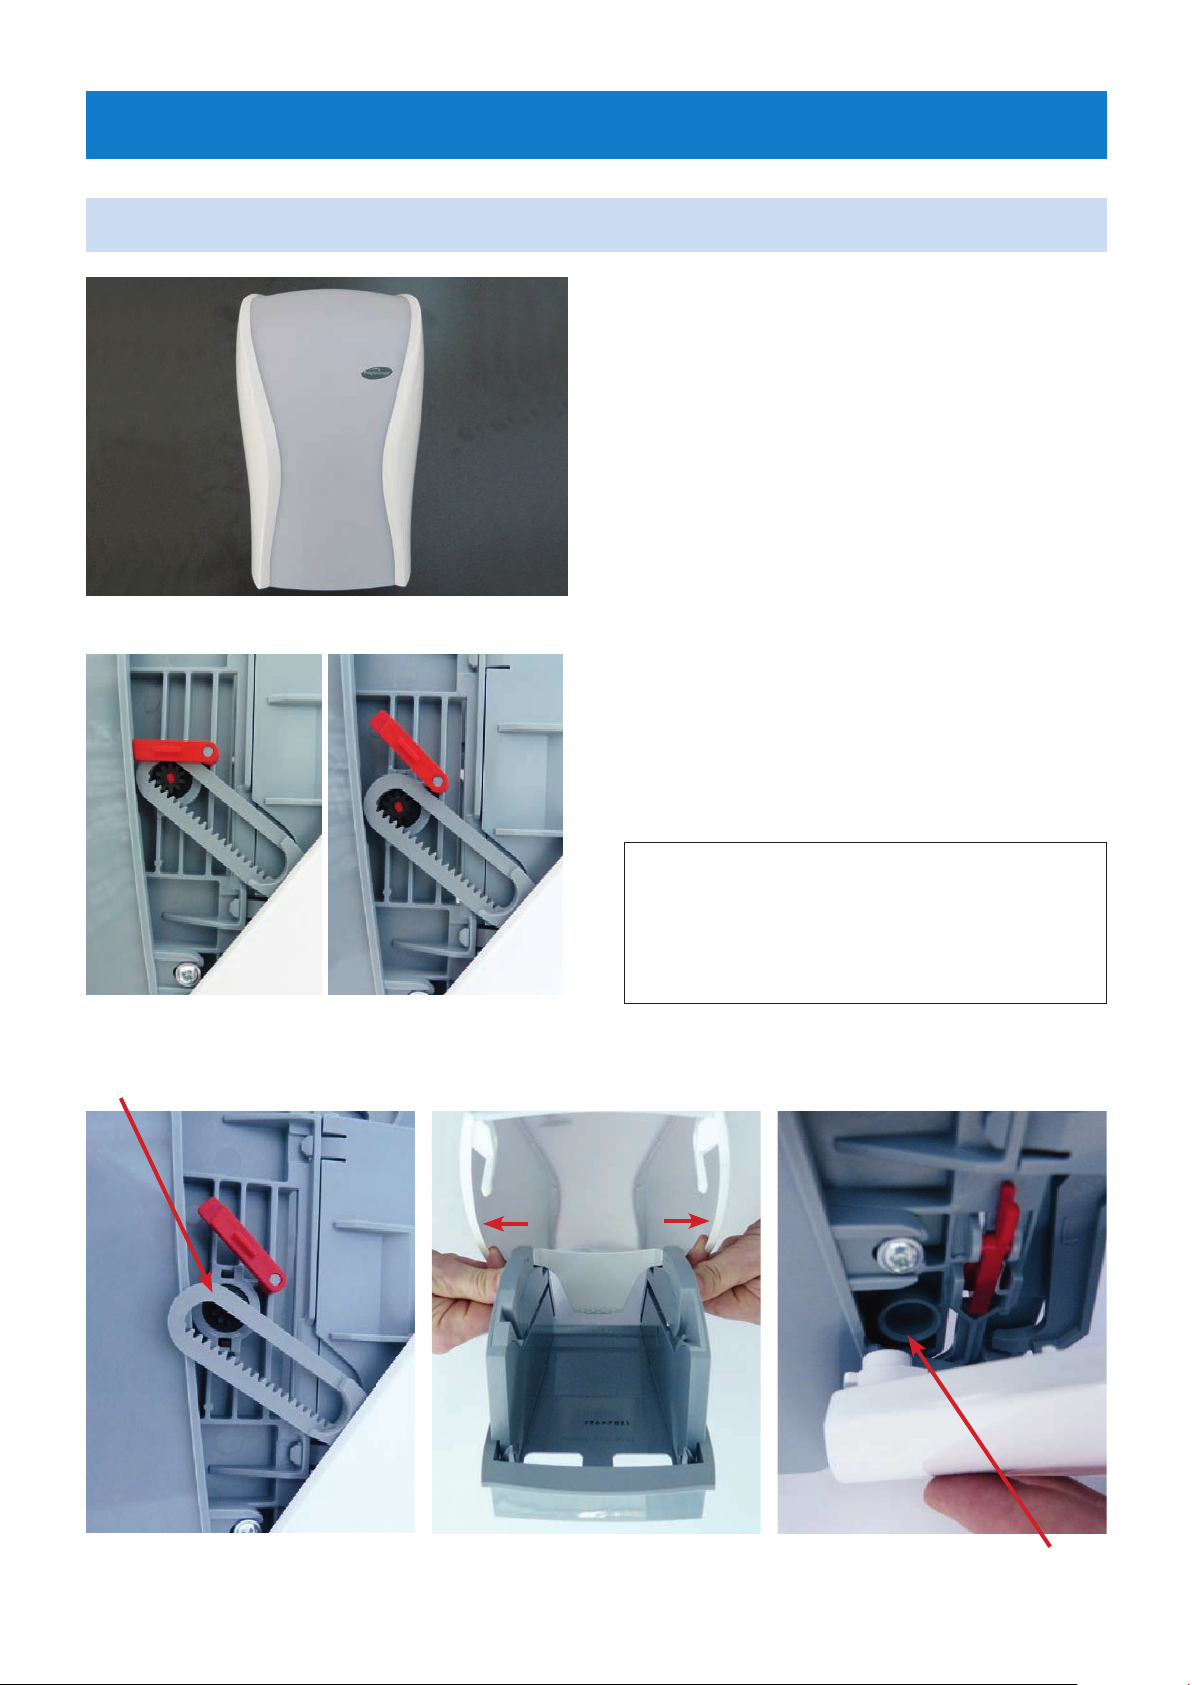
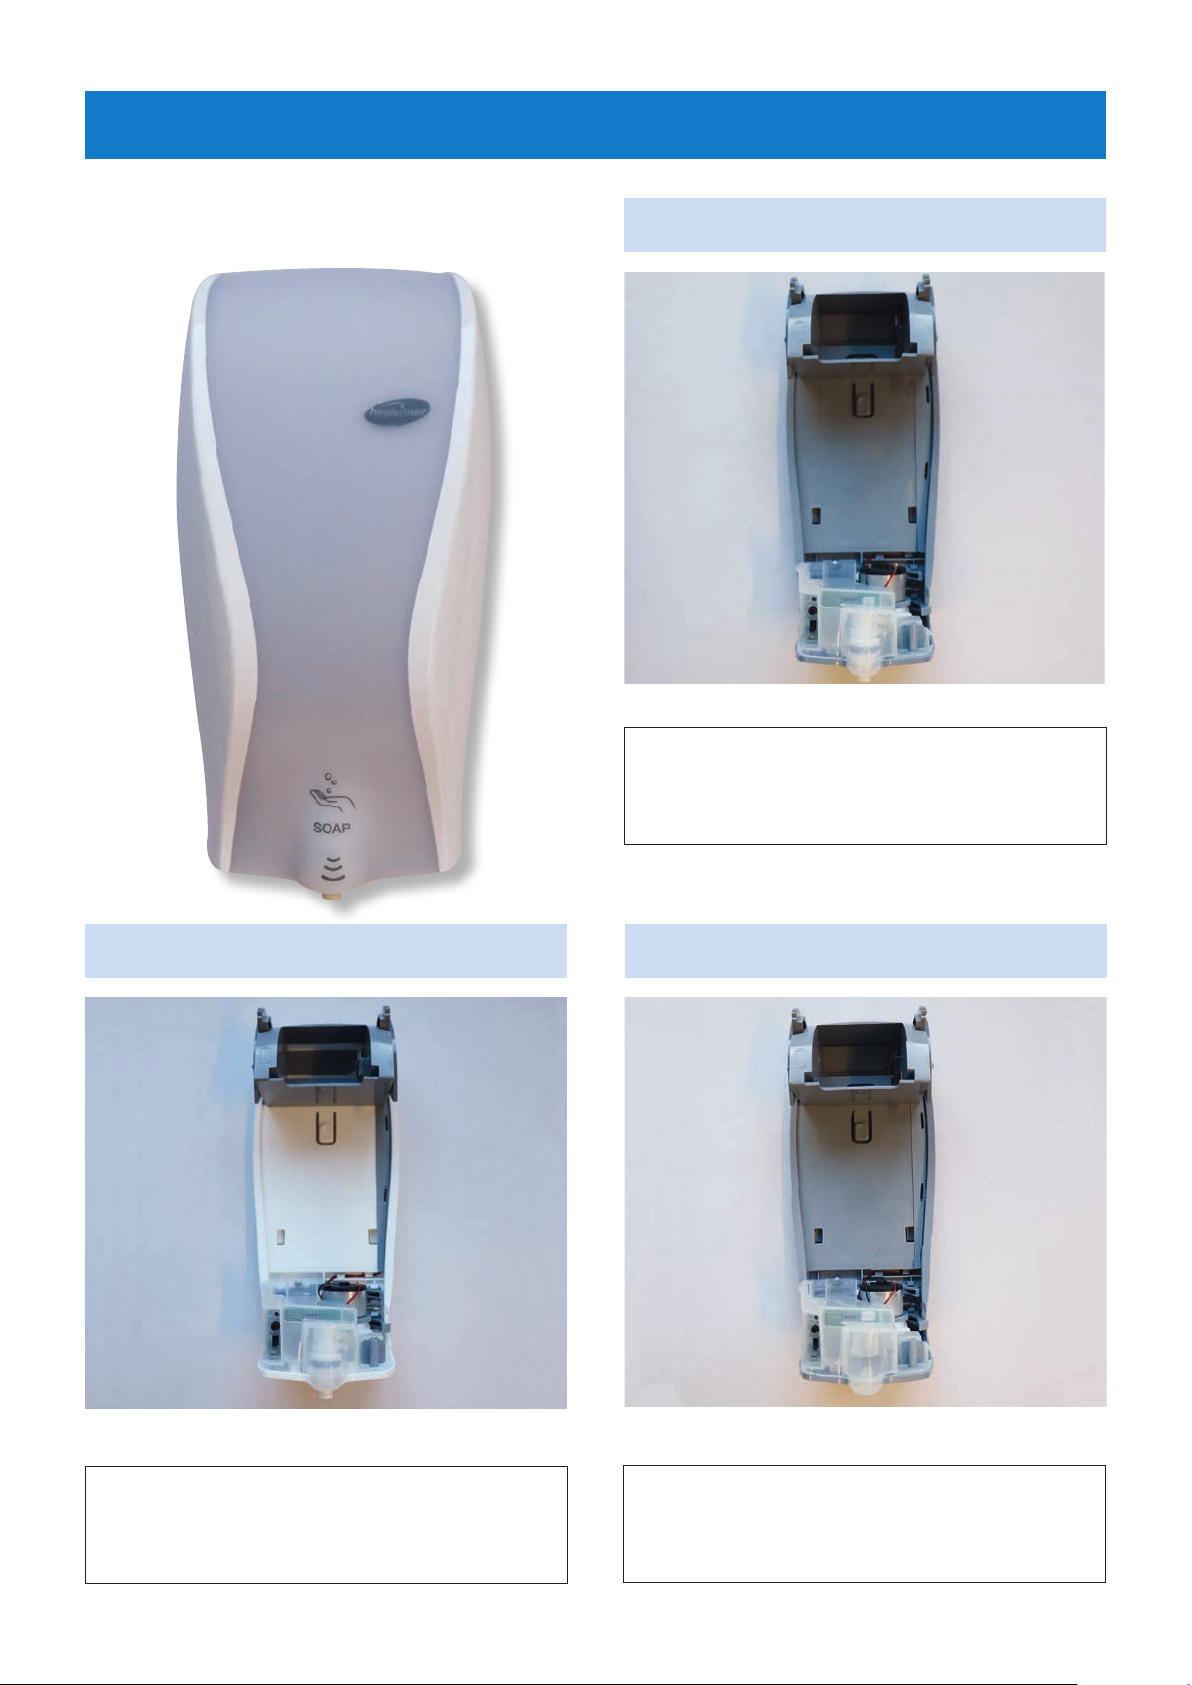
XIBU senseFOAM / XIBU senseDISINFECT / XIBU senseDISHES / senseSEATCLEANER
Technical package ........................................................................................................................................................................... 7
Replacing the cover assembly.................................................................................................................................................... 8
Replacing the potentiometer axis ............................................................................................................................................ 9
Battery tray assembly ..................................................................................................................................................................... 9
Changing the soap/disinfect tank .......................................................................................................................................... 10
XIBU senseSEATCLEANER / XIBU senseMOISTCARE / XIBU touchSEATCLEANER
Technical package ........................................................................................................................................................................... 11
Replacing the cover assembly .................................................................................................................................................. 12
XIBU touchFOAM
Technical package .......................................................................................................................................................................... 13
Replacing the technical package assembly ..................................................................................................................... 14
XIBU touchSEATCLEANER
Technical package ........................................................................................................................................................................... 15
Replacing the technical package assembly ..................................................................................................................... 16
XIBU senseTOWEL
Technical package .......................................................................................................................................................................... 17
Replacing the cover assembly.................................................................................................................................................... 18-19
Cover microswitch .......................................................................................................................................................................... 20
Replacing the battery tray ............................................................................................................................................................ 21
Tensioning roller spring ................................................................................................................................................................. 22
Replacing the cutting unit assembly ...................................................................................................................................... 23-24
Replacing the lower counter roller / ESD film installation ........................................................................................ 25-26
Replacing the top counter roller ............................................................................................................................................... 27-28
XIBU touchTOWEL
Technical package ........................................................................................................................................................................... 29
Replacing the cover assembly.................................................................................................................................................... 30-31
Tensioning roller spring ................................................................................................................................................................. 32
Insert spring ........................................................................................................................................................................................ 33
Replacing the cutting unit assembly .................................................................................................................................... 34-35
Exchange the spring time interval .......................................................................................................................................... 36
XIBU senseFRESHAIR
Replacing the AF adjustment pin ............................................................................................................................................ 37
Replacing the technical package assembly / Battery tray assembly ................................................................... 38
XIBU XL senseFLUID
Technical package ........................................................................................................................................................................... 39
Replacing the technical package assembly ....................................................................................................................... 40
Installation of various XIBU dispensers using two-sided adhesive tape
Foam/Disinfect, SEATCLEANER, senseMOISTCARE, tissuePAPER................................................................... 41
FRESHAIR, MULTIFOLD, XIBU XL senseFLUID.............................................................................................................. 42-43
Installation of various XIBU dispenser on mirrors
Screw mounting of XIBU dispensers on mirrors ............................................................................................................. 44
2 |Tips & Tricks |January 2018

XIBU senseTOWEL
XIBU touchTOWEL
XIBU touchMULTIFOLD
XIBU touchSEATCLEANER
XIBU senseSEATCLEANER
XIBU senseMOISTCARE
XIBU XL senseFLUID
XIBU
touchTISSUEPAPER
XIBU senseFRESHAIR XIBU senseFOAM
XIBU senseDISINFECT
XIBU senseDISHES
Batch number
The batch number for 20 January 2012
is formed as follows:.
Year Month Day Pers.
Checklist for troubleshooting on site
This checklist serves an aid for the fast detection of malfunctions and signs of wear
in the dispensers and, if possible, for carrying out on-the-spot repairs.
The overriding principle must be that dispensers have to be repaired on site and that
only hopeless cases are dismantled and sent to the headquarters.
16 01 20 XX
XIBU touchFOAM
January 2018 |Tips & Tricks |3
Batch-number
Since 14.9.2016 printed on all dispensers.
The batch number is formed as follows:
For example the date 17.09.2019.
The batch number is printed on the
respective dispenser here
Year Month Day
Pers.
serial number per day

XIBU TISSUEPAPER
Abb. 1: XIBU touchTISSUEPAPER
Spare part name:
XIBU touchTISSUEPAPER techn. package
Article no.
492011730000
Technical package
XIBU touchTISSUEPAPER
Article no.
411010065000
Abb. 2: XIBU touchTISSUEPAPER Technical package
4 |Tips & Tricks |January 2018

XIBU TISSUEPAPER
Replacing the cover assembly
Open the dispenser with the XIBU key.
Press the red (grey) locking lever on the left
side wall (Fig. 2) and slide it upwards (Fig. 3).
Fig. 1: Cover assembly
Fig. 4 Fig. 5 Fig. 6
Fig. 2
Spare part name:
WC cover white XIBU
Article no.
492011620000
Fig. 3
Press the right side of the cover lightly
to the outside so that the cover can be turned
to the side wall via the latch (Fig. 5).
Turn the cover down and then remove it from
the pivot on the side wall (Fig. 6).
The installation of the new cover takes place
in the reverse order!
rotation point
Remove the gear rack from the gear.
(Fig. 4)
January 2018 |Tips & Tricks |5

XIBU TISSUEPAPER
Spare part name:
XIBU WC lid clip
Artikel number:
492011830000
Change the lid clip
Change oft he lid clip:
Twist the lid clip counterclockwise until it
strikes and remove it. (Fig. 1 + 2)
The insert of the lid happens in the opposite
order.
Fig. 2
Fig. 1
6 |Tips & Tricks |January 2018

XIBU senseFOAM / XIBU senseDISINFECT / XIBU senseDISHES
Spare part name:
XIBU senseDISINFECT techn. package
Article no. 492011820000
Fig. 3
Spare part name:
XIBU senseDISHES techn. package
Article no. 492011880000
Fig. 4
XIBU senseFOAM
Article no. 411020105000
Fig. 1
XIBU senseFOAM Technical package
XIBU senseDISHES Technical packageXIBU senseDISINFECT Technical package
Spare part name:
XIBU senseFOAM techn. package
Article no. 492011650000
Fig. 2
January 2018 |Tips & Tricks |7

XIBU senseFOAM / XIBU senseDISINFECT / XIBU touchFOAM / XIBU senseDISHES
Replacing the cover assembly
Spare part name:
SE cover white XIBU
Article no.
492011575000
Fig. 1: Cover assembly, white
Fig. 2 Fig. 3
Slide the new cover into the guide on the
swivel joint and put back together in the re-
verse order.
Spare part name:
SE cover white XIBU touch
Article no.
492011765000
Spare part name:
DI cover white XIBU
Article no.
492011645000
XIBU senseDISINFECT
XIBU senseFOAM
XIBU touchFOAM
Spare part name:
XIBU senseDISHES cover
Article no.
492011895000
XIBU senseDISHES
Tools used:
Phillips screwdriver size PH1
Replacing the cover:
Open the dispenser with the XIBU key
Loosen the screws on the left and the right
side of the cover, (Fig. 2 and 3) so that the
cover can be pushed back. (Fig. 3)
The cover can now be removed.
8 |Tips & Tricks |January 2018

XIBU senseFOAM / XIBU senseDISINFECT / XIBU senseDISHES
January 2018 |Tips & Tricks |9
Replacing the potentiometer axis
Tools used:
Pin punch (Fig. 6)
Needle nose pliers
XIBU key
Requem:
Broken potentiometer axis
Solution:
Replace the potentiometer axis
Push the remainder of the potentiometer shaft
out with the pin punch (Fig. 2)
Insert the new potentiometer shaft (Fig. 3 and
4) with the needle nose pliers and press it in
lightly by hand (Fig. 5)
Fig. 1
Fig. 6
Battery tray assembly
Fig. 7: Battery tray assembly
Spare part name: SE battery case XIBU
Article no. 492011590000
Spare part name:
SE potentiometer axis XIBU
Article no. 492011580000
Request:
No blinking signal, dispenser without function
Possible causes: Batteries are completely
empty, the battery springs are broken, the
battery contacts are oxidised
Solution:
Replace the batteries and/or battery tray
Fig. 2 Fig. 3
Fig. 4 Fig. 5
Battery tray assembly
XIBU senseFOAM / XIBU senseDISINFECT / XIBU senseDISHES / XIBU senseSEATCLEANER /
XIBU senseMOISTCARE

Changing the soap/disinfect tank
Request:
intake bag broken
fill level display does not work
third party product was filled in
technical package has to be replaced
Fig. 1
Fig. 2
Solution:
replace the tank
Remove the dispenser from the wall and turn
it around.
Press in the notches with the screwdriver,
and pull out the tank (Fig. 1-2).
Insert the new soap tank and press in until the
tank snaps into place (click).
Spare part name:
XIBU SE-S Tank komplett HAG
Article no.: 492012000000
Spare part name:
XIBU DIS Tank komplett HAG
Article no: 492012010000
10 |Tips & Tricks |January 2018
XIBU senseFOAM / XIBU senseDISINFECT / XIBU senseDISHES / XIBU senseSEATCLEANER /
XIBU senseMOISTCARE

January 2018 |Tips & Tricks |11
XIBU senseSEATCLEANER
Article no.:
411010145000
Technical package
Fig. 1: senseSEATCLEANER technology package
Spare part name:
XIBU senseSEATCLEANER TP
Article no.:
492012110000
Spare part name:
XIBU MOISTCARE TP
Article no.:
492012130000
Fig. 2: senseMOISTCARE technology package
XIBU senseMOISTCARE
Article no.:
411010165000
XIBU senseSEATCLEANER / XIBU senseMOISTCARE

XIBU senseSEATCLEANER / XIBU touchSEATCLEANER / XIBU senseMOISTCARE
Replacing the cover assembly
Fig. 1
XIBU senseSEATCLEANER lid
Fig.5
Fig. 4
Tools used:
Phillips screwdriver size PH1
Lid replacement:
Open the dispenser with the XIBU key.
Undo screw on the left-hand side of the
cover (Figs. 4 and 5) so that the covers can be
pushed to the back (Fig. 5). The lid can now
be taken off.
Insert the new lid into the guide at the pivot
joint and reassemble in reverse order.
Fig. 2
XIBU touchSEATCLEANER lid
Fig. 3
XIBU senseMOISTCARE lid
12 |Tips & Tricks |January 2018

January 2018 |Tips & Tricks |13
XIBU touchFOAM
XIBU touchFOAM wl
Article no.
411020145000
Technical package
Fig. 1: touchFOAM technical package
Spare part name:
XIBU touchFOAM white techn.p.
Article no.
492011740000
Spare part name:
XIBU touchFOAM black techn.p.
Article no.
492011750000

Replacing the technical package assembly
Fig. 1
Tools used:
Slot screwdriver, size 2
XIBU key
Replacing the technical package:
Loosen the push piece from both latches.
(Fig. 1)
Fig. 3
Fig. 2
Loosen the lock on the bottom of the rear
side by using the screwdriver.
(Fig. 2)
Pull the technical package forwards (Fig. 3)
and loosen it from the holder.
The installation of the new technical package
takes place in the reverse order.
XIBU touchFOAM
14 |Tips & Tricks |January 2018

January 2018 |Tips & Tricks |15
XIBU touchSEATCLEANER
Article no.:
411010155000
Technical package
Fig. 1: touchSEATCLEANER TP dl
Spare part name:
XIBU touchSEATCLEANER TP bl
Article no.: 492012105000
Spare part name:
XIBU touchSEATCLEANER TP dl
Article no.: 492012106700

XIBU touchSEATCLEANER
Replacing the technical package assembly
Fig. 1
Tools used:
Slot screwdriver, size 2
XIBU key
Replacing the technical package:
Loosen the push piece from both latches.
(Fig. 1)
Fig.3
Fig. 2
Open the lock at the bottom using a
screwdriver (Fig. 2).
Pull the technology package forward (Fig. 3)
and detach it from the mounting.
Install the new technology package by
following above instructions in reverse order.
16 |Tips & Tricks |January 2018

January 2018 |Tips & Tricks |17
XIBU senseTOWEL
Fig. 1: XIBU senseTOWEL
XIBU senseTOWEL
Article no.
411020115000
Fig. 2: XIBU senseTOWEL Technical package
Spare part name:
XIBU senseTOWEL techn. package
Article no.
492011660000
Technical package
Spare part compatible with batch
no. 110115XX and higher

XIBU senseTOWEL
Replacing the cover assembly
Fig. 2 Fig. 3
Fig. 1: Baugruppe Deckel weiß
Tools used:
Phillips screwdriver size PH1
XIBU key
REPLACING THE COVER
Use the XIBU key to
Open the cover
remove the paper roll
Remove screw on the left and the right
side of the cover swivel joint using the Phillips
screwdriver. (Fig. 2 and 3)
Loosen screw by a single rotation.
Attention! Only a single rotation
(Fig. 2 and 3)
18 |Tips & Tricks |January 2018

January 2018 |Tips & Tricks |19
XIBU senseTOWEL
Replacing the cover assembly
Fig. 2 Fig. 3
Fig. 1
Twist the swivel joint upwards to the right and
left as seen in Fig. 1.
This exposes the gears of the cover and the
cover can be carefully lifted out.
When mounting the cover, ensure that the
guides slide inside each other (Fig. 3) and the
gears are positioned as in (Fig. 2).
Fig. 4
Then twist the cover swivel joint back to its
original position and tighten both screws
again (Fig. 4)
Spare part name:
HT cover white XIBU
Article no.
492011525000

XIBU senseTOWEL
Cover microswitch
Fig. 2
Fig. 4
Fig. 1
Request:
No paper is dispensed despite a green blin-
king LED (no difference whether the cover is
open or closed).
Possible cause:
Microswitch (cover) is not working!
Analysis:
Press and hold the microswitch with a finger
(Fig. 1) now check whether the dispenser is
dispensing paper?
The dispenser is dispensing paper!
Solution:
On the cover swivel joint, remove screw 2 on
the left and loosen screw 1 (1 rotation).
Rotate the cover upwards so that the micro-
switch becomes visible (Fig. 2).
Now gently bend the microswitch upwards
using the long nose pliers (Fig. 3 and 4).
It is put back together in the reverse order.
Fig. 3
Tools used:
Phillips screwdriver size PH1
Long nose pliers
20 |Tips & Tricks |January 2018
Other manuals for XIBU
1
Table of contents
Other Hagleitner Bathroom Fixture manuals
Popular Bathroom Fixture manuals by other brands

Signature Hardware
Signature Hardware BERWYN 953652 quick start guide

Kohler
Kohler MasterShower K-74 installation instructions

Kohler
Kohler C3-230 quick start guide

Symmons
Symmons Elm 553RH Operation & maintenance manual

Hans Grohe
Hans Grohe Rainfinity 130 3jet 26864700 Assembly instructions

Winsome house
Winsome house WHIF631 instruction manual