Haier HLH26ATBB - 26" LCD TV User manual

Please READ this manual carefully before
operating your TV, and retain it for future
reference.
TFT-LCD TV
OWNER S MANUAL'
MODEL :HLH26ATBB
HLH32ATBB
HLH266BB
HLH326BB
S

2 TFT-LCD TV
THIS SYMBOL INDICATES THAT HIGH VOLTAGE IS PRESENT
INSIDE. IT IS DANGEROUS TO MAKE ANY KIND OF CONTACT
WITH ANY INSIDE PART OF THIS PRODUCT.
WARNING : To reduce the risk of electric shock do not remove cover or back.
No user-serviceable parts inside refer service to qualified service personnel.
This equipment has been tested and found to comply with the limits for a Class B digital device,
pursuant to Part 15 of the FCC Rule. These limits are designed to provide reasonable protection
against harmful interference in a residential installation. This equipment generates, use and
can radiate radio frequency energy and, if not installed and used in accordance with the
instructions, may cause harmful interference to radio communications. However ,there is no
guarantee that interference with not occur in a particular installation. If this equipment does
cause harmful interference to radio or television reception, which can be determined by turning
the equipment off and on, the user is encourage to try to correct the interference by one or
more of the following measures:
*Reorient or relocate the receiving antenna.
*Increase the separation between the equipment and receiver.
*Connect the equipment into an outlet on a circuit different from that to which the receiver
is connected.
*Consult the dealer or an experienced radio/TV technician for help.
This device compiles with Part 15 of the FCC Rules. Operation is subject to the following
two conditions: (1) This device may be not cause harmful interference, and (2) this device
must accept any interference received, including interference that may cause undesired
operation.
FCC CAUTION:
To assure continued compliance and possible undesirable interference, the provided ferrite
cores must be used when connecting this plasma display to video equipment; and maintain
at least 40cm spacing to other peripheral device.
CANADIAN NOTICE:
This Class B digital apparatus compiles with Canadian ICES-003.
RISK ELECTRIC SHOOK
DO NOT OPEN
WARNING
Safety of operators has been taken into consideration at the design and manufacture
phase, but inappropriate operation may cause electric shock or fire. To prevent the product
from being damaged, the following rules should be observed for the installation, use and
maintenance of th product. Read the following safety instruction before starting the operation.
The User Manual uses the following symbols to ensure a safe operation and prevent
any damage to operators or properties:
THIS SYMBOL INDICATES THAT THERE ARE IMPORTANT
OPERATING AND MAINTENANCE INSTRUCTIONS IN THE
LITERATURE ACCOMPANYING THE APPLIANCE.
FCC STATEMENT

Owner s Manual 3
IMPORTANT SAFETY INSTRUCTIONS
Read all of the instructions before using this appliance. When using this
appliance, always exercise basic safety precautions, including the following:
1)Save these Instructions ---the safety and operating instructions should be
retained for future reference.
2)All warning on the appliance and in the operating instructions should be followed.
3)Cleaning --- Unplug from the wall outlet before cleaning. Do not use liquid
cleaners or aerosol cleaners. Use only dry cloth for cleaning.
4)Attachments ---do not use attachments not recommended by the manufacturer
as they may cause hazards.
5)Water and moisture -- do not place this product near water, for example, near a
bathtub, wash bowl, kitchen sink, laundry tub, in a wet basement, or near a
swimming pool.
6)Accessories ---do not place this unit on an unstable cart, stand, tripod, bracket,
or table. Use only with a cart, stand, tripod, bracket, or table recommend by the
manufacture, or sold with the unit.
7)Ventilation ---Slots and openings in the cabinets and the back or bottom are
provided for ventilation. These openings must not be blocked. In a built in
installation such a bookcase or rack do not install product unless proper ventilation
is provided.
8)Power Source ---this TV should be operated only from the type of power source
indicated on the rating label. If you are not sure of the type of power supply to your
home, consult your appliance dealer or local power company.
9)Do not defeat the safety purpose of the polarized or grounding-type plug. A
polarized plug has two blades with one wider than the other. Agrounding type plug
has two blades and a third grounding prong. The wide blade or the third prong are
provided for your safety. If the provided plug does not fit into your outlet, consult an
electrician for replacement of the obsolete outlet. To prevent electric shock, ensure
the grounding pin on the AC cord power plug is securely connected.
10)Power cord protection ---Power supply cords should be routed so that they are
not likely to be walked on or pinched by items placed upon or against them. Pay
particular attention to cords or plugs, convenience receptacle, and the point where
they exit from the appliance.
11)Lighting precaution ---for added protection for this product during a lighting
storm or when it is left unattended for long period of time, unplug it from the wall
outlet and disconnect the antenna or cable system. This will prevent damage to the
product due to lighting and power line surges.
12)Never push objects of any kind into this product through openings as they may
touch dangerous voltage point or short out parts that could result in a fire or electric
shock. Avoid spilling liquid of any kind on the product.
13)Servicing ---do not attempt to service the product by yourself, as opening or
removing covers may expose you to dangerous voltage or other hazards. Refer all
servicing to authorized service personnel.
14)Unplug this unit from the wall outlet and refer servicing to qualified service
personnel under the following conditions:
a. When the power supply cord or plug is damaged or frayed.

b.If liquid has been spilled, or objects have been fallen into the unit.
c.If the unit has been exposed to rain or water.
d.If the unit does not operate normally by following the operating instructions.
Adjust only those controls that are covered by the operating instructions, as
improper adjustment of other controls may result in damage and will often
require extensive work by a qualified technician to restore the unit to its normal
operation.
e.If the unit has been dropped or damaged in any way.
f.When the unit exhibits a distinct change in performance; this indicates a need
for service.
15)Heat --- The product should be situated away heat source such as radiators, heat
registers, stoves, or other products (Including amplifiers) that product heat.
16)Overloading ---Do not overload wall outlets and extension cord as this can result
in a risk of fire or electric shock.
SAVE THESE INSTRUCTIONS
Thank you for using our Haier product. This easy-to-use manual will guide you in
getting the best use of your product. Remember to record the model and serial
number. They are on label in back of the unit.
Model number
serial number
Date of purchase
Staple your receipt to your manual. You will need it to obtain warranty service.
4 TFT-LCD TV

Contents
Introduction
Owner s Manual 5
War nin g . . . . . . . ... ... ... ... .. . . . . . . . . . . . . . . . . . . . . . . .
Saf ety I nst ruc tio ns . . . . . . . . . . . . . . . . . . . . . . . . . . . . ...
Introduction
Con tro ls . . . . . . . . . . . . . . . . . . . . . . . . . . . . . . . ... ... ... ... ..
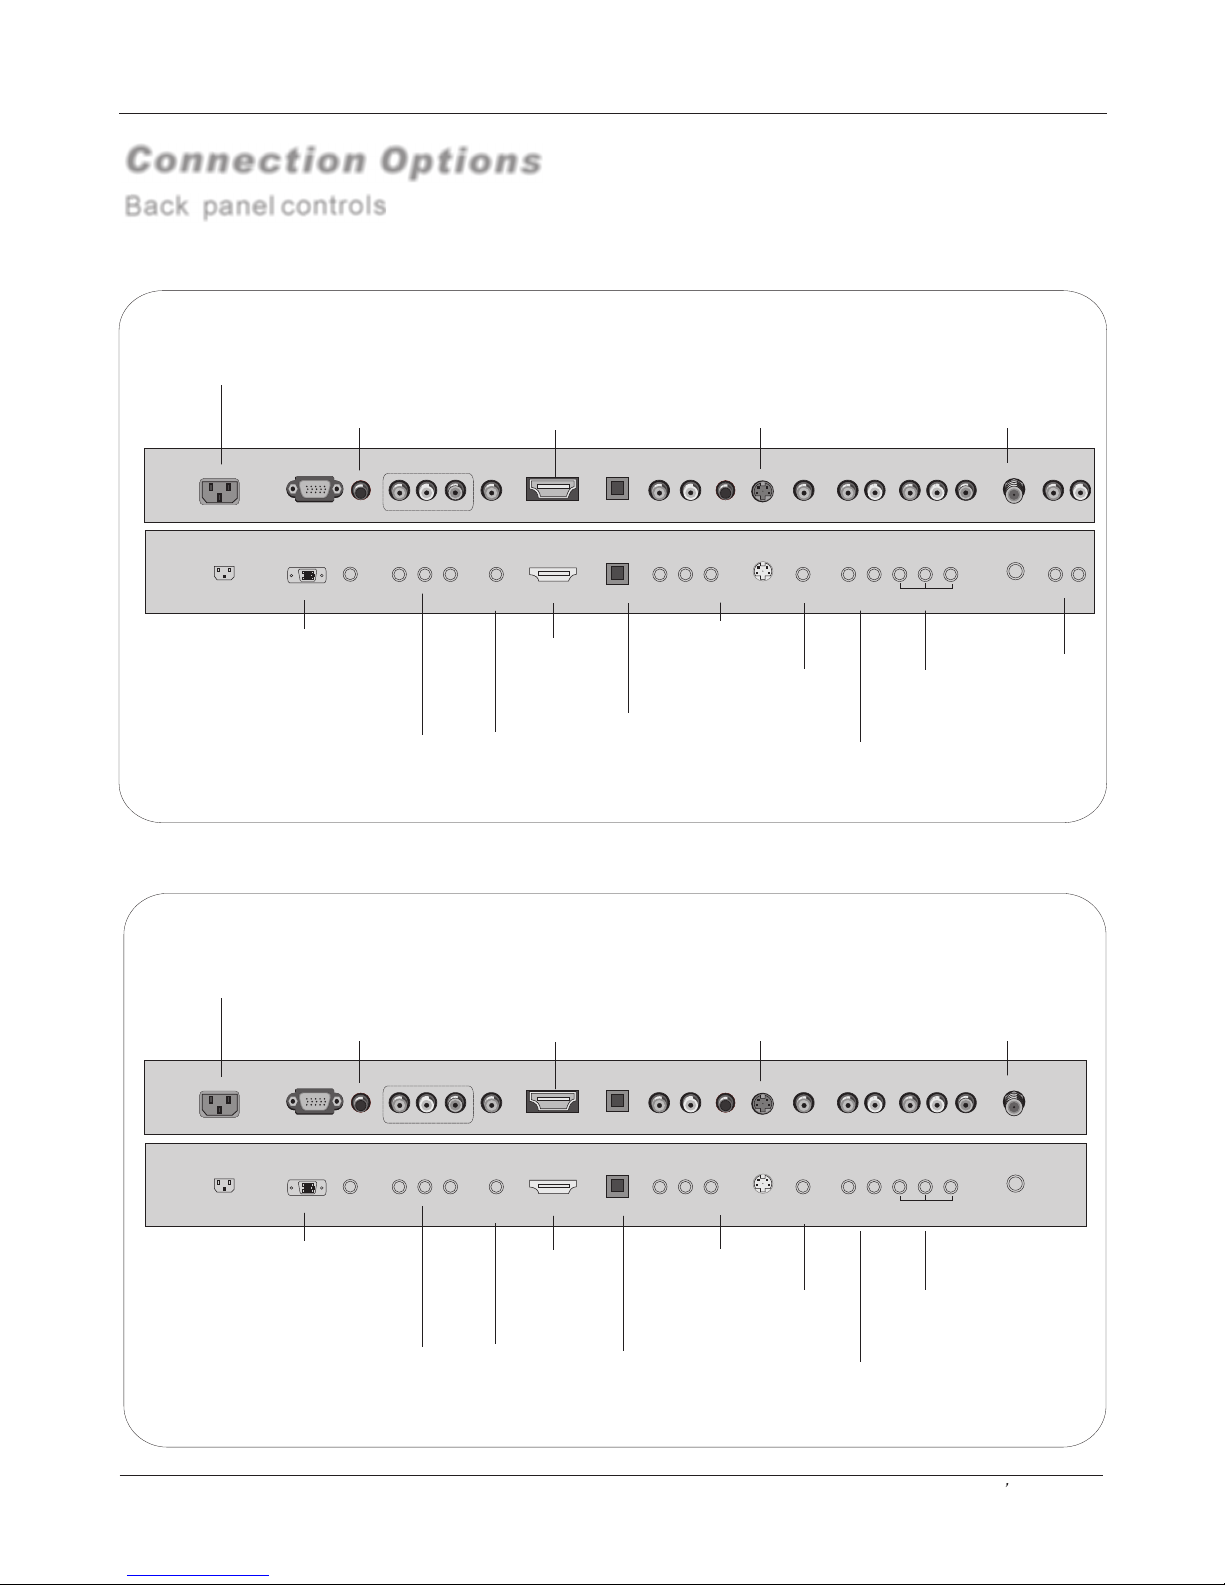
Connection Options .. . . . . . . . .. . .. . .. . . . . .............
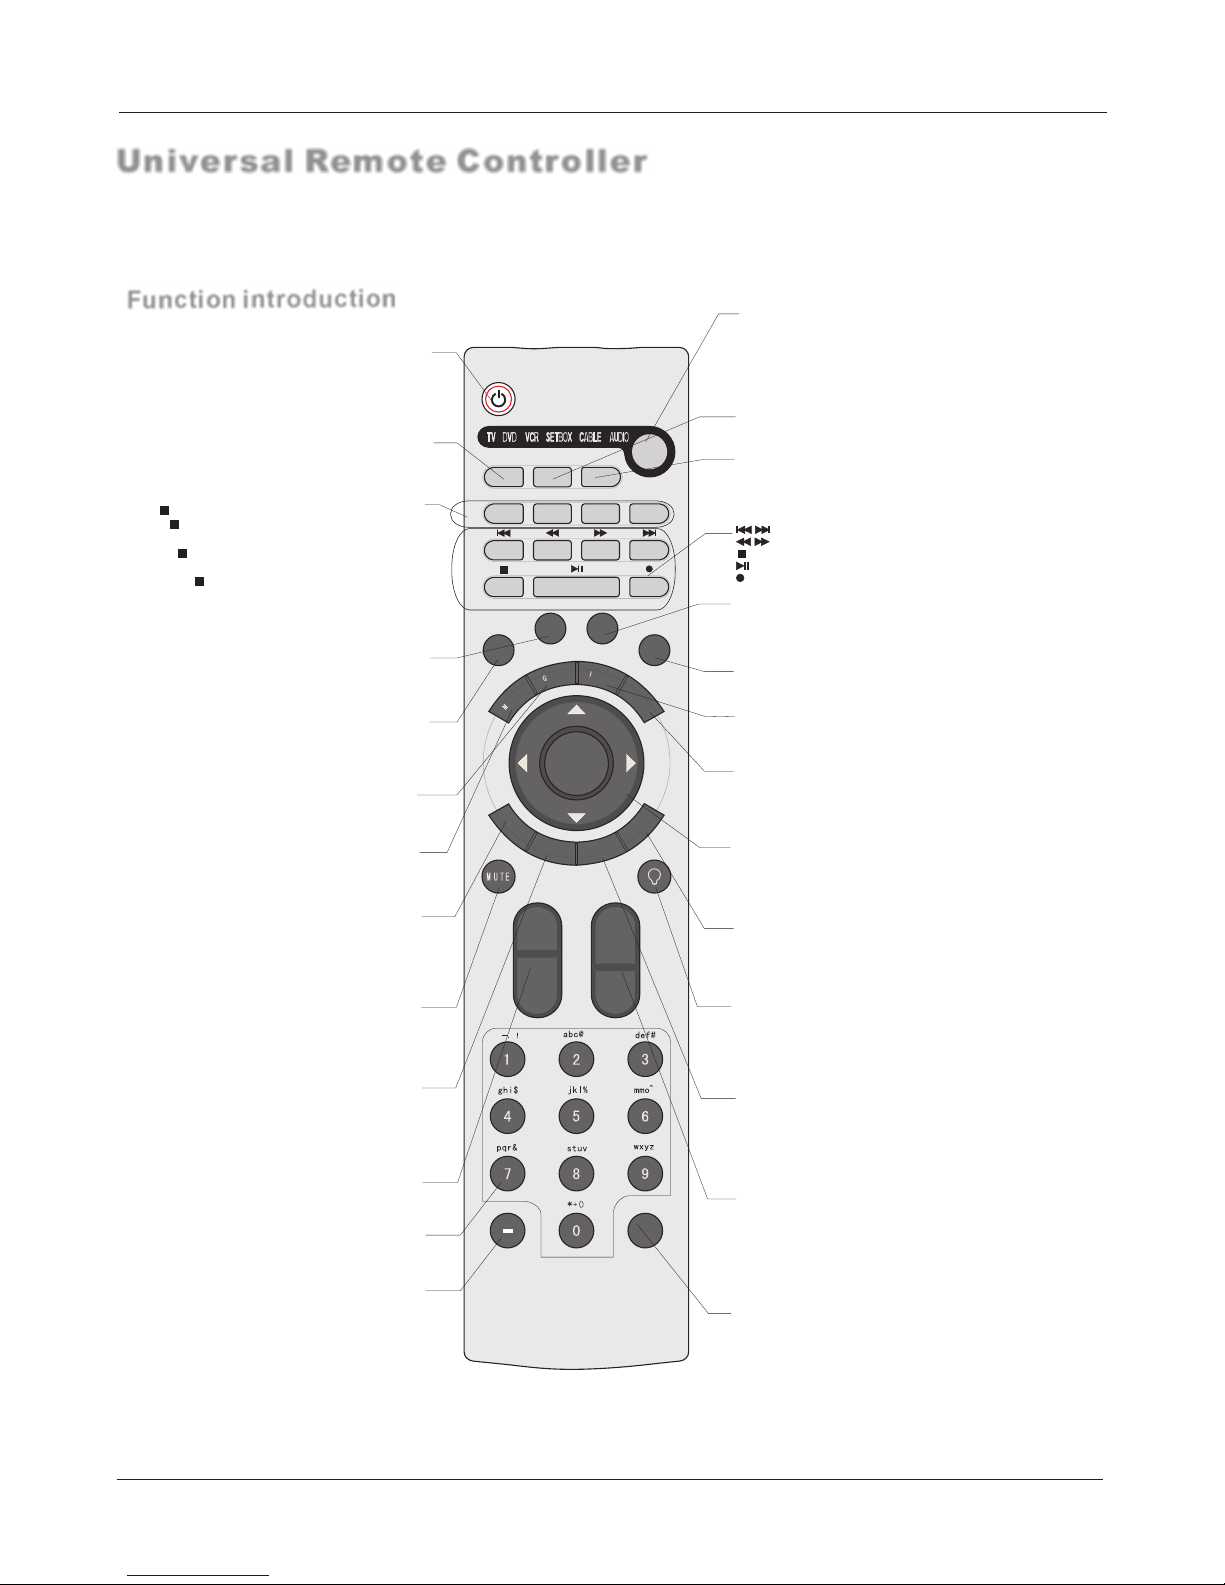
Universal Remote Controller. ............ .. . . . . . . ......
Installation
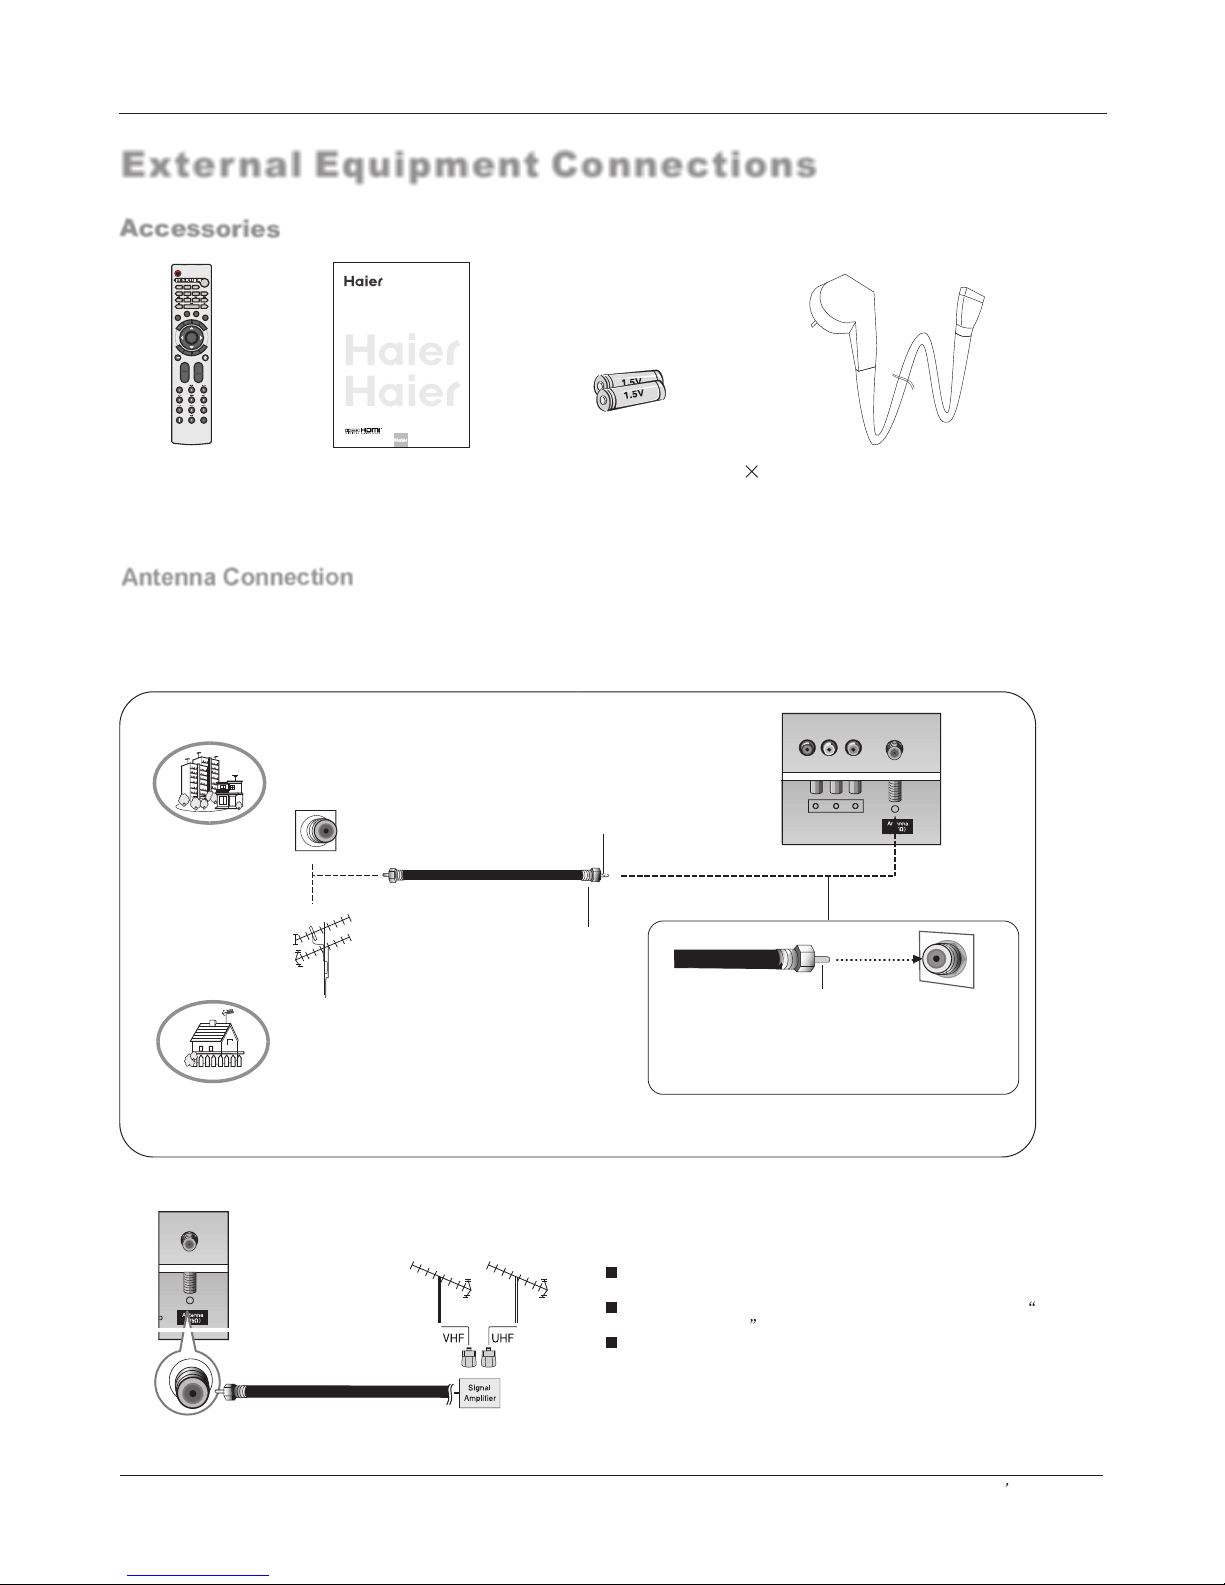
Acc ess ori es . . . . . . . . . . . . . . . . . . . . . . . . . . . . . ... ... ... ..
Antenna Connection .. . . . . . . . ...............................
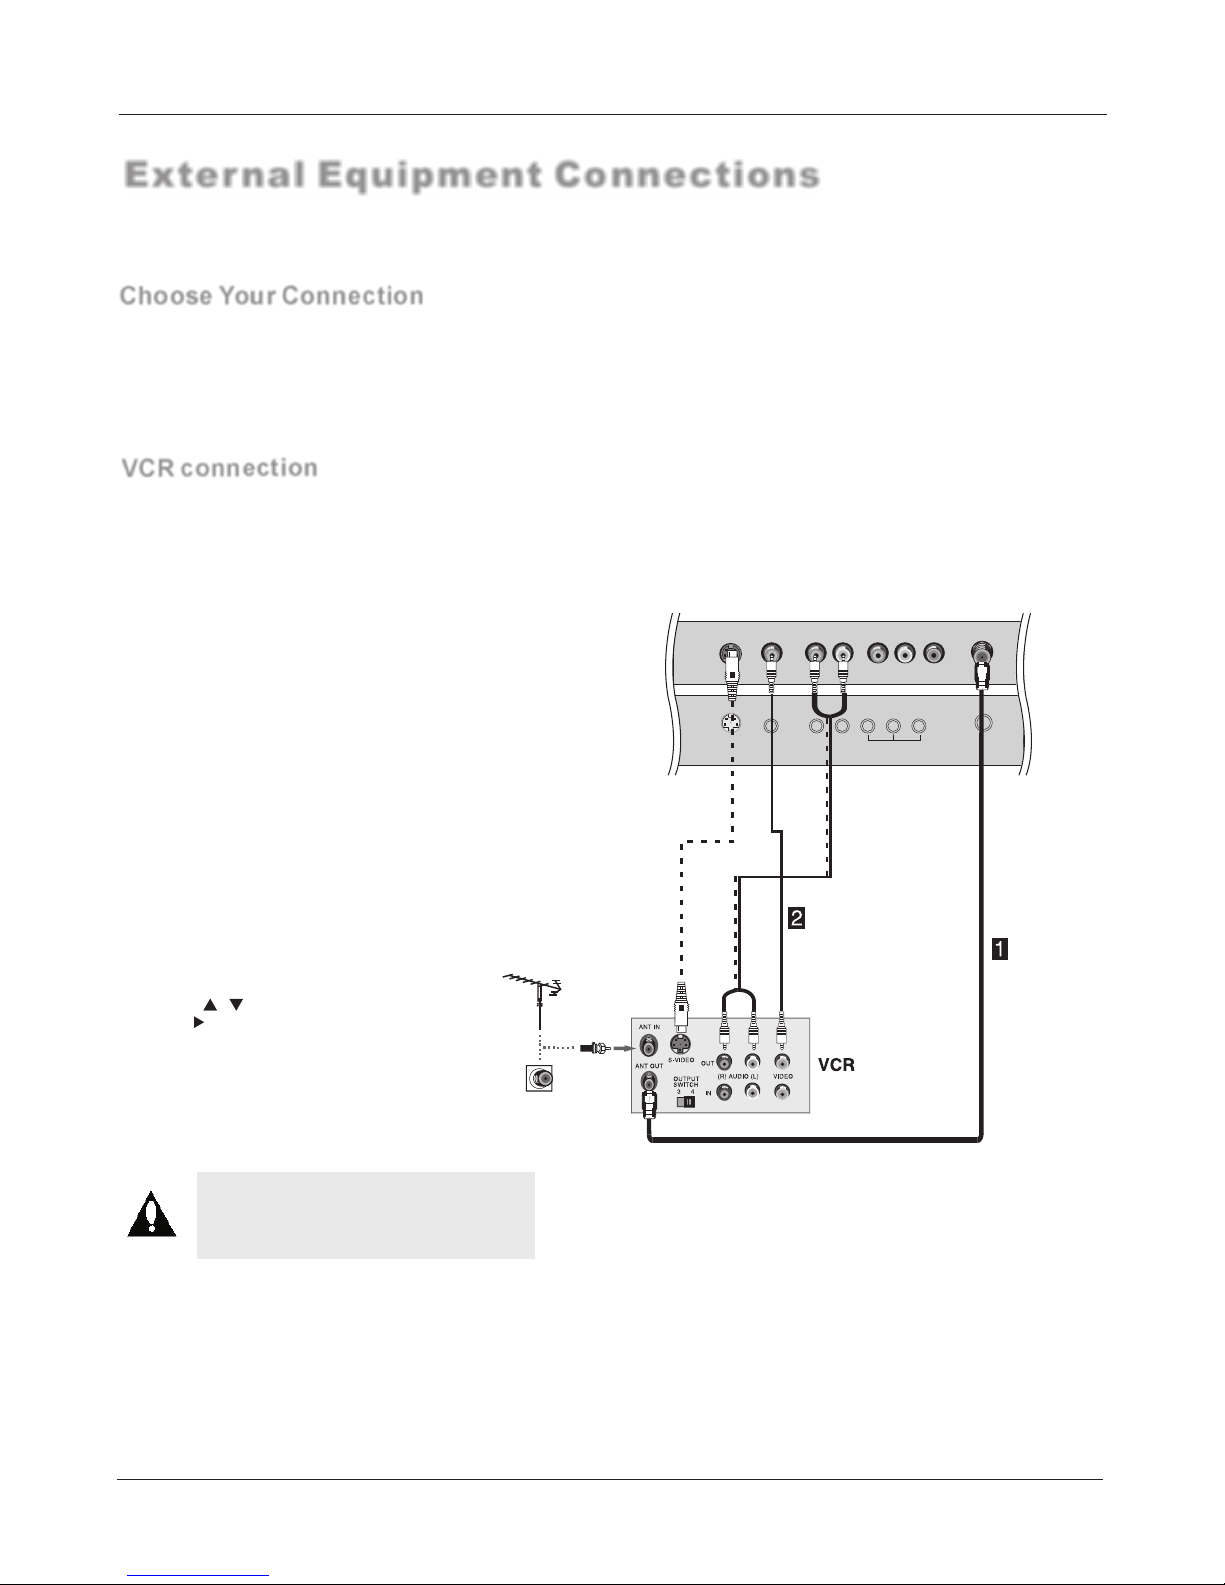
VCR Connectio. .. . . . . . . . . . . .. . .. . . . ................. ..
External A/VSource Setup . . . . .. . .. . ......................
DVD Connection .. . . . ...... . . . . . . .. . .. . . ................
DTV Connection.....................................................
Digital AudioOutput . . . . . . . .. . .. . . . . . . . . ..............
PC Connection. .. . . . . . . . . . . . . . .. . . . . . ................
Monitor Out Setup. . . . . . . . . . . .. . .. . . . . ............... .
HDM I . . . . . . . . . . . . . . . . . . . . . . . . . . . . . . .. ... ... ... ... ... .
Cable sample.........................................................
Connecting Headphones .. . . . . . . . .. . .. . . . . . ....... .
Pow er so urc e.. ... ... ... ... .. . . . . . . . . . . . . . . . . . . . . . . . . .
Operation
Switching On/Off the TV set . . . . . ... . . . . . . . . . . . ... ...
Choose the MenuLanguage . . . . ..... .......................
Choose the inputsource.........................................
Channel Menu
Automatic Scan. .. . . . . . . . . . . .............................. .
Man ual S can . . . . ... ... ... ... .. . . . . . . . . . . . . . . . . . . . . .. .
Fine tune................................................................
Edi t Pro gra m.. ... ... ... ... . . . . . . . . . . . . . . . . . . . . . . . . . ..
S. . .. . ........... ............ . . ..
S. . ............... . . ............ . . ..
Mute .............. .. . ............................................ . . ..
Video Menu
Aspect Ratio Control. . . . . . . . . . . . . . . . . . . . .. . . .. . . ..
Audio Menu
SAP Broadcasts Setup............................................
elect the desiredprogram
elect the desiredsound
How to selectpicture modes.....................................
How to customizeyour own picture status .................
How to selectaudio modes......................................
How to customizeyour own audio status ..................
Timer Menu
Function Menu
Closed Captions.....................................................
CC mode...............................................................
........................................................
DTV Caption..........................................................
DTV Caption Style..................................................
.........................................................
...........................................................
..................................................
Menu
Screen Setup forPC mode......................................
Lock Menu
rating and categories.......................
Others Functions
EPG (Electronic ProgramGuide) . . . . . . . .. . .. .........
Bri ef In fo. . . . . . . . . . . . . . . . . . . . . . . . . . . . . ... ... ... ... . .
Veiwing Picture-in- Picture
Other function
Maintenance . . ... ... . . . . . . . . . . . . . . . . . . . . . . . . . . . .
Troubleshooting . . . . . . . . . . . . . . . . . . . . . . . . . . . . . . .
Product Specifications . . . . . . . . . . . . . . . . . . . . . . . . .
Warranty ................................................................
Date /Time setting...................................................
Timer on setting......................................................
Timer offsetting......................................................
Sleep Timersetting.................................................
Time zone setting...................................................
Daylight Saving setting...........................................
NTSC Caption
OSD Timeout
Blue screen
OSD transparency
Adjust
.....................................
Quick program view.................................................
Setting up yourremote control ..................................
Remote Control Codes............................................
Parental Control
Manufactured under licensefrom Dobly Laboratories."Dobly" and the
double-D symbol aretrademarks of DoblyLaboratories. Confidential
unpublished works.
Copyright 1992-1997 DolbyLaboratories. Allright reserved.

Front panel controls
-This is a simplified representation of front panel.
-Here shown may be somewhat different from your TV.
1.
2.
3.
4.
5.
6. Remote control signal receive window.
7.Remote Indicator In red when standby mode, in blue when display.
INPUT:
CH( ) Program plus and minus, menu options
VOL( ) Volume increase and decrease, menureset and entry
MENU Menu display
all input sourcedisplay and OK confirm.
POWER : Is used to activate the display or return to standby mode.
Controls
1.INPUT: all input source display and OK confirm.
2.CH ( ) : program minus and plus, menu options
3.VOL ( ): volume decreaseand increase , menu reset and entry
4.MENU: menu display
5. POWER : Is used to activate the display or return to standby mode.
6.Power indicator: in red when standby mode, in blue when display.
7.Remote control signal receive window
HLH266BB
HLH26ATBB
The buttons are on the bottom of the TV set)
INPUT CH VOL MENU
1
INPUT
2
3
4
5
6
7
Introduction
6 TFT-LCD TV
HLH32ATBB
HLH326BB
VIDEO
R
AUDIO
L
AUDIO2 Input
connect to hear
stereo sound froman
external device.
VIDEO2 Input
Connects the videosignal
from a videodevice.
MENU
CH
VOL

Back panel controls
Connection Options
HLH266BB
HLH26ATBB
DVI Input
Connect the monitor
output connector from
a PC to the appropriate
input port.
Power Cord Socket
This TV operates on AC power.
The voltage is indicated on the
Specifications page. Never attempt
to operate the TV on DC power
PC
Audio In
PrPb
Y
DVI Audio In
AC IN
DVD/DTV Input
(Component )
Connect a component
video/audiodevice to
these jacks.
Earphone jack:
Earphone audio
output terminal.
Audio input
for linking PC audio
frequency output terminals.
PC VIDEO Input
Connect the monitor
output connector from
a PC to the jack
Antenna Input
Connect cable or
antenna signals to
the TV, either directly
or through your
cable box.
HDMI
Optical
YPbPr
Audio In
LR
Headphone
out
S-Video
S-Video Input
Connect SVideo
out from
an S-VIDEO
device to theS-VIDEO
input.
Digital Audio Output
Connect digital audio
from various typesof
equipment. Note: In
standby mode,
these ports willnot
work.
CVBS
S-video/CVBS
Audio In
LR
RL V
AV OU T
R INPUT
F
HDMI/DVI
connect a
DVI(Video)
signal to
HDMI/DVI.
DVI Input
Connect the monitor
output connector from
a PC to the appropriate
input port.
Power Cord Socket
This TV operates on AC power.
The voltage is indicated on the
Specifications page. Never attempt
to operate the TV on DC power
PC
Audio In
PrPb
Y
DVI Audio In
AC IN
DVD/DTV Input
(Component )
Connect a component
video/audiodevice to
these jacks.
Earphone jack:
Earphone audio
output terminal.
Audio input
for linking PC audio
frequency output terminals.
PC VIDEO Input
Connect the monitor
output connector from
a PC to the jack
Antenna Input
Connect cable or
antenna signals to
the TV, either directly
or through your
cable box.
HDMI
Optical
YPbPr
Audio In
LR
Headphone
out
S-video
S-Video Input
Connect SVideo
out from
an S-VIDEO
device to theS-VIDEO
input.
Digital Audio Output
Connect digital audio
from various typesof
equipment. Note: In
standby mode,
these ports willnot
work.
CVBS
S-video/CVBS
Audio In
LR
RL V
AV OU T
R INPUT
F
HDMI/DVI
connect a
DVI(Video)
signal to
HDMI/DVI.
Introduction
Owner s Manual 7
AUDIO OUT
HLH326BB
HLH32ATBB
Caption output
Caption output
AUDIO Input
connect to hear
stereo sound froman
external device.
VIDEO Input
Connects the video
signal from a
video device.
AUDIO/VIDEO
output
AUDIO output
AUDIO Input
connect to hear
stereo sound froman
external device.
VIDEO Input
Connects the video
signal from a
video device.
AUDIO/VIDEO
output

SELECT
CH.LIST FAV.LIST
AUDIOLIST
PIP SWAP
AUDIOSWAP
POSITION
CC
P.MODE
S.MODE
FREEZE
ENU
UIDE
NPUT
INFO
EXIT
R
AC
SAP
SLEEP
VOL+
CH+
Q.VIEW
OK
VO
L
-
CH-
POWER
Turns your TV or any other programmed
equipment on oroff, depending on mode.
- The remote controller cannot be operated unless the batteries are properly loaded.
Function introduction
- When using the remote control, aim it at the remote control sensor on the TV.
SAP
Selects MTS sound:Mono, Stereo, andSAP in Analog
mode. Change theaudio language inDTV mode.
Introduction
8 TFT-LCD TV
Favorite
Open the favoritechannel list. Select the subchannel
THUMBSTICK
(Up/Down/Left/Right/OK)
Allows you tonavigate the on-screenmenus and adjust
the system settingsto your preference.
CHANNEL UP/DOWN
Selects available channels
PAGE UP/PAGE DOWN
Moves from onefull set ofscreen
Renamermation to thenext one.
P.MODE
Selects a factorypreset picture mode
depending on theviewing environment. FREEZE
Freezes the currently-viewedpicture, but audiocontinues.
Press FREEZE buttonagain to resumethe normal picture.
ARC
(Aspect Ratio Control)
Changes the aspectratio.
It is noavailable in PIPmode.
S.MODE
Selects the soundappropriate for theprogram's
character.
VOLUME UP/DOWN
Increases/decreases the soundlevel.
Digits
press to changethe channel.
EXIT
Clears all on-screendisplays and
returns toTV viewingfrom any menu.
INPUT
show the input sourcemode.
MUTE
Switches the soundon or off
CC(closed caption)
Select a closedcaption:
CC MUTE, CCON, CC OFF.
GUIDE
Shows program schedule.
INFO
When you watchthe TV, press thekey, theinformation
displays on bottomof the screen.
MENU
Brings up themain menu tothe screen.
PIP function buttons
PIP:Selects PIP, POP and main Window;
SWAP:In PIP andPOP mode, swapthe
main and sub window;
AUDIO SWAP: In PIP and POP mode,
swap the audioof main andsub window;
PIP position: To select sub picture
position for PIP.
SLEEP button
Displays the SleepTimer option.
Q.VIEW
Switch the currentchannel to thelast channel
you have viewed,or switch theother source to TV.
CH.LIST
Open the channellist.
Universal Remote Controller
TV DVD VCR SETBOX CABLE AUDIO
Press the SELECT button repeatedly to select one of the
system modes inwhich the remotecontrol can be used.
When the desireddevice is selected,the corresponding
LED lights on5seconds.
VCR/DVD Functions
/ Rewind / Fast
/
Control some videocassette recorders orDVD players.
backward /Forward
Stop
Play/Pause
REC
AUDIO.LIST
Open the audiochannellist.
- button
Press to selectadditional channels
(digital and analog)
being broadcast bythe same station.
For example, toselect channel
“54-3”, press “54”,then press “-”and “3”.
Electric Torch key
Press and hold ElectricTorchkey, whiteLED will be ON,release
this key,white LED will beOFF.

Generally speaking, to enjoy a clearer picture, we recommend that you use a CATV system or an
outdoor antenna .In different places, the suitable antenna type and position are different.
External Equipment Connections
Antenna Connection
Multi-family Dwellings/Apartments
(Connect to wallantenna socket)
Wall Antenna
Socket
Single-family Dwellings /Houses
(Connect to walljack for outdoorantenna)
Outdoor
Antenna
VHF Antenna
UHF Antenna
Turn clockwise to tighten.
RF Coaxial Wire(75 ohm)
Bronze Wire
Be careful notto bend thebronze wire when
connecting the antenna.
Bronze Wire
To improve the picture quality in a poor signal area,
please purchase asignal amplifier andinstall properly.
If the antennaneeds to besplit for twoTV`s, install a 2-
Way Signal Splitter in the connections.
If the antennais not installedproperly, contact your dealer
for assistance.
Installation
Owner s Manual 9
Accessories
Remote controller User's manual Alkaline battery(AAA) 2 Power cable
SELECT
CH.LIST FAV.LIST
AUDIOLIST
PIP SWAP
AUDIOSWAP
POSITION
CC
P.MODE
S.MODE
FREEZE
ENU
UIDE
NPUT
INFO
EXIT
R
AC
SAP
SLEEP
VOL+
CH+
Q.VIEW
OK
VO
L
-
CH-
Please READ this manual carefully before
operating your TV,and retain it for future
reference.
TFT-LCD TV
OWNER S MANUAL'
MODEL :HLH26ATBB
HLH32ATBB
HLH266BB
HLH326BB
S

VCR connection
NOTE: All cables shown are not included with the TV.
There are severalways to connect your television, dependingon the components you want to connect
and the qualityof the signal you want toachieve. The following are examples of some waysto connect
your TV. Choose the connection which is best for you.
External Equipment Connections
Choose Your Connection
Note:
Do not connect to both Video and
S-Video at the same time.
- To avoid picture noise (interference), leave an adequate distance between the VCR and TV
Connection Option 1
Set VCR outputswitch to channel3 or 4and
then tune theTV to the same channelnumber.
Connection Option 2
1. Connect theaudio and videocables from the
VCR's output jacksto the TV input jacks,as
shown in thefigure.
When connecting theTV to VCR, match the
jack colors (Video = yellow, Audio Left = white,
and AudioRight = red).
If you connectan S-VIDEO outputfrom VCR to
the S-VIDEO input,the picture qualityis
improved; compared toconnecting a regular
VCR to theVideo input.
2. Insert avideo tape intothe VCR andpress
PLAY on the VCR. (Refer to the VCR owner`s
manual.)
3. Select theinput source withusing the
INPUT button on theremote control, and
then press / button to selectthe source,
press the button to confirm.
S-Video
CVBS
S-Video/CVBS
Audio In
LR
RL V
AV OU T
R INPUT
F
Installation
10 TFT-LCD TV

Pr Pb
Y
DVI Audio IN
YPbPr
Audio In
LR
Headphone
out
S-Video
CVBS
S-Video/CVBS
Audio In
LR
How to connect
1. Connect theDVD video outputs(Y, Pb/Cb, Pr/Cr)to the Y, Pb,
Pr jacks onthe TV and connect theDVD audio outputsto the
YPbPr AudioIN jacks onthe TV, as shown in the figure.
2. If yourDVD only hasan S-VIDEO output jack, connect this
to the S-VIDEOinput on theTV. as shown inthe figure.
NOTE: If your DVDplayer does nothave component video
output, use S-Video.
How to use
1. Turnon the DVDplayer, insert a DVD.
2. Use theINPUT button on the remotecontrol to selectYPbPr
mode.
3. Press Playbutton on externalequipment for program play.
4. Refer tothe DVD player'smanual for operatinginstructions.
DVD connection
External Equipment Connections
How to connect
Connect the audioand video cablesfrom the externalequipment's
output jacks tothe TV input jacks, asshown in thefigure.
When connecting theTV to external equipment, matchthe
jack colors (Video = yellow, Audio Left = white, and Audio
Right = red).
How to use
1. Select theinput source withusing the INPUTbutton on
the remote control.
2. Press the / button to selectthe desired source.
3. Press the or ok buttonto confirm
2. Operate thecorresponding external equipment.
External A/V Source Setup
Video Game Set
Camcorder
Component Input ports
Toget better picturequality, connect a DVDplayer to thecomponent
input ports asshown below.
S-Video
CVBS
S-Video/CVBS
Audio In
LR
RL V
AV OU T
R INPUT
F
Installation
Owner s Manual 11
Component ports
on the TV
Video output ports
on DVD player
Y Pb Pr
Y Pb Pr
Y B-Y R-Y
Y Cb Cr
Y P P
BR

PC
Audio In
Pr Pb
Y
DVI Audio IN
HDMI
Optical
YPbPr
Audio In
LR
Headphone
out
Digital Set-top Box
- This TV can receive Digital Over-the-air/Cable signals without an external digital set-top box. However, if you do receive Digital
signals from adigital set-top boxor other digitalexternal device, referto the figureas shown below.
- This TV supports HDCP (High-bandwidth Digital Contents Protection) protocol for Digital Contents (480p,720p,1080i).
How to connect
Use the TV`s (Y, PB, PR) , VGAor HDMI
jack for videoconnections, depending on
your set-top boxconnector. Then, make
the corresponding audioconnections.
How to use
1. Turnon the digitalset-top box. (Referto the owner`s
manual for thedigital set-top box.)
2. Use INPUTon the remotecontrol to select
YPbPr, VGA,or HDMI source.
Send the TV`s audio toexternal audio equipment (stereo system) via
the DigitalAudio Output (Optical) port.
How to connect
1. Connect oneend of anoptical cable tothe TV Digital Audio
(Optical) Output port.
2. Connect theother end ofthe optical cableto the digitalaudio (optical)
input on theaudio equipment.
See the externalaudio equipment instructionmanual for operation.
Note: When connecting withexternal audio equipments,such as
amplifers or speakers,please turn theTV speakers off.
Digital Audio Output
Caution: Do notlook into theoptical output port.
Looking at thelaser beam maydamage
your vision.
External Equipment Connections
DTV connection
HDMI
Optical
YPbPr
Audio In
LR
Headphone
out
Installation
12 TFT-LCD TV
Signal
480i
480p
720p
1080i
YPbPr
Yes
Yes
Yes
Yes
HDMI/DVI
No
Yes
Yes
Yes

PC
AUDIO
IN
Pr Pb
Y
DVI
Audio IN
HDMI
How toconnect
1. To get thebest picture quality, adjust thePC graphics cardto (>1024
2. Use theTV`s PCor DVI (DigitalVisual Interface)AudioIN port forvideo connections, dependingon your PCconnector.
If the graphiccard on thePC does notoutput analog anddigital RGB simultaneously, connect onlyone of eitherVGA r DVI INto
display the PCon theTV.
If the graphic card onthe PC doesoutput analog anddigital RGB simultaneously, set theTV toeithe DVI; (the othermode is
set to Plugand Play automaticallyby theTV.)
3. Then,make the correspondingaudio connection. Ifusing a soundcard, adjust thePC sound asrequired.
How touse
1. Turnon the PCand theTV.
2. Turnon the displayby pressing thePOWER button onthe TV'sremote control.
3. Use INPUTon the remotecontrol to selectVGA orHDMI source.
4. Check theimage on yourTV.There maybe noise associatedwith the resolution,vertical pattern, contrastor brightness inPC mode.
If noise ispresent, change thePC mode toanother resolution, changethe refresh rateto another rateor adjust thebrightness and
contrast on themenu until thepicture is clear. If therefresh rate ofthe PC graphiccard can notbe changed, changethe PC graphic
card or consultthe manufacturer ofthe PC graphiccard.
NOTES:
1 Use a DVIcable.
2Avoid keeping afixed image onthe TV'sscreen for along period oftime. Thefixed image maybecome permanently imprintedon the
screen.
3 The synchronization inputform for Horizontaland Verticalfrequencies is separate.
x768),60Hz.
IN o
r VGAor
PC connection
Resolution
Frame
frequency
(Hz)
VGA
SVGA
XGA
640*480 60Hz
800*600 60Hz
1024*768
60Hz
Mode Resolution
External Equipment Connections
Installation
Owner s Manual 13
75Hz
85Hz

External Equipment Connections
The TV has a specialsignal output capabilitywhich allows you to
hook up asecond TV or monitor.
Connect the secondTV or monitor to theTV`s AV .
See the OperatingManual of the second TV or monitor for further
details regarding thatdevice`s input settings.
Notes:
YPbPr, VGA, HDMI,DTV inputsources
cannot be usedfor Monitor out.
When connecting with external audio equipments,such as amplifers
or speakers, pleaseturn the TV speakers off.
We recommend to use the video and audio output jacks forVCR
recording.
OUT
Monitor Out Setup
AUDIO OUT
LR
RL V
AV OU T
R INPUT
F
Installation
14 TFT-LCD TV

- HDMITM, the HDMIlogo and High-Definition Multimedia Interface is a trademark or registered trademark of HDMI Licensing."
- This TV can receive the High-Definition Multimedia Interface(HDMI) or theDigital Visual Interface(DVI).
- This TV supports HDCP(High-bandwidth Digital Contents Protection) Protocol for 720x480p,1280x720p, and 1920x1080iresolution.
- When youconnect this TVwith a source device(DVD player, Set Top Box orPC) supportingAuto HDMI/DVI function,the output
resolution of thesource device willbe automatically setto 1280x720p.
- If thesource device doesnot supportAuto HDMI/DVI, youneed to set the output resolution appropriately.
Toget the bestpicture quality,adjust the DVD Player or Set TopBox's output resolutionto 1280x720p, and the PC graphics card's
output resolution to1024x768, 60Hz.
- If thesource device hasan HDMI output,no other audioconnection is necessary because HDMI-to-HDMI connection includes
both video andaudio.
- If thesource device hasa DVI outputand no HDMIoutput, a separated audio connection is necessary.
<When the sourcedevice(DVD player orSet TopBox) supports HDMI>
How ToConnect
1. Connect thesource device toHDMI port ofthis TV withan HDMI cable(not supplied with thisproduct).
2. No separatedaudio connection isnecessary.
How ToUse
- If thesource device supportsAuto HDMIfunction, the outputresolution of the source device will be automatically set to 1280x720p.
- If thesource device doesnot supportAuto HDMI, youneed to set the output resolution appropriately.
Toget the bestpicture quality,adjust the output resolution of the source device to1280x720p.
- Select HDMIinput source ininput source optionof Select Mainsource menu.
<When the sourcedevice(DVD player orSet TopBox) supports DVI>
How ToConnect
1. Connect thesource device toHDMI port ofthis TV witha HDMI-to-DVI cable(not supplied with thisproduct).
2. Aseparated audio connectionis necessary.
3. If thesource device hasa fiber opticdigital audio output,connect the audio output to DIGITAL AUDIO(Optical) port for DVI
INPUT.
4. If thesource device hasan analog audiooutput connector,connect the source device audio output to DVI Audio In port located on the
left side ofHDMI port.
How ToUse
- If thesource device supportsAuto DVIfunction, the outputresolution of the source device will be automatically set to 1280x720p.
- If thesource device doesnot supportAuto DVI, youneed to set the output resolution appropriately.
Toget the bestpicture quality,adjust the output resolution of the source device to 1280x720p.
- Press theINPUT button toselect HDMI input source in input source option of Select Main source menu.
HDMI
Installation
Owner s Manual 15

Cable sample
HDMI Cable
(not supplied with the product)
HDMI to DVI Cable
(not supplied with the product)
Analog Audio Cable(RCAtype)
(not supplied with the product)
Analog AudioCable
(Stereo to RCA type)
(not supplied with the product)
Installation
16 TFT-LCD TV

YPbPr
Audio In
LR
Headphone
out
S-VIDEO
Power source
TO USE AC POWER SOURCE
Use theAC polarized linecord provided for
operation onAC. Insert theAC cordplug into
a standard polarizedAC outlet.
NOTES:
Never connect theAC linecord plug toother
than the specifiedvoltage. Use the
attached power cordonly.
If the polarizedAC corddoes not fitinto a non-
polarized ACoutlet, do notattempt to fileor cut
the blade. Itis the user`sresponsibility to have
an electrician replacethe obsolete outlet.
If you causea static dischargewhen touching
the unit andthe unit failsto function, simply
unplug the unitfrom theAC outlet andplug it
back in. The unit shouldreturn to normaloperation.
Polarized AC Cord Plug
AC Outlet
Wider Hole
and Blade
You can connect a set of headphones to your set if you wish to watch a
TV programme without disturbing the other people in the room.
Connecting Headphones
External Equipment Connections
Note
Prolonged use ofheadphones at ahigh volume
may damage yourhearing.
You will not receive sound from the speakers
when you connectheadphones to thesystem.
Plug a setof headphones into the 3.5mm
mini-jack socket onthe rear panel of the set.
Installation
Owner s Manual 17

Switching On/Off the TV set
Choose the Menu Language
When you start using your set for the first time, you must select the language which will be used for displaying menus
and indications.
-In the manual, the OSD (on screen display) may be different from your TV`s, because it is just an
example to help you with the TV operation.
Operation
-There are several options you might need to set up in order for your TV to work properly. Read the
instructions that follow.
Note:
If the TV in power on , the screen show information according the type of input signal . the information
will disappear.If there is no signal and bluescreen in ON the screen enter in bluescreen and display No signal
on top and center of the screen.
1 Press the MENU button and thenuse / button to select the
Function menu.
2 Press the button and thenuse / button to selectMenu
Language.
3 Press the button and thenuse / button to enter the list of
available language. English Spanish or French
4Select your language with the / button and press the OK
button to confirm you selection.
5 When you are satisfied with your choice, press the EXIT button
to return to normal viewing or press MENU button to return to the
previous menu.
1. First, connect power cord correctly.
2. Select the viewing source by using INPUT button on the remote control.
3. When finished using the TV, press the POWER button on the remote control. The TV reverts to standby mode.
4. If you intend tobe away onvacation, disconnect the power plug from the wall poweroutlet.
: Move cursor, /OK: Go to submenu, EXIT/ MENU: Exit main menu
English
Spanish
French
Menu Language English
CC Mode On
NTSC Caption CC1
DTV Caption Service1
DTV caption Style
OSD Timeout Middle
Blue Screen On
OSD transparency Middle
B
C
A
Video
Audio
Time
Channel
Function
Lock
Choose the Input source
- Change thepicture source so you can watch your TV, cable TV, VCR, DVD, or any other devicesthat are
connected to yourTV.
1. Press the INPUT button to enter the Select Main picture Source menu
and then use / button to select the desired items. Air TV, ,
SVIDEO, YPBPR, VGA, HDMI.
2. Press the OK button to confirm.
3. Press INPUT button to returnto TV viewing or pressEXIT button to return to the
previous menu.
VIDEO Select Main Source
Cable TV
VIDEO1
VIDEO2
SVIDEO
YPBPR
VGA
HDMI
Operation
Note:
1. According to your connection device, you can change the name of every source.
2. In channel menu, ifthe Tuneritem is set ting as Air and Cable,the source menu will display Air TV and Cable TV;
If the Tuner item is setting as the one of the Air andCable, the source menu will display the one of two.
18 TFT-LCD TV

This TV set has three methods to set channels, which are respectively Auto Scan, manual Scan fine tune.
In this section, how to use the remote control to set channel is explained. You can also use buttons on the TV
set to set channel.
Apassword is required to gain access to Channel menu if the Lock of Edit program menu is turned on.
Automatic Scan
Note : the Channel menu will be only operated in normal TV mode.
Channel menu
- Automatically finds all channels available through antenna or cable inputs, and
stores them inmemory on the All Channel List.
When Air is selected, the TV will detect antenna signals and will
search for antenna TV (NTSC and ATSC) channels available in
your local area.
When Cable is selected, the TV will detect cable company supplied
signals and willsearch for cable TV (NTSC,ATSC, QAM modulated)
channels available in your area.
Make sure that registration with your cable TV provider and
connection of equipment are completed.
When Air and Cable are selected, the TV will detect the antenna
signals and cable company supplied signals, and search for the
antenna TV and cable TV channels available in your area.
1 Press the MENU button and thenuse / button to select the
Channel menu.
2 Press the button and thenuse / button to selectTuner.
3 Press the button and thenuse / button to Select Cable or
Air mode.
4Press the OK button
5 When you are satisfied with your choice, press MENU button to
return to the previous menu.
6 Press the / button to selectAuto Scan.
7Press the button and pressthe OK button to start searching.
8 To cancel searching, press the OK button.
: Move cursor, /OK: Go to submenu, EXIT/ MENU: Exit main menu
B
C
A
Video
Audio
Time
Channel
Function
Lock
Tuner Air
Auto Scan
Manual Scan
Fine Tune
Edit Program
Rename
Air
Cable
B
C
A
Video
Audio
Time
Channel
Function
Lock
OK Cancel
Air Tuner Number: 47
Found: 1
Tuner Air
Auto Scan
Manual Scan
Fine Tune
Edit Program
Rename
Operation
Owner s Manual 19
: Move cursor, OK: Enter,MENU: Return to upper menu,
EXIT:Exit main menu

Manual Scan
Channel menu
If excessive channel signals of unwanted programs are received in local area,
manual search function is recommended.
1 Press the MENU button and thenuse / button to select the
Channel menu.
2 Press the button and thenuse / button to selectTuner.
3 Press the button and thenuse / button to Select Cable or Air
mode.
4Press the OK button.
5 When you are satisfied with your choice, press MENU button to return
to the previous menu.
6 Press the / button to selectManual Scan.
7Press the button and then use digital buttons to select channel number you want to add or delete.
8Press the button to select OK item and press OK button to add or delete for the channel number.
9 Press EXIT button to returnto TV viewing or press MENU button to return to the previous menu.
Fine Tune (only in anolog signal )
1 Press the MENU button and thenuse / button to select the
Channel menu.
2 Press the / button to selectFine Tune.
3 Press the or OK button
4Press the button to tune.
5 Press EXIT button to returnto TV viewing or press MENU button
to return to the previous menu.
/
: Move cursor, /OK: Go to submenu, EXIT/ MENU: Exit main menu
B
C
A
Video
Audio
Time
Channel
Function
Lock
Tuner Air
Auto Scan
Manual Scan
Fine Tune
Edit Program
Rename
Type Air
Channel NO
Frequency
0k
4
67.250MHz
: Move cursor, /OK: Go to submenu, EXIT/ MENU: Exit main menu
B
C
A
Video
Audio
Time
Channel
Function
Lock
Tuner Air
Auto Scan
Manual Scan
Fine Tune
Edit Program
Rename
For the tune of the analog channels
Operation
20 TFT-LCD TV
Other manuals for HLH26ATBB - 26" LCD TV
2
This manual suits for next models
3
Table of contents
Other Haier LCD TV manuals

Haier
Haier L40A9A-A1 User manual

Haier
Haier 40D3505T User manual

Haier
Haier LE19P620 User manual

Haier
Haier HL19D2 User manual

Haier
Haier L40F1180 User manual

Haier
Haier LE40B650CF User manual

Haier
Haier L39B2180 User manual

Haier
Haier L32M9 User manual

Haier
Haier LE24T1000F User manual

Haier
Haier L26C300 User manual